| Aura - Tab |
|---|
| | Panel |
|---|
| borderColor | #002D72 |
|---|
| bgColor | #F3F4F9 |
|---|
| titleColor | #ffffff |
|---|
| borderWidth | 1 |
|---|
| titleBGColor | #002D72 |
|---|
| borderStyle | none |
|---|
| title | Portal Access |
|---|
|
|
| UI Steps |
|---|
| | UI Step |
|---|
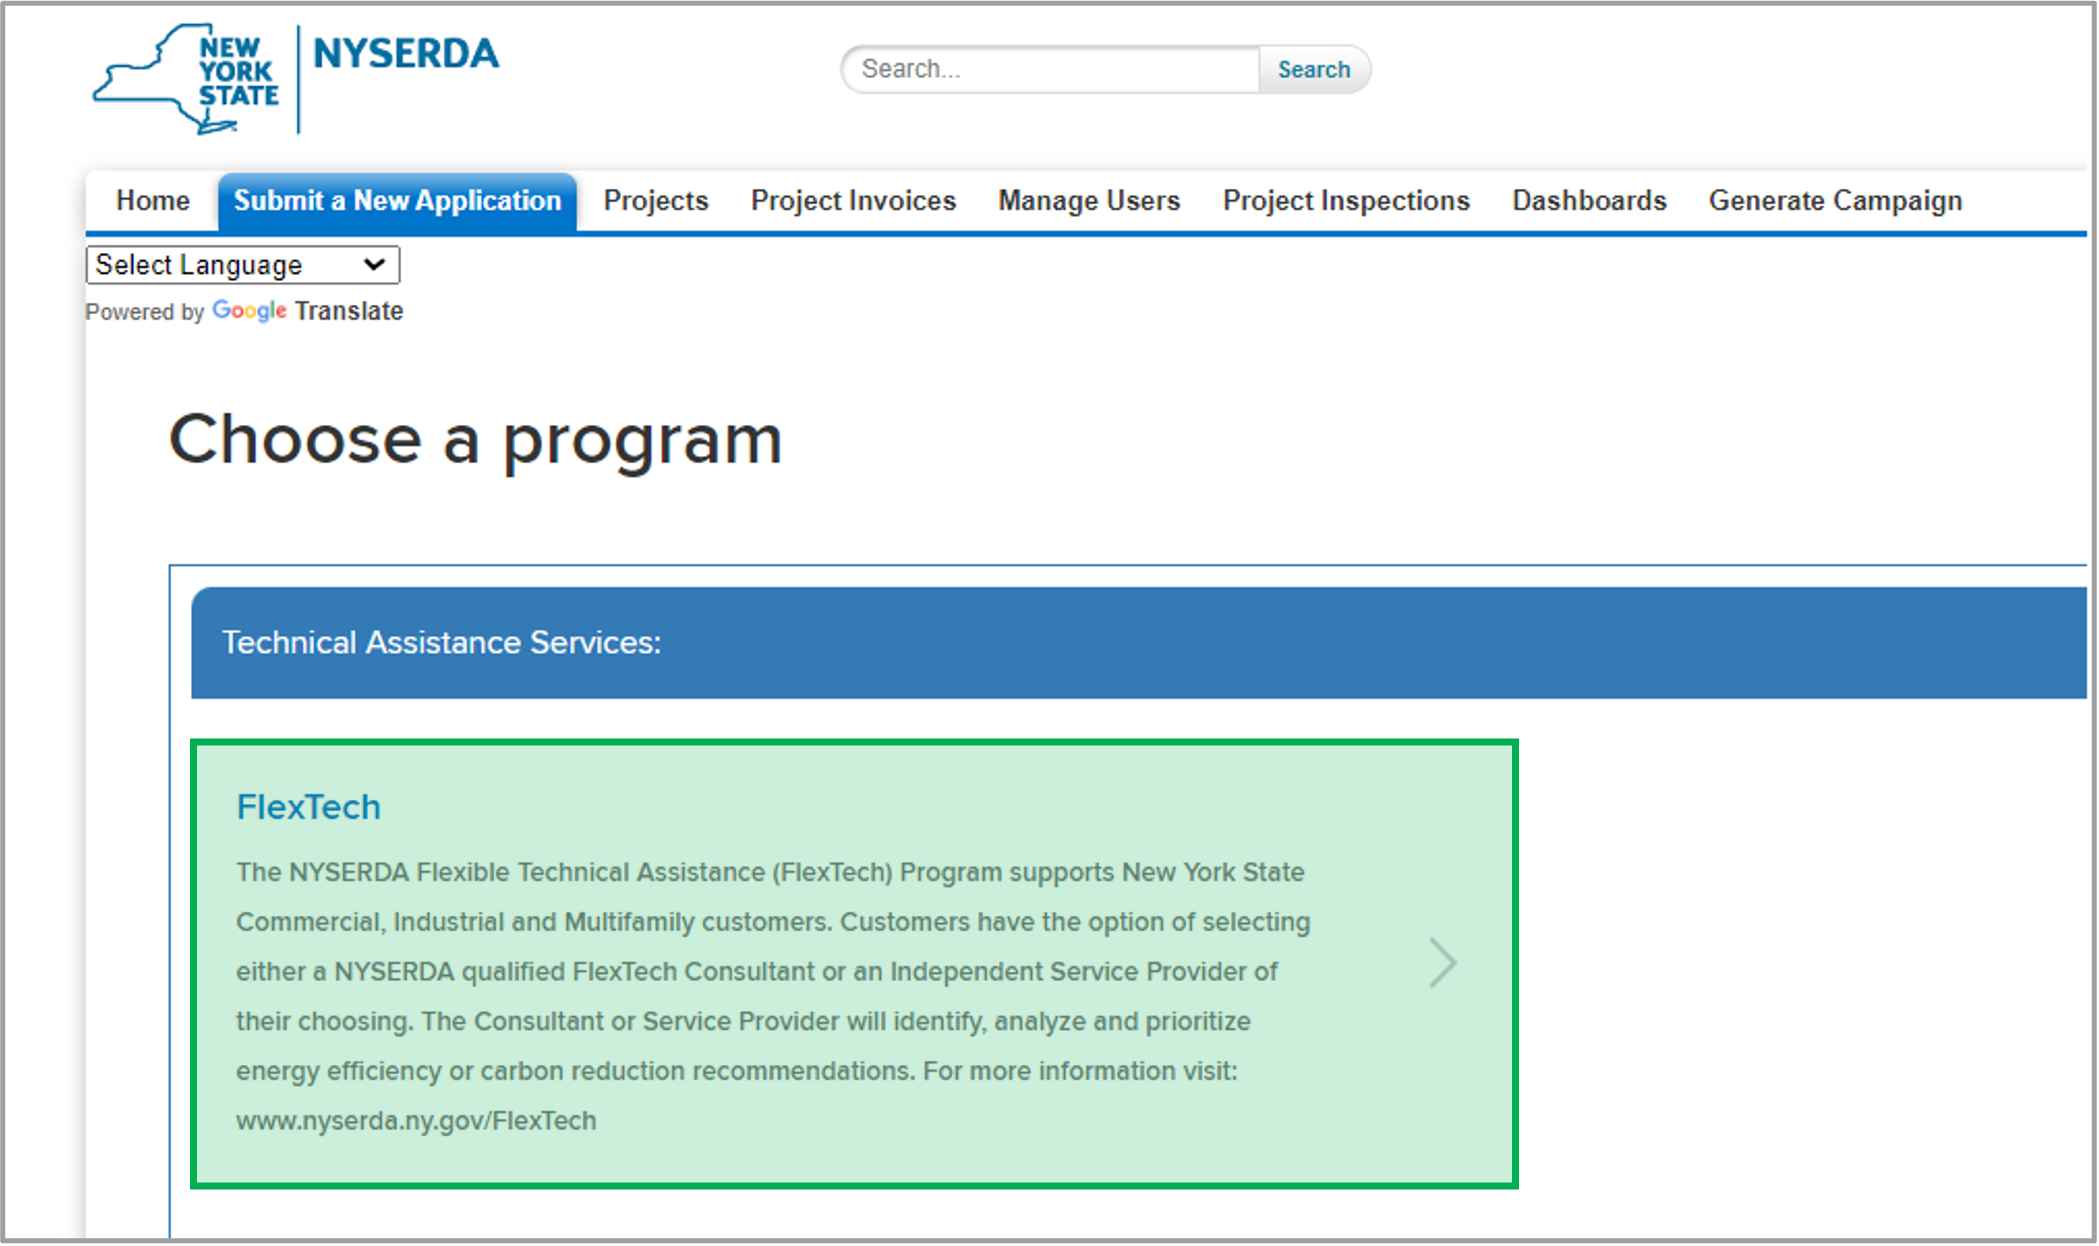
Once you are in the Salesforce Portal, click on the Submit a New Application tab on the home page. | Expand |
|---|
| 
|
|
| UI Step |
|---|
From the Choose a Program page, click on the Technical Assistance-FlexTech tab. | Tip |
|---|
| A third-party technical assistance service provider is required for all projects. If you're a customer who does not have a service provider, please email FlexTech@nyserda.ny.gov for assistance. |
| Expand |
|---|
| 
|
|
|
|
| Aura - Tab |
|---|
| | Panel |
|---|
| borderColor | #002D72 |
|---|
| bgColor | #F3F4F9 |
|---|
| titleColor | #ffffff |
|---|
| borderWidth | 1 |
|---|
| titleBGColor | #002D72 |
|---|
| borderStyle | none |
|---|
| title | Page 1 |
|---|
|
|
| Section |
|---|
| Column |
|---|
| | UI Steps |
|---|
| | UI Step |
|---|
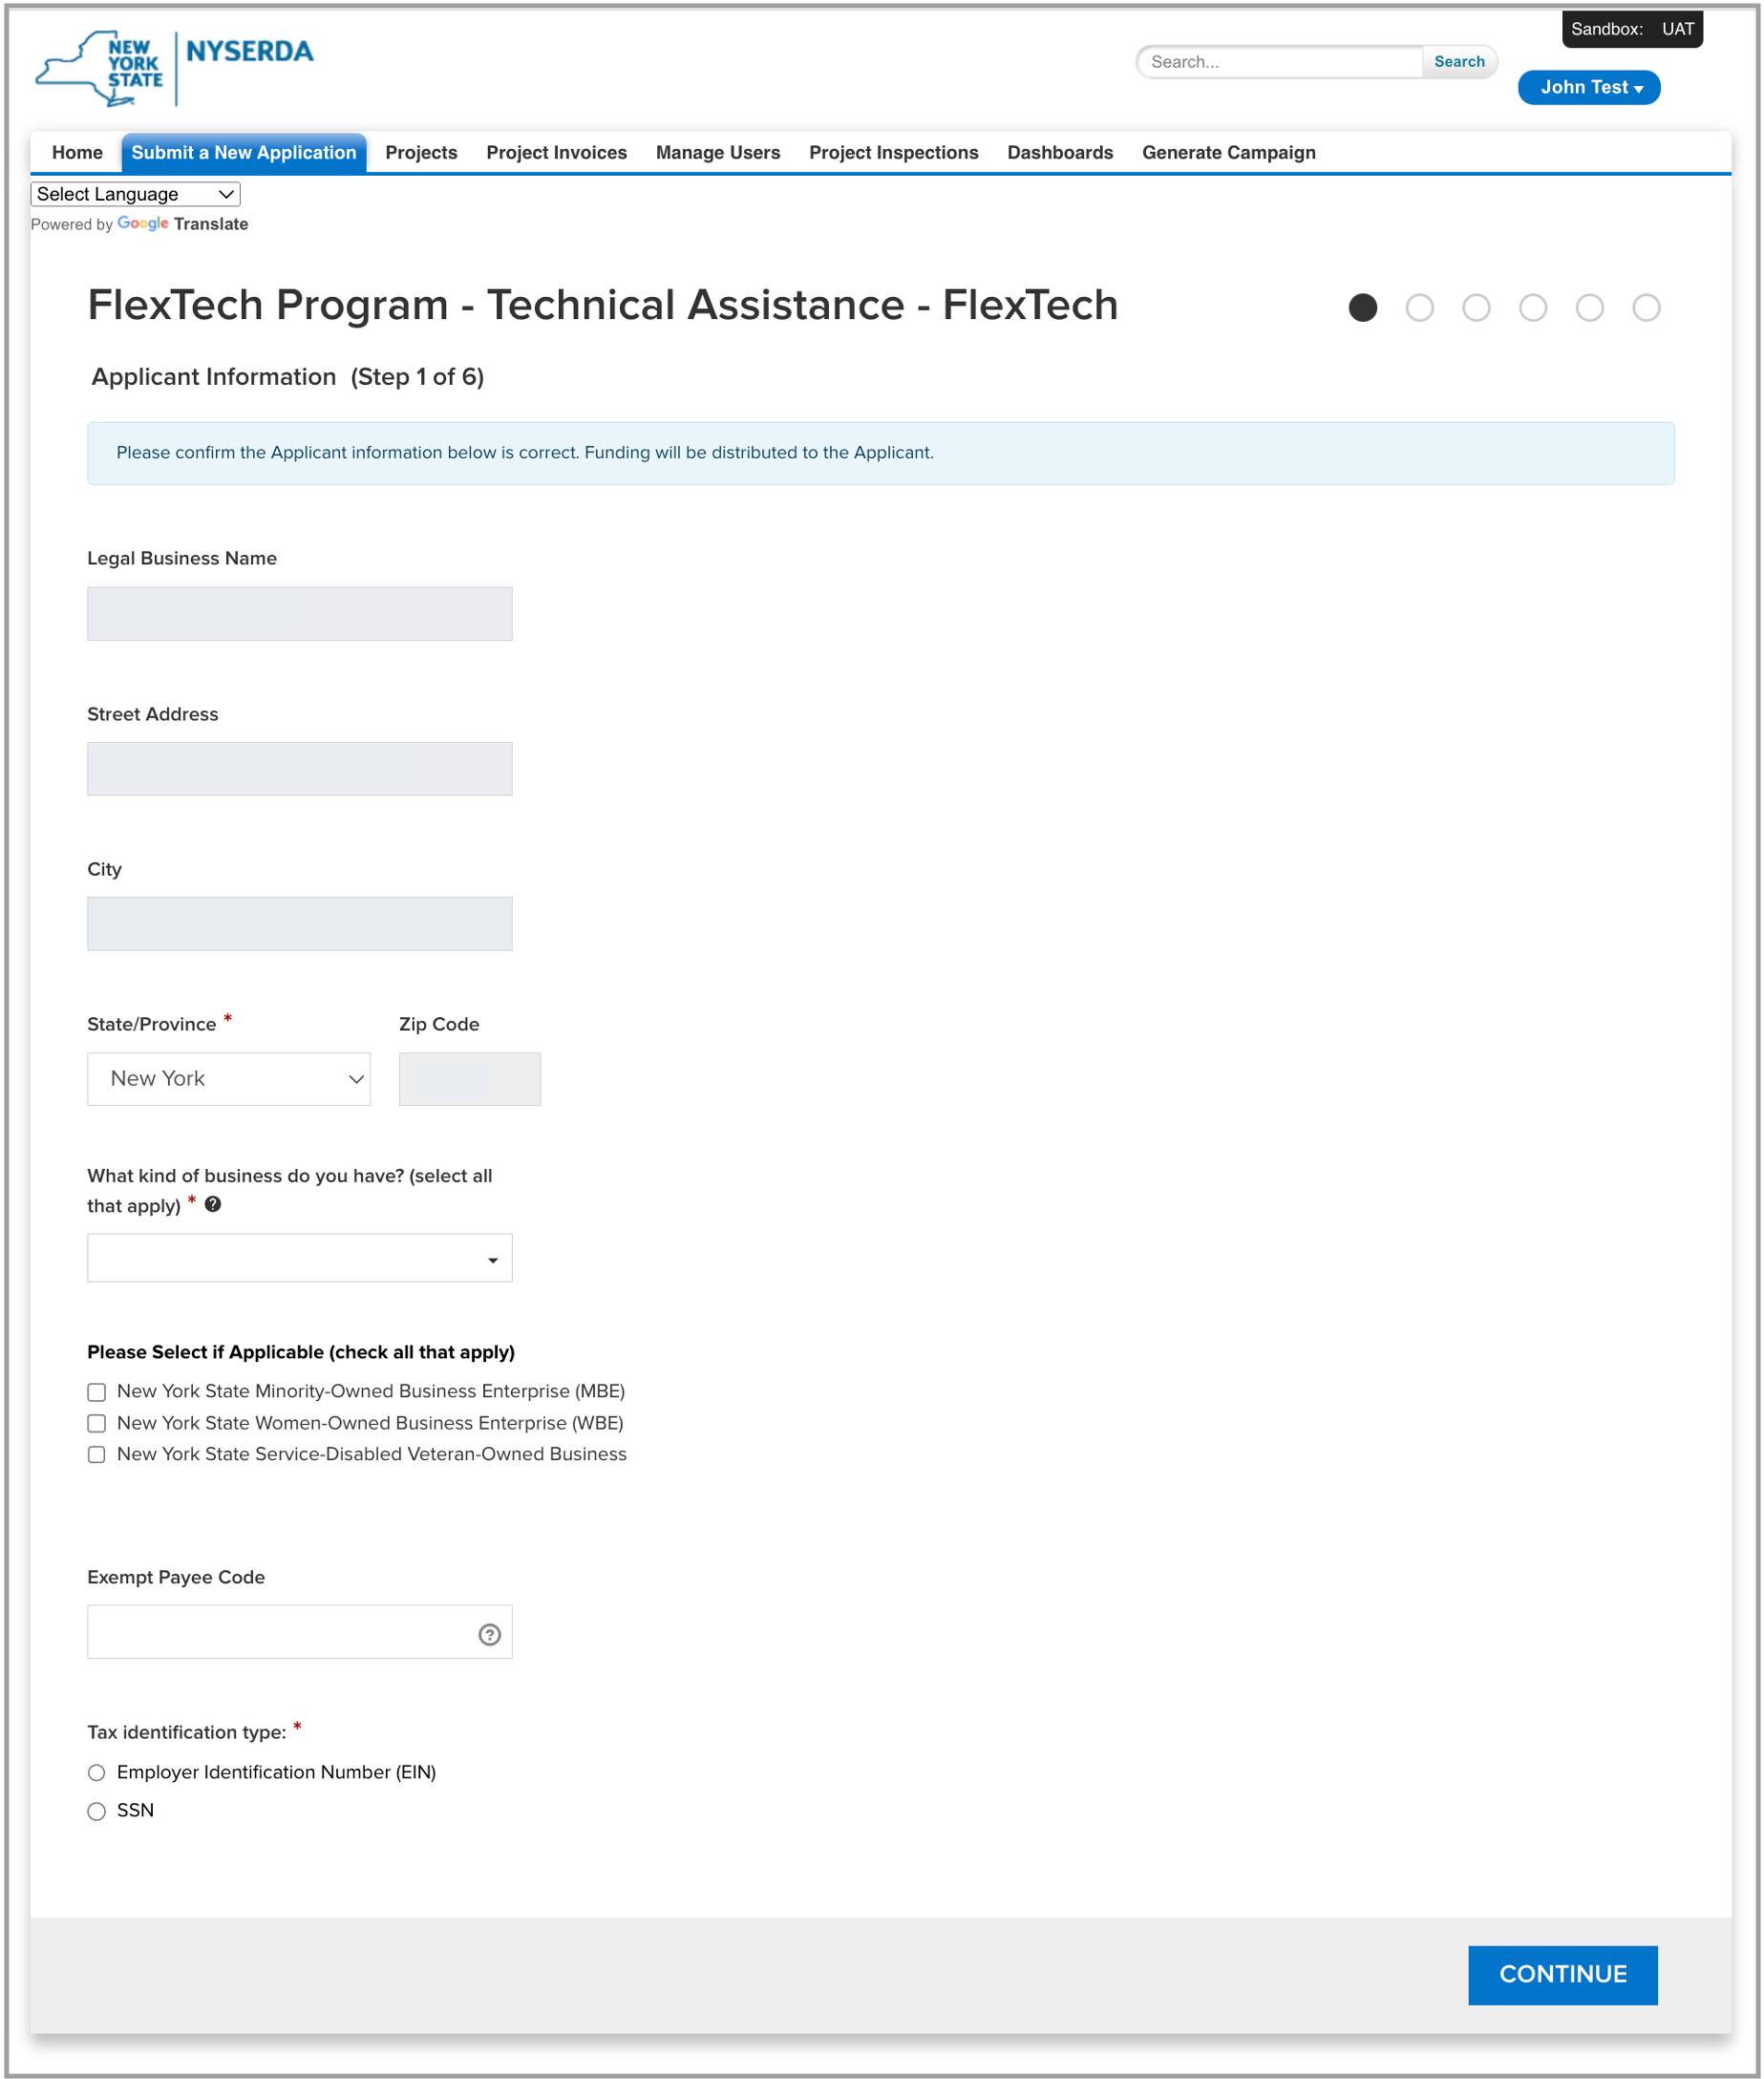
Fill out the required fields under the Applicant Information section and click Continue. | Tip |
|---|
| Some information on this page will be pre-populated based on your registration. |
|
|
|
| Column |
|---|
|  |
|
|
| Aura - Tab |
|---|
| | Panel |
|---|
| borderColor | #002D72 |
|---|
| bgColor | #F3F4F9 |
|---|
| titleColor | #ffffff |
|---|
| borderWidth | 1 |
|---|
| titleBGColor | #002D72 |
|---|
| borderStyle | none |
|---|
| title | Page 2 |
|---|
|
|
| UI Steps |
|---|
| | UI Step |
|---|
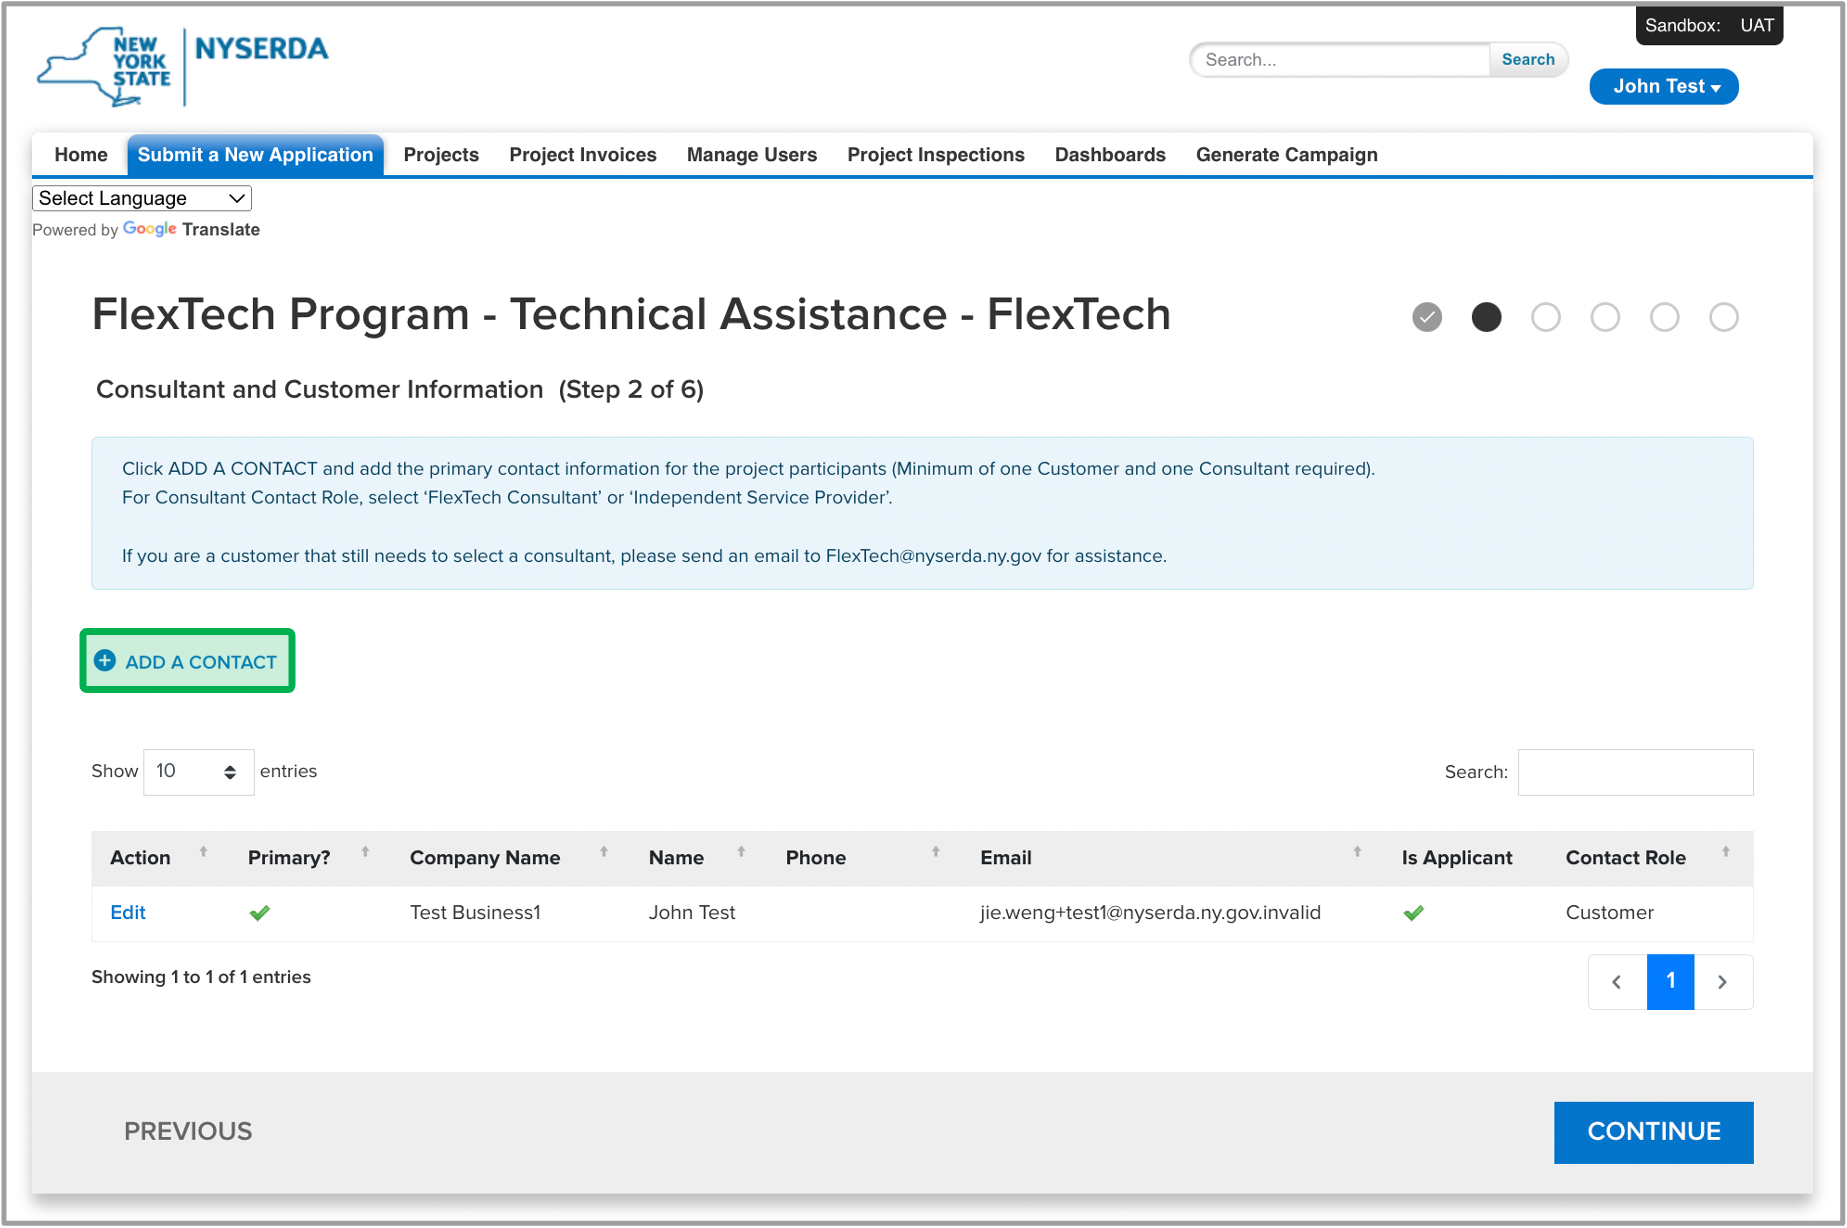
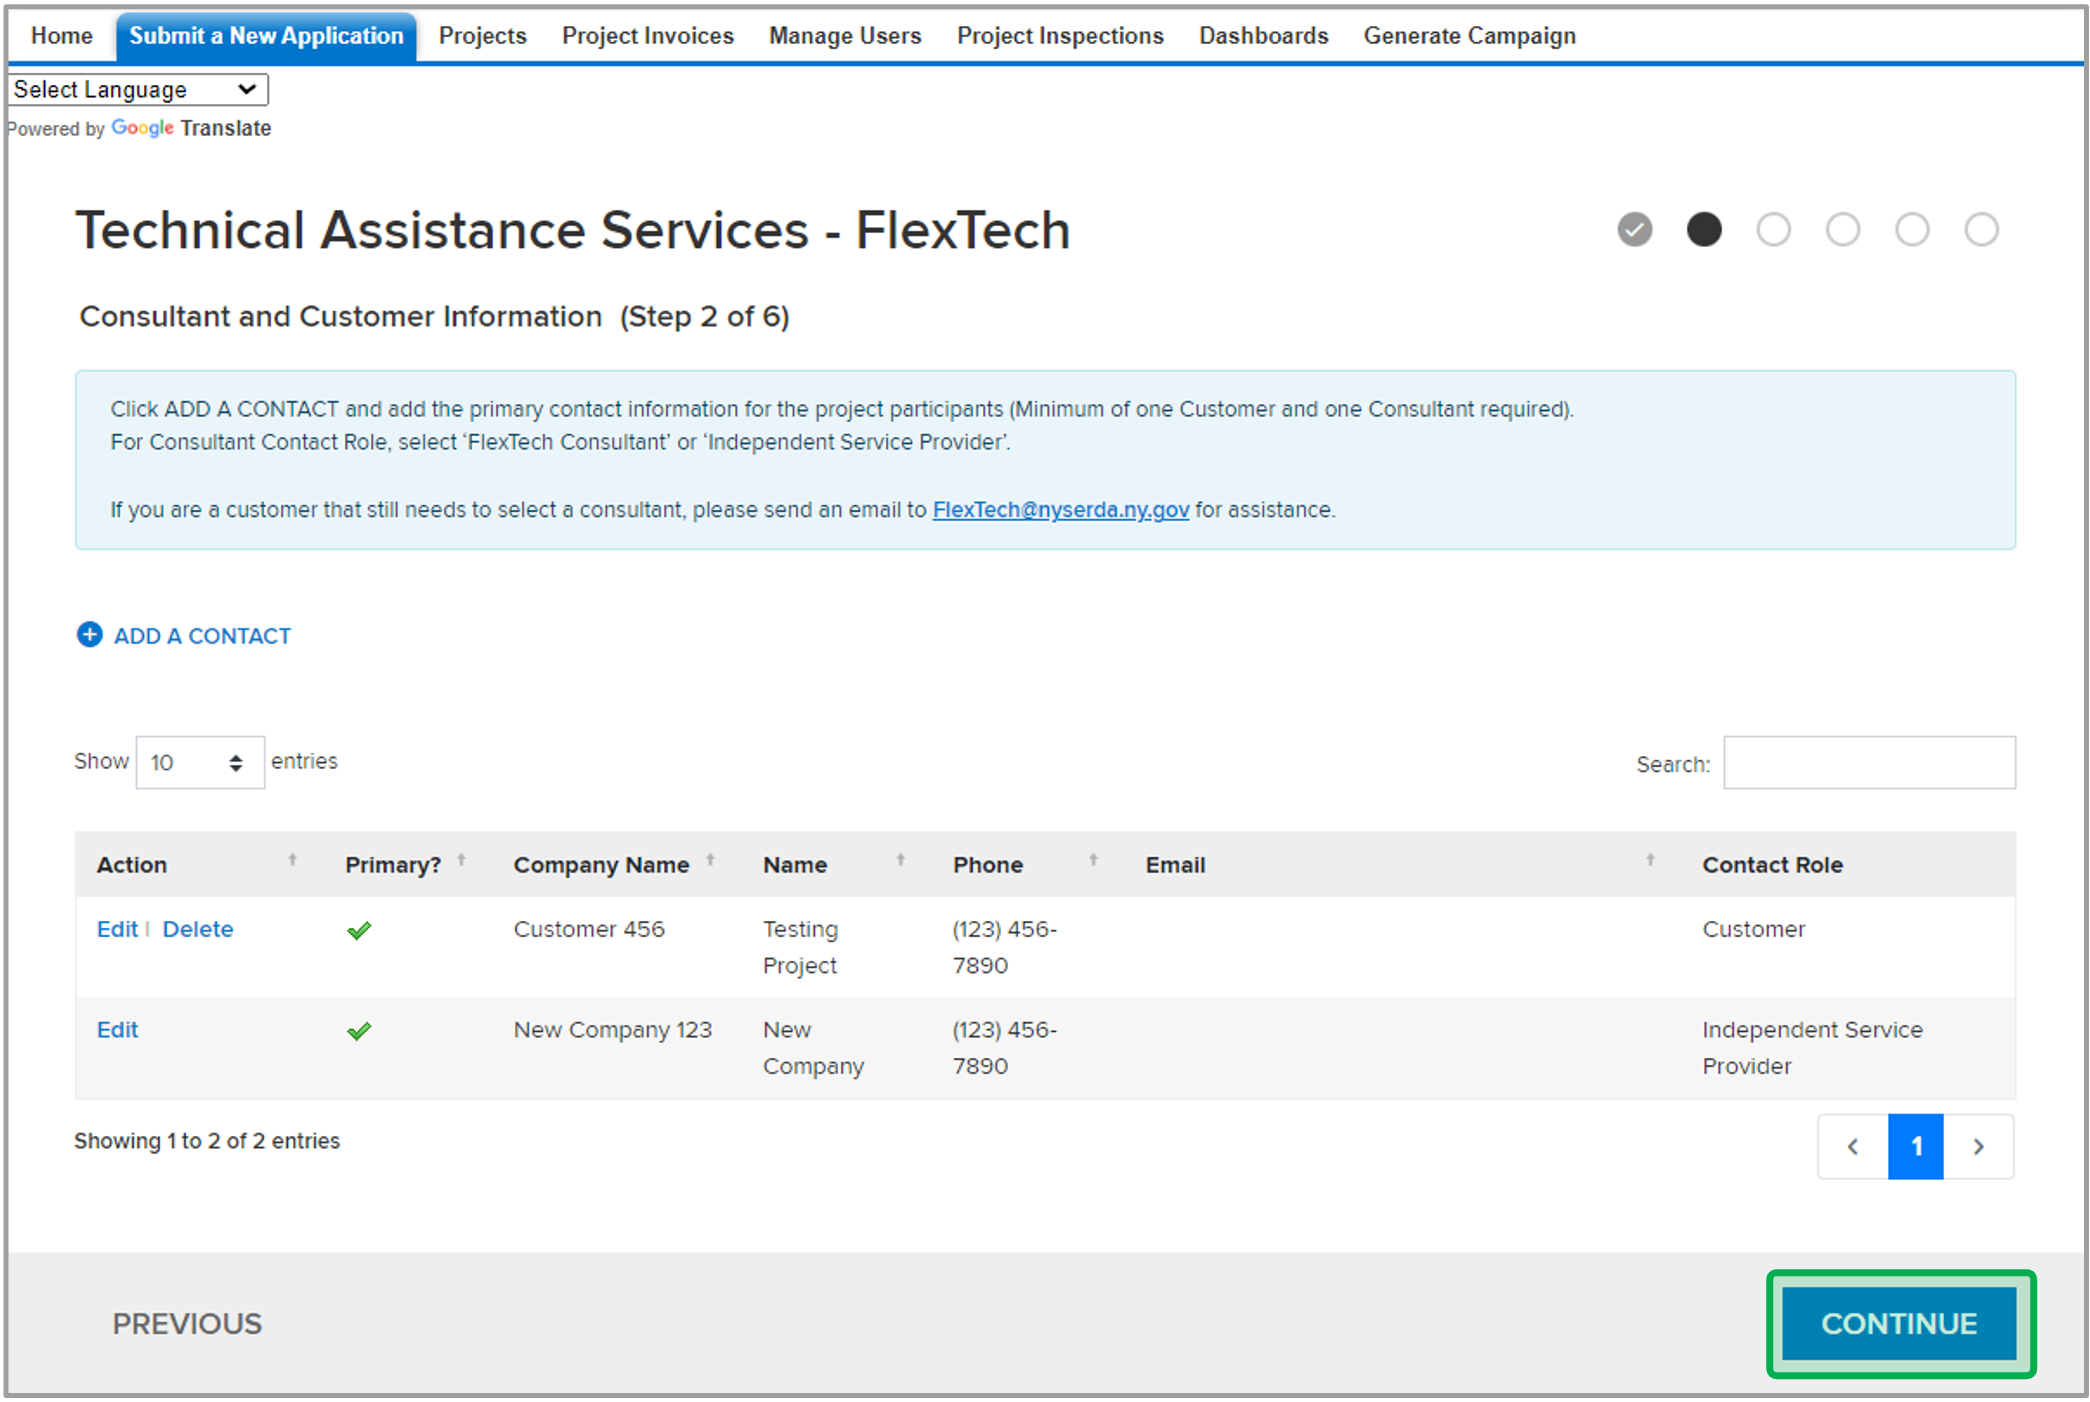
The Consultant and Customer Information step must contain at least two contacts before you can proceed to the next step. There must be a FlexTech Consultant or Independent Service Provider contact, and a Customer contact listed below. Click on Add a Contact to include another contact. | Expand |
|---|
| 
|
|
| UI Step |
|---|
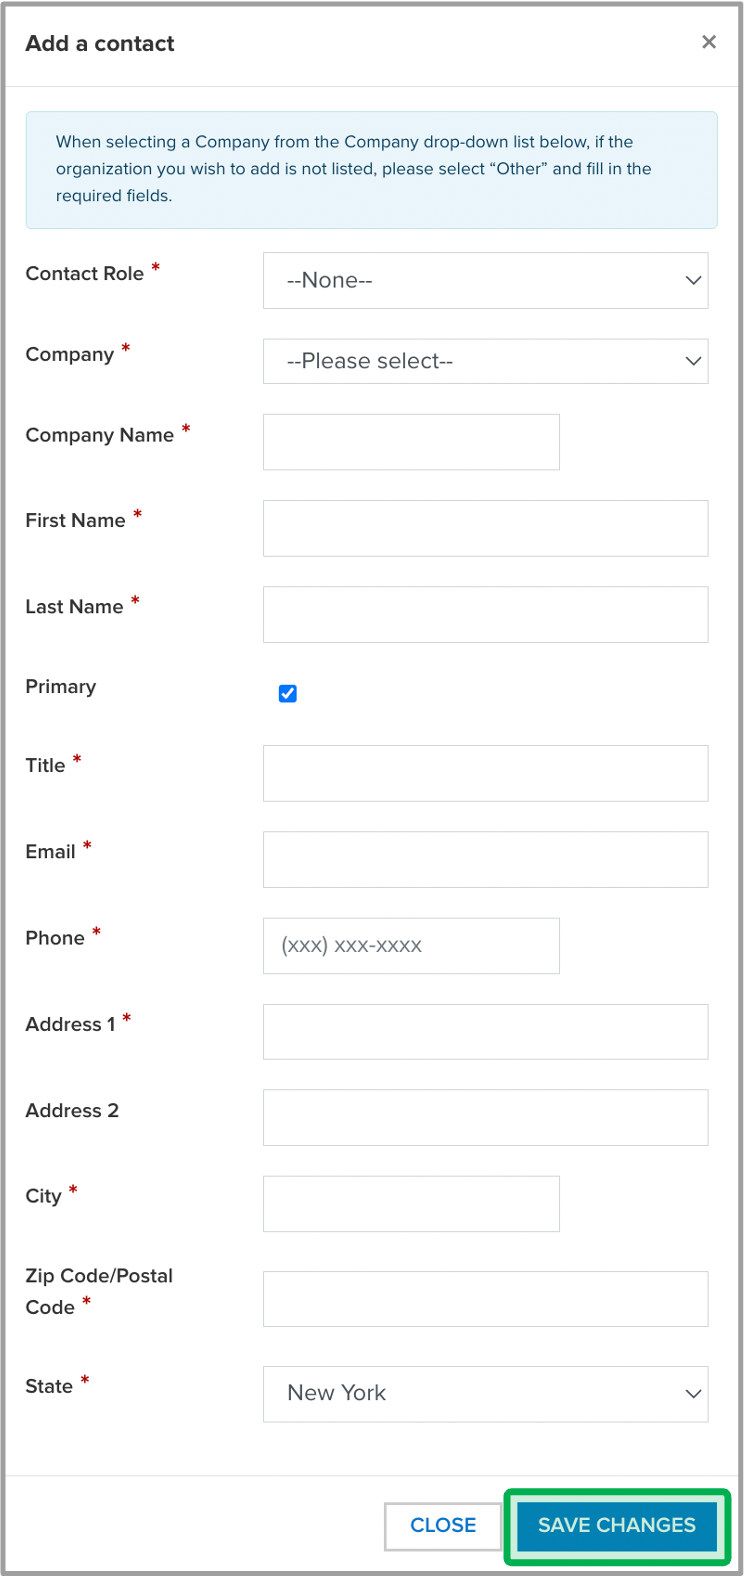
After clicking Add a Contact, select the Role and fill out all of the required fields, then click Save Changes. | Expand |
|---|
| 
|
|
| UI Step |
|---|
Once all contact roles are added, click the Continue button to move to the next page. | Expand |
|---|
| 
|
|
|
|
| Aura - Tab |
|---|
| | Panel |
|---|
| borderColor | #002D72 |
|---|
| bgColor | #F3F4F9 |
|---|
| titleColor | #ffffff |
|---|
| borderWidth | 1 |
|---|
| titleBGColor | #002D72 |
|---|
| borderStyle | none |
|---|
| title | Page 3 |
|---|
|
|
| Info |
|---|
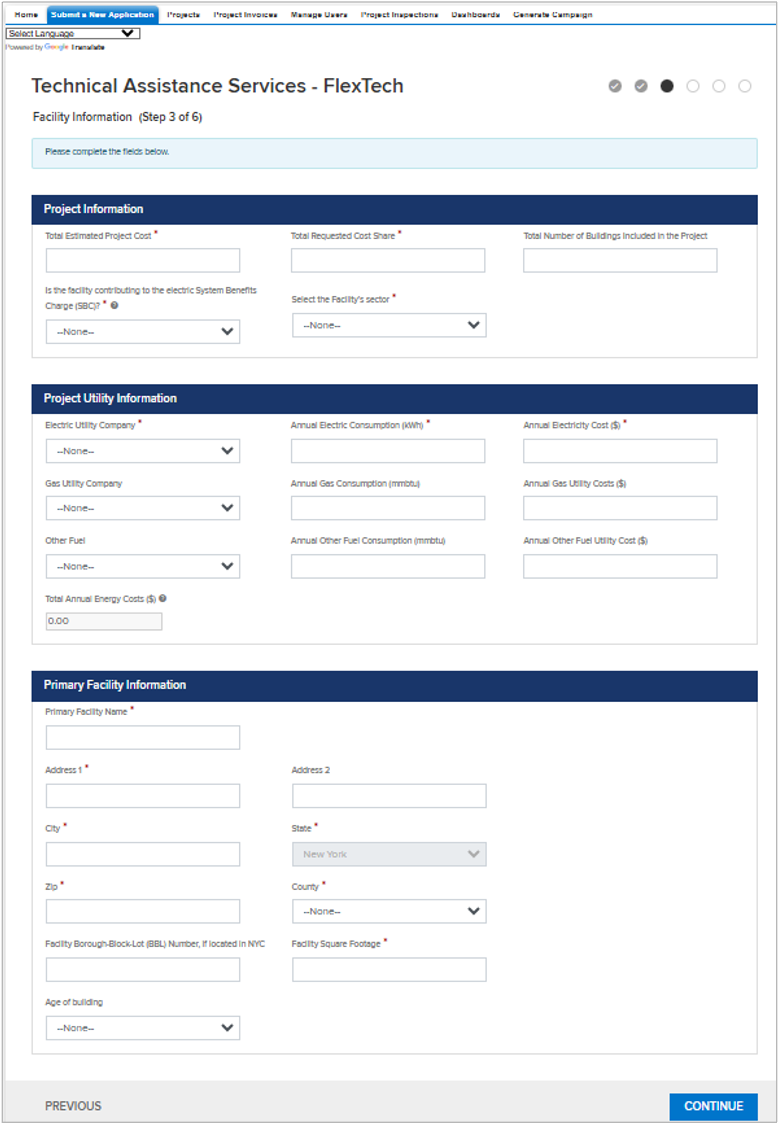
| If the Facility's Sector selected is: P-12 School, Industrial, College/University, or Healthcare, you will have additional required fields to complete on the page. |
| Section |
|---|
| Column |
|---|
| | UI Steps |
|---|
| | UI Step |
|---|
Fill out all the required Project and Facility information and click Continue. |
|
|
| Column |
|---|
|  |
|
|
| Aura - Tab |
|---|
| | Panel |
|---|
| borderColor | #002D72 |
|---|
| bgColor | #F3F4F9 |
|---|
| titleColor | #ffffff |
|---|
| borderWidth | 1 |
|---|
| titleBGColor | #002D72 |
|---|
| borderStyle | none |
|---|
| title | Page 4 |
|---|
|
|
| UI Steps |
|---|
| | UI Step |
|---|
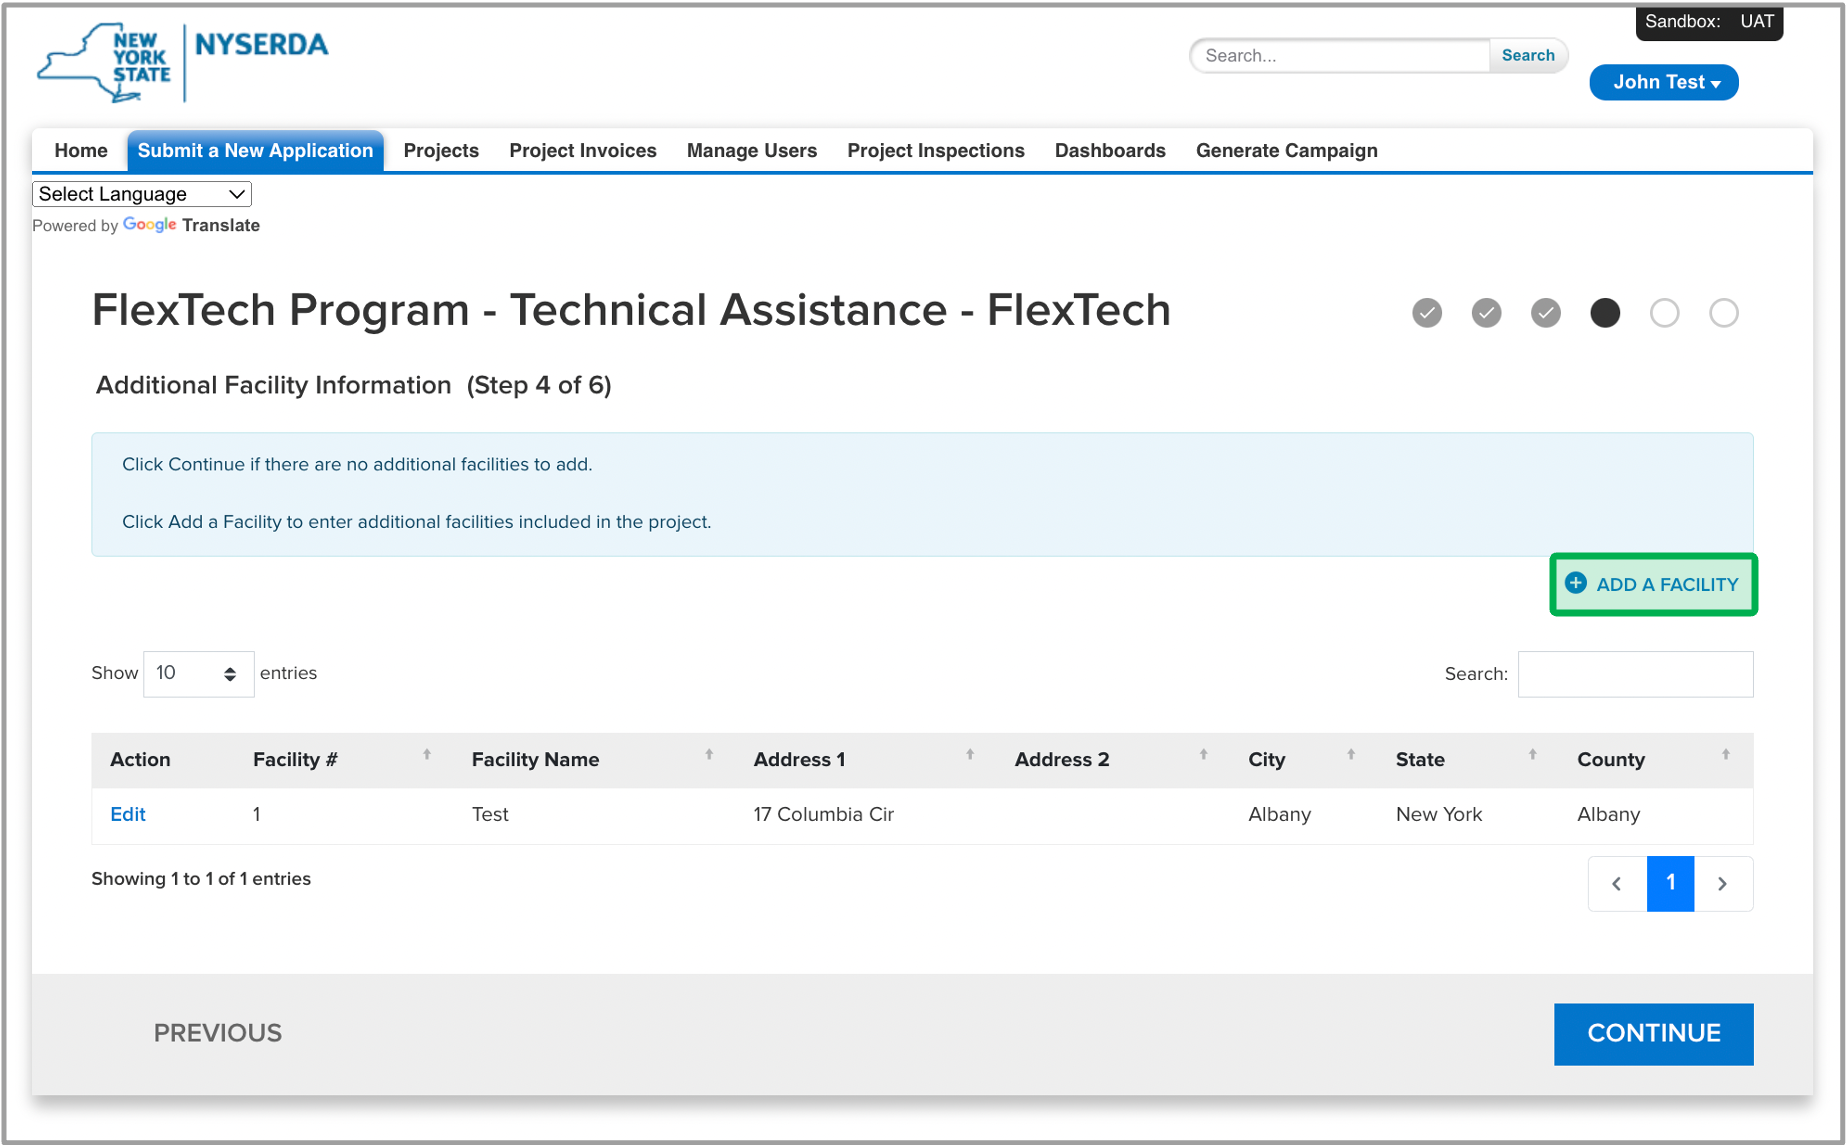
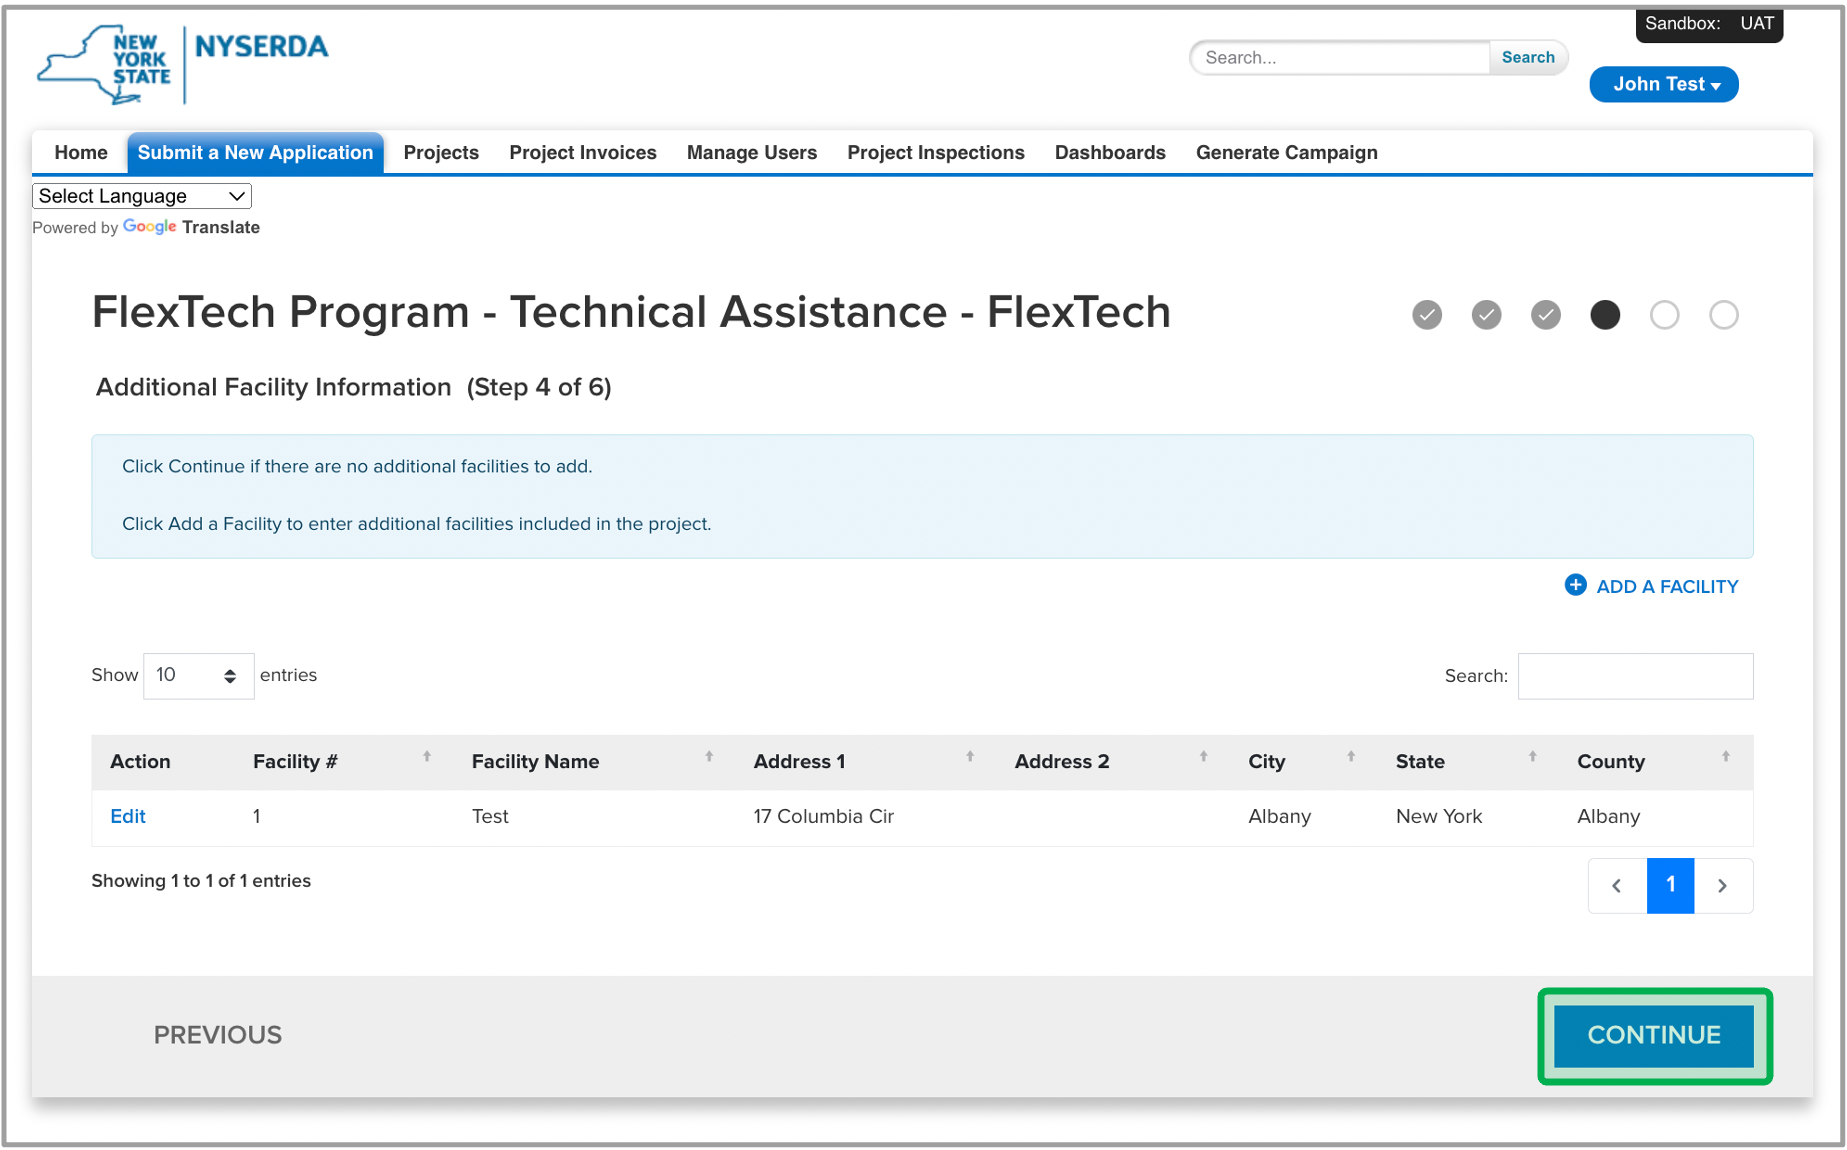
The Facility Information will populate automatically. If applicable, click on Add a Facility and enter any additional facilities information. | Tip |
|---|
| Additional facilities may also be added to your project record after NYSERDA has approved your application. |
| Expand |
|---|
| 
|
|
| UI Step |
|---|
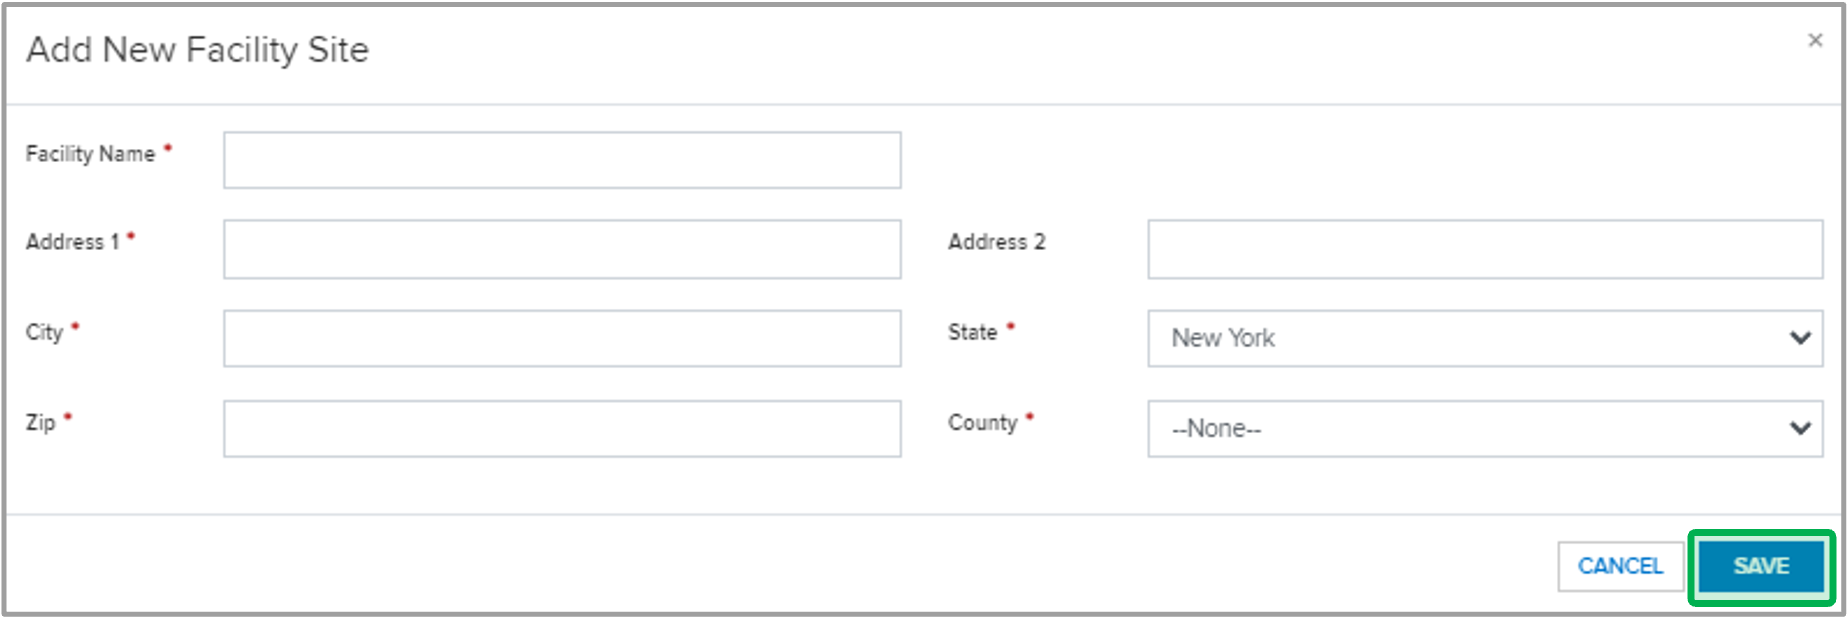
Enter in the additional Facility Information in the modal window and click Save. | Expand |
|---|
|  |
|
| UI Step |
|---|
Once all Facility(s) are added, review the information in the table and, if correct, click Continue. | Expand |
|---|
| 
|
|
|
|
| Aura - Tab |
|---|
| | Panel |
|---|
| borderColor | #002D72 |
|---|
| bgColor | #F3F4F9 |
|---|
| titleColor | #ffffff |
|---|
| borderWidth | 1 |
|---|
| titleBGColor | #002D72 |
|---|
| borderStyle | none |
|---|
| title | Page 5 |
|---|
|
|
| Section |
|---|
| Column |
|---|
| | UI Steps |
|---|
| | UI Step |
|---|
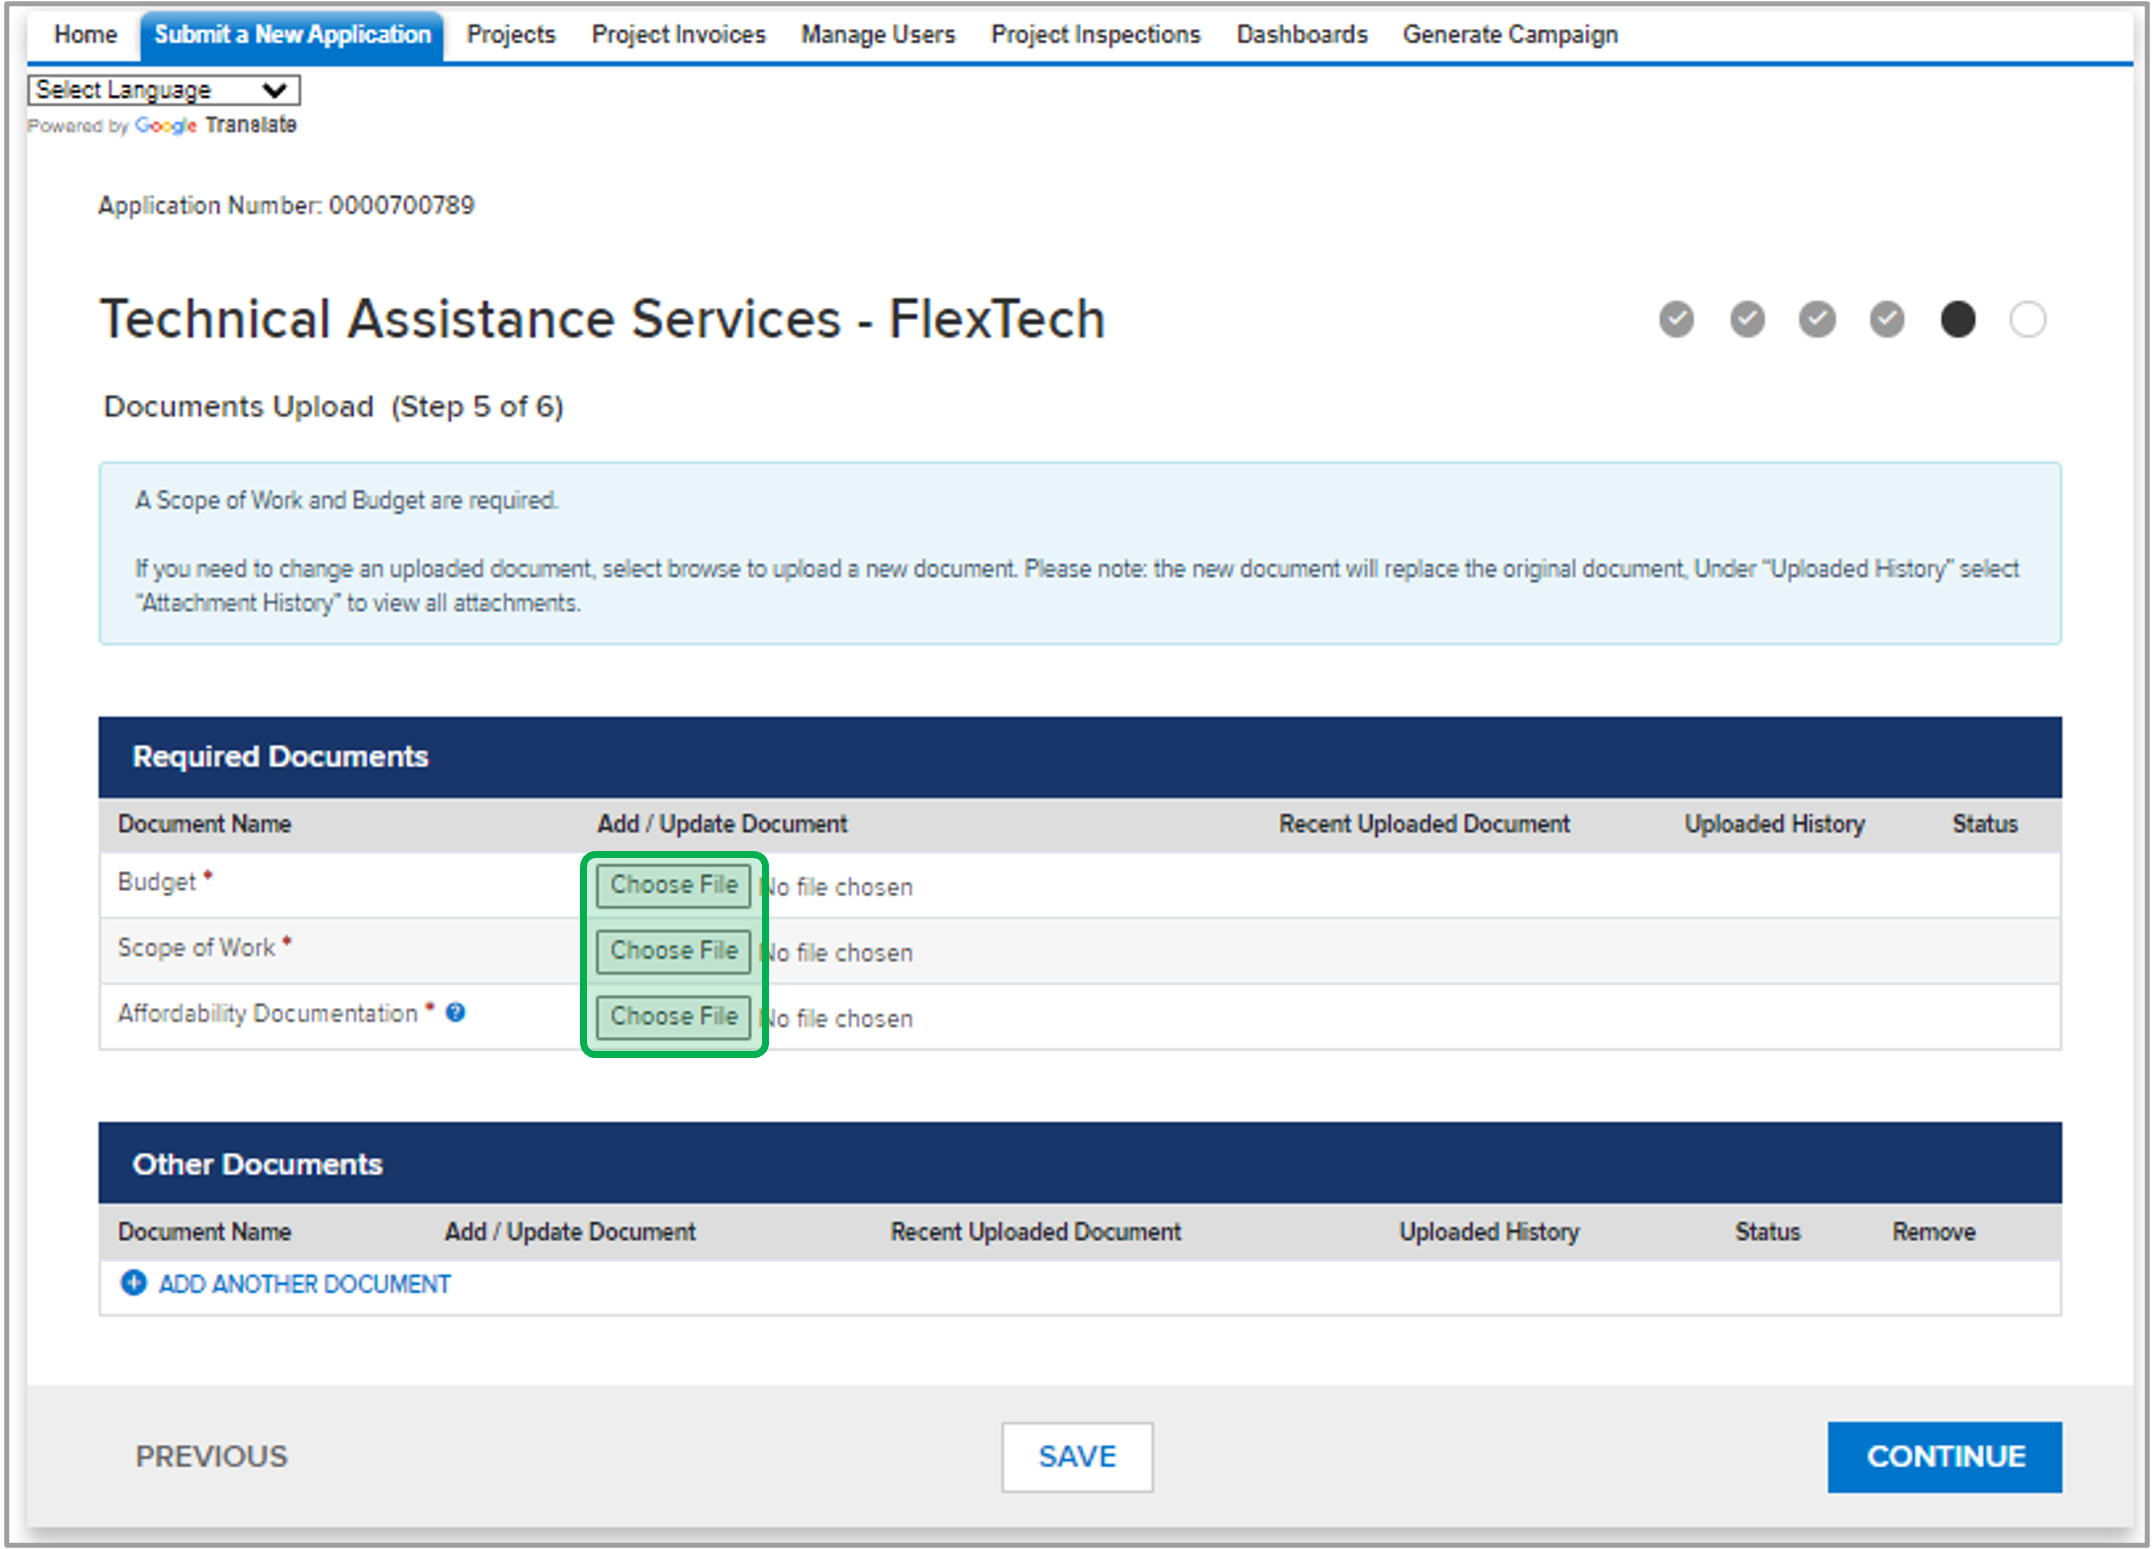
On the Documents page, click on the Choose File button under the Required Documents section to upload the appropriate files in the Budget and Scope of Work fields. Click Continue. | Tip |
|---|
| If the sector selected in Step 3 is Multifamily Affordable Housing, Affordability documentation must also be uploaded. Please click the Blue ? Icon for acceptable forms of affordability documentation. |
|
|
|
| Column |
|---|
|  |
|
|
| Aura - Tab |
|---|
| | Panel |
|---|
| borderColor | #002D72 |
|---|
| bgColor | #F3F4F9 |
|---|
| titleColor | #ffffff |
|---|
| borderWidth | 1 |
|---|
| titleBGColor | #002D72 |
|---|
| borderStyle | none |
|---|
| title | Page 6 |
|---|
|
|
| Info |
|---|
| The Customer's signature is required for all applications. The Customer signature may be obtained either through DocuSign via the send for Electronic Signature button, or you may select the Print button to obtain an electronic version of the application for Customer signature and upload to the Signed Application section. You can also print the application to acquire the customer signature to later upload a scan of the application with their signature for review. See the instructions below depending on your role: |
| UI Expand |
|---|
| title | Customer as the Applicant |
|---|
| | UI Steps |
|---|
| | UI Step |
|---|
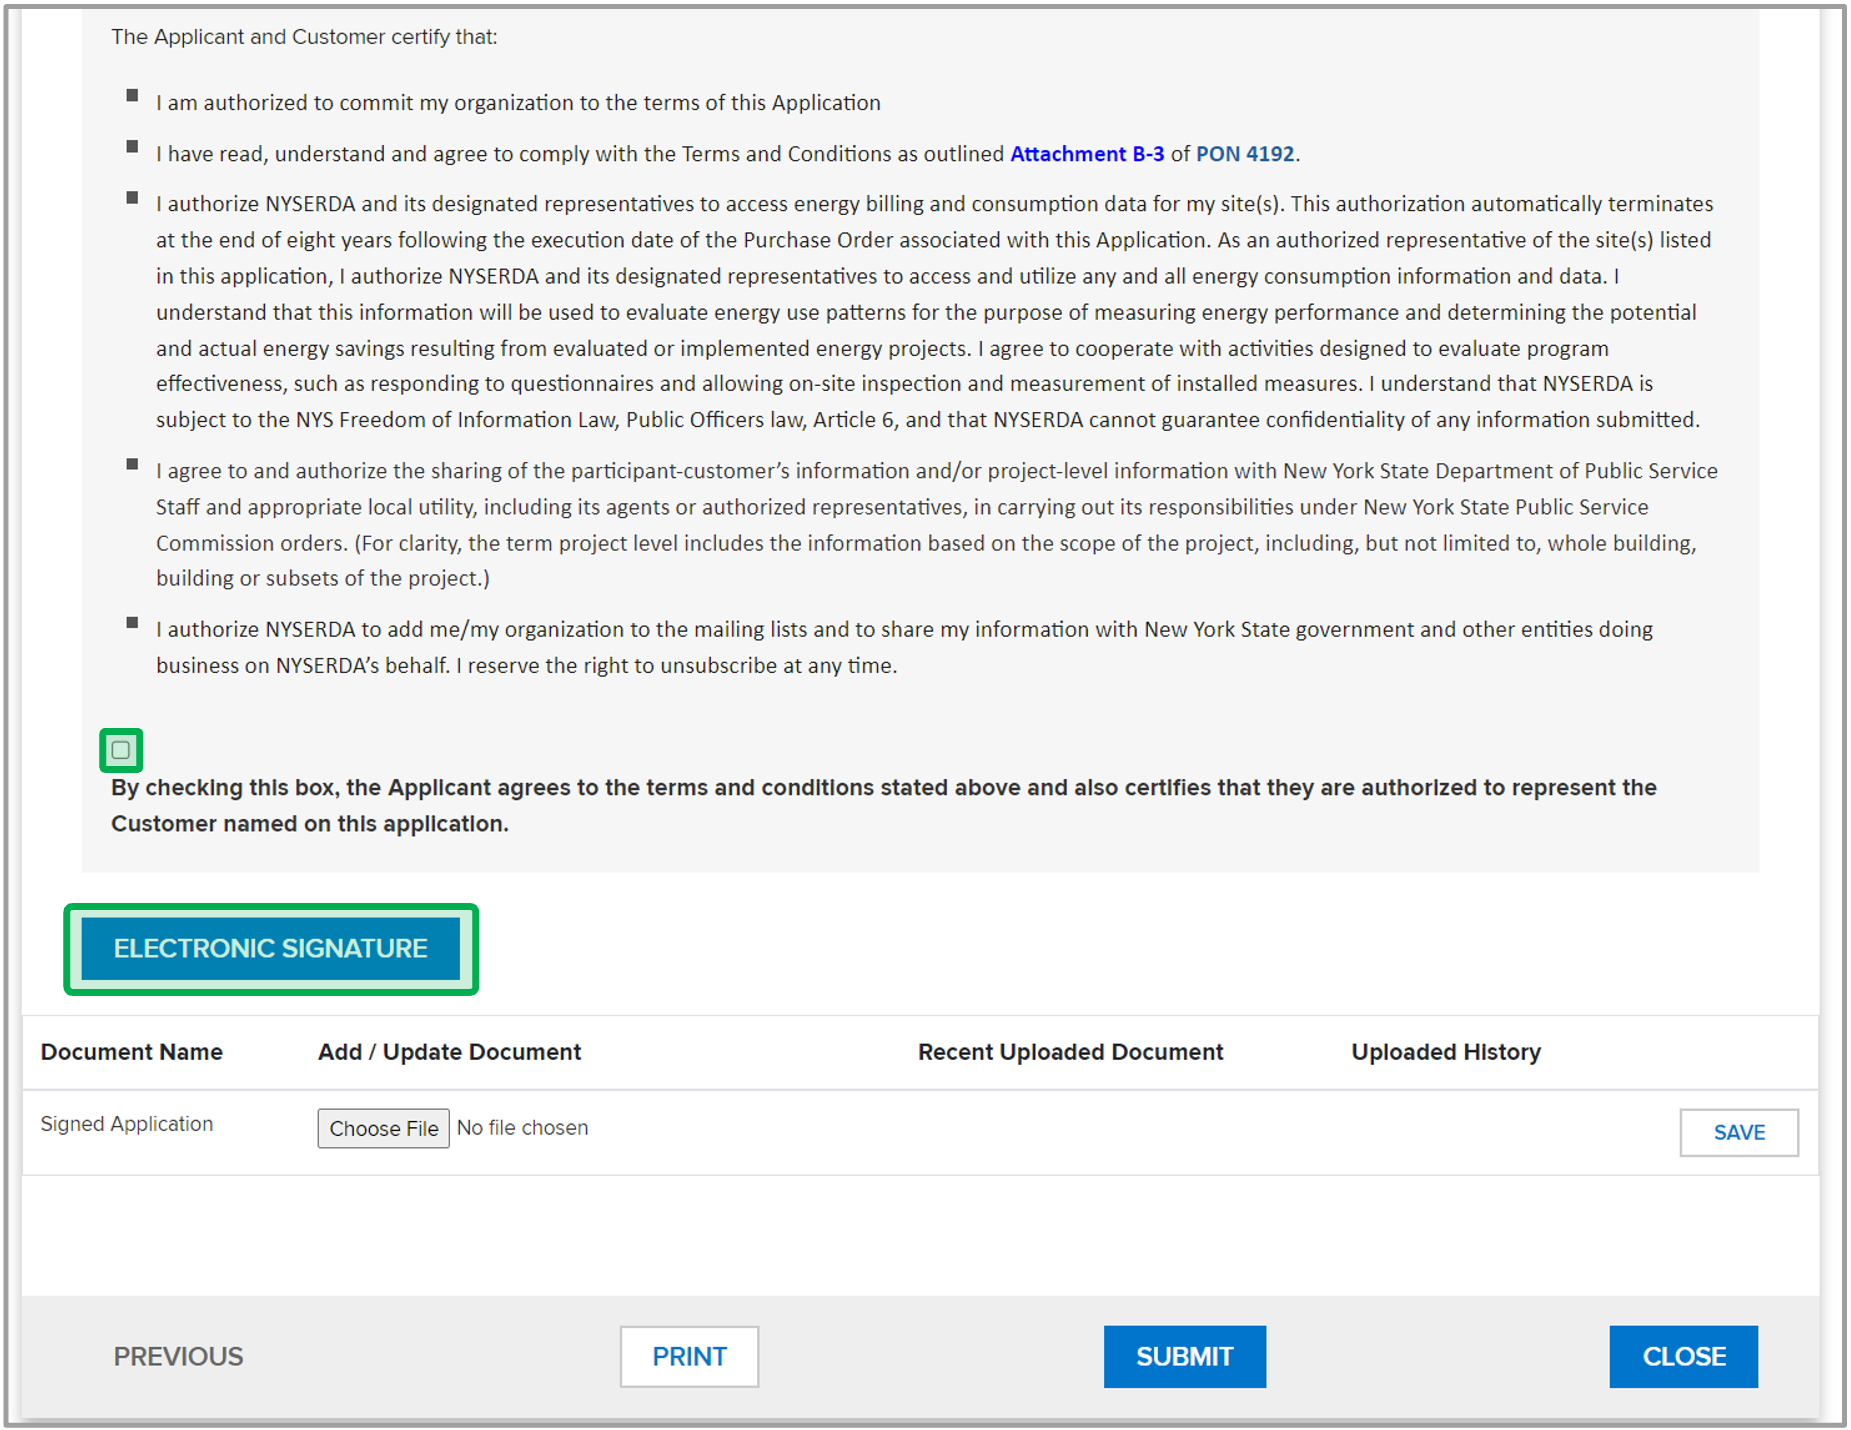
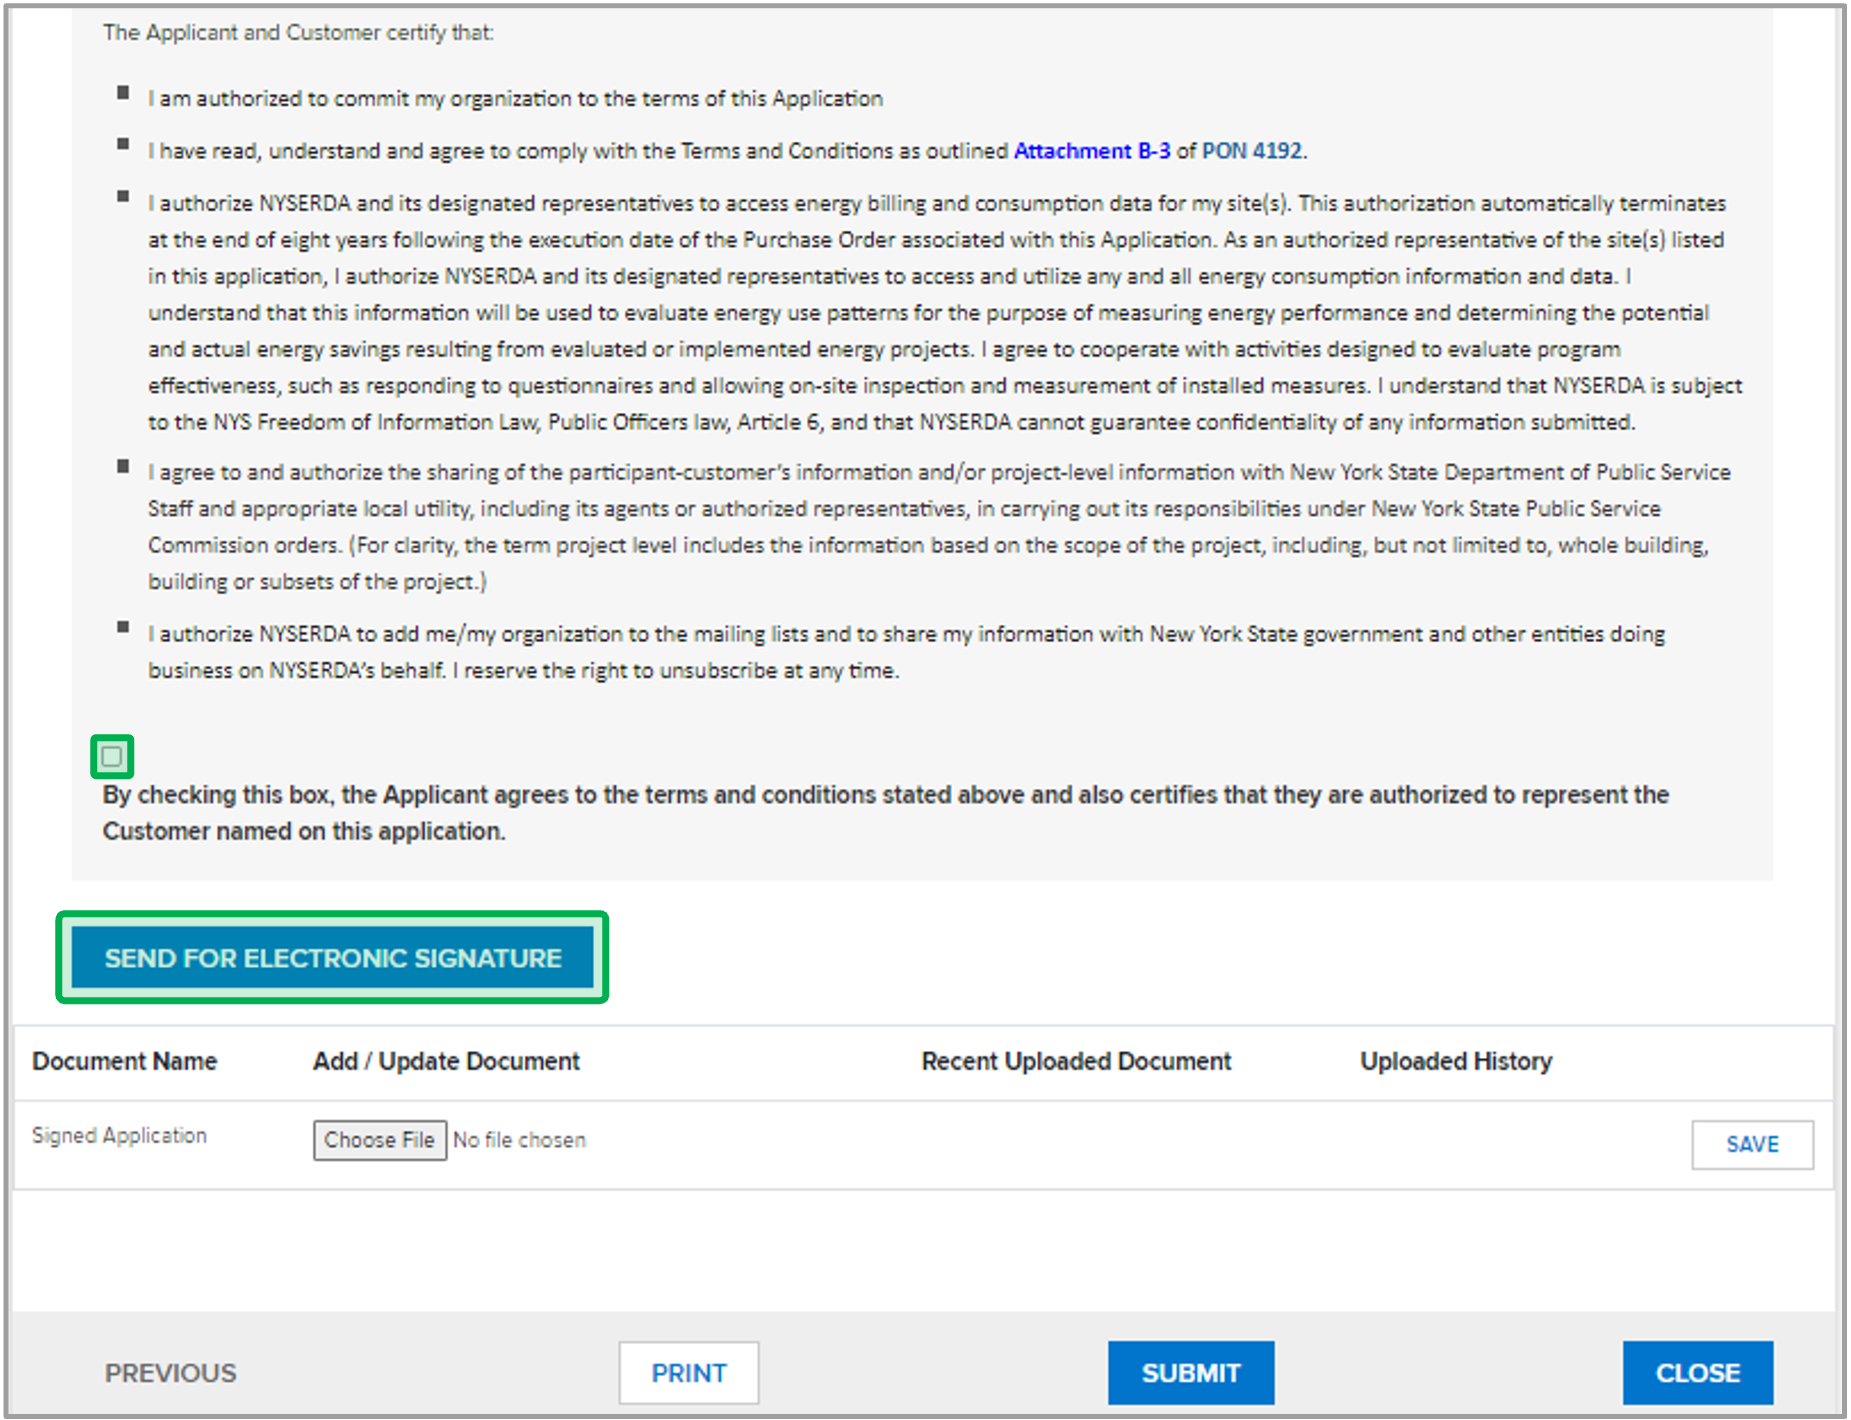
Review the summary of your application, then at the bottom of the Certification page, check the Checkbox and then click the Electronic Signature button. | Expand |
|---|
| 
|
|
| UI Step |
|---|
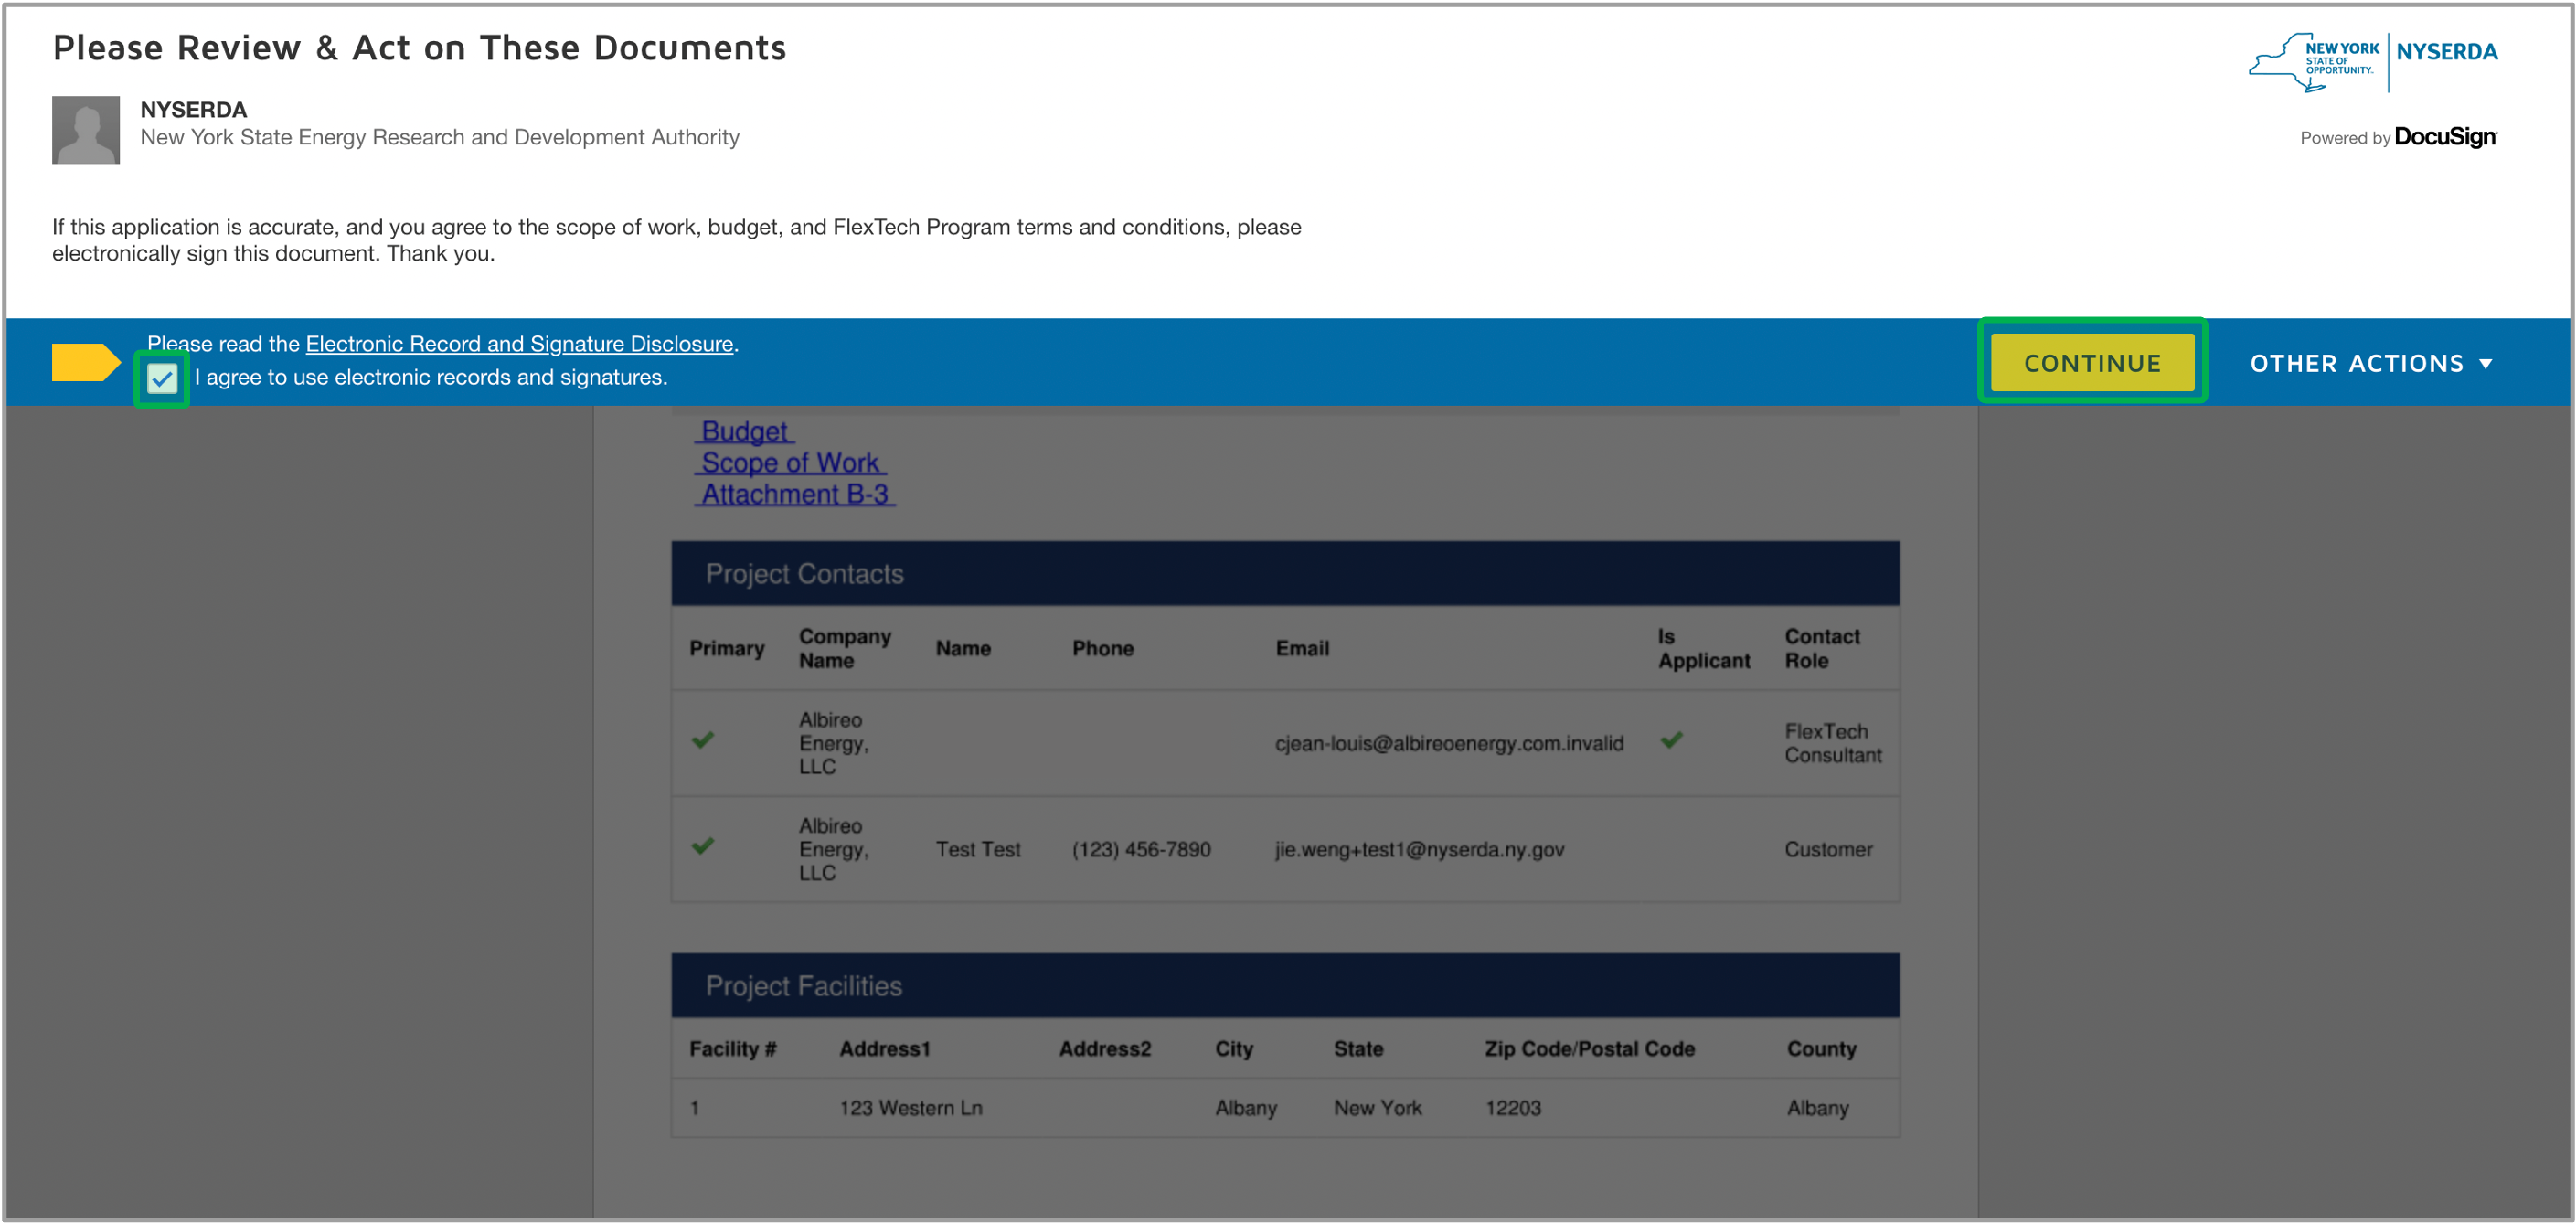
The page will redirect for you to DocuSign to review and sign the document. Read the Electronic Record and Signature Disclosure and check the Checkbox, then click Continue.
| Expand |
|---|
| 
|
|
| UI Step |
|---|
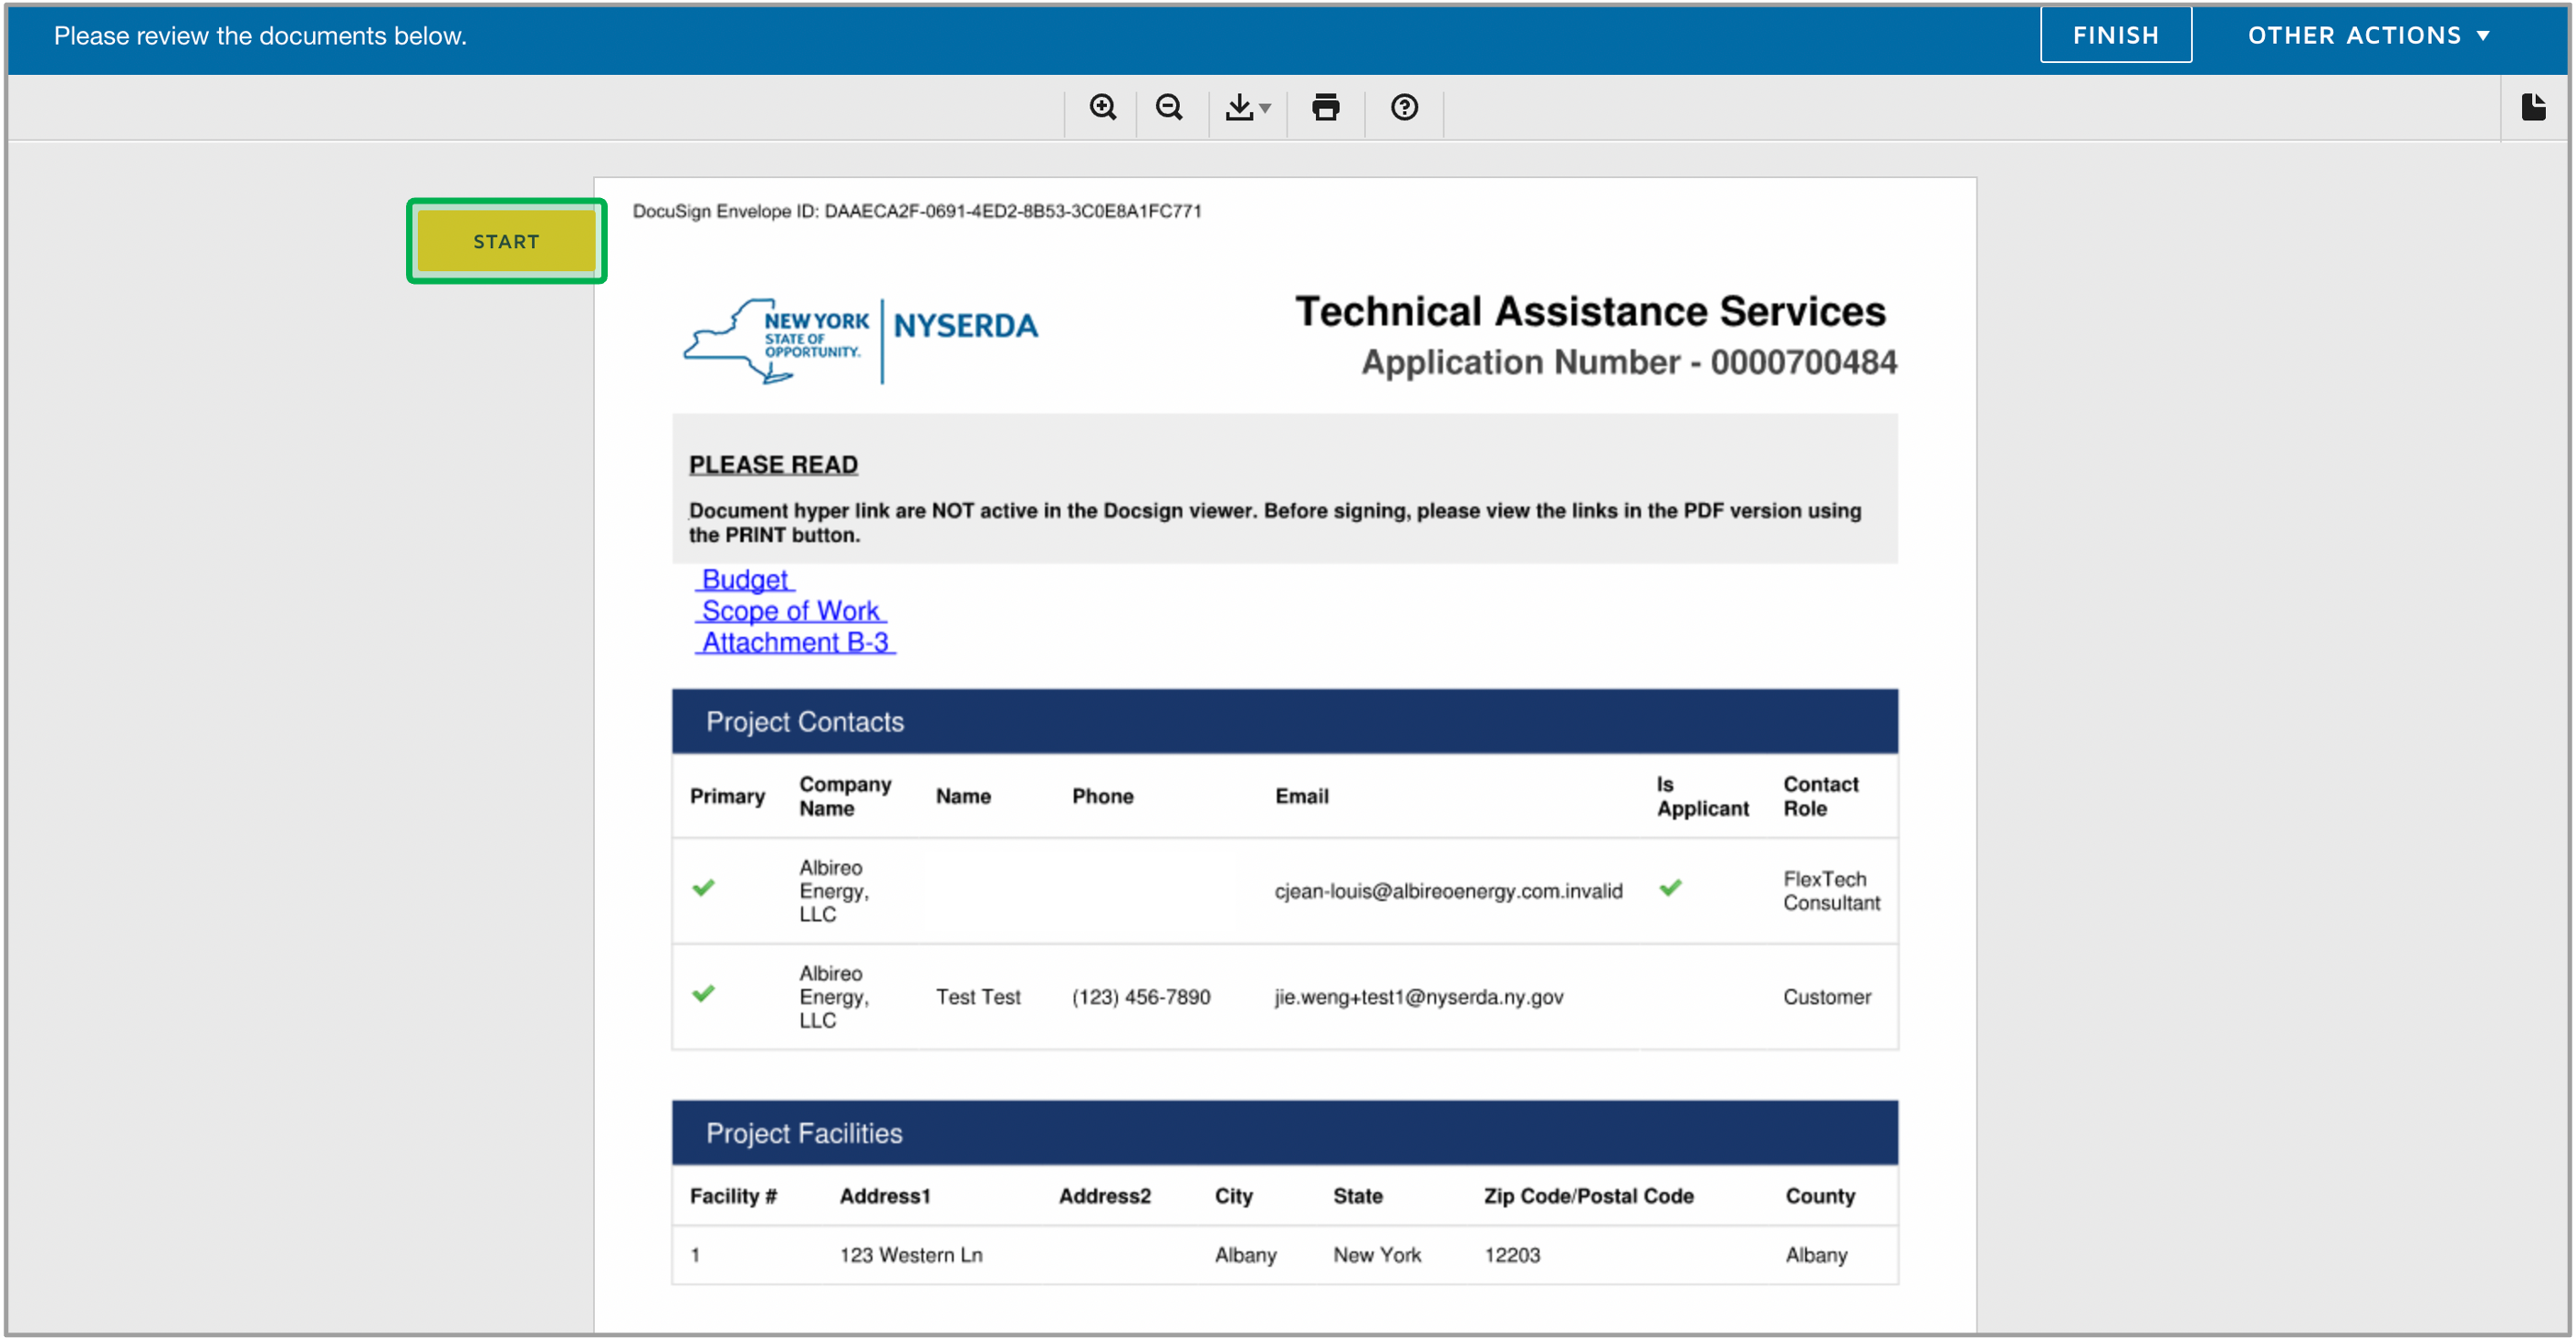
After you review the document, click the Start button for the page to redirect you to sign. | Expand |
|---|
| 
|
|
| UI Step |
|---|
At the bottom of the page, click the Sign button. | Expand |
|---|
| 
|
|
| UI Step |
|---|
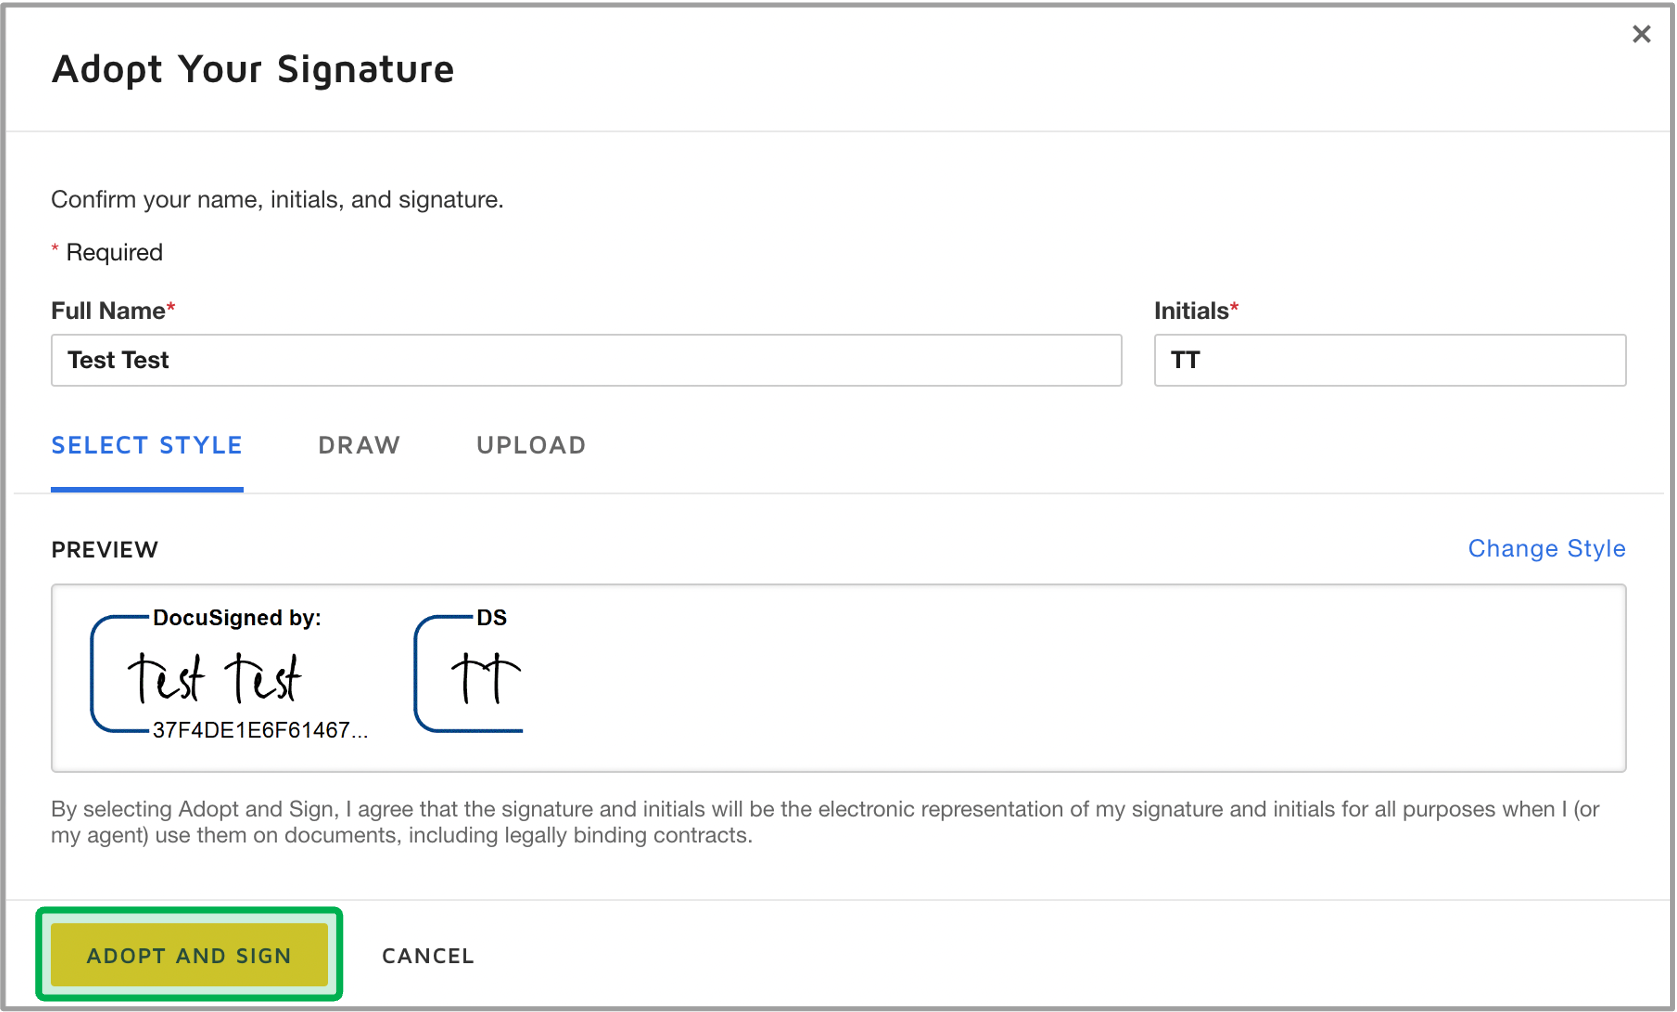
Review your signature then click the Adopt and Sign button. | Expand |
|---|
|  |
|
| UI Step |
|---|
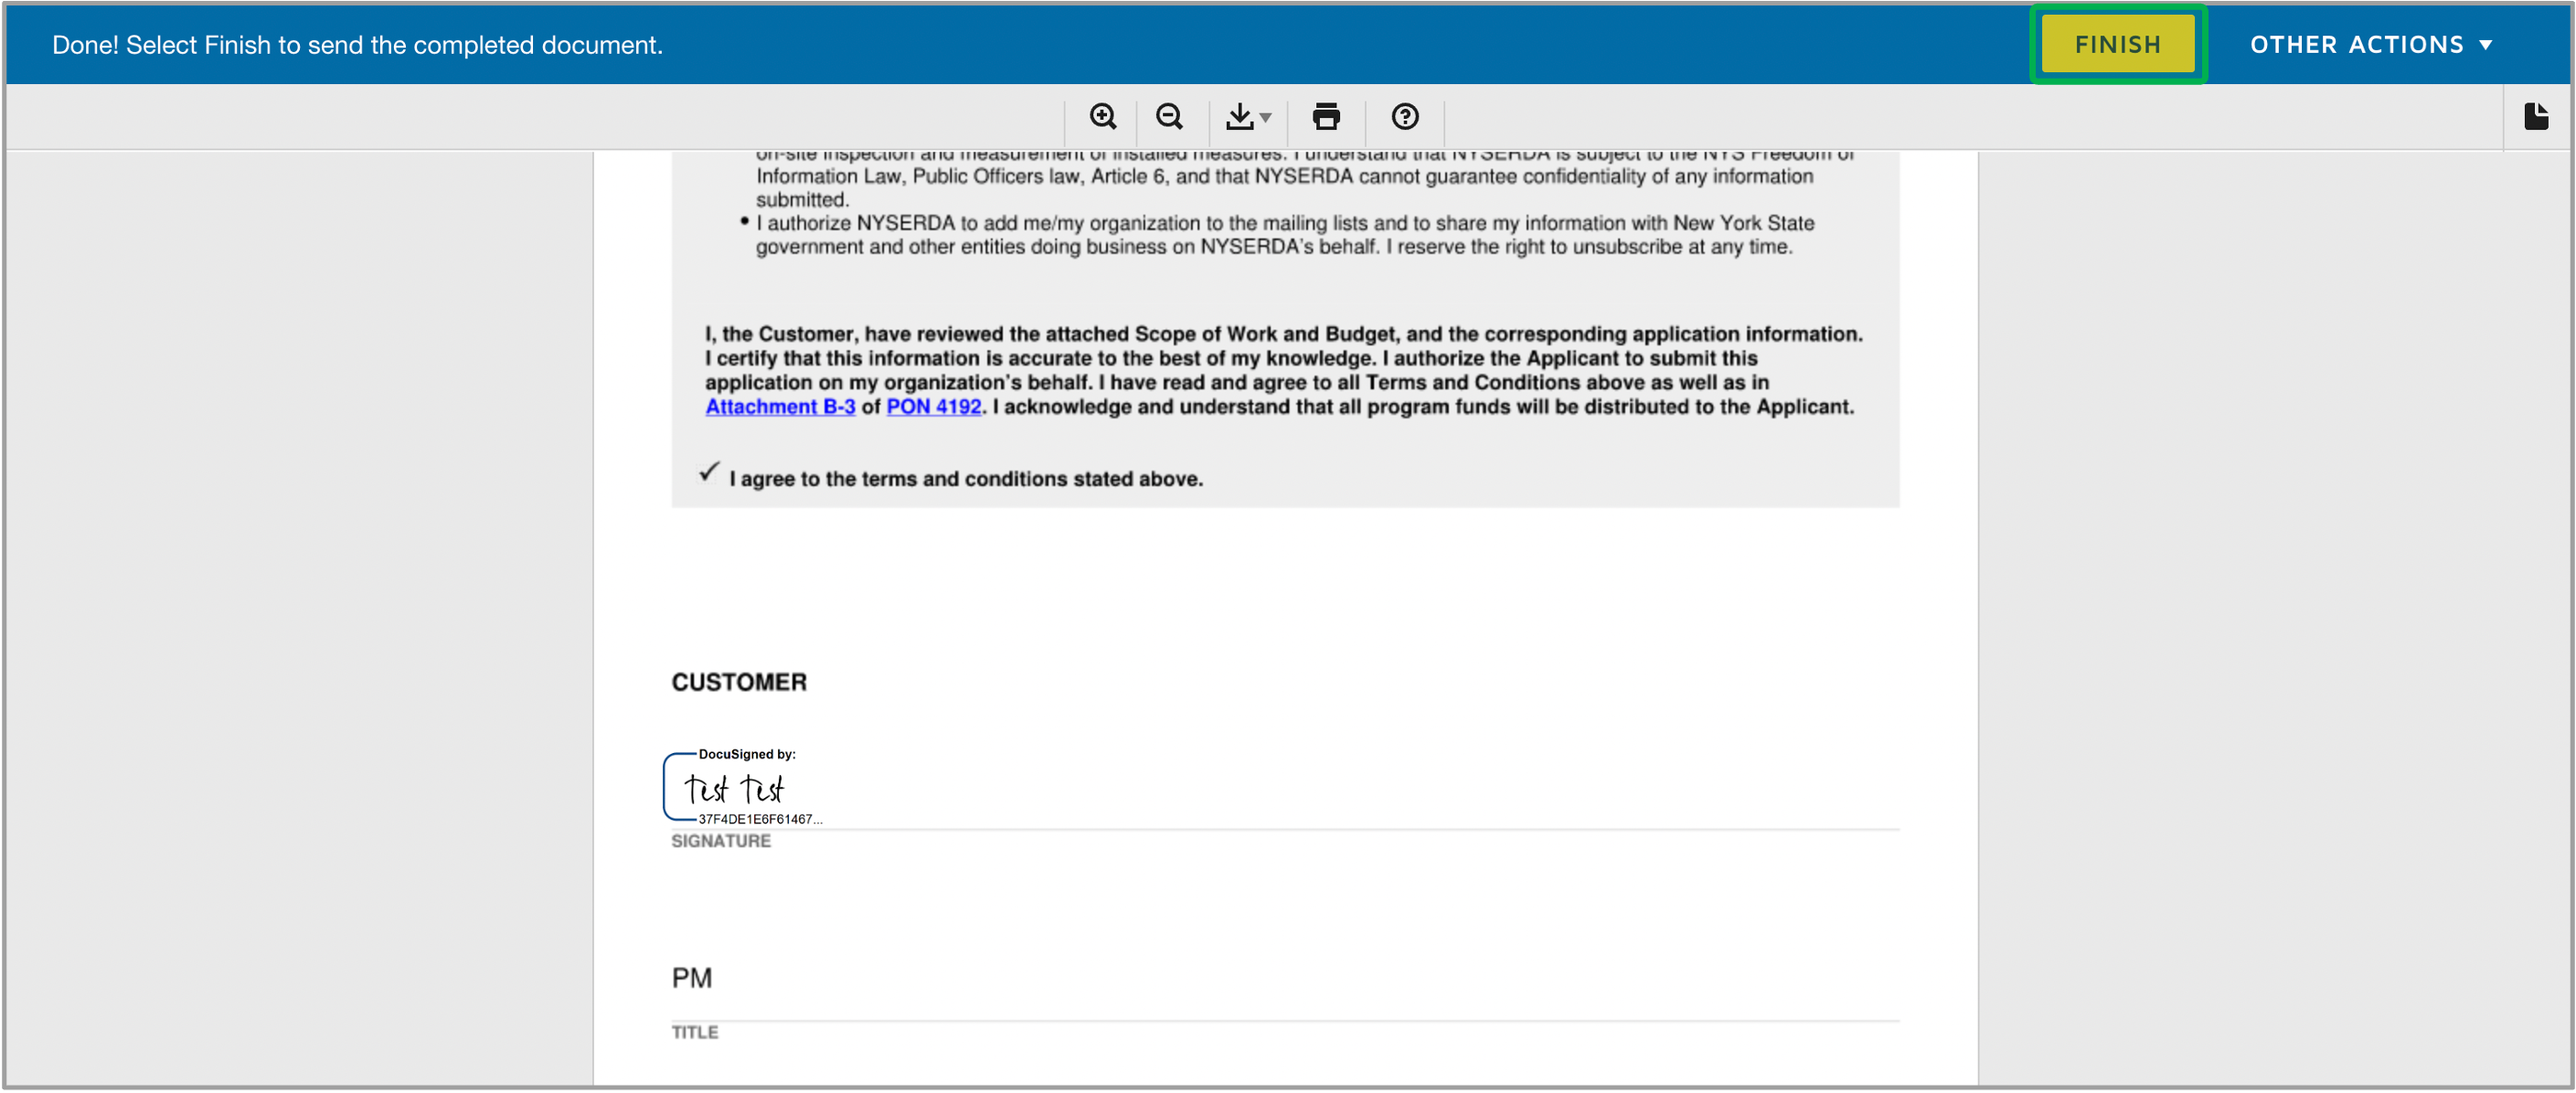
Click the Finish button to complete your Electronic Signature process. The page will redirect back to the Certification page.| Expand |
|---|
| 
|
|
|
|
| UI Expand |
|---|
| title | Consultant as the Applicant |
|---|
| | UI Steps |
|---|
| | UI Step |
|---|
Review the summary of your application, then at the bottom of the Certification page, check the Checkbox and thenclick the Send for Electronic Signature button. | Expand |
|---|
|  |
|
| UI Step |
|---|
Consultant should see a green bar once DocuSign is sent. The browser can be closed as this is the last screen that the Consultant will see if the docusign function is used. | Tip |
|---|
Consultant can check on the status of their project by going to the Projects tab in the portal. The status will change from Unsubmitted to Submitted within 24 hours after the Customer signs the DocuSign agreement. |
| Expand |
|---|
| 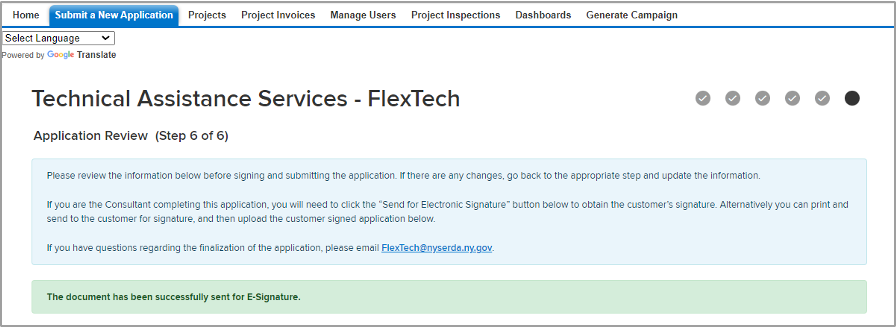 Image Added Image Added |
|
| UI Step |
|---|
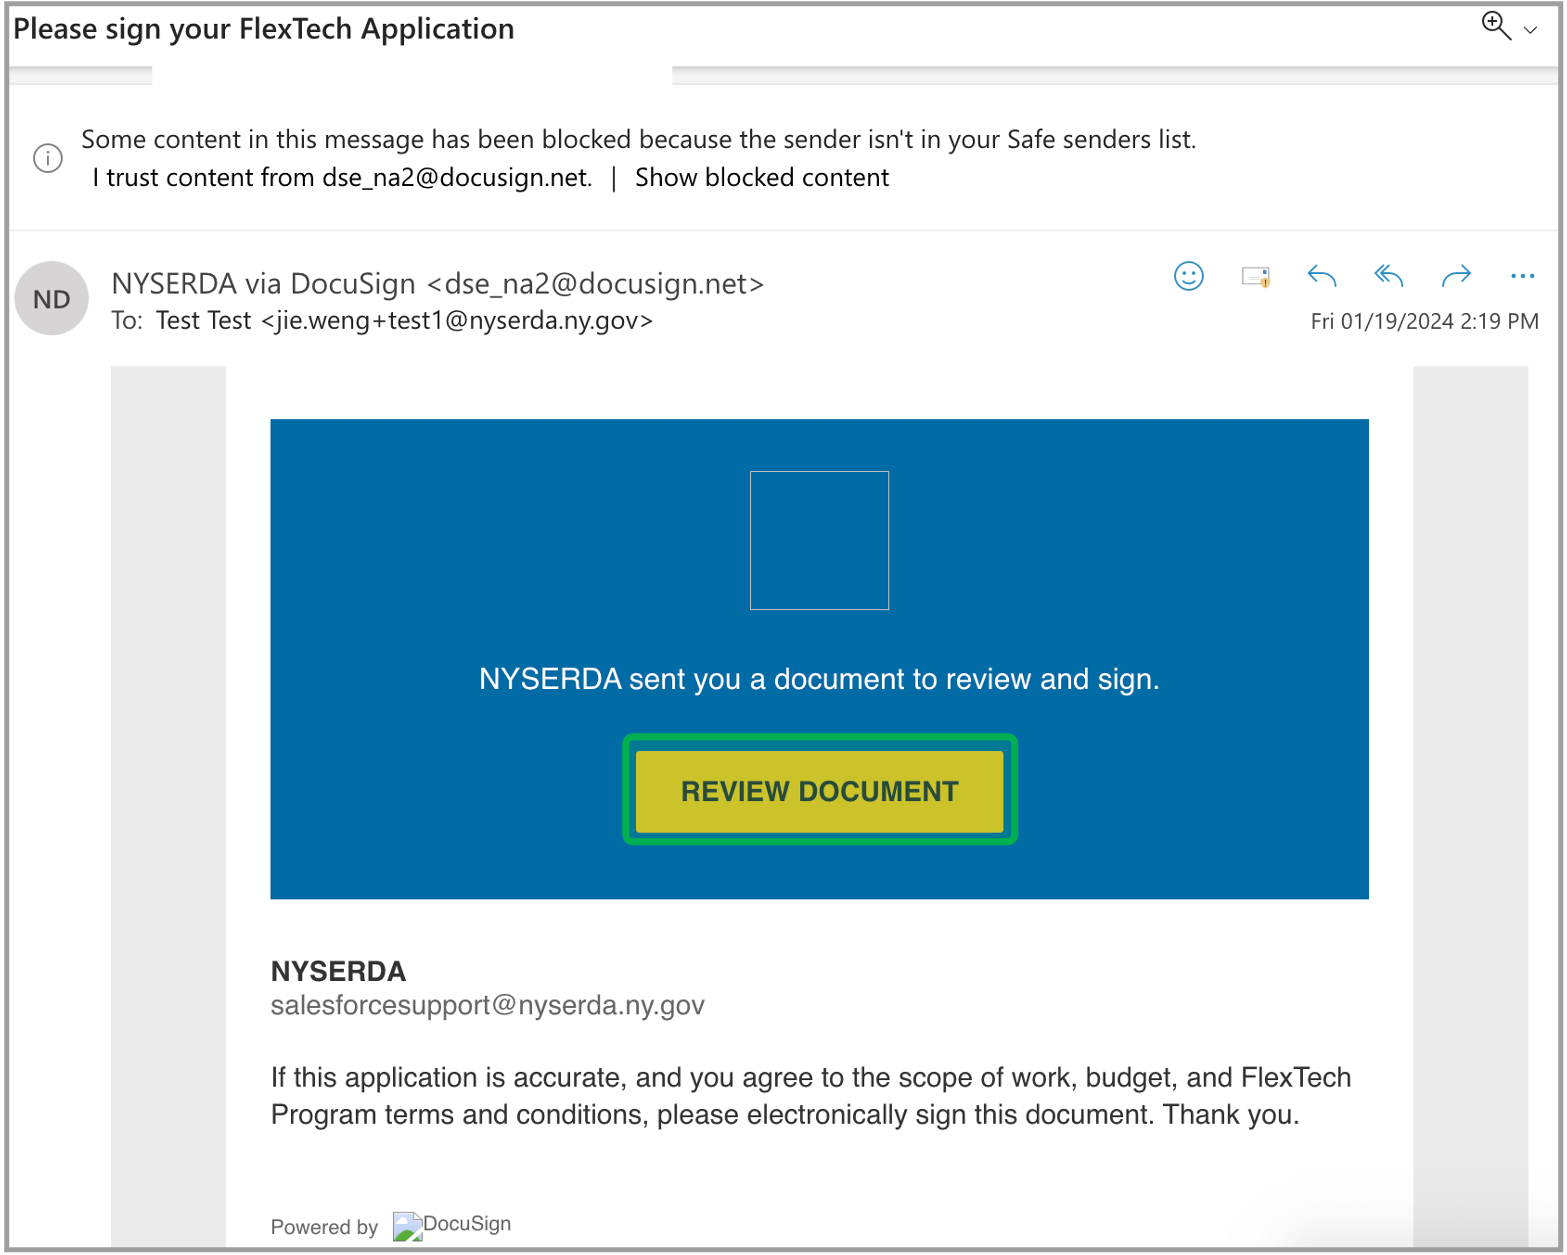
The Customer should expect an email from Docusign to provide the signature, click Review Document. | Tip |
|---|
| The Customer will have 30 days to provide signature. Please check spam folder for the email to Docusign. The Consultant will receive an email confirming the Customer's signature once they have done so. |
| Expand |
|---|
|  |
|
| UI Step |
|---|
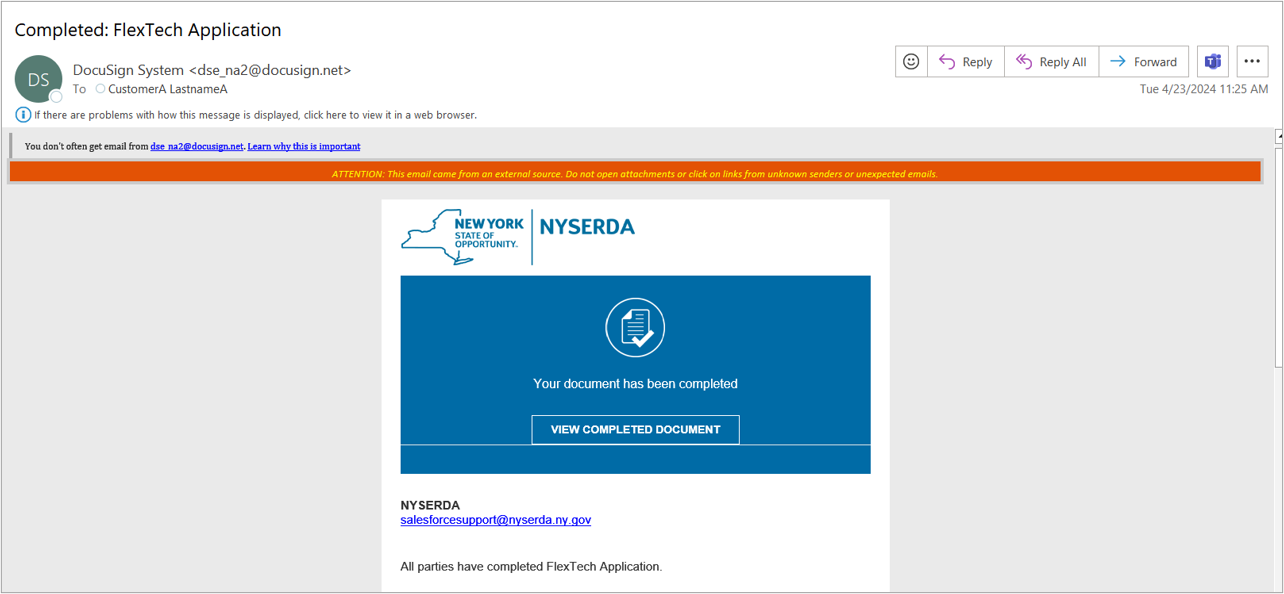
Once the Customer has electronically signed the application, all parties involved with the application will receive an email confirmation that the application has been submitted. | Expand |
|---|
|  |
|
| UI Step |
|---|
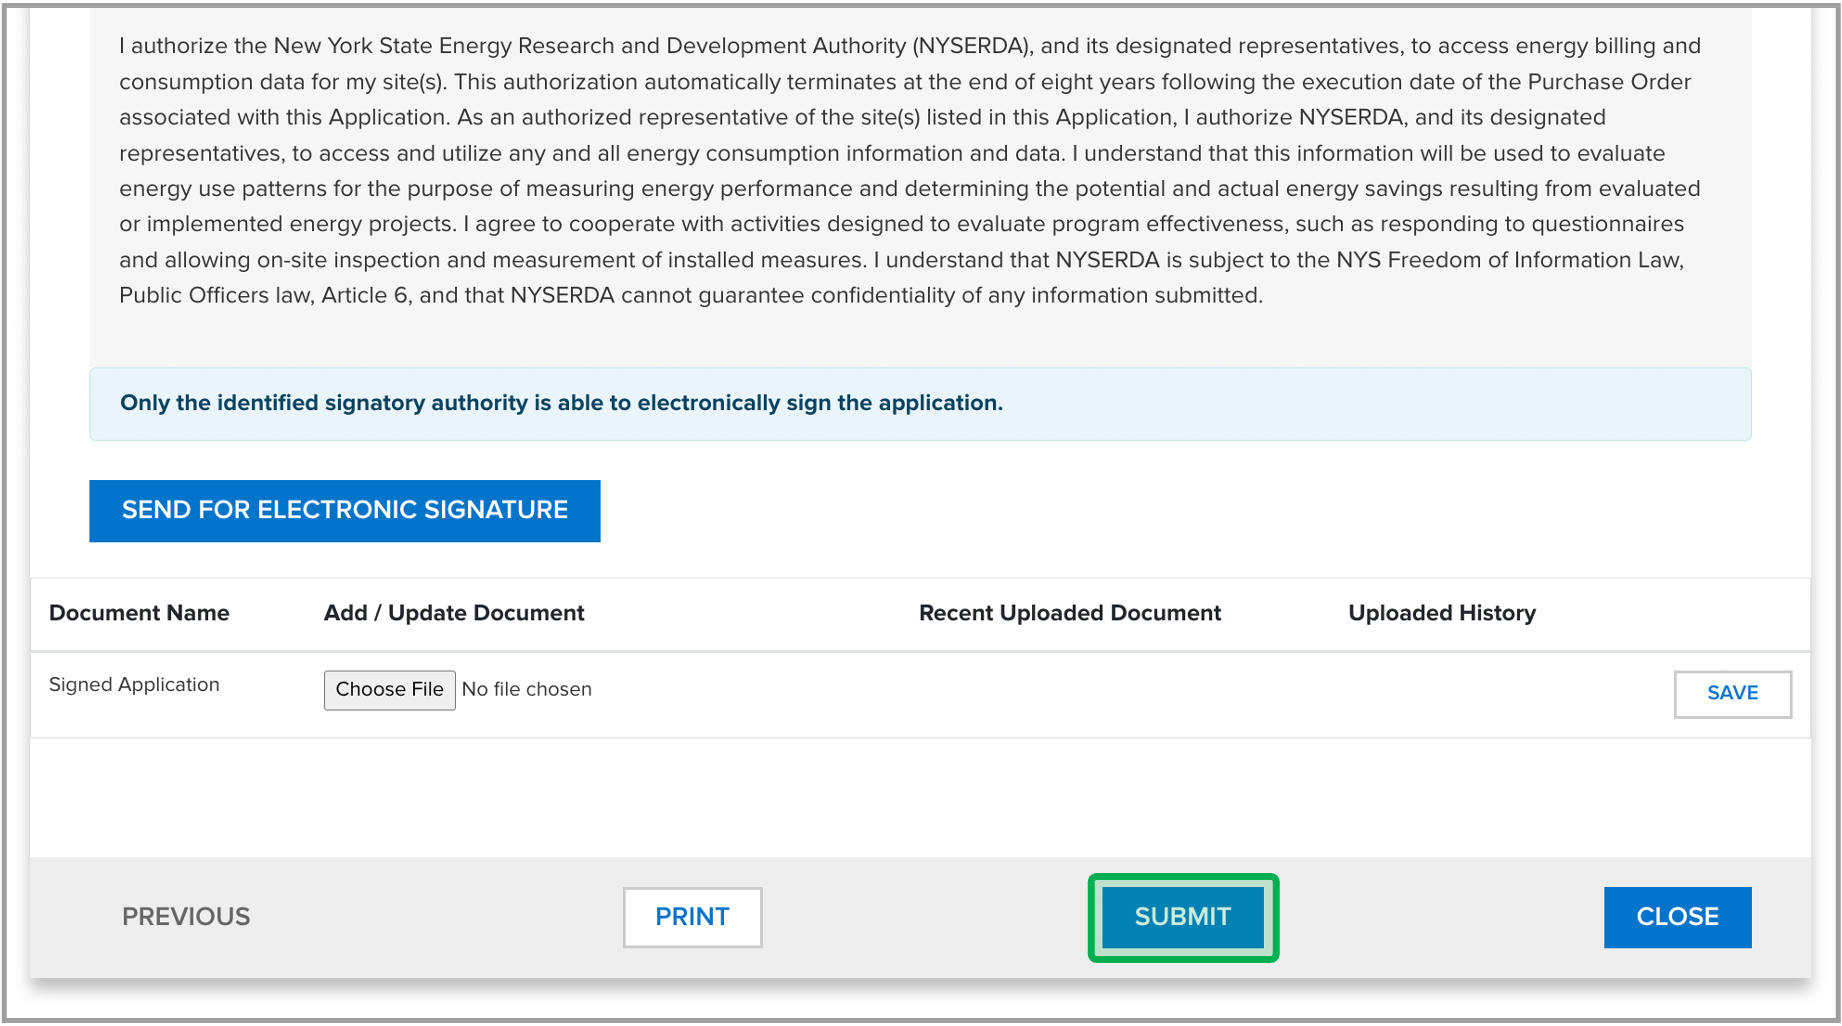
If you have received the customer's signature on the printed application, scan it into your system, upload it to the application, and click Submit. | Expand |
|---|
| 
|
|
|
|
|
| Aura - Tab |
|---|
| | Panel |
|---|
| borderColor | #002D72 |
|---|
| bgColor | #F3F4F9 |
|---|
| titleColor | #ffffff |
|---|
| borderWidth | 1 |
|---|
| titleBGColor | #002D72 |
|---|
| borderStyle | none |
|---|
| title | Next Steps |
|---|
|
|
| UI Expand |
|---|
| title | Submission Verification |
|---|
| | Info |
|---|
| The instructions below guide you through the Submission Verification process. Once you submit the Project Application, you should expect the following communication via email: | Expand |
|---|
| title | Application submission |
|---|
|
|
|
|
| UI Expand |
|---|
| | Info |
|---|
| The instructions below guide you through the Document Rejection process. Once you submit the Project Application, NYSERDA staff will review and approve all required documents submitted. If any document(s) do not meet the requirement, it will be set to Rejected status and you are expected to upload a new document. You can expect the following communication via email if any document is rejected: | Expand |
|---|
| title | Document Rejection Email |
|---|
| Hello [User Name] There is additional information needed to complete the review of your Technical Assistance application FT - 0000000000 - test - test Street.
Please provide the following in two weeks: - a) Document Name - Scope of Work
b) File Name - Test.docx
c) Notes - Wrong Project SOW - a) Document Name - Budget
b) File Name - Test.docs
c) Notes - Incomplete
|
|
| UI Steps |
|---|
|
| UI Step |
|---|
If you receive a Document Rejection Email, access your NYSERDA SalesForce Portal. Then, navigate to the Projects tab and select All Waiting for Customer Response under the dropdown list. |
| UI Step |
|---|
Under the new dropdown, locate your application and click on your Project Name Hyperlink. |
| UI Step |
|---|
In the Project Details page, scroll down to locate the Document Information section. Then, look for any document with a Reject status. |
| UI Step |
|---|
Click the Choose File button to re-submit the document. |
| UI Step |
|---|
Once you add the new document, click the Save Document button. |
| UI Step |
|---|
The rejected document should now show a Submitted status. |
|
|
|
|


