
Submitted EmPower+ Application are reviewed by CLEAResult Shared Services within Salesforce. Applications, once approved, are systematically pushed into Uplight for future project management. Note that paper applications received from Applicants must first be submitted through the Online Application process before they can be reviewed by CLEAResult Shared Services. Access each step below by clicking on the learn more... link to expand the section and review the related instructions.
The instructional materials below are intended to provide guidance for CLEAResult Shared Services when reviewing submitted applications in Salesforce.
Log into Salesforce.
Access the Projects tab.

On the Projects page, select EmPower+ - Submitted from the drop-down menu to view all applications in Submitted status. Then, click on the link in the Project Name column to open a specific Application Record.
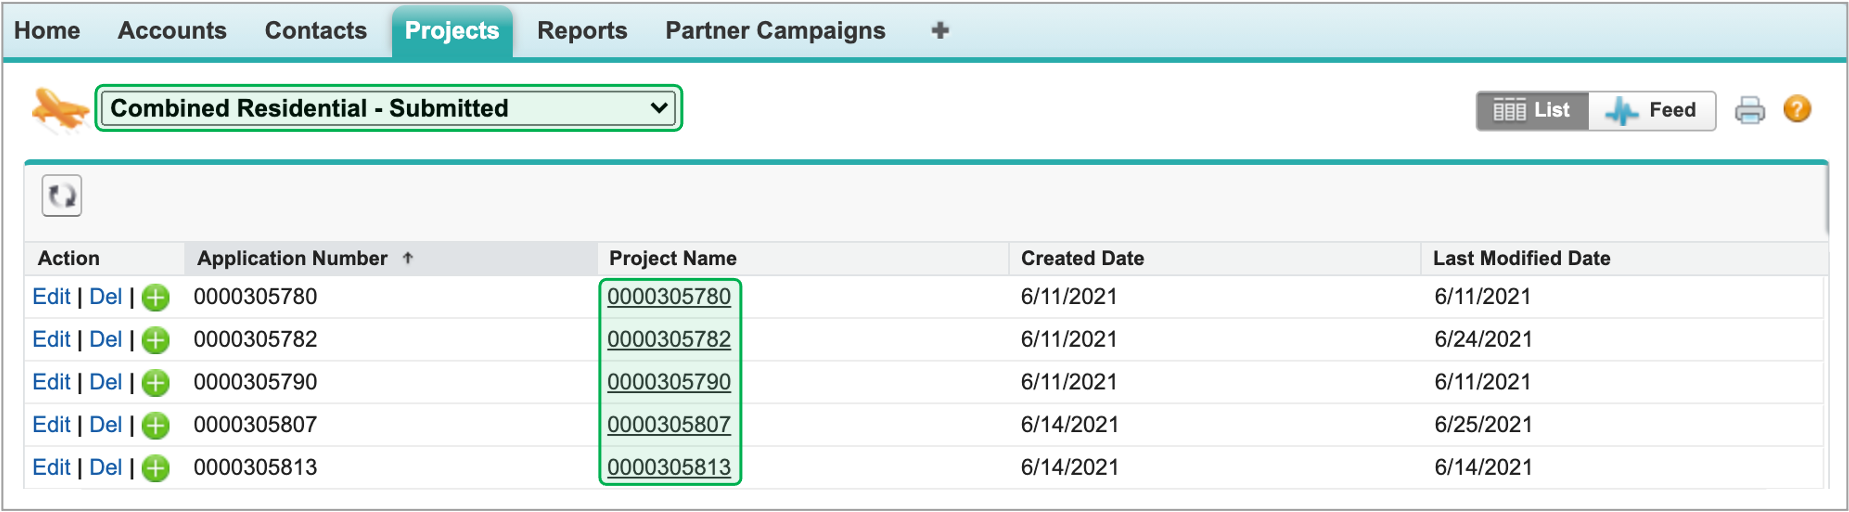
Click on the link in the Project Name column to open a specific Application Record.
Submitted applications that have no Primary Contractor Account listed in the Contact Information section of the Application Record indicate that the applicant selected Select Next Available for the Contractor Selection drop-down on step (page) 3 of the application and will need to be assigned by CLEAResult Shared Services as part of the application review in both Salesforce and Uplight.

Once in the Application Record, update the application Status from Submitted to Under Review in the Project Detail section. This change lets others in CLEAResult Shared Service know this application is currently being reviewed.
Double click on the Submitted status field.
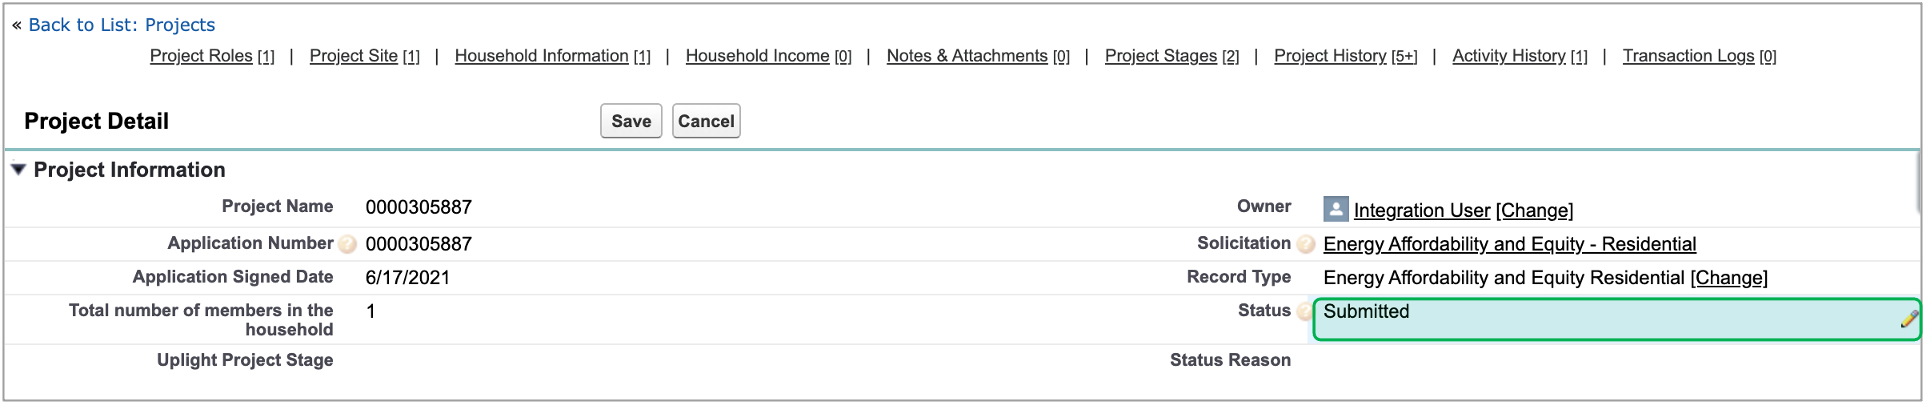
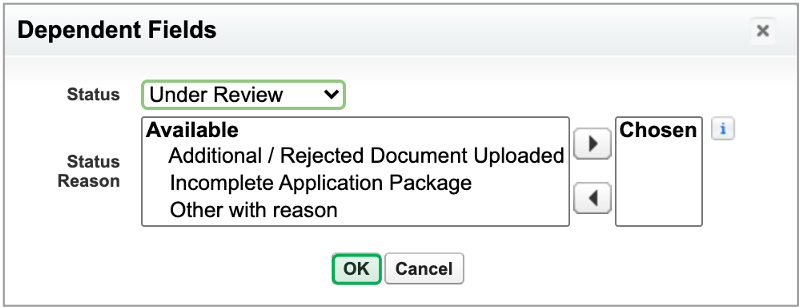
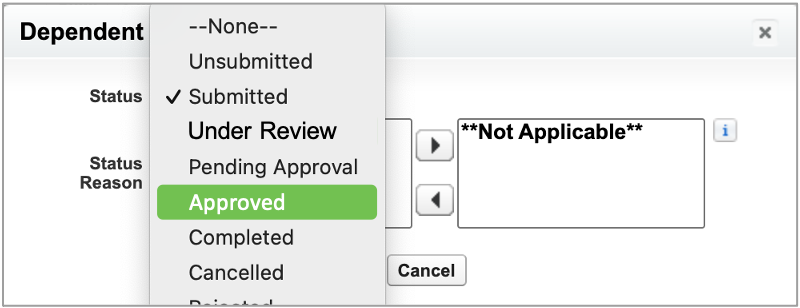
A modal window will appear. Select Under Review from the drop-down, currently set as Submitted.

Click Go to save the change.
Once Under Review is selected, Status Reasons associated with the selected status will populate. These Status Reasons should not be selected at this time. However, if in the review process, issues with application are uncovered, CLEAResult Shared Services should re-access the application record and choose a corresponding status reason to identify the application issue(s) for remediation. This will indicate what missing information is required for an approval.
The application record page will reload, displaying Under Review in orange text in the Status field. Be sure to click Save before leaving the application record or navigating away from this page, otherwise the change in Status will not apply.
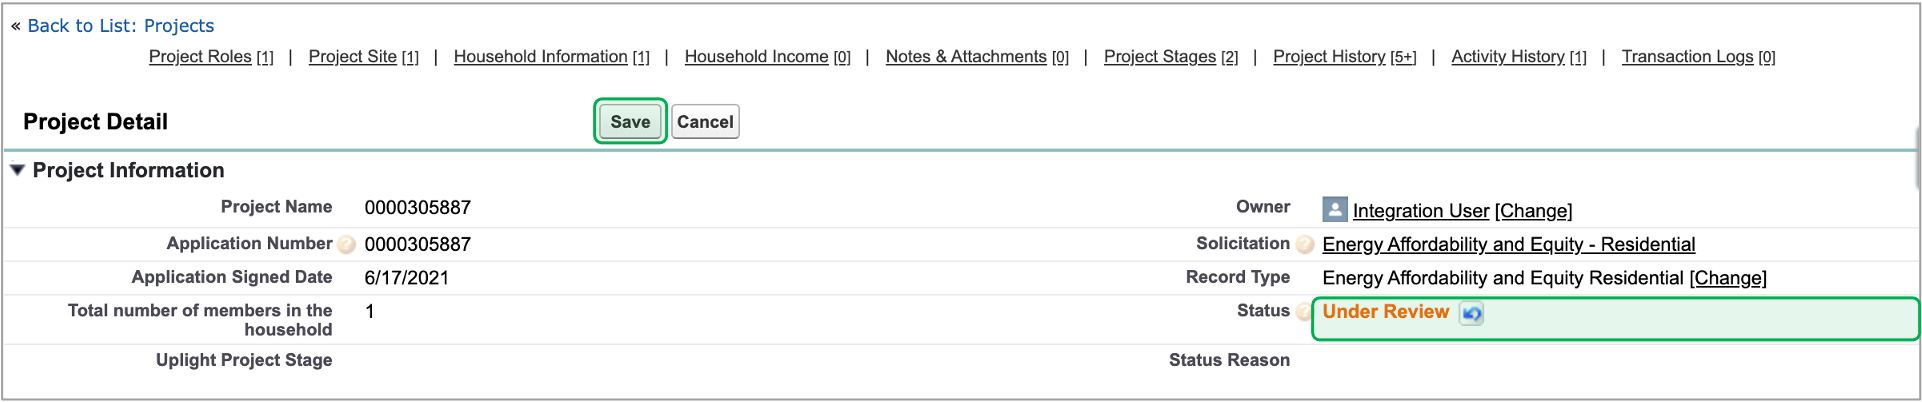
Once the change is made to the application Status, the application will no longer appear in the EmPower+ - Submitted project queue and will now be located in the EmPower+ - Under Review project queue.
If the applicant selected Select Next Available for the Contractor Selection drop-down on step (page) 3 of the application, the Contact Information section of the application record will be blank. CLEAResult Shared Services must assign a Contractor to the application.
Scroll down to the Custom Links section of the application record and click the Partner Information link. This will open step (page) 3 of the submitted application in a new browser tab.

On step (page) 3 of the submitted application, use the Contractor Selection drop-down to select the next available contractor. Click Save when complete.
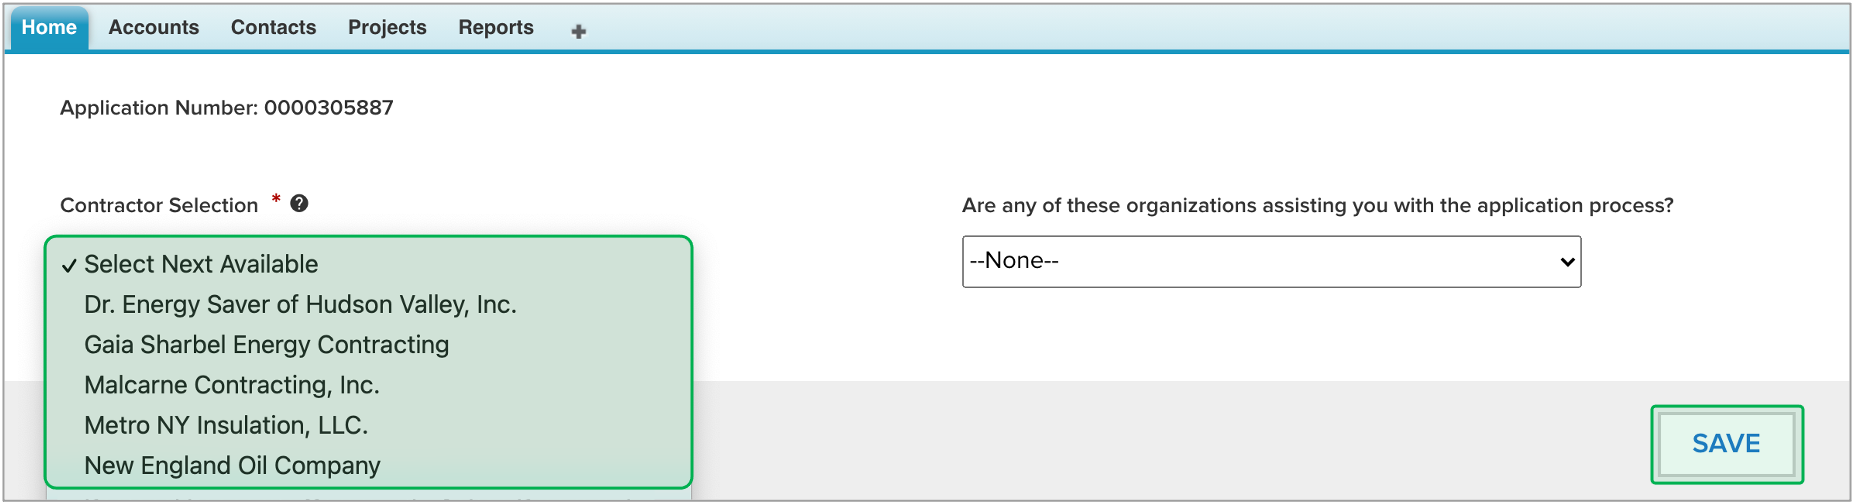
Close the tab after clicking Save. Back on the application record in Salesforce, refresh the browser window to re-load the application record page. The Contractor Information section should now be populated with the selected Contractor.
Next, CLEAResult Shared Services should review previous projects for the applicant within the last three (3) years.
Navigate back to the Custom Links section of the application record in Salesforce. Two additional links appear in this section:
- Completed Residential Projects NYHEP
This link accesses Salesforce reporting that locates project records where ANY of the following information matches with the applicant:- Customer First Name
- Customer Last Name
- Customer Street Address
- Customer City
- Customer State
- Customer Zip
- Completed Res Proj NYHEP Exact Match
This link accesses Salesforce reporting that locates project records where ALL of the following information matches with the applicant:- Customer First Name
- Customer Last Name
- Customer Street Address
- Customer City
- Customer State
- Customer Zip
Click on each link to navigate to the associated Salesforce reporting.

This review is to evaluate if Applicants with submitted applications have received program services within the last 3 years.
Shared Services should then review the application to determine if any additional information is needed from the applicant. Keep in mind if this step is not completed at the same time as the steps listed above, Shared Services will need to access the EmPower+ - Under Review project queue if the status of the application has already been changed.
Review the Application Record to validate that all required information is documented such as, but not limited to:
- If the Applicant rents or owns the site
- Utility information
- Site information
- Household information
- Household income
Then, scroll down to the Document Approval / Rejection section of the application record.

Using the links associated with each document, click to access. Review the Signed Application first to determine, based on the applicant's responses, if any additional documentation is needed. Then, review any other attached documents to determine if additional information is needed from the applicant, such as:
- Categorical Screening Documents
- Income Documentation
- Landlord Agreements (if the Applicant rents)
If no additional information is needed, move on to the next step.
If more information is required of the applicant, follow the instructions in Step 2: Update the Application Status on this page to update the Status field that identifies the issue with the current application.
After double-clicking the Status field, use the Status Reason field to locate and select the reason the application will remain Under Review. Be sure to click the right-facing arrow to the right of the Status Reason field once you've selected the Status Reason to move it over into the Chosen field otherwise it will not apply. Click OK when complete.
Shared Services must then send an email to the applicant requesting the additional information. Scroll down to the Activity History and click the Send An Email button.

Once the Send An Email page loads, click the lookup icon to the right of the To field.
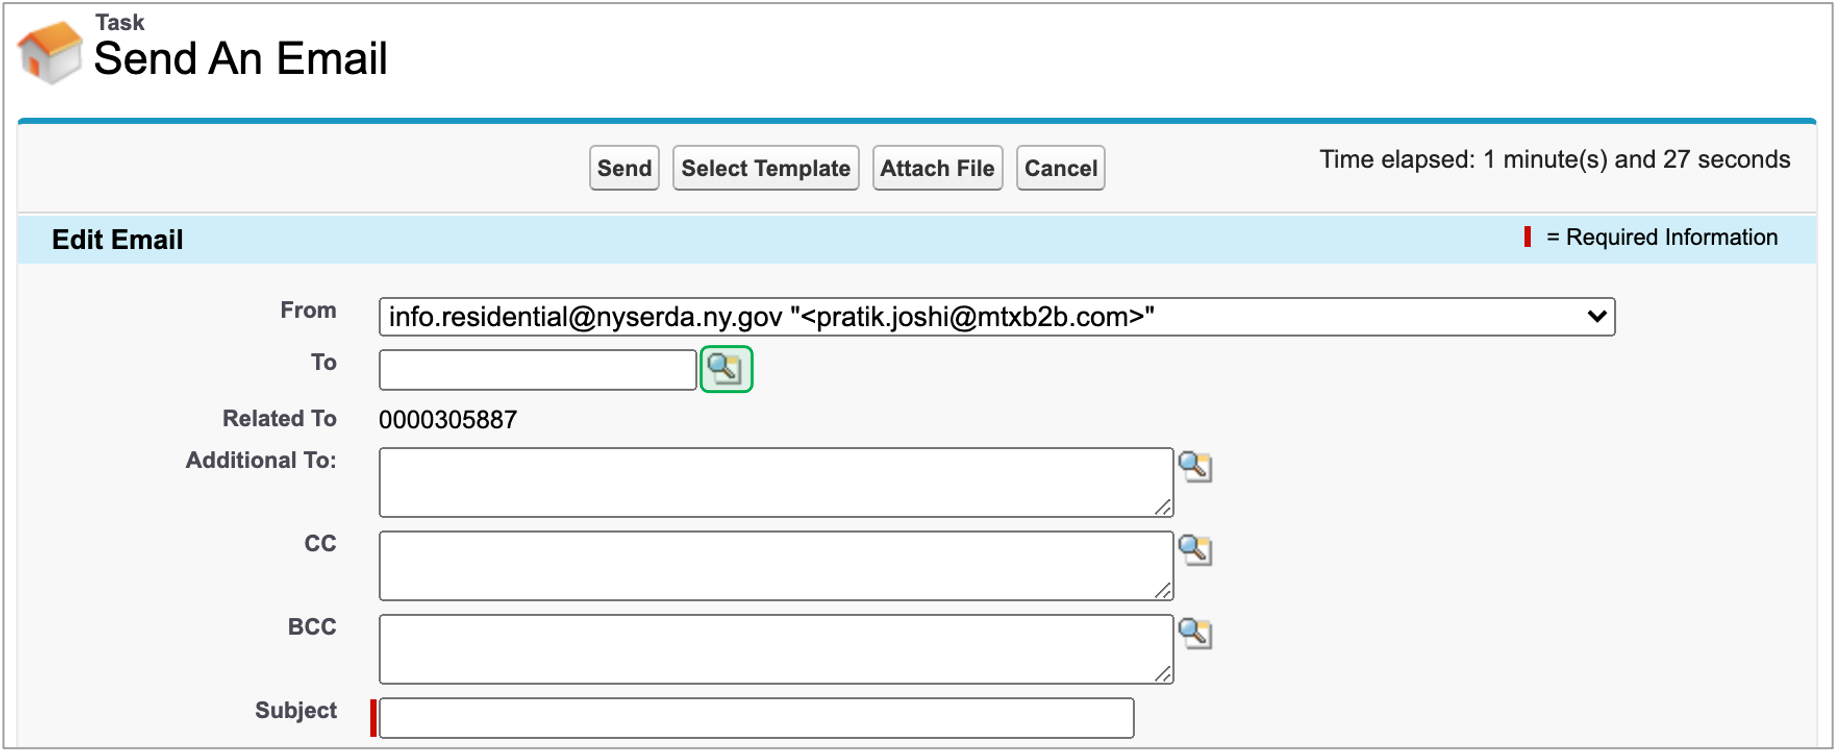
A modal window will appear. Select the Customer (applicant) from the list.

Then, click the Select Template button.
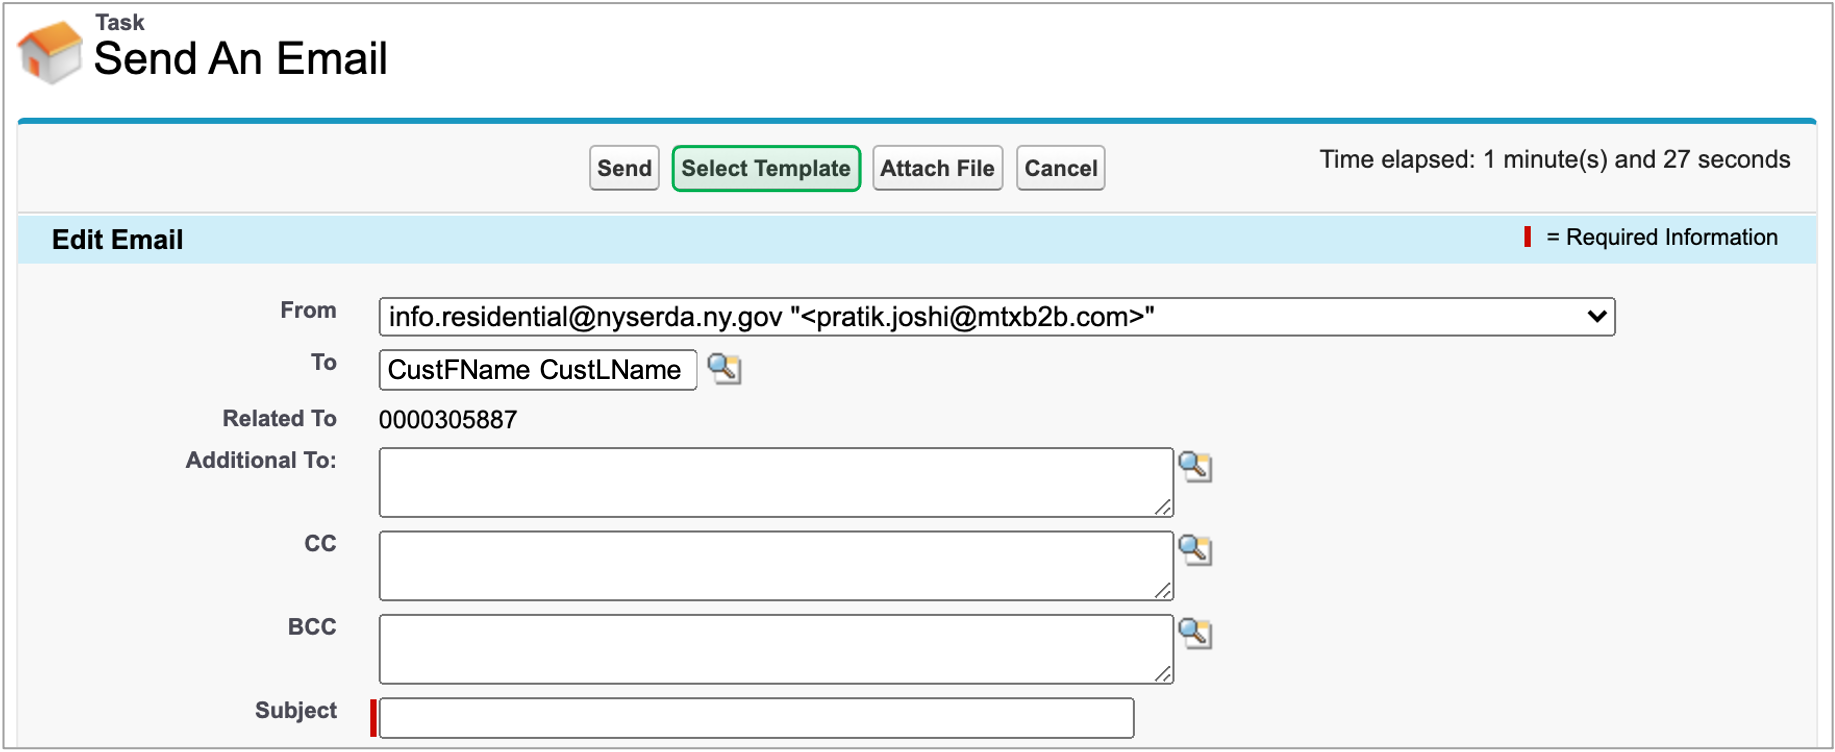
A modal window appears with a list of emails templates. Scroll through to locate the template that will request the needed information from the applicant.
Once a template is selected, the Send An Email screen will update to populate the Subject and Body of the email from the template chosen. Once the template has been applied, changes can be made to the subject and body of the email. Scroll down to the bottom of the page when ready and click Send.
Back on the application record in Salesforce, the Activity History section now includes the new email sent to the applicant.\ and the Waiting for External Response checkbox will be checked.
If the Applicant uploads the requested documentation to their application after receiving the email notification, the Waiting for External Response checkbox will systematically uncheck. CLEAResult Shared Services will use this indicator to sort the EmPower + - Under Review project queue to locate projects with newly uploaded documentation for review.
If the Applicant does not respond to the initial email notification, additional systematic notifications will be sent. After the third notification, if the Applicant continues not to respond with the required documentation, the application will systematically move to the EmPower + - Cancelled project queue.
The final step is to approve the application in Salesforce. Applications, once approved, are systematically pushed into NYHEP for further Enrollment Management.
Return to the Project Details section of the application and double-click the Status field. When the modal window opens, switch the drop-down, with Under Review currently selected, and change it to Approved. Click OK.
This ends the work Shared Services performs with respect to submitted EmPower + Application.