| Aura - Tab |
|---|
|
| Panel |
|---|
| borderColor | #002D72 |
|---|
| bgColor | #F3F4F9 |
|---|
| titleColor | #ffffff |
|---|
| borderWidth | 1 |
|---|
| titleBGColor | #002D72 |
|---|
| borderStyle | none |
|---|
| title | Process Overview |
|---|
|
|
| Info |
|---|
| The diagram below outlines the SQA Process Steps for the complete inspection process. The standard inspection process is outlined in the All Inspections row. Additional requirements for Photo Inspection are outlined in the Photo Inspections Only row. Lastly, if an inspection requires Corrective Actions, this process is included in the Correct Action Required Path. Generally speaking, Inspections without major or critical failures non-conformances will typically end at the Review & Approve Inspection step in the All Inspections row. If there are any CAR Tasks, the process will include the Corrective Action Required Path. |
| Aura - Panel |
|---|
| tab | 1 |
|---|
| styles | {"body":{},"header":{"backgroundColor":{"color":"#f3f4f9"}},"headline":{"text":{"text":"Process Steps","color":"#002d72","textAlign":"left","fontWeight":"bold","fontSize":18},"alignment":{"horizontal":"start"}},"base":{"backgroundColor":{"color":"#ffffff"},"borderRadius":{"radius":4},"boxShadow":{"shadows":[{"color":"rgba(0, 0, 0, 0.08)","x":0,"y":1,"blur":1,"spread":0},{"color":"rgba(0, 0, 0, 0.16)","x":0,"y":1,"blur":3,"spread":1}]}}} |
|---|
| body | <p><br /></p> |
|---|
| | draw.io Diagram |
|---|
| border | false |
|---|
| |
|---|
| diagramName | SQA NYSUN Workflow |
|---|
| simpleViewer | false |
|---|
| width | 1200 |
|---|
| links | auto |
|---|
| tbstyle | hidden |
|---|
| diagramDisplayName | |
|---|
| lbox | false |
|---|
| diagramWidth | 781 |
|---|
| revision | 5 |
|---|
|
|
| Aura - Panel |
|---|
| tab | 1 |
|---|
| styles | {"body":{},"header":{"backgroundColor":{"color":"#f3f4f9"}},"headline":{"text":{"text":"Process Overview Video","color":"#002d72","textAlign":"left","fontWeight":"bold","fontSize":18},"alignment":{"horizontal":"start"}},"base":{"backgroundColor":{"color":"#ffffff"},"borderRadius":{"radius":4},"boxShadow":{"shadows":[{"color":"rgba(0, 0, 0, 0.08)","x":0,"y":1,"blur":1,"spread":0},{"color":"rgba(0, 0, 0, 0.16)","x":0,"y":1,"blur":3,"spread":1}]}}} |
|---|
| body | <p><br /></p> |
|---|
|
| Expand |
|---|
| | Widget Connector |
|---|
| url | https://www.youtube.com/watch?v=jmZeTbD2QZQ&feature=youtu.be |
|---|
|
|
|
|
| Aura - Tab |
|---|
|
| Panel |
|---|
| borderColor | #002D72 |
|---|
| bgColor | #F3F4F9 |
|---|
| titleColor | #ffffff |
|---|
| borderWidth | 1 |
|---|
| titleBGColor | #002D72 |
|---|
| borderStyle | none |
|---|
| title | Process Details |
|---|
|
|
| Aura - Panel |
|---|
| tab | 1 |
|---|
| styles | {"body":{},"header":{"backgroundColor":{"color":"#f3f4f9"}},"headline":{"text":{"text":"Inspections","color":"#002d72","textAlign":"left","fontWeight":"bold","fontSize":18},"alignment":{"horizontal":"start"}},"base":{"backgroundColor":{"color":"#ffffff"},"borderRadius":{"radius":4},"boxShadow":{"shadows":[{"color":"rgba(0, 0, 0, 0.08)","x":0,"y":1,"blur":1,"spread":0},{"color":"rgba(0, 0, 0, 0.16)","x":0,"y":1,"blur":3,"spread":1}]}}} |
|---|
| body | <p><br /></p> |
|---|
|
| Expand |
|---|
| NYSERDA conducts a minimum of three field inspections for each new participating Contractor/Builder. New Contractors/Builders who have not passed three inspections are listed as Provisional. When they are in good standing after these inspections, their status updates to Full. After a Contractor/Builder receives Full status, NYSERDA periodically selects a random sample of projects for review. Contractors/Builders with a Probationary or Suspended status may have 100% of their projects inspected. In general, users can only schedule inspections for completed projects. However, Salesforce can allow inspections on in-progress projects if the program/initiative requires. The SQA Module uses the following Statuses for scheduling, conducting and reviewing inspections. Users can filter projects through these statuses. | Status | Description |
|---|
Not Schedule | A project with no scheduled inspection. | Scheduling in Progress | An inspection where scheduling has begun, but the scheduling procedure is incomplete. | Customer Non-Responsive | An inspection where the customer is not responding to contact efforts. Please note that there are several instances where a Scheduler, Inspector, or Program Implementer can identify the customer as non-responsive. | Scheduled | A scheduled field inspection (the Inspector has not submitted the inspection record). Scheduling an inspection automatically updates the record to this status. | Photos Requested | The Contractor or Builder must submit photos for a photo inspection request. | Photos Submitted | The Contractor or Builder has submitted photos for a photo review request. | Inspection Complete | A completed inspection where the Inspector has submitted the inspection record. | QA Manager Approval Needed | An inspection ready for QA Manager approval. | Report Issued – No Corrective Action Needed | The QA Manager has approved and issued the inspection report and there are no CAR-eligible failures (incidental and/or minor failures may remain). | Report Issued – Corrective Action Needed | The QA Manager has approved and issued the inspection report and CAR-eligible |
failures | non-conformances (major and/or critical) remain unresolved. | Program Implementer Approval Needed | The Contractor or Builder has submitted their response to a CAR and it is ready for Program Implementer approval. | Contractor Non-Responsive | The Contractor or Builder has not responded to NYSERDA's request for corrective actions on a project or has not responded to a photo review request. The Program Implementer or QA Manager manually changes the status of the inspection to this status. | Contested – QA Manager Review Needed | The Contractor or Builder has contested the validity of a |
failure | non-conformance (CAR-eligible or not) identified during the inspection and the Program Implementer has confirmed. | Contested – NYSERDA QA Manager Review Needed | An inspection that requires NYSERDA QA Manager review. These occur when a Contractor or Builder has contested the validity of a |
failure | non-conformance (CAR-eligible or not) identified during the inspection, and both the Program Implementer and QA Manager have confirmed. | Completed | A completed inspection (inspection record complete, all |
failures | non-conformances resolved, etc.) | Cancelled | An inspection cancelled at the customer’s request. |
|
|
| Aura - Panel |
|---|
| tab | 1 |
|---|
| styles | {"body":{},"header":{"backgroundColor":{"color":"#f3f4f9"}},"headline":{"text":{"text":"Post Inspection Report","color":"#002d72","textAlign":"left","fontWeight":"bold","fontSize":18},"alignment":{"horizontal":"start"}},"base":{"backgroundColor":{"color":"#ffffff"},"borderRadius":{"radius":4},"boxShadow":{"shadows":[{"color":"rgba(0, 0, 0, 0.08)","x":0,"y":1,"blur":1,"spread":0},{"color":"rgba(0, 0, 0, 0.16)","x":0,"y":1,"blur":3,"spread":1}]}}} |
|---|
| body | <p><br /></p> |
|---|
|
| Expand |
|---|
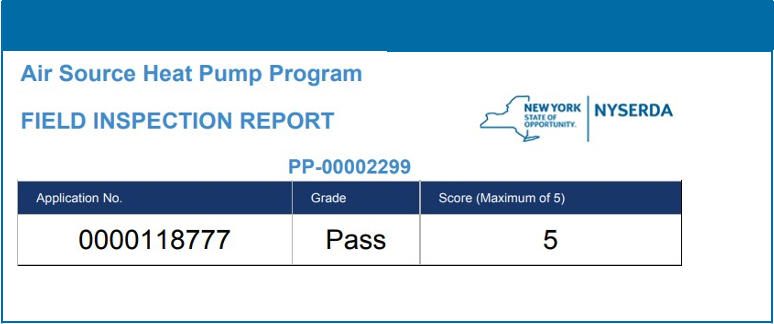
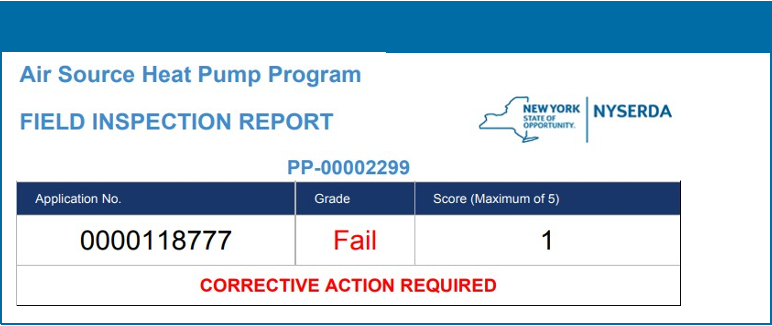
| Once an inspection has been completed and submitted by the Inspector, an Inspection Report is generated and appended to the Inspection Record. An email is systematically sent to the Contractor/Builder with a link to the Inspection Report. Below are examples of the heading for an Inspection Report for both a passed and failed inspection. In an actual Inspection Report, below the Pass/Fail heading displays details on all aspects of the inspection results. | Expand |
|---|
| 
|
|
|
| Aura - Panel |
|---|
| tab | 1 |
|---|
| styles | {"body":{},"header":{"backgroundColor":{"color":"#f3f4f9"}},"headline":{"text":{"text":"Email Communications","color":"#002d72","textAlign":"left","fontWeight":"bold","fontSize":18},"alignment":{"horizontal":"start"}},"base":{"backgroundColor":{"color":"#ffffff"},"borderRadius":{"radius":4},"boxShadow":{"shadows":[{"color":"rgba(0, 0, 0, 0.08)","x":0,"y":1,"blur":1,"spread":0},{"color":"rgba(0, 0, 0, 0.16)","x":0,"y":1,"blur":3,"spread":1}]}}} |
|---|
| body | <p><br /></p> |
|---|
|
| Expand |
|---|
| Contractors and builders will always receive email communication about SQA inspections. When NYSERDA schedules a project for SQA, we will send an email to the contractor with the inspection date, time, and address. NYSERDA automatically sends emails for cancelled and rescheduled inspections. The QSP QA Manager - the designated manager from the QSP QA agency - approves and distributes inspection reports to the project applicant. In rare instances a Contractor/Builder may not be notified of an upcoming inspection upon the customer’s request. |
|
| Aura - Panel |
|---|
| tab | 1 |
|---|
| styles | {"body":{},"header":{"backgroundColor":{"color":"#f3f4f9"}},"headline":{"text":{"text":"Quality Scoring","color":"#002d72","textAlign":"left","fontWeight":"bold","fontSize":18},"alignment":{"horizontal":"start"}},"base":{"backgroundColor":{"color":"#ffffff"},"borderRadius":{"radius":4},"boxShadow":{"shadows":[{"color":"rgba(0, 0, 0, 0.08)","x":0,"y":1,"blur":1,"spread":0},{"color":"rgba(0, 0, 0, 0.16)","x":0,"y":1,"blur":3,"spread":1}]}}} |
|---|
| body | <p><br /></p> |
|---|
|
| Expand |
|---|
| The SQA Salesforce module assigns a Quality Score (on a scale of 1 to 5) based on the inspection results. This score will be provided in a report that is generated once the inspection is complete. NYSERDA provides Contractors/Builders a link to the inspection report through Salesforce. | SQA Quality Score | Description |
|---|
| 1 or 2 | Signifies a Failed Inspection with major and/or critical non-conformanceconformances. The Contractor/Builder must provide evidence to NYSERDA that these non-conformance conformances outlined in the Inspection Report were resolved. Inspections in this score range may also contain minor or incidental non-conformance conformances that will still need resolution, though the Contractor/Builder is not required to provide evidence for resolution of these issues. The inspection score may be updated if the major and/or critical non-conformance conformances are contested and NYSERDA approves. | | 3, 4 or 5 | Signifies a Passed Inspection with only minor or incidental non-conformanceconformances. The Contractor/Builder must correct these issues but is not required to provide evidence to NYSERDA. |
|
|
|
| Aura - Tab |
|---|
| title | The NYSERDA Partner Portal |
|---|
|
| Panel |
|---|
| borderColor | #002D72 |
|---|
| bgColor | #F3F4F9 |
|---|
| titleColor | #ffffff |
|---|
| borderWidth | 1 |
|---|
| titleBGColor | #002D72 |
|---|
| borderStyle | none |
|---|
| title | The NYSERDA Partner Portal |
|---|
|
|
| Info |
|---|
| The Standards and Quality Assurance (SQA) module is built within the NYSERDA Partner Portal (Salesforce). All activity related to scheduling, conducting, reviewing and approving inspections, and managing corrective action responses and resolutions, is documented and managed from within Salesforce. |
| Aura - Panel |
|---|
| tab | 1 |
|---|
| styles | {"body":{},"header":{"backgroundColor":{"color":"#f3f4f9"}},"headline":{"text":{"text":"Logging into the NYSERDA Partner Portal","color":"#002d72","textAlign":"left","fontWeight":"bold","fontSize":18},"alignment":{"horizontal":"start"}},"base":{"backgroundColor":{"color":"#ffffff"},"borderRadius":{"radius":4},"boxShadow":{"shadows":[{"color":"rgba(0, 0, 0, 0.08)","x":0,"y":1,"blur":1,"spread":0},{"color":"rgba(0, 0, 0, 0.16)","x":0,"y":1,"blur":3,"spread":1}]}}} |
|---|
| body | <p><br /></p> |
|---|
|
| Expand |
|---|
|
| UI Steps |
|---|
|
| UI Step |
|---|
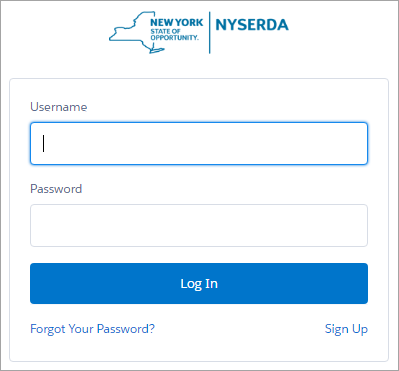
Enter your Username and Password. | Expand |
|---|
| 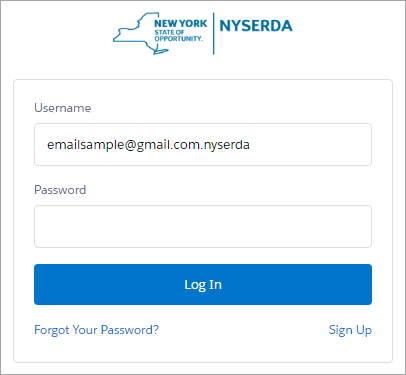
| Username: | Your username is the email address used when creating your NYSERA Partner Portal (Salesforce) account with .nyserda added to the end as shown in the example screenshot above | | Password: | You created this password when registering for the NYSERDA Partner Portal (Salesforce) account. If you have forgotten the password, click the Forgot Your Password? Link and follow the prompts to reset your password. |
|
|
| UI Step |
|---|
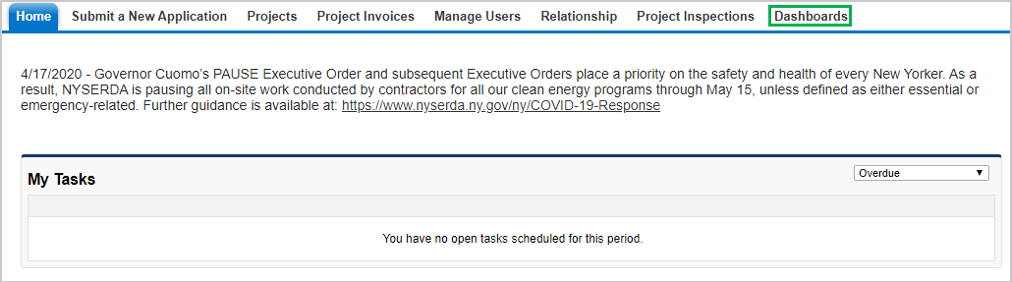
Below is an example of the NYSERDA Partner Portal (Salesforce) Home page after logging in. Many of the menu options along the top will be reviewed throughout this guide and provide navigation access to other parts of the Standards and Quality Assurance Salesforce build. | Expand |
|---|
| 
|
|
|
|
|
| Aura - Panel |
|---|
| tab | 1 |
|---|
| styles | {"body":{},"header":{"backgroundColor":{"color":"#f3f4f9"}},"headline":{"text":{"text":"Dashboard","color":"#002d72","textAlign":"left","fontWeight":"bold","fontSize":18},"alignment":{"horizontal":"start"}},"base":{"backgroundColor":{"color":"#ffffff"},"borderRadius":{"radius":4},"boxShadow":{"shadows":[{"color":"rgba(0, 0, 0, 0.08)","x":0,"y":1,"blur":1,"spread":0},{"color":"rgba(0, 0, 0, 0.16)","x":0,"y":1,"blur":3,"spread":1}]}}} |
|---|
| body | <p><br /></p> |
|---|
|
| Expand |
|---|
|
| Info |
|---|
| The Dashboard page provides an overview of your projects and to the available reports for Contractors/Builders. |
| UI Steps |
|---|
|
| UI Step |
|---|
After logging into Salesforce, click the Dashboards tab to access the Dashboard. | Expand |
|---|
| 
|
|
| UI Step |
|---|
The Dashboard includes several visual charts to help you track your projects. | Expand |
|---|
| 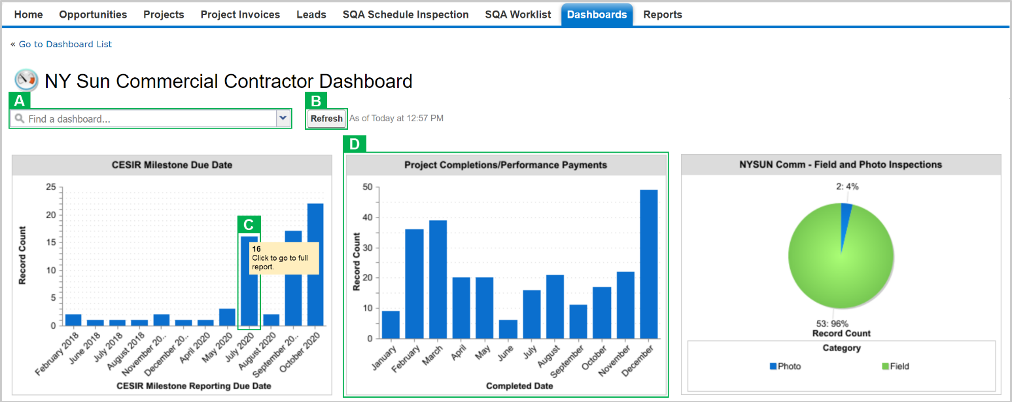
| A | If you have access to several dashboards, use the dropdown menu to navigate between them | | B | Click Refresh to update the dashboards and display the most up-to-date information | | C | Hover your mouse over any data elements in any graph to reveal a tooltip with granular details | | D | Each chart in the Dashboard has an underlying report that can be accessed by clicking the chart |
|
|
|
|
|
| Aura - Panel |
|---|
| tab | 1 |
|---|
| styles | {"body":{},"header":{"backgroundColor":{"color":"#f3f4f9"}},"headline":{"text":{"text":"Reports","color":"#002d72","textAlign":"left","fontWeight":"bold","fontSize":18},"alignment":{"horizontal":"start"}},"base":{"backgroundColor":{"color":"#ffffff"},"borderRadius":{"radius":4},"boxShadow":{"shadows":[{"color":"rgba(0, 0, 0, 0.08)","x":0,"y":1,"blur":1,"spread":0},{"color":"rgba(0, 0, 0, 0.16)","x":0,"y":1,"blur":3,"spread":1}]}}} |
|---|
| body | <p><br /></p> |
|---|
|
| Expand |
|---|
|
| Info |
|---|
| To access all of the reports available to Contractors/Builders, follow the instructions below. |
| UI Steps |
|---|
|
| UI Step |
|---|
After logging into Salesforce, access the Dashboards tab. |
| UI Step |
|---|
Then click the Go to Dashboard List link. | Expand |
|---|
| 
|
|
| UI Step |
|---|
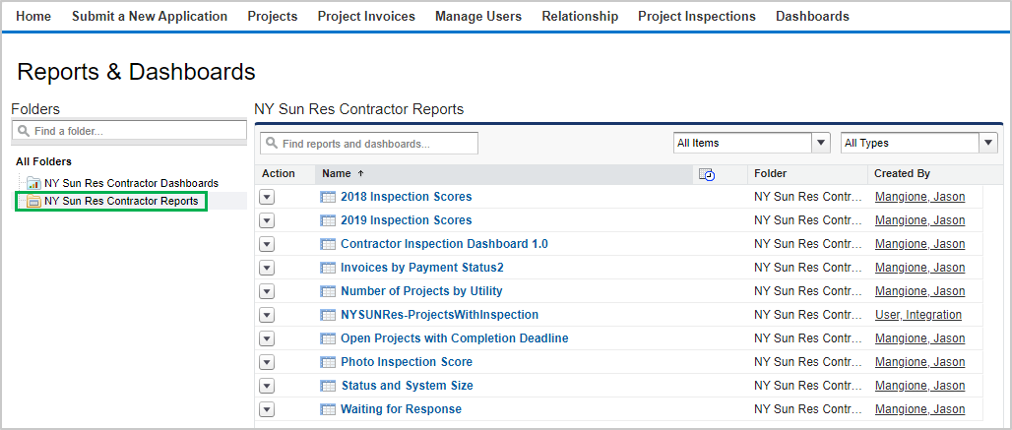
Select the Program folder to access the report list. Once clicked, the reports will show to the right. | Expand |
|---|
| 
|
|
| UI Step |
|---|
Below is a list of all reports available to Contractors/Builders. | Report Name | Description |
|---|
| Contractor Inspection Dashboard | High-level overview of completed inspections. | | Photo Inspection Score | Overview of all photo inspection score over a set period of time. | | 2018 Inspection Scores* | List of all projects from 2018. | | 2019 Inspection Scores* | List of all projects from 2019. | | Invoices by Payment Status** | Groups projects by invoice status and displays invoice amount. | | Status and System Size* | Groups projects by project status and system size. | | Waiting and Response* | Lists all projects that require input/response for process participants. | | Number of Projects by Utility* | Groups projects by electric utility company. | | Open Projects with Completion Deadline* | Lists all approved projects at risk for termination. | | Inspection List | Lists all approved/completed field or photo inspection projects. |
| * Includes links to Project records
** Includes links to Project and Invoice records
*** Includes links to Project and Inspection records
|
|
| UI Step |
|---|
After accessing a report, use the Filters at the top of the page to define how the information in the report should be displayed. | Expand |
|---|
| 
| Run Report | Click to update the report information based on the filters set. | | Hide Details | Hides the details of each heading in the report table. Click again to unhide these details. | | Printable View | Click to open the report in a print friendly format. | | Export Details | Exports the report into an excel format. |
|
|
| UI Step |
|---|
Click any Underlined Link in a report table to open the corresponding Project Record. | Expand |
|---|
| 
|
|
|
|
|
|
| Aura - Tab |
|---|
| title | Responding to Photo Inspections |
|---|
|
| Panel |
|---|
| borderColor | #002D72 |
|---|
| bgColor | #F3F4F9 |
|---|
| titleColor | #ffffff |
|---|
| borderWidth | 1 |
|---|
| titleBGColor | #002D72 |
|---|
| borderStyle | none |
|---|
| title | Responding to Photo Inspections |
|---|
|
|
| Info |
|---|
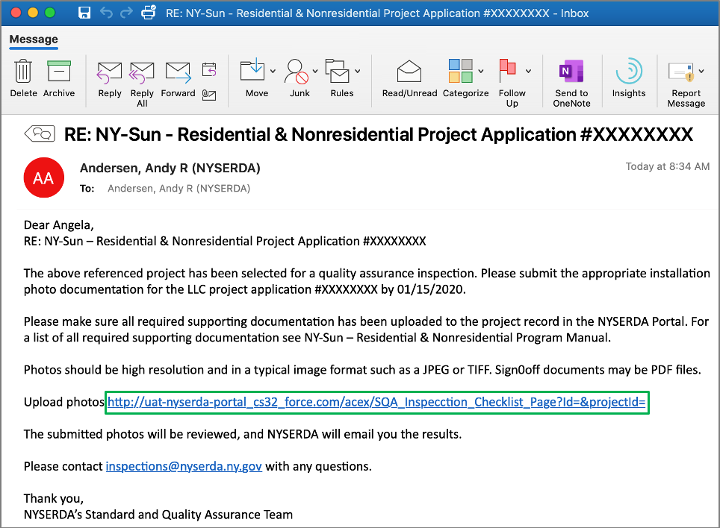
| Some NYSERDA Programs stipulate in their respective Program Manuals that photo inspections may be scheduled. If Contractors or Builders are performing an installation for a project under a NYSERDA program that conducts photo inspections, Contractors or Builders should be taking photos of their work at the time of installation or during project completion, regardless if any future scheduled inspection will be a field or photo Inspection. These photos will only need to be uploaded to the inspection checklist when a photo inspection has been scheduled. When NYSERDA requests a photo inspection, Contractors or Builders will upload photos to Salesforce. There are two ways to upload photos for photo inspections. The first is , by apending appending them to the inspection check list. Ther The other is bulk uploading them through the project inspection record (Bulk uploading through the project inspection record will help save time). NYSERDA will review all uploads, provide a QA score, and issue CAR reports if necessary. Contractors or Builders have fifteen (15) days to upload installation/project photos after receiving an email notification requesting a photo inspection and will be reminded, via email, on the sixteenth (16) day if photos are not submitted. Below is an example of the NYSERDA email communication that Contractors or Builders will receive when the QSP QA Scheduler schedules a photo inspection. The highlighted links open the Salesforce page where users can provide evidence/photos*. | Expand |
|---|
| 
| Tip |
|---|
| If Contractors or Builders use the link in the email notification to access the Project Inspection Record, they will not need to log into Salesforce and navigate manually. |
|
|
| Aura - Panel |
|---|
| tab | 1 |
|---|
| styles | {"body":{},"header":{"backgroundColor":{"color":"#f3f4f9"}},"headline":{"text":{"text":"Adding Photos to the Inspection Check List","color":"#002d72","textAlign":"left","fontWeight":"bold","fontSize":18},"alignment":{"horizontal":"start"}},"base":{"backgroundColor":{"color":"#ffffff"},"borderRadius":{"radius":4},"boxShadow":{"shadows":[{"color":"rgba(0, 0, 0, 0.08)","x":0,"y":1,"blur":1,"spread":0},{"color":"rgba(0, 0, 0, 0.16)","x":0,"y":1,"blur":3,"spread":1}]}}} |
|---|
| body | <p><br /></p> |
|---|
|
| Expand |
|---|
|
| UI Steps |
|---|
|
| UI Step |
|---|
After accessing the correct Project Inspection Record either by logging into Salesforce or clicking the link in the email notification, click the Inspection Checklist button to open the checklist where photos can be uploaded. | Expand |
|---|
| 
|
|
| UI Step |
|---|
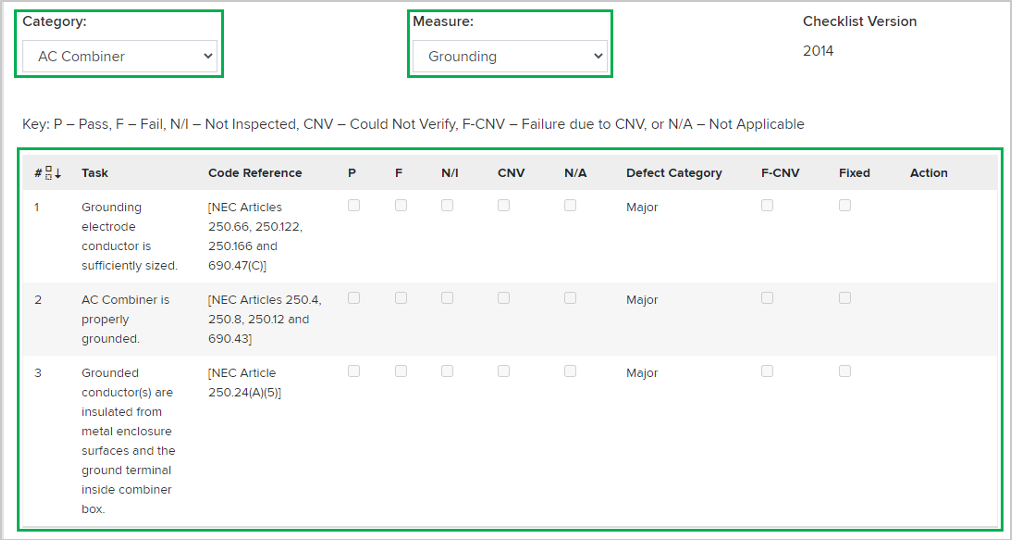
The first page of the inspection checklist outlines the first series of Inspection Tasks. Each series of Inspection Tasks is associate to a specific Measure, and each Measure is associated to a specific Category . There may be multiple Categories (and therefore multiple Measures and Tasks ) assigned to an inspection. | Expand |
|---|
| 
|
|
| UI Step |
|---|
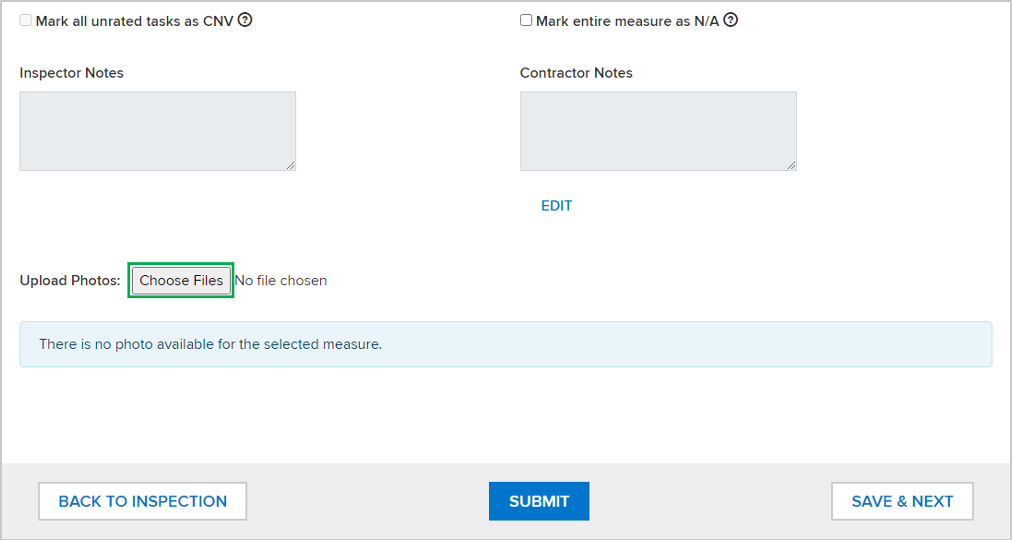
To upload photos, scroll to the bottom of the inspection checklist Measure and click Choose File. To locate and select the photo(s) from your computer. | Expand |
|---|
| 
|
|
| UI Step |
|---|
After a photo is successfully uploaded to the Measure you will see it as a list item underneath the Choose File button. | Expand |
|---|
| 
|
|
| UI Step |
|---|
To advance to the next Measure, click the Save & Next button. | Expand |
|---|
| 
|
|
| UI Step |
|---|
Repeat steps 3-5 above until the Save & Next button is no longer visible. This means you have reached the last page of the Inspection and can click Submit . | Tip |
|---|
| Multiple photos can be uploaded for each Measure at the same time by simply selecting multiple photo files during the upload process. |
|
| UI Step |
|---|
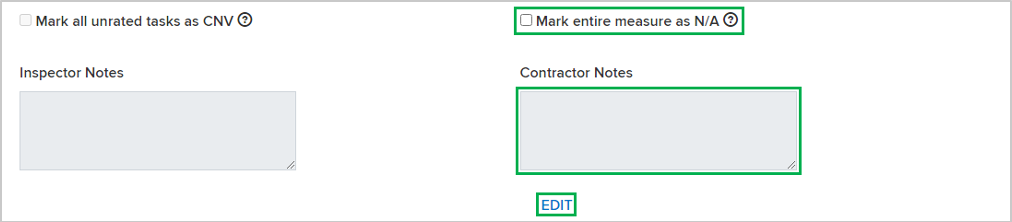
There may be cases when a Measure in the inspection checklist should be marked as Photo Not Applicable. If you need to mark a Measure this way, follow the steps in the Uploading Photos section on this page but replace step 3 with the below instructions. Check the Mark entire measure as N/A box. This will systematically mark all Tasks in the viewable Measure as N/A. Additionally, Contractors or Builders should also click Edit underneath the Contractor Notes window to activate the text box and document a note in the Contractor Notes section as to why the Measure was marked as N/A. Be sure to hit Save when done with the note. | Expand |
|---|
| 
|
|
|
|
|
| Aura - Panel |
|---|
| tab | 1 |
|---|
| styles | {"body":{},"header":{"backgroundColor":{"color":"#f3f4f9"}},"headline":{"text":{"text":"Uploading Inspection Photos in Bulk","color":"#002d72","textAlign":"left","fontWeight":"bold","fontSize":18},"alignment":{"horizontal":"start"}},"base":{"backgroundColor":{"color":"#ffffff"},"borderRadius":{"radius":4},"boxShadow":{"shadows":[{"color":"rgba(0, 0, 0, 0.08)","x":0,"y":1,"blur":1,"spread":0},{"color":"rgba(0, 0, 0, 0.16)","x":0,"y":1,"blur":3,"spread":1}]}}} |
|---|
| body | <p><br /></p> |
|---|
|
| Expand |
|---|
|
| UI Steps |
|---|
|
| UI Step |
|---|
Click the Project Inspections tab to access the records. After accessing the correct Project Inspection Record, click on the Project Inspection Number link to open the record. | Tip |
|---|
| Change the drop down menu to Photo Inspections for easier access to the correct record. |
| Expand |
|---|
| 
|
|
| UI Step |
|---|
In the Project Inspection Details page, click the Upload Files link under the Custom Links section to open the SQA File Upload page. | Expand |
|---|
| 
|
|
| UI Step |
|---|
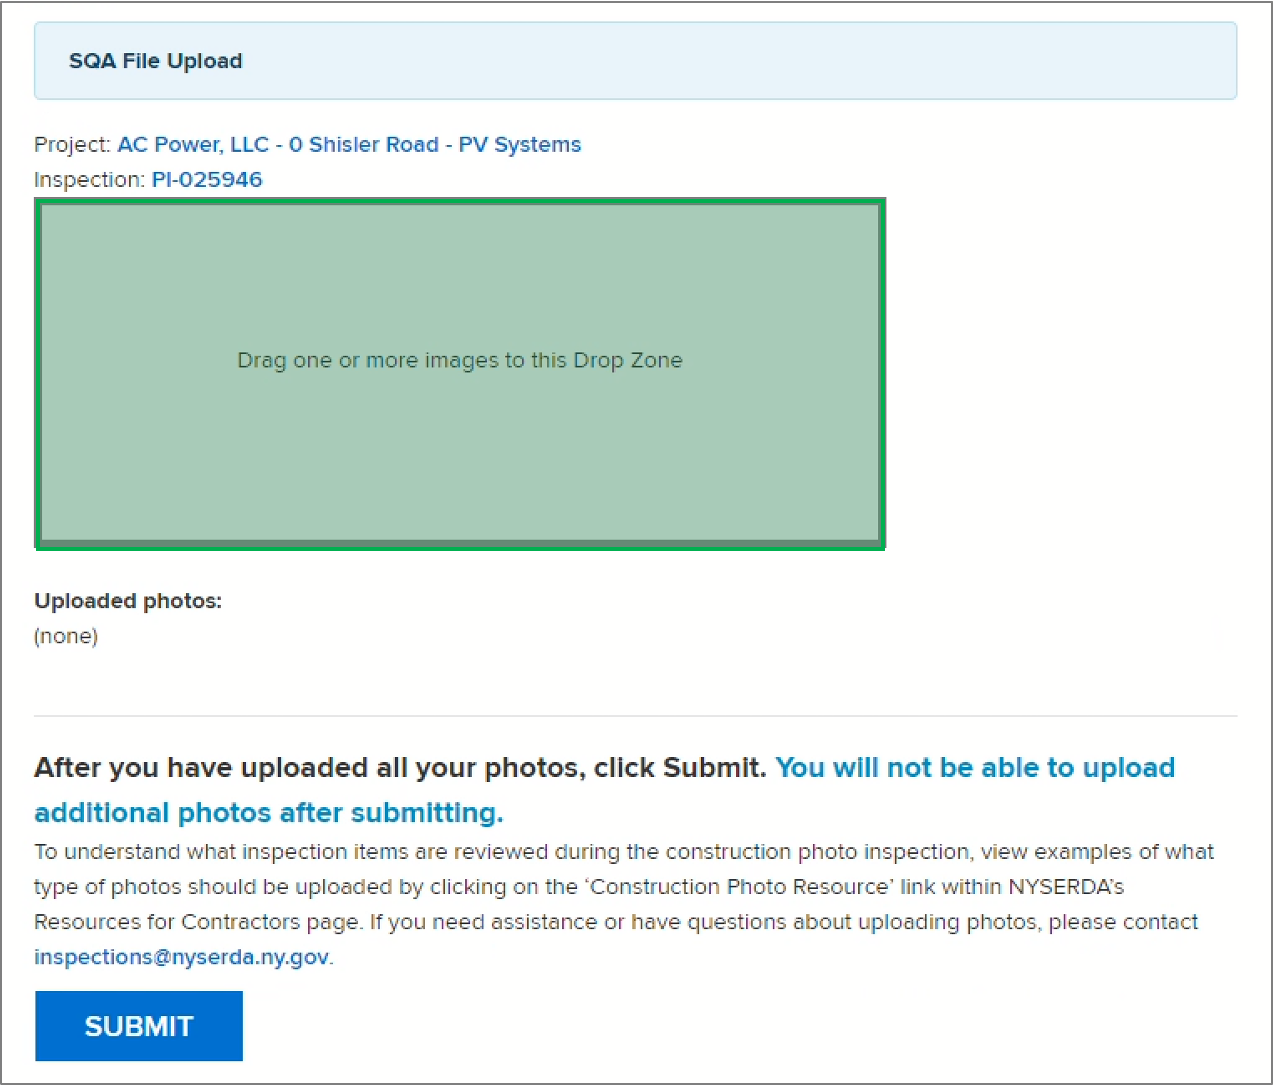
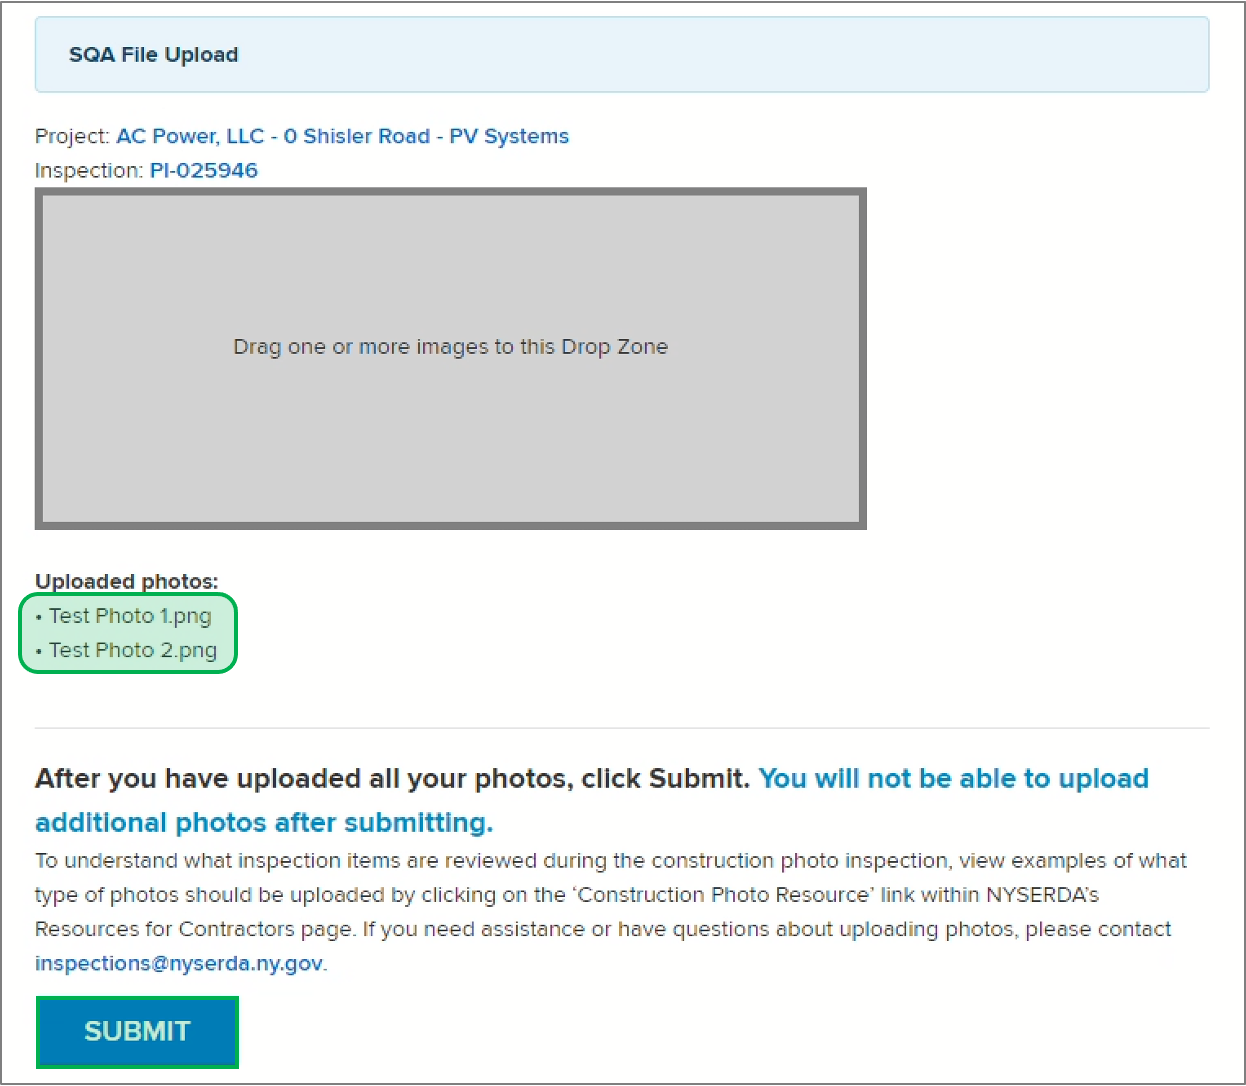
In the SQA File Upload page, drag and drop all of the applicable images into the Drop Zone. | Expand |
|---|
| 
|
|
| UI Step |
|---|
The list of images uploaded will display under the Uploaded Photos section. After reviwing reviewing the list of images, click the the Submit button to finish uploading. | Warning |
|---|
| Make sure all of the applicable images are added as you will not be able to upload additional photos after clicking the Submit button. |
| Expand |
|---|
| 
|
|
| UI Step |
|---|
A notification will pop up, click the OK button to proceed. | Expand |
|---|
| 
|
|
| UI Step |
|---|
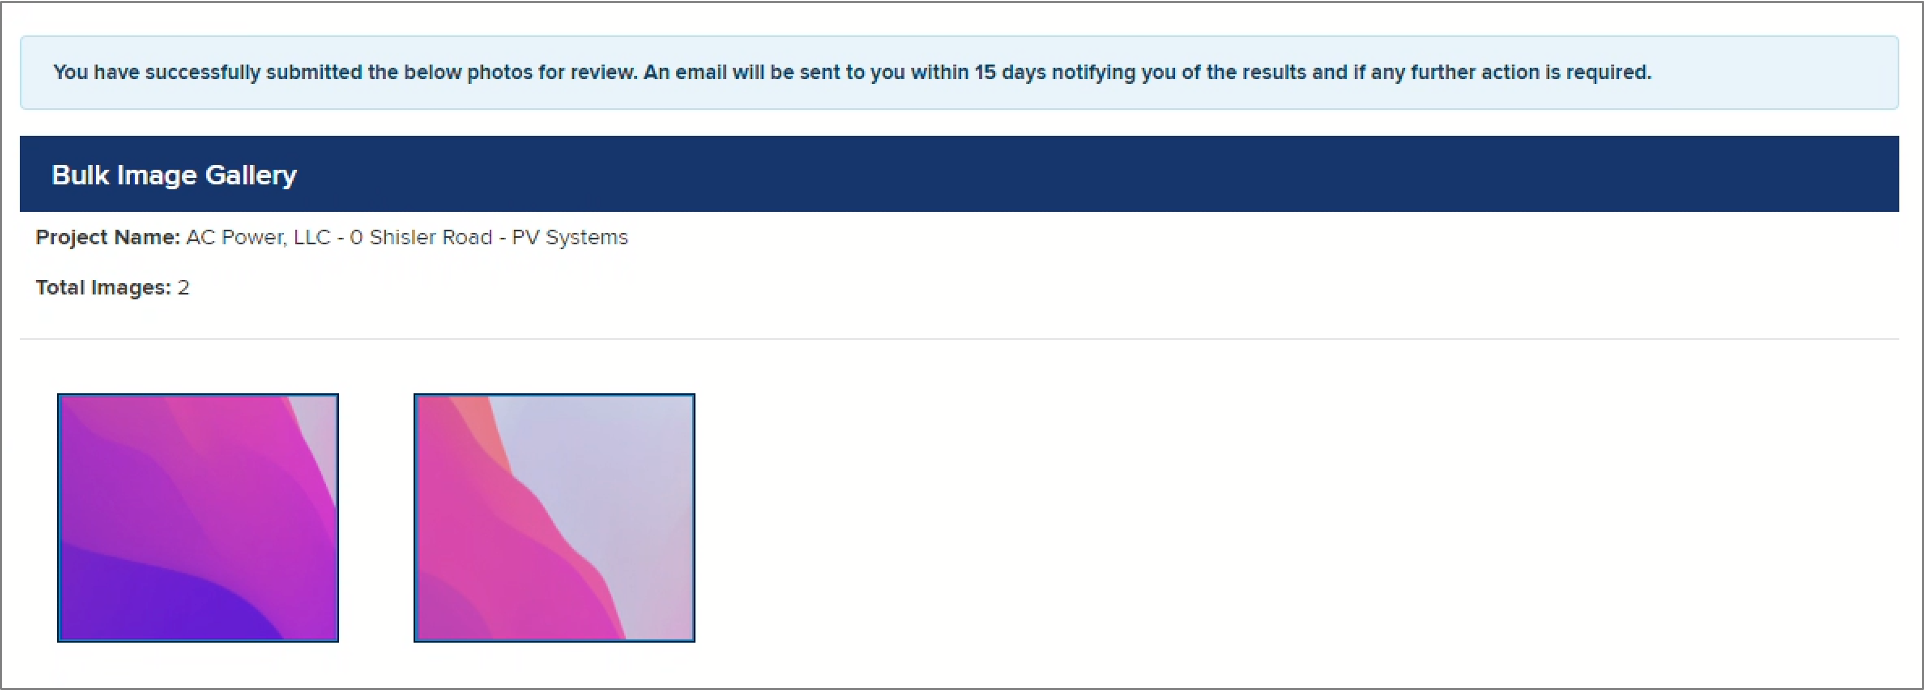
The page will redirect to the Bulk Image GallergyGallery. The results or additional actions required will be emailed within 15 days. | Expand |
|---|
| 
|
|
|
|
|
|
| Aura - Tab |
|---|
| title | Responding to CNV Measures |
|---|
|
| Panel |
|---|
| borderColor | #002D72 |
|---|
| bgColor | #F3F4F9 |
|---|
| titleColor | #ffffff |
|---|
| borderWidth | 1 |
|---|
| titleBGColor | #002D72 |
|---|
| borderStyle | none |
|---|
| title | Responding to Could Not Verify (CNV) Measures |
|---|
|
|
| Info |
|---|
| If a photo that has previously been uploaded by a Contractor/Builder does not adequately provide information for the Inspector to assess the associated Measure was installed properly, the Inspector will mark the Measure as Could Not Verify. Once the Inspector has completed the inspection process and submitted their findings, Contractors/Builders will receive an email communication notifying them that a photo(s) associated with a Measure(s) must must be re-submitted to show evidence of proper installation. |
| Aura - Panel |
|---|
| tab | 1 |
|---|
| styles | {"body":{},"header":{"backgroundColor":{"color":"#f3f4f9"}},"headline":{"text":{"text":"Instructions","color":"#002d72","textAlign":"left","fontWeight":"bold","fontSize":18},"alignment":{"horizontal":"start"}},"base":{"backgroundColor":{"color":"#ffffff"},"borderRadius":{"radius":4},"boxShadow":{"shadows":[{"color":"rgba(0, 0, 0, 0.08)","x":0,"y":1,"blur":1,"spread":0},{"color":"rgba(0, 0, 0, 0.16)","x":0,"y":1,"blur":3,"spread":1}]}}} |
|---|
| body | <p><br /></p> |
|---|
|
| UI Steps |
|---|
|
| UI Step |
|---|
To re-submit a photo, access the Inspection Report (PDF Document) from the Project Inspection Record. This report will help you easily and quickly identify all Tasks that are marked as CNV. |
| UI Step |
|---|
Next, access the Inspection Checklist for for the Project Inspection. This can be done either by: - Clicking the link in the email notification
- Logging into Salesforce, Accessing the Project Inspection Record and clicking on the Inspection Checklist.
|
| UI Step |
|---|
Once in the Inspection Checklist, use the Category and Measure drop down fields, in conjunction with the Inspection report, to navigate to the first Task marked as CNV.
Follow the process in the Uploading Photos section of this guide to upload new photos for each Measure where a Task was marked as CNV. | Warning |
|---|
| Contractors should not be checking the box for inspectors when uploading an image. 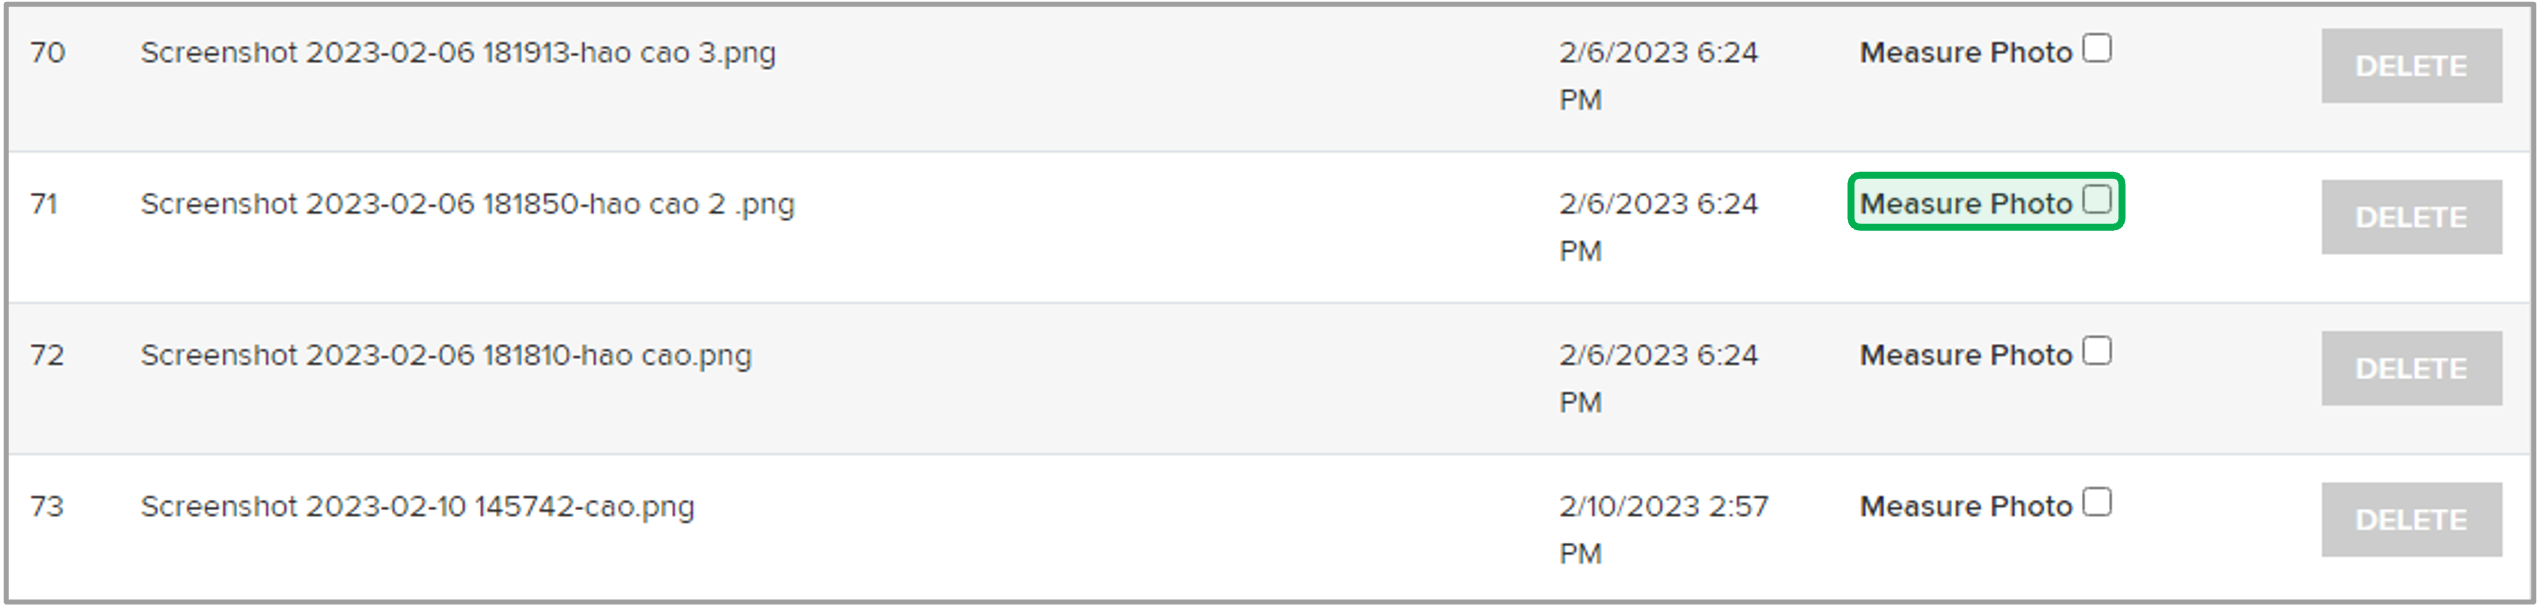
|
|
| UI Step |
|---|
Continue until all tasks marked as CNV have a newly uploaded photo, then click Submit. |
|
|
|
| Aura - Tab |
|---|
| title | Responding to Corrective Actions |
|---|
|
| Panel |
|---|
| borderColor | #002D72 |
|---|
| bgColor | #F3F4F9 |
|---|
| titleColor | #ffffff |
|---|
| borderWidth | 1 |
|---|
| titleBGColor | #002D72 |
|---|
| borderStyle | none |
|---|
| title | Responding to Corrective Action Required (CAR) Requests |
|---|
|
|
| Info |
|---|
| Corrective Action Required (CAR) tasks may be assigned to specific Measures or Tasks for an inspection. CARs, in general, highlight major or critical non-conformance conformances of the installation or project. Contractors/Builders who receive CAR tasks related to a prior inspection must resolve all Critical and Major failed tasksnon-conformances. This may require performing additional work on the build site to fix any documented issues. Once these issues have been resolved, Contractors/Builders should follow the following process to update the inspection record. |
| Aura - Panel |
|---|
| tab | 1 |
|---|
| styles | {"body":{},"header":{"backgroundColor":{"color":"#f3f4f9"}},"headline":{"text":{"text":"Resolving Corrective Actions (CARs)","color":"#002d72","textAlign":"left","fontWeight":"bold","fontSize":18},"alignment":{"horizontal":"start"}},"base":{"backgroundColor":{"color":"#ffffff"},"borderRadius":{"radius":4},"boxShadow":{"shadows":[{"color":"rgba(0, 0, 0, 0.08)","x":0,"y":1,"blur":1,"spread":0},{"color":"rgba(0, 0, 0, 0.16)","x":0,"y":1,"blur":3,"spread":1}]}}} |
|---|
| body | <p><br /></p> |
|---|
|
| Expand |
|---|
|
| UI Steps |
|---|
|
| UI Step |
|---|
Contractors and Builders respond to Corrective Action Required (CAR) tasks through the Review Failed Tasks page in Salesforce. Access to this page can be found in the email communication sent to Contractors and Builders when an inspection uncovers CARs. | Expand |
|---|
| 
|
|
| UI Step |
|---|
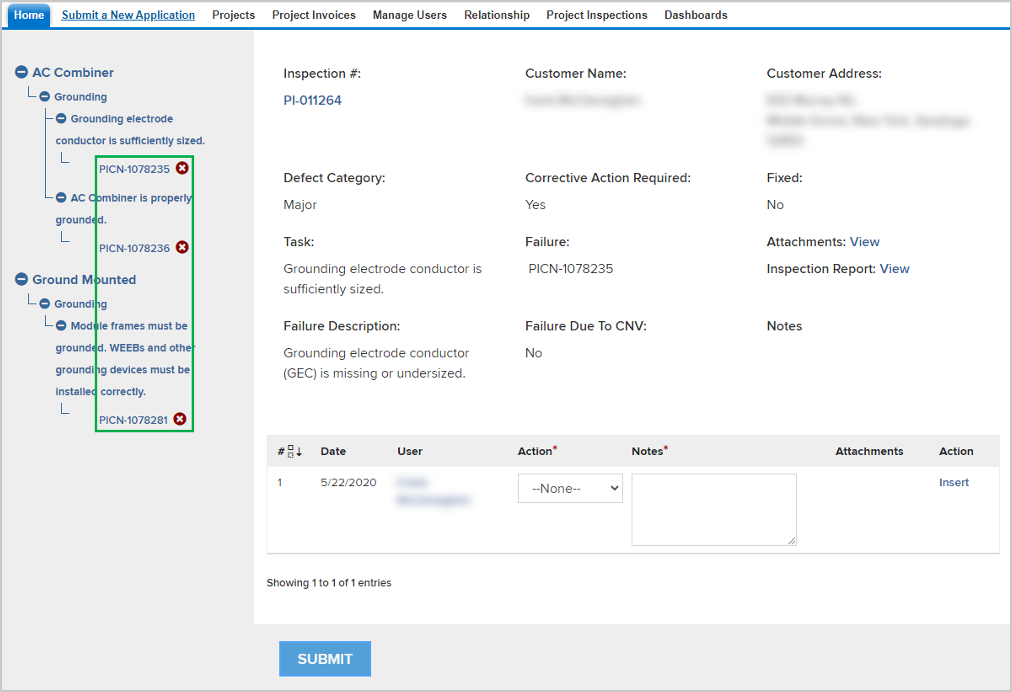
On the Review Failed Tasks page, use the side navigation bar to locate all CAR eligible failed tasks. Failed tasks non-conformances that require a response are denoted with a Red X to the right of the task. The first failed task non-conformance will already be visible. | Expand |
|---|
| 
|
|
| UI Step |
|---|
For each CAR eligible failed tasknon-conformance, click the Action dropdown list and selectMark as Resolved, then add a note in the Notes section. Finally, click Insert to update the failed task non-conformance and open the attachment window. | Expand |
|---|
| 
| Warning |
|---|
Note that an Action must be selected, and Notes documented before you are able to click the Insert option to upload new files or photos. |
|
|
| UI Step |
|---|
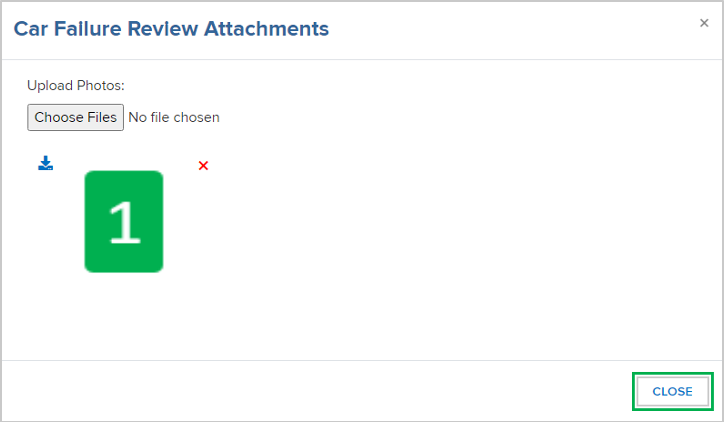
In the Attachment column, click the Paperclip icon to open theCAR Failure Review Attachment window. | Expand |
|---|
| 
|
|
| UI Step |
|---|
Click Choose Files in the new window to locate the files on your computer. Choose the appropriate file(s) for upload. | Expand |
|---|
| 
| Note |
|---|
| Multiple files or photos can be uploaded at the same time. Simply select multiple files or photos during Step three of this section. |
|
|
| UI Step |
|---|
After a file is uploaded, a thumbnail of the file will display in the Attachment window. Click the Close button when complete. |
| UI Step |
|---|
After successfully responding to all Failed tasksnon-conformances, click Submit at the bottom of the page to submit your CAR replies for review. |
| UI Step |
|---|
After resolving the CAR tasks, the Program Implementer will review the submitted resolution. If the resolution is approved, no further actions are necessary for that specific CAR tasks. If the resolution is denied, the Program Implemented will reach out to request additional corrections. |
| UI Step |
|---|
Complete the above steps for all other CAR tasks. |
|
|
|
| Aura - Panel |
|---|
| tab | 1 |
|---|
| styles | {"body":{},"header":{"backgroundColor":{"color":"#f3f4f9"}},"headline":{"text":{"text":"Contesting Corrective Actions (CARs)","color":"#002d72","textAlign":"left","fontWeight":"bold","fontSize":18},"alignment":{"horizontal":"start"}},"base":{"backgroundColor":{"color":"#ffffff"},"borderRadius":{"radius":4},"boxShadow":{"shadows":[{"color":"rgba(0, 0, 0, 0.08)","x":0,"y":1,"blur":1,"spread":0},{"color":"rgba(0, 0, 0, 0.16)","x":0,"y":1,"blur":3,"spread":1}]}}} |
|---|
| body | <p><br /></p> |
|---|
|
| Expand |
|---|
|
| Info |
|---|
| To contest a failed tasknon-conformance, follow step 1 and step 2 from the Resolving Corrective Actions (CARs) section on this page, then: |
| UI Steps |
|---|
|
| UI Step |
|---|
To contest a failed tasknon-conformance, select Contest Rating from the Action dropdown list. |
| UI Step |
|---|
Follow all additional steps from the Resolving Corrective Actions (CARs) section until all CARs have been resolved or contested. - Contractors are still required to resolve any failed tasks non-conformances if the Program Manager denies the contest.
- If the Program Implementer marks a Contest Failed Task as upheld, it will be escalated to the NYSERDA QA Manager.
|
| UI Step |
|---|
Contested Failed Tasks that are upheld by the Program Implemented are escalated to the NYSERDA QA Manager who will also perform a review and either deny or uphold the contested failed tasknon-conformance. - Contractors are still required to resolve any failed tasks non-conformances if the NYSERDA QA Manager denies the contest.
- Contractors will receive a follow-up notification email regarding the CAR tasks and must respond by the Respond By date in the notification.
- Failed tasks Non-conformances can only be contested twice.
|
|
|
|
|
| Aura - Tab |
|---|
|
| Panel |
|---|
| borderColor | #002D72 |
|---|
| bgColor | #F3F4F9 |
|---|
| titleColor | #ffffff |
|---|
| borderWidth | 1 |
|---|
| titleBGColor | #002D72 |
|---|
| borderStyle | none |
|---|
| title | Training Resources |
|---|
|
|
| Aura - Panel |
|---|
| tab | 1 |
|---|
| styles | {"body":{},"header":{"backgroundColor":{"color":"#f3f4f9"}},"headline":{"text":{"text":"Videos","color":"#002d72","textAlign":"left","fontWeight":"bold","fontSize":18},"alignment":{"horizontal":"start"}},"base":{"backgroundColor":{"color":"#ffffff"},"borderRadius":{"radius":4},"boxShadow":{"shadows":[{"color":"rgba(0, 0, 0, 0.08)","x":0,"y":1,"blur":1,"spread":0},{"color":"rgba(0, 0, 0, 0.16)","x":0,"y":1,"blur":3,"spread":1}]}}} |
|---|
| body | <p><br /></p> |
|---|
| | Multimedia |
|---|
| name | SQA Inspection Process for Contractors and Builders.mp4 |
|---|
| width | 100% |
|---|
| page | External Guide Video Library |
|---|
| height | 100% |
|---|
|
|
|
|