| Aura - Tab |
|---|
|
| Panel |
|---|
| borderColor | #002D72 |
|---|
| bgColor | #F3F4F9 |
|---|
| titleColor | #ffffff |
|---|
| borderWidth | 1 |
|---|
| titleBGColor | #002D72 |
|---|
| borderStyle | none |
|---|
| title | Process Overview |
|---|
|
|
| Info |
|---|
NYSERDA conducts a minimum of three field inspections for each new participating Contractor. New contractors who have not passed three inspections are listed as Provisional. When they are in good standing after these inspections, their status is updated to Full. After an installer receives Full status, NYSERDA reviews a random sample of projects for review. Contractors with a Probationary or Suspended status may have 100% of their projects inspected. In general, inspections can only be scheduled for completed projects. However, Salesforce can allow inspections of in-progress projects if the program/initiative requires. | Expand |
|---|
|
| SQA Process Role Name | Role Description |
|---|
| Contractor | The entity contracting with NYSERDA as part of a project under a NYSERDA initiative. | | NYSERDA QA Manager | Member of the NYSERDA Program Team responsible for final approval of contested CAR tasks and issuing the final Inspection Report. | | QSP Inspector | Member of a Quality Service Provider (QSP) who performs field inspections and reports findings in accordance with project requirements. | | QSP QA Manager | Member of a Quality Service Provider (QSP) who is responsible for review and approval of all inspection reports. | | QSP Scheduler | Member of a Quality Service Provider (QSP) who is responsible for scheduling quality assurance inspections for eligible Contractors. | | Program Implementer | Member of the CLEAResult team responsible for reviewing and approving CAR responses and contested inspections. |
| Tip |
|---|
A single individual may fill multiple roles simultaneously. |
|
| Expand |
|---|
| title | Inspection Resolution Statuses |
|---|
|
| Inspection Status | Status Description |
|---|
| Completed | Inspection complete with no non-conformances found or all Corrective Action Required (CAR) eligible tasks are resolved. | | Contested - NYSERDA QA Manager Approval Needed | The NYSERDA QA Manager must approve or reject any contested or resolved Corrective Action Required (CAR) tasks. | | Contested - QA Manager Approval Needed | The QSP QA Manager must approve or reject any contested or resolved Corrective Action Required (CAR) tasks. | | Contractor Non-Responsive | Both the NYSERDA and QSP members cannot successfully contact the Contractor. | | Program Implementer Approval Needed | The NYSERDA Program Implementer must approve or reject any contested or resolved Corrective Action Required (CAR) tasks. | | Report Issued - Corrective Action Needed | The Inspection is complete and there are Corrective Action Required (CAR) tasks to address. |
|
| Expand |
|---|
| The SQA Salesforce module assigns a Quality Score (on a scale of 1 to 5) based on the inspection results. This score will be provided in the Inspection report that is generated after the Inspector completes the inspection and it is approved by the QA Manager. NYSERDA provides Contractors a link to the inspection report through the NYSERDA Partner Portal. | SQA Quality Score | Quality Score Description |
|---|
| 1 or 2 | Signifies a Failed Inspection with major and/or critical non-conformances. The Contractor must provide evidence to NYSERDA that these non-conformances outlined in the Inspection Report were resolved. Inspections in this score range may also contain minor or incidental non-conformances that will still need resolution, though the Contractor is not required to provide evidence for these issues. The inspection score may be updated if the Major and/or critical non-conformances are successfully contested | | 3, 4, or 5 | Signifies a Passed Inspection with only minor or incidental non-conformances. The Contractor must correct these issues but is not required to provide evidence to NYSERDA. |
|
|
| Aura - Panel |
|---|
| tab | 1 |
|---|
| styles | {"body":{},"header":{"backgroundColor":{"color":"#f3f4f9"}},"headline":{"text":{"text":"Process Overview","color":"#002d72","textAlign":"left","fontWeight":"bold","fontSize":18}},"base":{"boxShadow":{"shadows":[{"color":"rgba(0, 0, 0, 0.08)","x":0,"y":1,"blur":1,"spread":0},{"color":"rgba(0, 0, 0, 0.16)","x":0,"y":1,"blur":3,"spread":1}]},"borderRadius":{"radius":4},"backgroundColor":{"color":"#ffffff"}}} |
|---|
| body | <p><br /></p> |
|---|
| | Embed draw.io Diagram |
|---|
| border | false |
|---|
| |
|---|
| pageId | 99877654 |
|---|
| diagramDisplayName | |
|---|
| lbox | false |
|---|
| diagramName | EAE - SQA Process |
|---|
| aspect | W1AjbQCRicNbGy_aNGse 1 YtFY_KSFKn00EHuqdjQj-12 |
|---|
| includedDiagram | 1 |
|---|
| simpleViewer | false |
|---|
| width | 1200 |
|---|
| aspectHash | f91ee9b36b8f549489fa1aa5e4ca9849cc1fcd03 |
|---|
| links | auto |
|---|
| tbstyle | hidden |
|---|
|
|
|
| Aura - Tab |
|---|
|
| Panel |
|---|
| borderColor | #002D72 |
|---|
| bgColor | #F3F4F9 |
|---|
| titleColor | #ffffff |
|---|
| borderWidth | 1 |
|---|
| titleBGColor | #002D72 |
|---|
| borderStyle | none |
|---|
| title | The NYSERDA Portal |
|---|
|
|
| Info |
|---|
The Standards and Quality Assurance (SQA) module is built within Salesforce (also known as the NYSERDA Portal). All activity related to scheduling, conducting, reviewing and approving inspections, and managing corrective action responses and resolutions, is documented and managed from within Salesforce. |
| Aura - Panel |
|---|
| tab | 1 |
|---|
| styles | {"body":{},"header":{"backgroundColor":{"color":"#f3f4f9"}},"headline":{"text":{"text":"Logging into the NYSERDA Portal","color":"#002d72","textAlign":"left","fontWeight":"bold","fontSize":18}},"base":{"boxShadow":{"shadows":[{"color":"rgba(0, 0, 0, 0.08)","x":0,"y":1,"blur":1,"spread":0},{"color":"rgba(0, 0, 0, 0.16)","x":0,"y":1,"blur":3,"spread":1}]},"borderRadius":{"radius":4},"backgroundColor":{"color":"#ffffff"}}} |
|---|
| body | <p><br /></p> |
|---|
|
| Expand |
|---|
|
| Info |
|---|
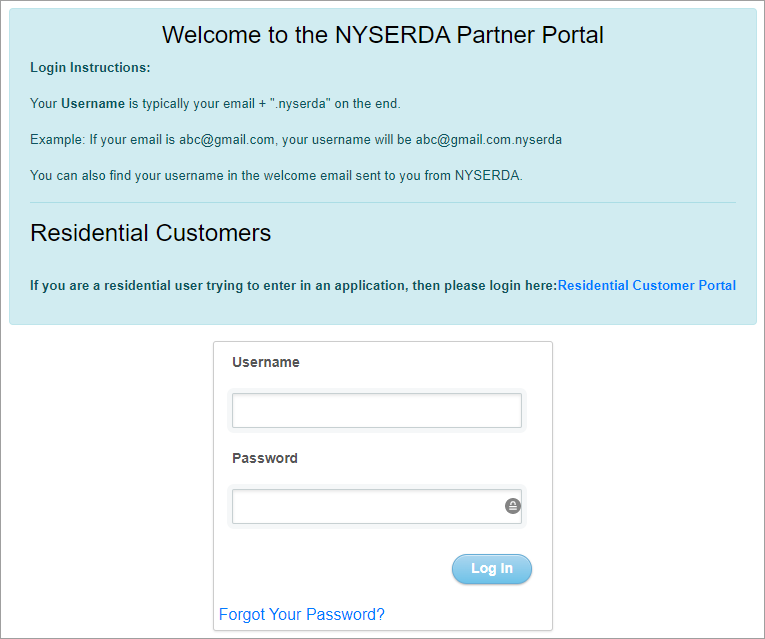
This section provides guidance on logging into the NYSERDA Partner Portal. |
| UI Steps |
|---|
|
| UI Step |
|---|
Access the portal login page at | UI Button |
|---|
| color | blue |
|---|
| size | small |
|---|
| title | https://portal.nyserda.ny.gov/login |
|---|
| url | https://portal.nyserda.ny.gov/login |
|---|
|
. | Expand |
|---|
| 
|
|
| UI Step |
|---|
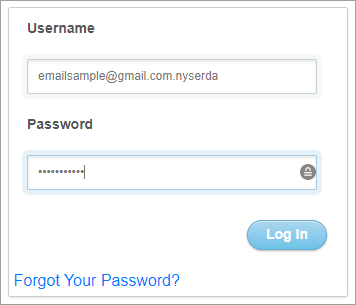
Enter your Username and Password and click Log In. Your username is your email address through your organization with .nyserda added to the end as shown in the example screenshot below. You created the password when accessing the NYSERDA Partner Portal the first time after receiving login information from NYSERDA. If you have forgotten the password, click the Forgot Your Password? Link and follow the prompts to reset your password. | Expand |
|---|
| 
|
|
|
|
|
| Aura - Panel |
|---|
| tab | 1 |
|---|
| styles | {"body":{},"header":{"backgroundColor":{"color":"#f3f4f9"}},"headline":{"text":{"text":"NYSERDA Portal Reports","color":"#002d72","textAlign":"left","fontWeight":"bold","fontSize":18}},"base":{"boxShadow":{"shadows":[{"color":"rgba(0, 0, 0, 0.08)","x":0,"y":1,"blur":1,"spread":0},{"color":"rgba(0, 0, 0, 0.16)","x":0,"y":1,"blur":3,"spread":1}]},"borderRadius":{"radius":4},"backgroundColor":{"color":"#ffffff"}}} |
|---|
| body | <p><br /></p> |
|---|
|
| Expand |
|---|
|
| Info |
|---|
There are a number of reports available to help manage and monitor SQA inspections. This section reviews how to access these reports from the NYSERDA Partner Portal. |
| UI Steps |
|---|
|
| UI Step |
|---|
After logging into Salesforce, click the Reports tab to access the Reports. | Expand |
|---|
| 
|
|
| UI Step |
|---|
Use the left-hand navigation pane to navigate between report dashboards and folders. Each report folder contains a unique set of reports. There are a significant number of reports available that provide insights into many of the activities performed as part of the SQA Inspection Process. Work with your manager or a coworker to review these reports and get a better understanding of their uses. |
| UI Step |
|---|
After accessing a report, use the Filters at the top of the page to define how the information in the report should be displayed. | Expand |
|---|
| title | screenshot & information table |
|---|
| 
| Run Report | Click to update the report information based on the filters set. | | Hide Details | Hides the details of each heading in the report table. Click again to unhide these details. | | Printable View | Click to open the report in a print friendly format. | | Export Details | Exports the report into an excel format. |
|
|
| UI Step |
|---|
Click any Underlined Link in a report table to open the corresponding Project Record. | Expand |
|---|
| 
|
|
|
|
|
| Aura - Panel |
|---|
| tab | 1 |
|---|
| styles | {"body":{},"header":{"backgroundColor":{"color":"#f3f4f9"}},"headline":{"text":{"text":"Accessing Inspection Records","color":"#002d72","textAlign":"left","fontWeight":"bold","fontSize":18}},"base":{"boxShadow":{"shadows":[{"color":"rgba(0, 0, 0, 0.08)","x":0,"y":1,"blur":1,"spread":0},{"color":"rgba(0, 0, 0, 0.16)","x":0,"y":1,"blur":3,"spread":1}]},"borderRadius":{"radius":4},"backgroundColor":{"color":"#ffffff"}}} |
|---|
| body | <p><br /></p> |
|---|
|
| Expand |
|---|
|
| Info |
|---|
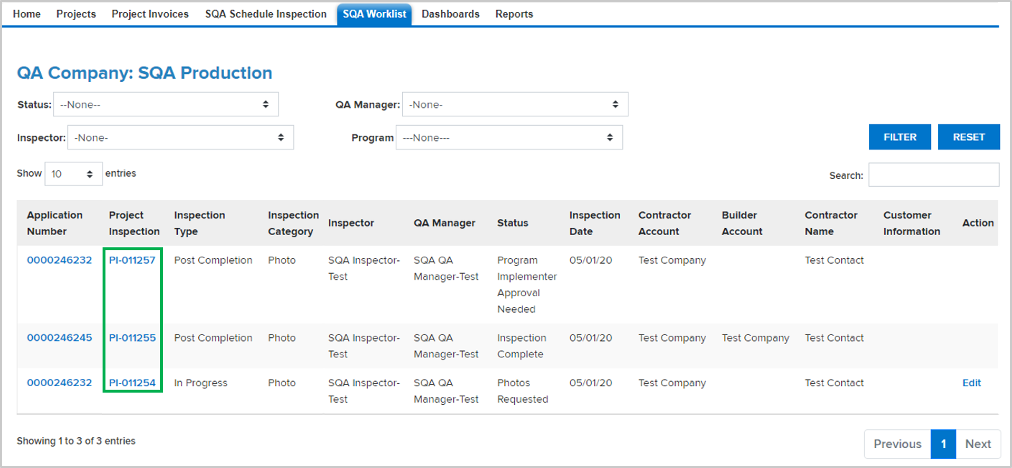
This section reviews the process to access inspection records from the SQA Worklist tab in the NYSERDA Partner Portal and may need to be referenced with other process steps throughout this guide. |
| UI Steps |
|---|
|
| UI Step |
|---|
Log into Salesforce and navigate to the SQA Worklist tab. | Expand |
|---|
| 
|
|
| UI Step |
|---|
Use the available Filters to locate specific projects. The most recently edited projects display at the top of the table. | Expand |
|---|
| 
|
|
| UI Step |
|---|
Click the Project Inspection number to open the Project Inspection Record in Salesforce. The Project Inspection Record will open in a new tab. | Expand |
|---|
| 
|
|
|
|
|
|
| Aura - Tab |
|---|
|
| Panel |
|---|
| borderColor | #002D72 |
|---|
| bgColor | #F3F4F9 |
|---|
| titleColor | #ffffff |
|---|
| borderWidth | 1 |
|---|
| titleBGColor | #002D72 |
|---|
| borderStyle | none |
|---|
| title | QSP Schedulers: Scheduling the Inspection |
|---|
|
|
| Info |
|---|
Scheduling an inspection officially kicks off the SQA Workflow in Salesforce. These inspections are scheduled by the Quality Service Provider (QSP) QA Scheduler. QSP companies are assigned to one or more counties within New York, and only projects that match the QSP QA company’s inspection criteria can be scheduled by the QSP QA Scheduler. There may be situations when a Scheduled Inspection needs to be updated, such as when an Inspector assigned to the Scheduled Inspection can no longer perform the inspection or if the date/time of the Scheduled Inspection needs to be changed. Follow the instructions in the Updating Scheduled Inspections below to learn how to make changes to a Scheduled Inspection. | Expand |
|---|
| title | Inspection Criteria and Requirements |
|---|
|
| Inspections can be scheduled by the QSP Schedulers if the Contractor meets the following criteria: |
|---|
Each program has specific criteria for Contractor status and inspection eligibility. Please review the program specific policies for additional details |
|
|
| Aura - Panel |
|---|
| tab | 1 |
|---|
| styles | {"body":{},"header":{"backgroundColor":{"color":"#f3f4f9"}},"headline":{"text":{"text":"Process Step","color":"#002d72","textAlign":"left","fontWeight":"bold","fontSize":18},"alignment":{"horizontal":"start"}},"base":{"backgroundColor":{"color":"#ffffff"},"boxShadow":{"shadows":[{"color":"rgba(0, 0, 0, 0.08)","x":0,"y":1,"blur":1,"spread":0},{"color":"rgba(0, 0, 0, 0.16)","x":0,"y":1,"blur":3,"spread":1}]},"borderRadius":{"radius":4}}} |
|---|
| body | <p><br /></p> |
|---|
| | Embed draw.io Diagram |
|---|
| border | false |
|---|
| diagramName | EAE - SQA Process |
|---|
| aspect | W1AjbQCRicNbGy_aNGse U404tycO2pwq8aiX1deP-1 |
|---|
| includedDiagram | 1 |
|---|
| simpleViewer | false |
|---|
| width | 1200 |
|---|
| aspectHash | 861e2129ccd766566c0b5e720760de5ecc8d590b |
|---|
| links | auto |
|---|
| tbstyle | hidden |
|---|
| pageId | 99877654 |
|---|
| lbox | false |
|---|
|
|
| Aura - Panel |
|---|
| tab | 1 |
|---|
| styles | {"body":{},"header":{"backgroundColor":{"color":"#f3f4f9"}},"headline":{"text":{"text":"Scheduling Inspections","color":"#002d72","textAlign":"left","fontWeight":"bold","fontSize":18},"alignment":{"horizontal":"start"}},"base":{"backgroundColor":{"color":"#ffffff"},"boxShadow":{"shadows":[{"color":"rgba(0, 0, 0, 0.08)","x":0,"y":1,"blur":1,"spread":0},{"color":"rgba(0, 0, 0, 0.16)","x":0,"y":1,"blur":3,"spread":1}]},"borderRadius":{"radius":4}}} |
|---|
| body | <p><br /></p> |
|---|
|
| Expand |
|---|
|
| Info |
|---|
Inspection of projects in support of the Combined Residential Application must be scheduled within the first 90 days after the physical work on the project site has been installed and completed. During this 90-day period, projects eligible for inspection can be located in the SQA Schedule Inspection tab. If an inspection is not scheduled within this 90-day period, the project cannot be located through the SQA Schedule Inspection tab. The NYSERDA QA Manager can manually set a project for inspection if an inspection is required but the project cannot be located in the SQA Schedule Inspection tab. |
| UI Steps |
|---|
|
| UI Step |
|---|
Navigate to the SQA Schedule Inspection tab after logging into the NYSERDA Portal (Salesforce Portal). | Expand |
|---|
| 
|
|
| UI Step |
|---|
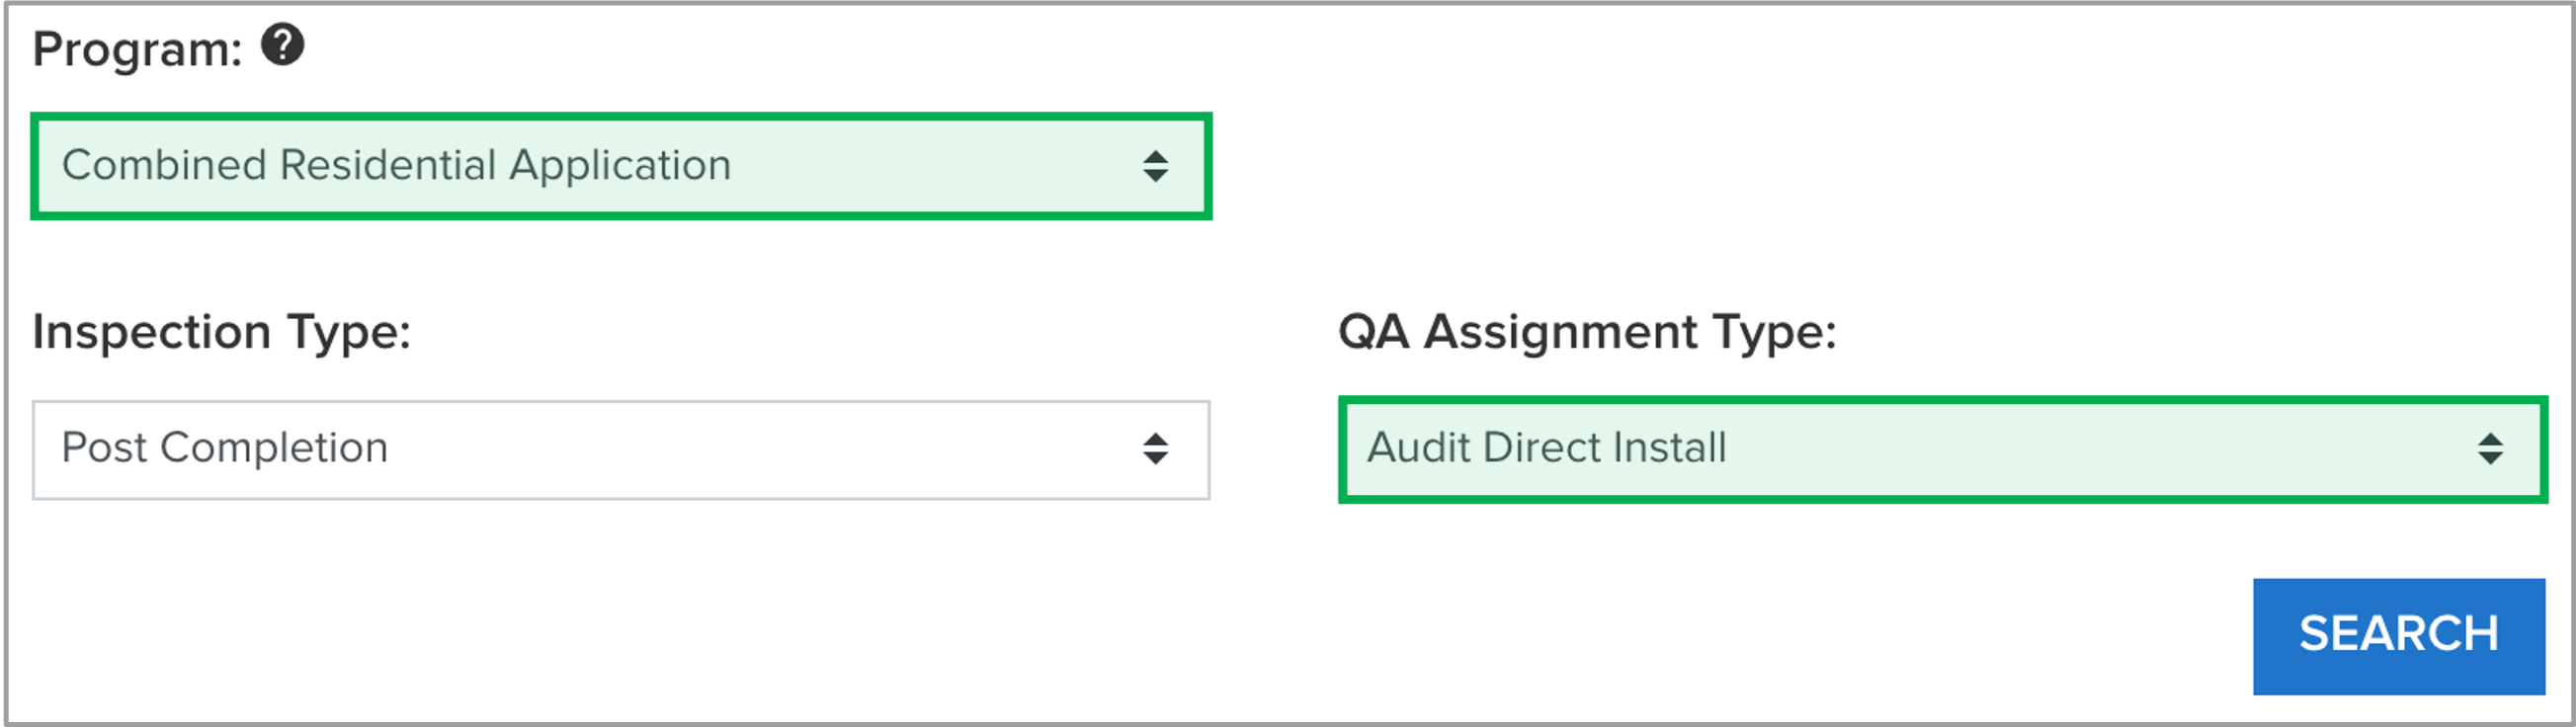
From the SQA Schedule Inspection tab, select Combined Residential Application from the Program drop-down then select the correct QA Assignment Type. Then, click Search. | QA Assignment Type | Select this option if... |
|---|
| Audit Direct Install | Selecting this option will display contractors with Electric Reduction projects eligible for inspection based on inspection threshold parameters. | | Full Comprehensive | Selecting this option will display contractors with full comprehensive projects (includes Electric Reduction, Insulation, and Air Sealing) eligible for inspection based on inspection threshold parameters. |
| Expand |
|---|
| 
|
|
| UI Step |
|---|
If needed, use the Filter Results options to continue fine-tuning the filtered list to locate projects ready for inspection scheduling. | Expand |
|---|
| title | screenshot & information table |
|---|
| 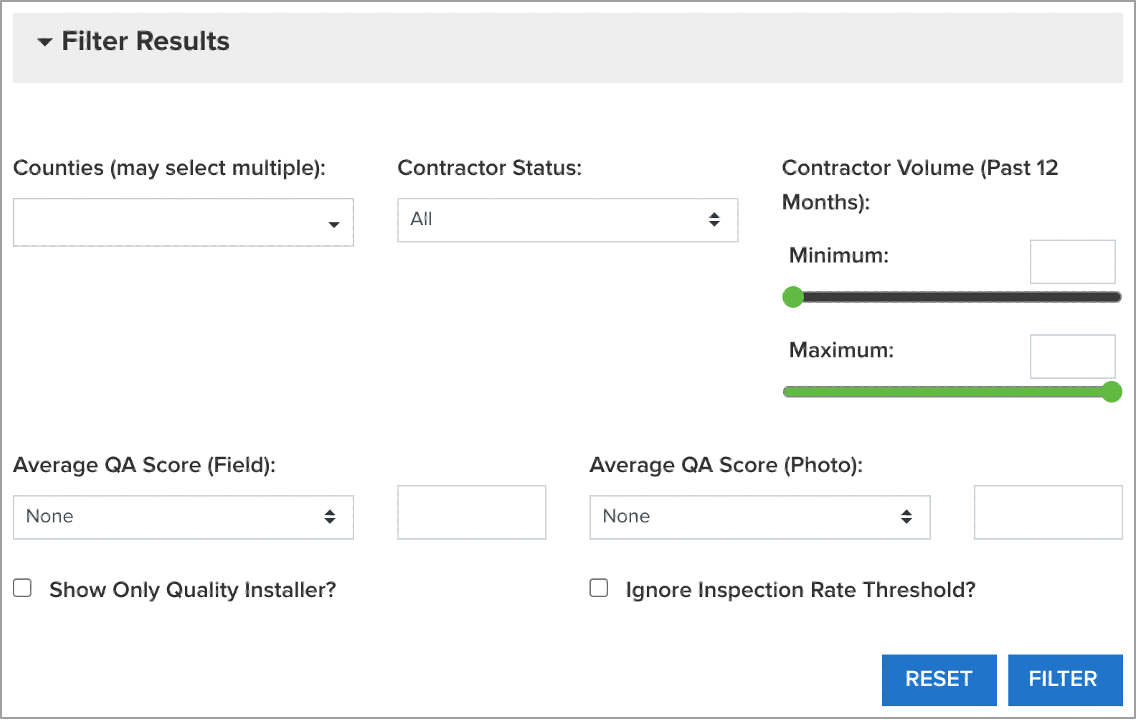
| Filter Components | Component Type | Description |
|---|
| Counties (may select multiple) | Multi-Select | Select from a list of current NYSERDA SQA Programs | | Contractor Status | Drop-Down | Select from the list of Contractor statuses | | Contractor Volume (Past 12 Months) Minimum | Slide Bar and Number | Use either the Slide Bar or the Number field to set the minimum Contractor volume that should be included in the filter. The Contractor Volume represents the annual number of projects over. the last 12 months. | | Contractor Volume (Past 12 Months) Maximum | Slide Bar and Number | Use either the Slide Bar or the Number field to set the maximum Contractor volume that should be included in the filter. The Contractor Volume represents the annual number of projects over. the last 12 months. | | Average QA Score (Field) | Drop-Down and Number | There are two filter fields for the Average QA Score. Use the dropdown list to filter Average QA Scores that are greater than, equal to or less than the QA Score entered into the blank field directly to the right of the dropdown list | | Average QA Score (Photo) | Drop-Down and Number | Not applicable for Combined Residential Application Inspections. | | Show Only Quality Installer | Checkbox | Not applicable for Combined Residential Application Inspections. | | Ignore Inspection Rate Threshold | Checkbox | Check the box to filter the results to show only Quality Installers | | Reset | Button | Click to clear the set filters | | Filter | Button | Click to activate the set filters |
|
|
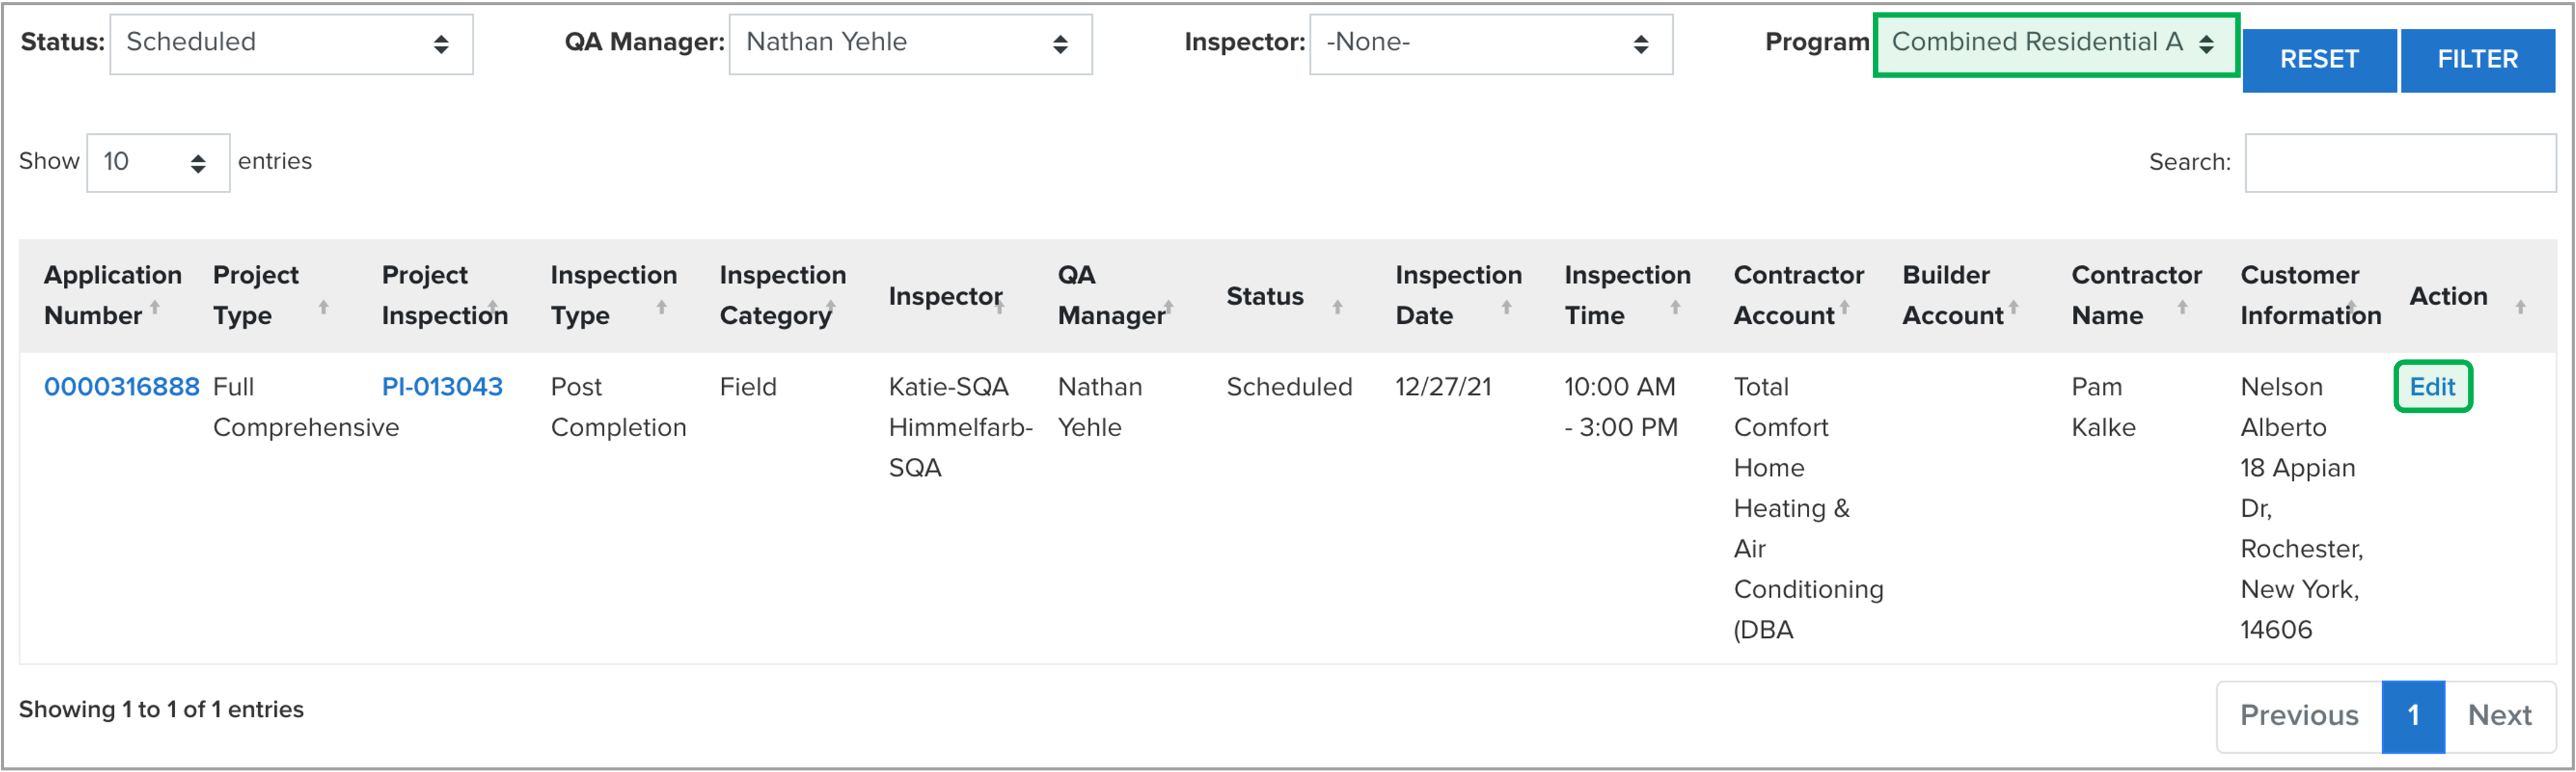
| UI Step |
|---|
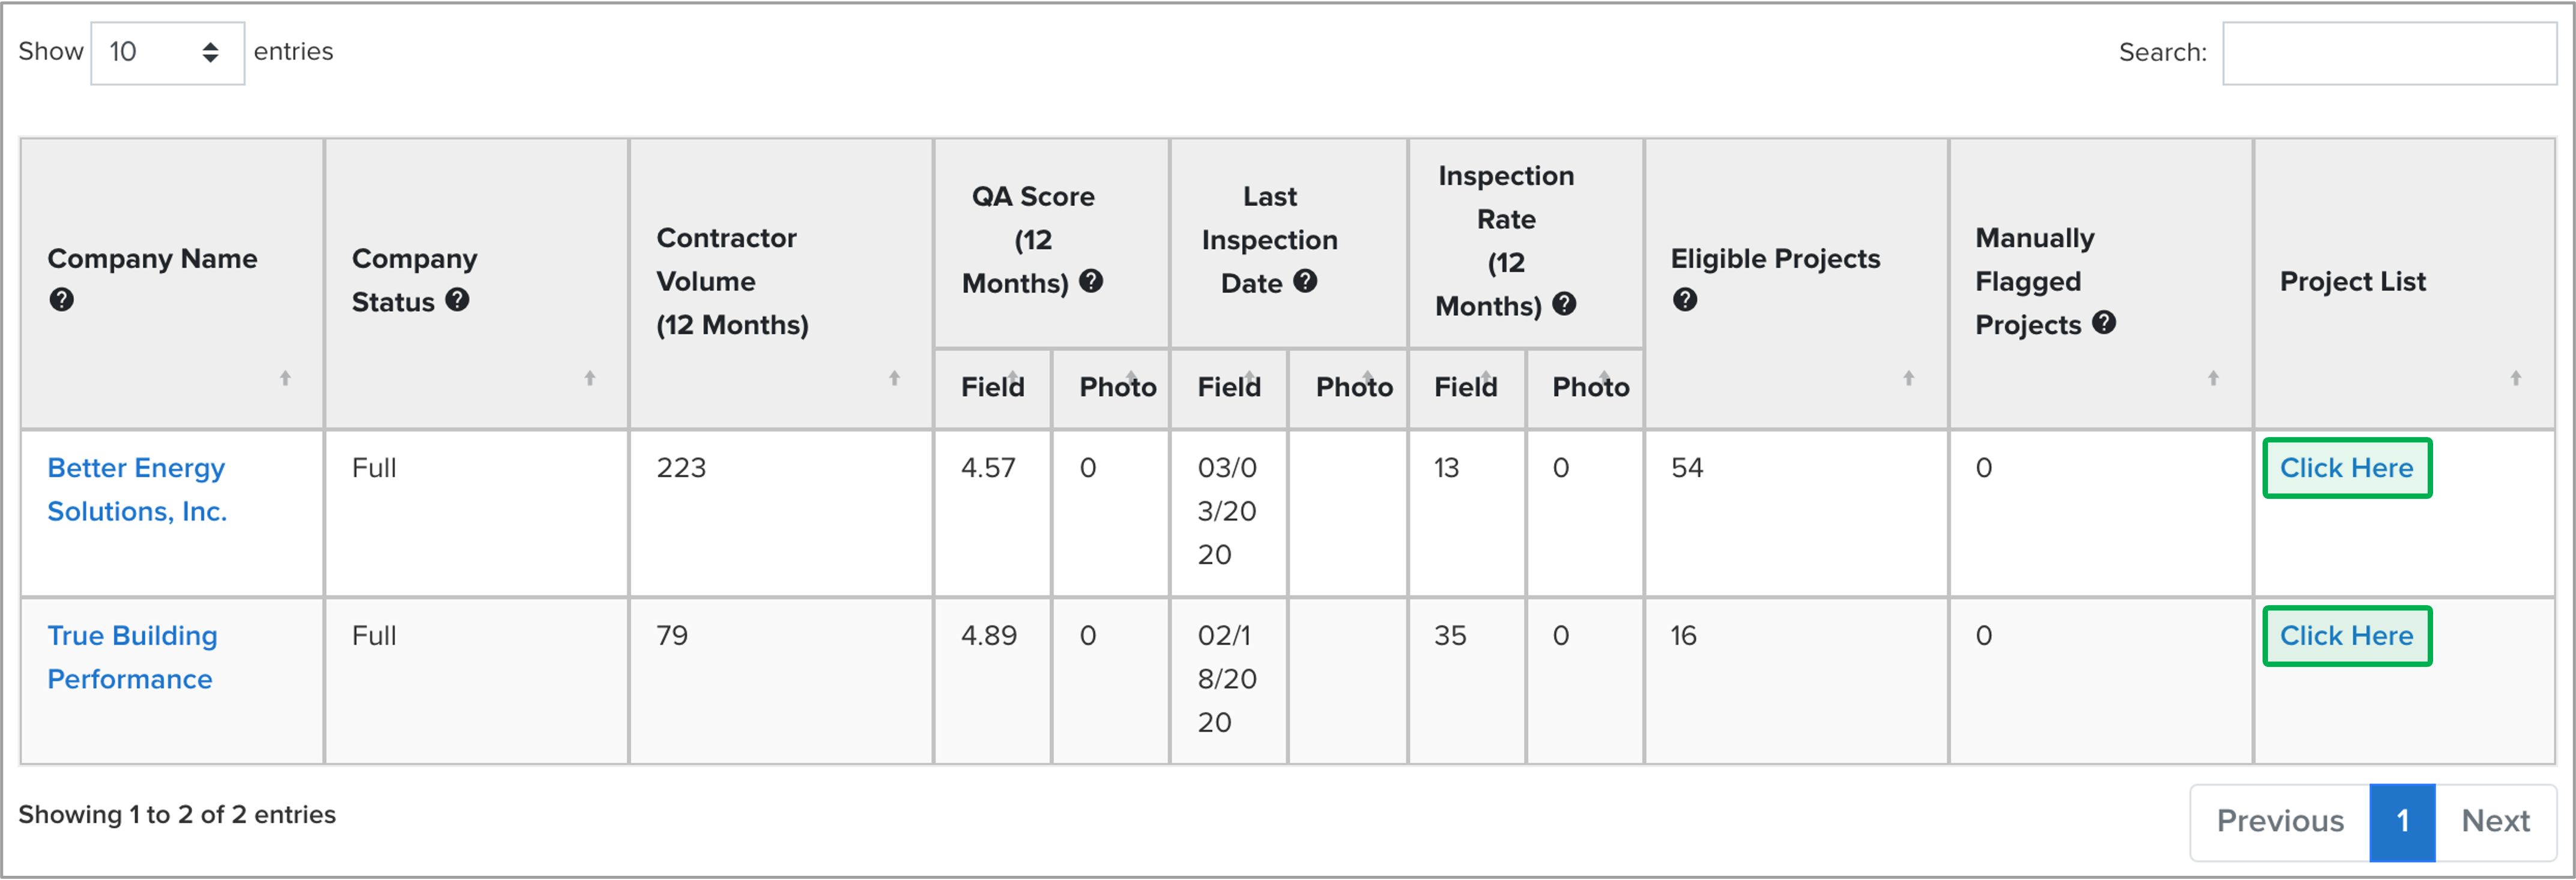
Once filtered, the SQA Inspection Table displays all Contractors eligible for inspection based on your selected filters. When you have located the correct Contractor, click the Click Here link in the Project List column. The table will only display Inspection Projects in counties/regions assigned to the QSP QA Organization and excludes any projects that already have a Scheduled or In-Progress inspection. | Expand |
|---|
| 
|
|
| UI Step |
|---|
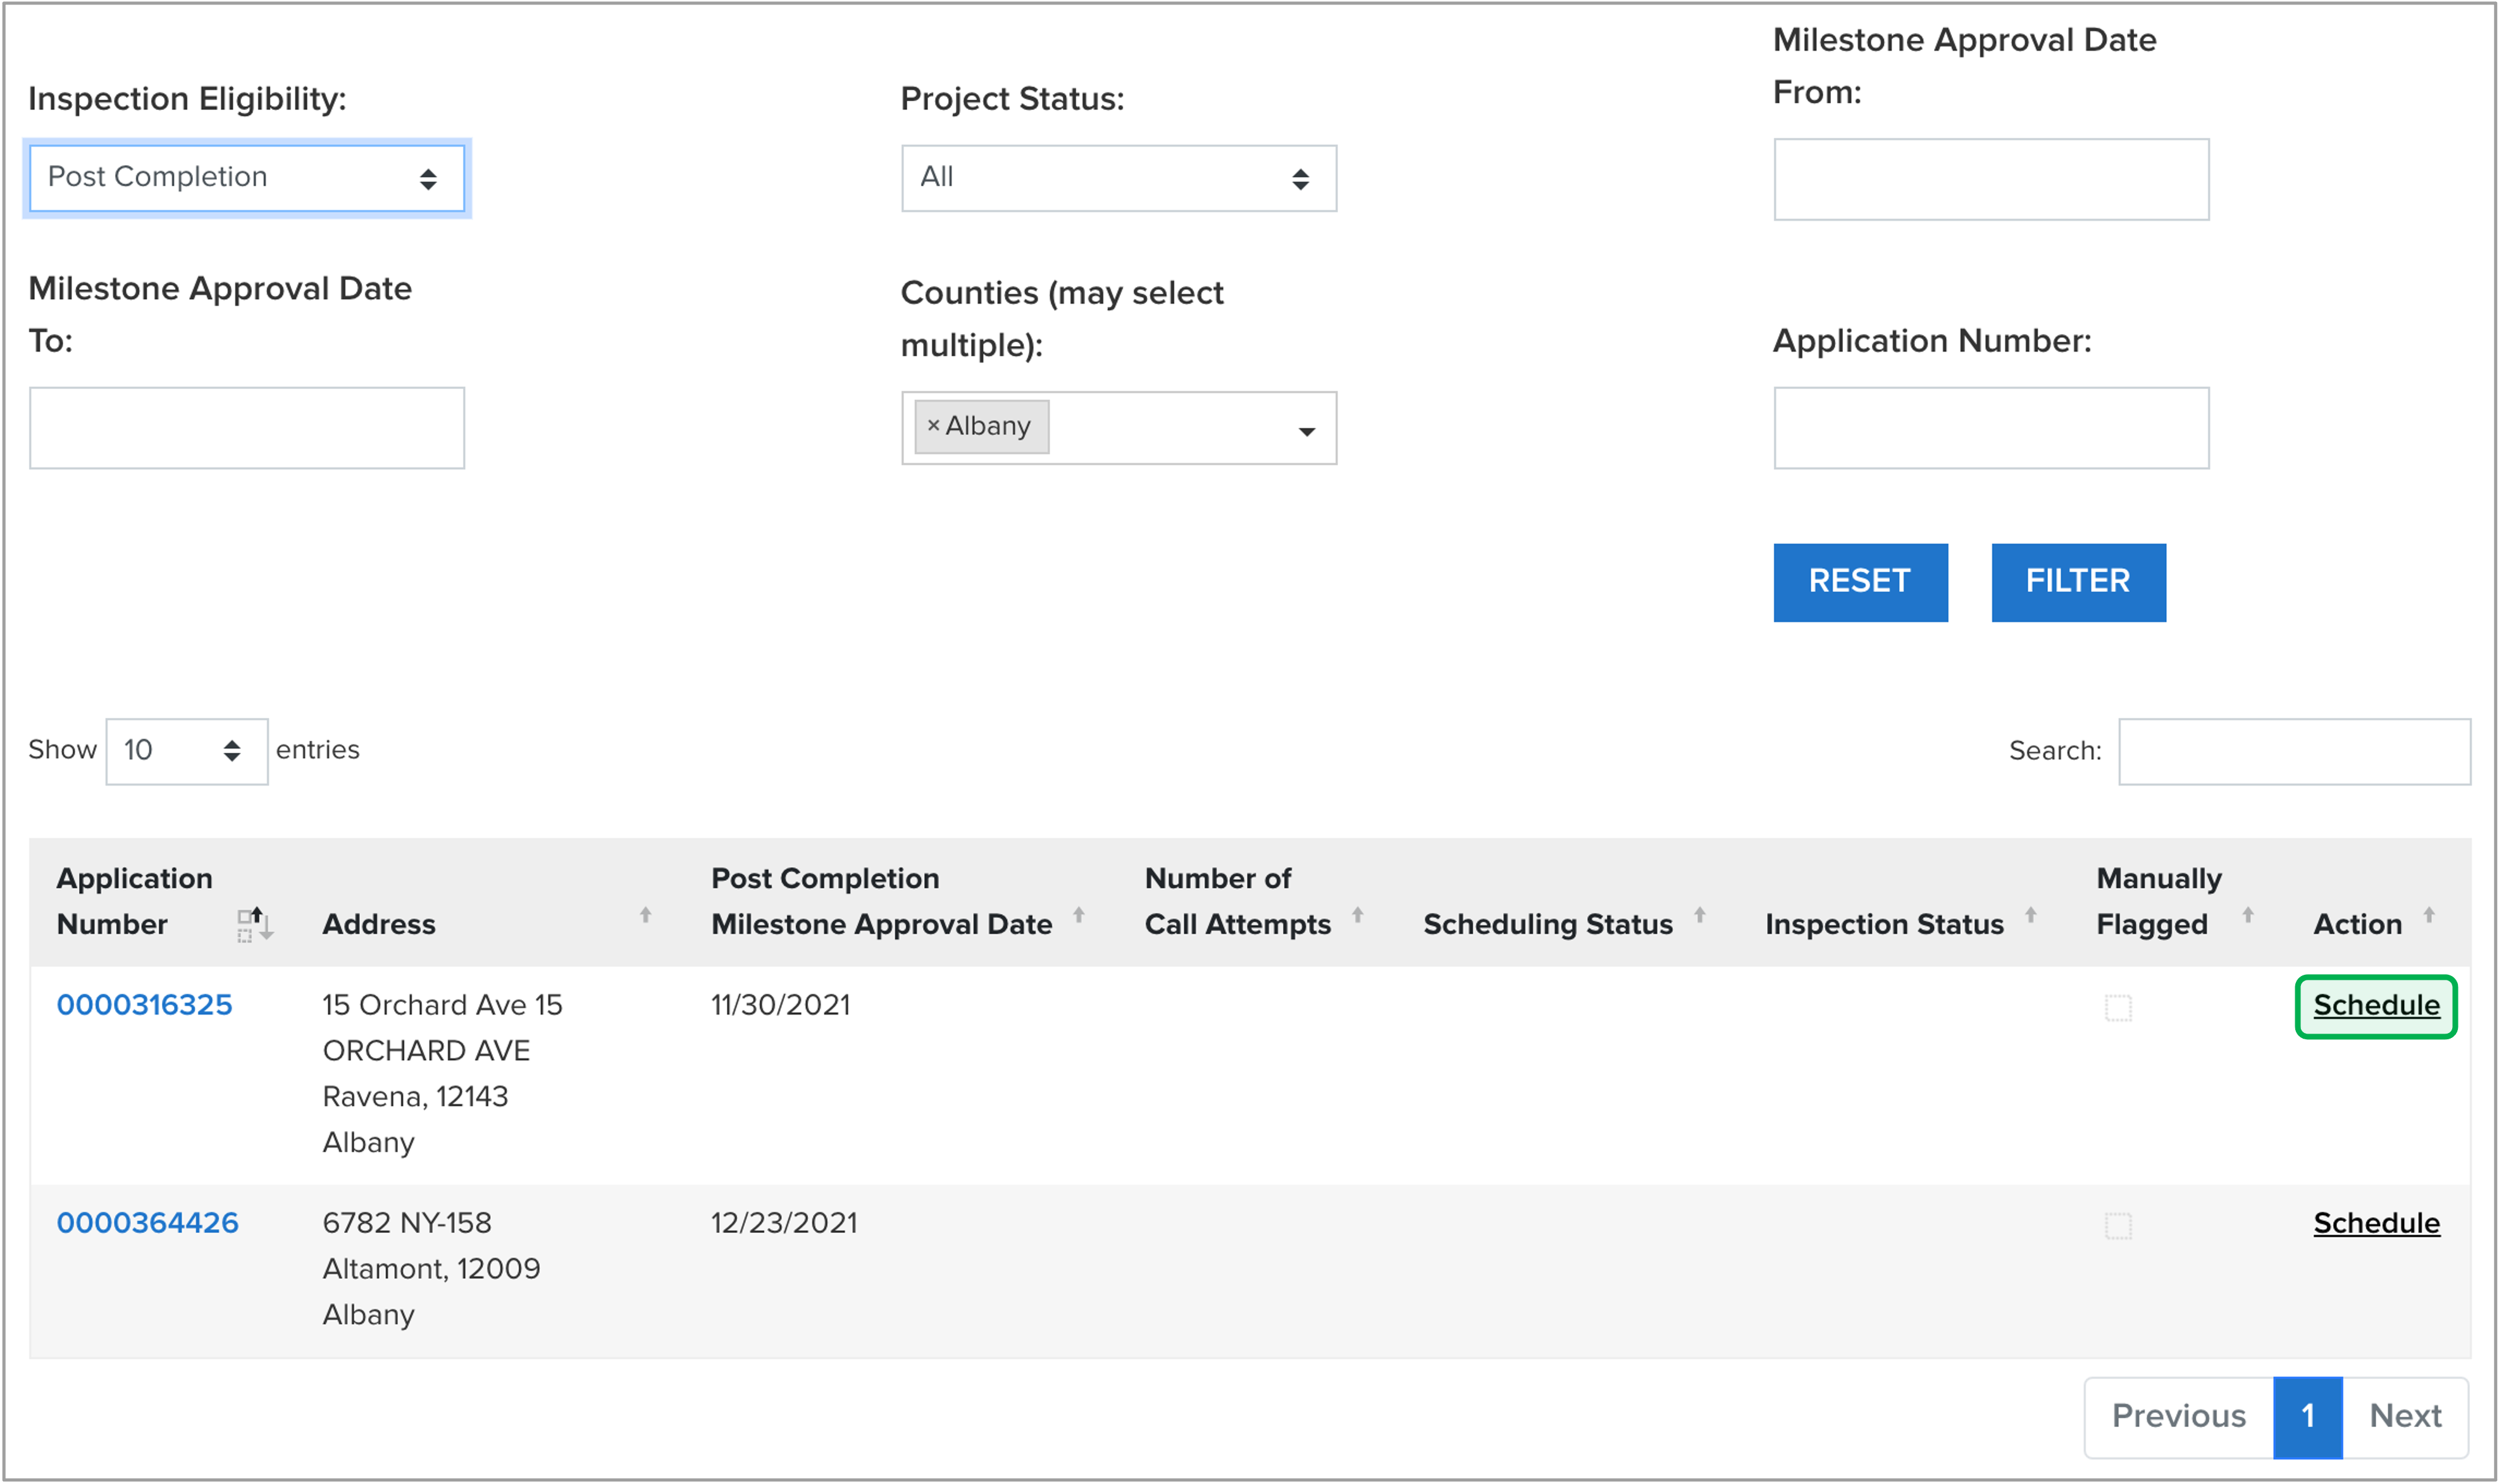
You will be directed to a page that lists all projects for the selected Contractor that are ready for inspection. Use the filters, as needed, to locate a specific project. When you have located the appropriate project click the Schedule link to open the Schedule an Inspection window. | Expand |
|---|
| title | screenshot & information table |
|---|
| 
| Filter Field | Description |
|---|
| Inspection Eligibility | Post-Completion is the only option and is selected by default | | Project Status | Select either All, Completed, Approved or Closed | | Milestone Approval Date From | The Milestone Approval Date refers to the date the physical work was completed on the project site and can be considered eligible for inspection. Use this field to filter the list of eligible projects based on the earliest date the project became eligible for inspection. | | Milestone Approval Date To | The Milestone Approval Date refers to the date the physical work was completed on the project site and can be considered eligible for inspection. Use this field to filter the list of eligible projects based on the latest date the project became eligible for inspection. | | Counties | Select one or more New York State counties for project sites | | Application Number | Enter the specific Inspection Application numbers (accepts partial numbers) | | Filter | Click to activate the set filters | | Reset | Click to clear the set filters |
|
|
| UI Step |
|---|
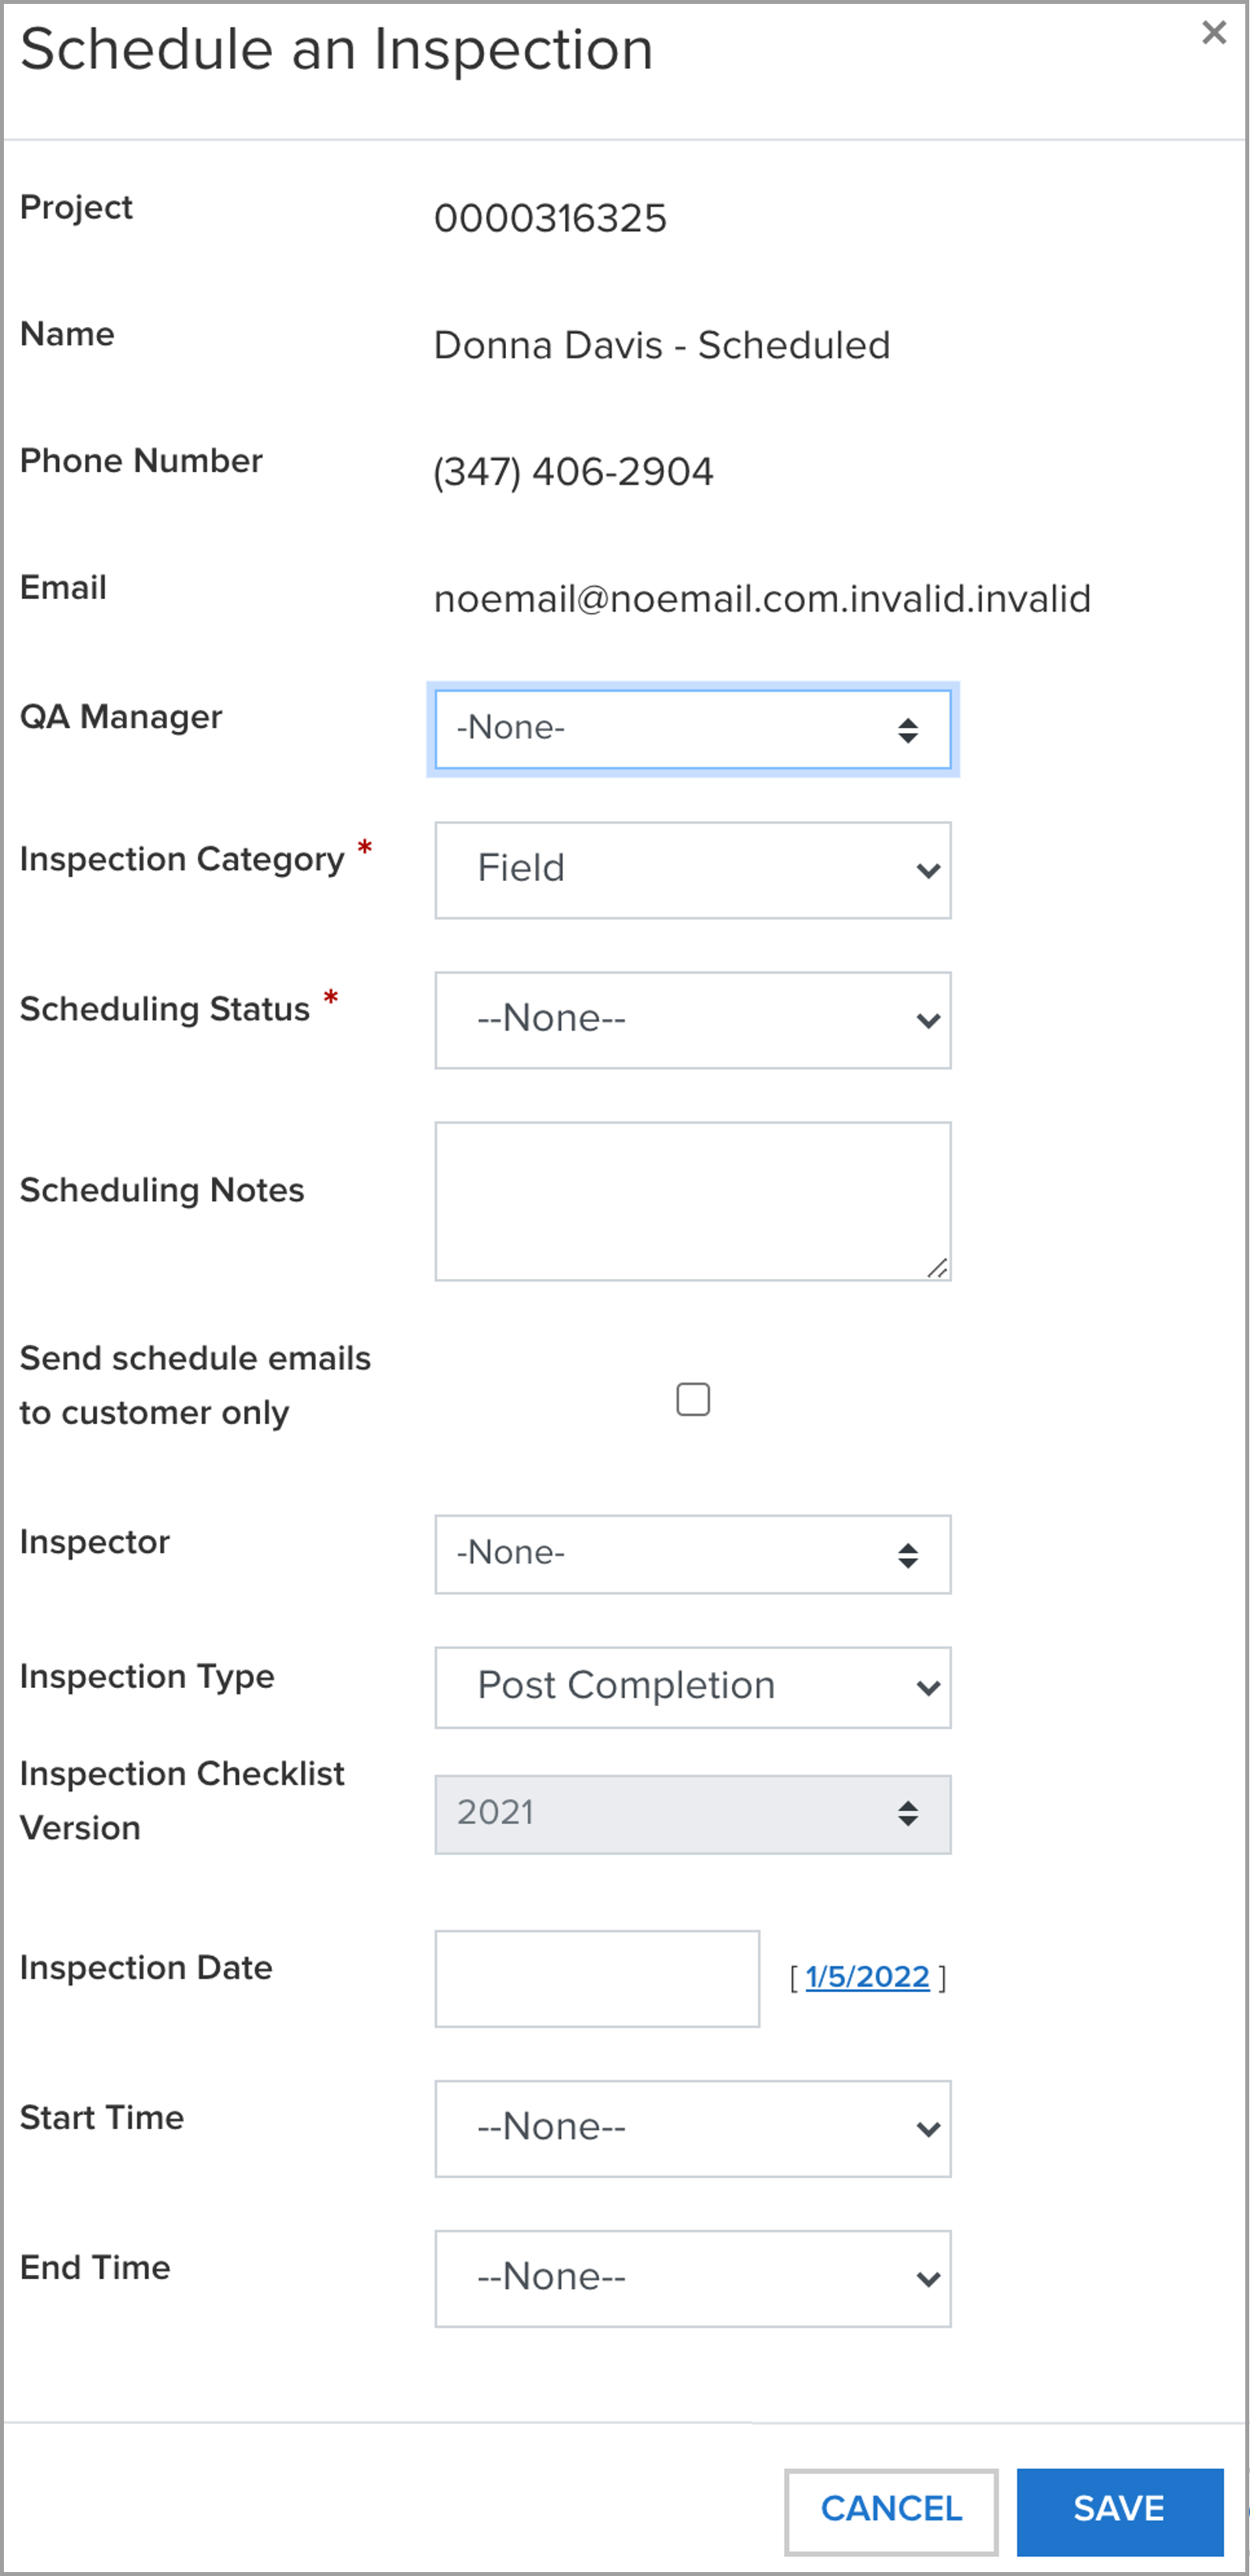
Once the Schedule an Inspection window is open, complete the form to schedule the inspection. | Warning |
|---|
When scheduling an inspection, it is best practice to complete the form when contacting the site owner. Use the fields in the Schedule an Inspection window to guide your conversation as you schedule the inspection with the site owner. |
| Expand |
|---|
| title | screenshot & information table |
|---|
|
| Section |
|---|
| Column |
|---|
| 
|
| Column |
|---|
|
| Field Name | Action |
|---|
| Project | Displays the Project Number | | Name | Displays the Customer name | | Phone Number | Displays the Customer’s contact phone number | | Email | Displays the Customer’s email address | | QA Manager | Click to select the correct QA Manager for the inspection | Warning |
|---|
If a QA Manager is not select in this field, it cannot be approved later by the associated QA Manager. It is important that a QA Manager is selected at this step. If this needs to be updated later, please review the Updating Scheduled Inspections section below to learn how. |
| | Inspection Category | Select Field if not selected by default. Photo inspections are not performed for Combined Residential Applications. | | Scheduling Status | Click to select an inspection schedule status | Warning |
|---|
If, when speaking to the customer, the inspection cannot be scheduled at this time, select the appropriate reason from the Scheduling Status and use the Scheduling Notes to provide any additional clarity regarding the reason the inspection could not be scheduled. Once an option is selected from this menu and the Scheduling Inspection form is saved, the project will move into the SQA Worklist tab where the inspection scheduling can continue. |
| | Scheduling Notes | Enter in any relevant notes (e.g. “Only contact before noon”) | | Send Schedule Emails to Customer Only | Check this box to ensure that only the customer receives the scheduling notification | | Inspector | Click to select an Inspector | | Inspection Type | Defaults to Post Completion. No other options are available. | | Inspection Checklist Version | This field is not editable by QSP Schedulers | | Inspection Date1 | Click to select the date for the inspection | | Start Time1 | Click to enter the Start Time of the scheduled inspection | | End Time1 | Click to enter the End Time of the scheduled inspection | - These fields can only be completed if the Scheduling Status is set to Scheduled
|
|
|
|
|
| UI Step |
|---|
If you are able to schedule an inspection, click the Scheduling Status drop-down and select Scheduled. This will allow you to complete the following fields: Inspection Date, Start Time, and End Time. When all required/needed fields are complete, click Save. Clicking Save generates a Project Inspection record and emails the installation contractor. Additionally, the Project Inspection record status will automatically be updated to Scheduled and the project will be moved to the SQA Worklist queue. | Warning |
|---|
The system will not let you double book an inspector (the times cannot overlap with already scheduled inspections). |
|
| UI Step |
|---|
If you do not schedule an inspection, click the Scheduling Status dropdown list and select a corresponding response to indicate the reason the inspection could not be scheduled. Enter any notes and click Save to finish. Clicking Save generates a Project Inspection record and moves the project to the SQA Worklist queue and updates the Project Inspection record status to Scheduling In Progress. |
|
|
|
| Aura - Panel |
|---|
| tab | 1 |
|---|
| styles | {"body":{},"header":{"backgroundColor":{"color":"#f3f4f9"}},"headline":{"text":{"text":"Updating Scheduled Inspections","color":"#002d72","textAlign":"left","fontWeight":"bold","fontSize":18},"alignment":{"horizontal":"start"}},"base":{"backgroundColor":{"color":"#ffffff"},"boxShadow":{"shadows":[{"color":"rgba(0, 0, 0, 0.08)","x":0,"y":1,"blur":1,"spread":0},{"color":"rgba(0, 0, 0, 0.16)","x":0,"y":1,"blur":3,"spread":1}]},"borderRadius":{"radius":4}}} |
|---|
| body | <p><br /></p> |
|---|
|
| Expand |
|---|
|
| Info |
|---|
QSP Schedulers and QSP QA Managers can revise scheduling information up until the inspection occurs. |
| UI Steps |
|---|
|
| UI Step |
|---|
After logging into the NYSERDA Portal, click the SQA Worklist tab. | Expand |
|---|
| 
|
|
| UI Step |
|---|
Use the filters at the top of the page to help locate the scheduled inspection. Combined Residential Application must be selected from the Program drop-down. Click Filter when all the required or needed filters are set. Once the list of scheduled inspections is filtered, access the Schedule an Inspection window by clicking the Edit link in the Action column. | Expand |
|---|
| 
|
|
| UI Step |
|---|
Once the Schedule an Inspection window is open, update any fields as required based on the revision needed to the scheduled inspection. Click Save when complete. |
|
|
|
|
| Aura - Tab |
|---|
|
| Panel |
|---|
| borderColor | #002D72 |
|---|
| bgColor | #F3F4F9 |
|---|
| titleColor | #ffffff |
|---|
| borderWidth | 1 |
|---|
| titleBGColor | #002D72 |
|---|
| borderStyle | none |
|---|
| title | QSP Inspectors: Configuring the Inspection Checklist |
|---|
|
|
| Info |
|---|
Configuring the Inspection Checklist is the second major step in the SQA Inspection Workflow in Salesforce. Inspections are performed by the QSP QA Inspector utilizing an Inspection Checklist that includes each required inspection task. QSP Companies are assigned to one or more counties within New York, and only projects that match the QSP QA company’s inspection criteria can be inspected by the QSP QA Inspector. |
| Aura - Panel |
|---|
| tab | 1 |
|---|
| styles | {"body":{},"header":{"backgroundColor":{"color":"#f3f4f9"}},"headline":{"text":{"text":"Process Step","color":"#002d72","textAlign":"left","fontWeight":"bold","fontSize":18},"alignment":{"horizontal":"start"}},"base":{"backgroundColor":{"color":"#ffffff"},"boxShadow":{"shadows":[{"color":"rgba(0, 0, 0, 0.08)","x":0,"y":1,"blur":1,"spread":0},{"color":"rgba(0, 0, 0, 0.16)","x":0,"y":1,"blur":3,"spread":1}]},"borderRadius":{"radius":4}}} |
|---|
| body | <p><br /></p> |
|---|
| | Embed draw.io Diagram |
|---|
| border | false |
|---|
| diagramName | EAE - SQA Process |
|---|
| aspect | W1AjbQCRicNbGy_aNGse U404tycO2pwq8aiX1deP-2 |
|---|
| includedDiagram | 1 |
|---|
| simpleViewer | false |
|---|
| width | 1200 |
|---|
| aspectHash | 4f5a5c0e5c8d3a8cc7a4fcdd99626e8459b1b17f |
|---|
| links | auto |
|---|
| tbstyle | hidden |
|---|
| pageId | 99877654 |
|---|
| lbox | false |
|---|
|
|
| Aura - Panel |
|---|
| tab | 1 |
|---|
| styles | {"body":{},"header":{"backgroundColor":{"color":"#f3f4f9"}},"headline":{"text":{"text":"Configure the Inspection Checklist","color":"#002d72","textAlign":"left","fontWeight":"bold","fontSize":18},"alignment":{"horizontal":"start"}},"base":{"backgroundColor":{"color":"#ffffff"},"boxShadow":{"shadows":[{"color":"rgba(0, 0, 0, 0.08)","x":0,"y":1,"blur":1,"spread":0},{"color":"rgba(0, 0, 0, 0.16)","x":0,"y":1,"blur":3,"spread":1}]},"borderRadius":{"radius":4}}} |
|---|
| body | <p><br /></p> |
|---|
|
| Info |
|---|
Before an inspection can be performed, the Inspection Checklist will need to be configured. Configuration will vary depending on the installation project. Unconfigured Inspection Checklists will set all Categories and their respective Measures and Tasks as required for an inspection. When performing an Inspection, the Inspector can configure the Inspection Checklist at any point before completing the inspection keeping in mind that the Inspection Checklist can continue to be configured as the inspection is performed. |
| UI Steps |
|---|
|
| UI Step |
|---|
To configure the Inspection Checklist, begin by accessing the Project Inspection Record as described in the Accessing Inspection Records section of the NYSERDA Portal tab on the left side of this page. |
| UI Step |
|---|
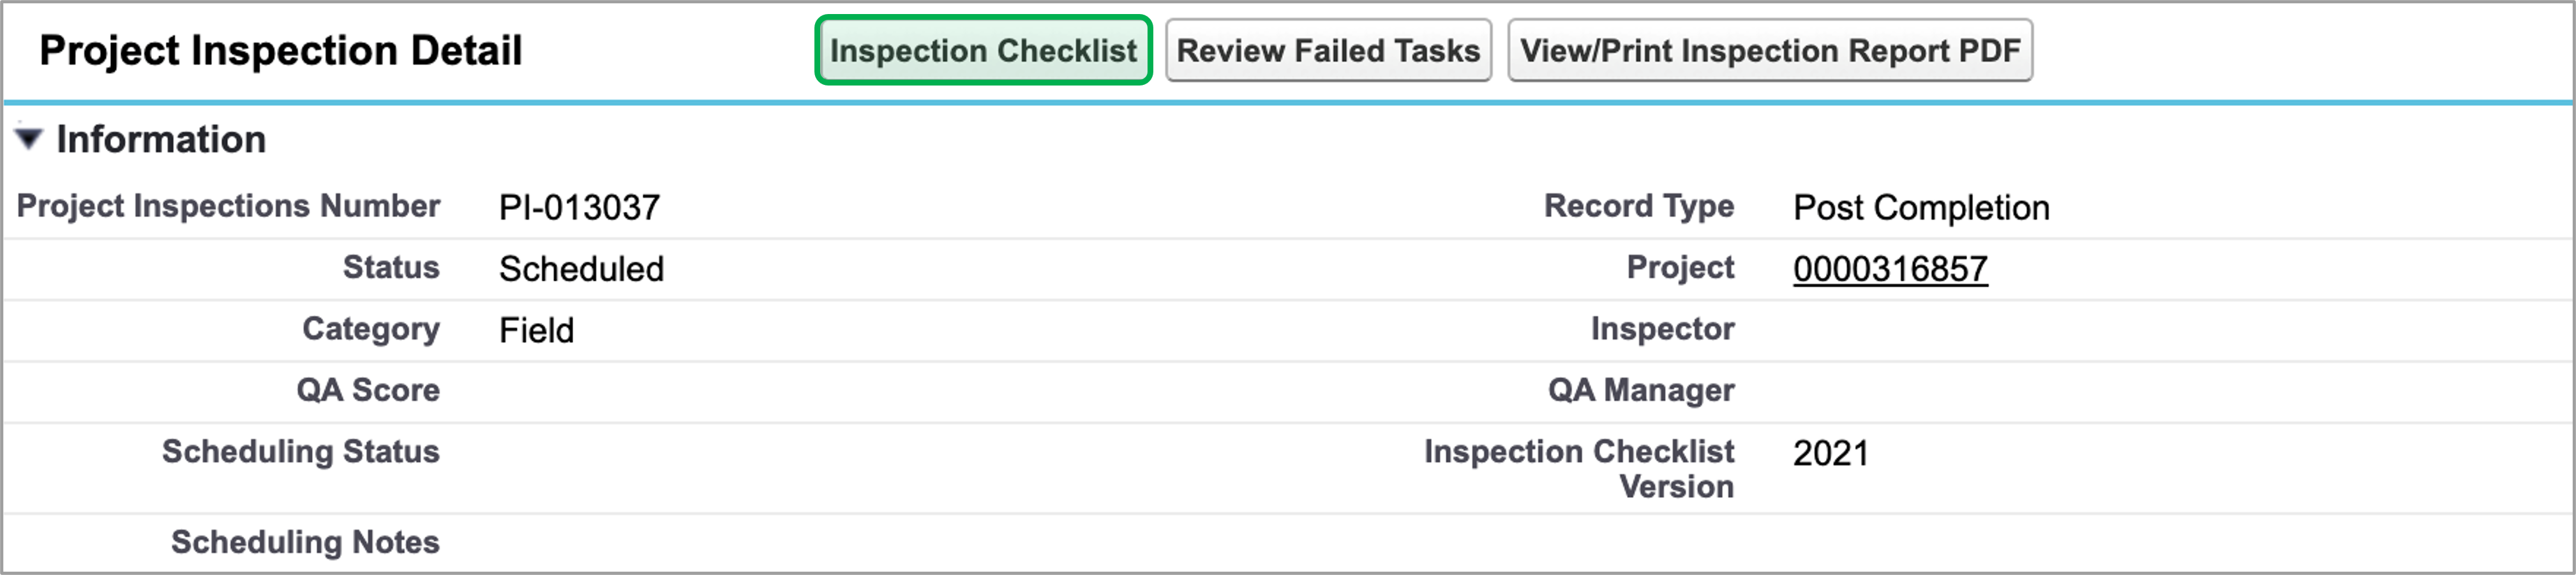
Once in the Project Inspection Record, click the Inspection Checklist button. | Expand |
|---|
| 
|
|
| UI Step |
|---|
Next, click the Hamburger icon in the upper-right hand corner of the Inspection Checklist. | Tip |
|---|
By default, all Inspection Checklists contain all possible inspection Categories, Measures, and Tasks assigned. |
| Expand |
|---|
| 
|
|
| UI Step |
|---|
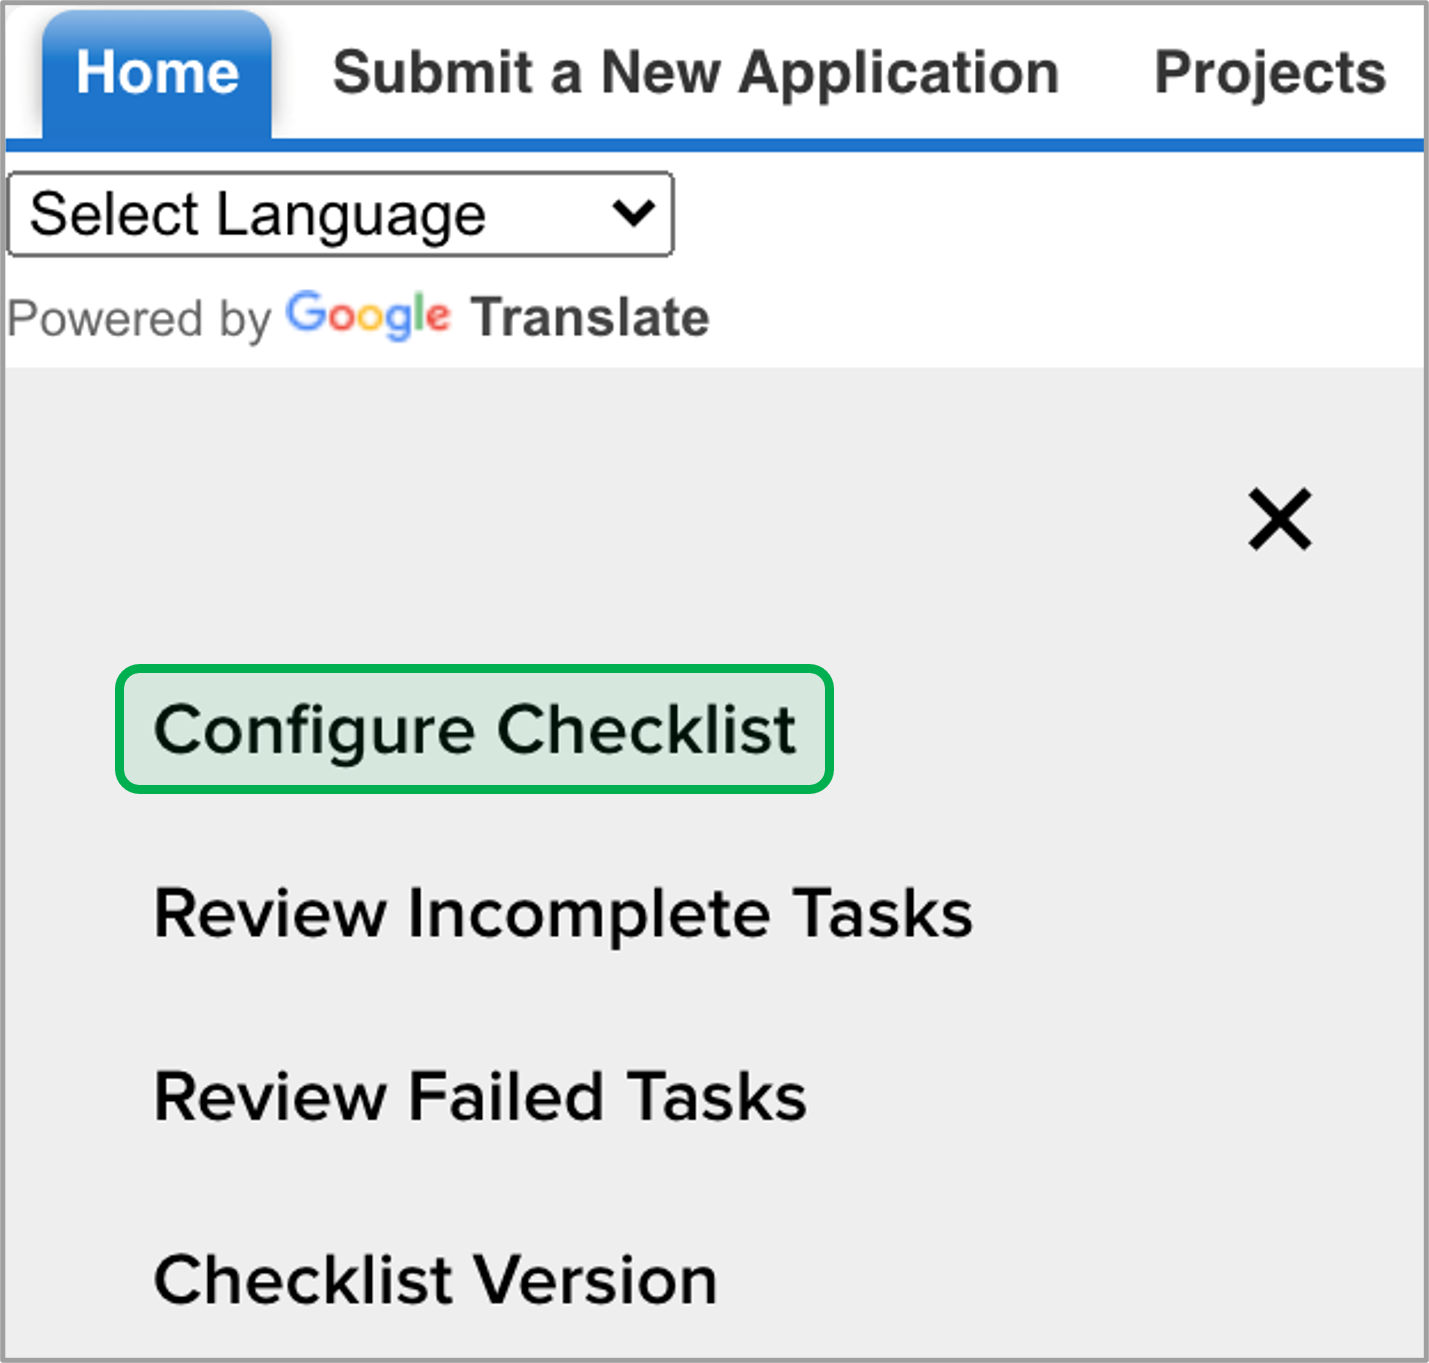
Click the Configure Checklist option. | Expand |
|---|
| 
|
|
| UI Step |
|---|
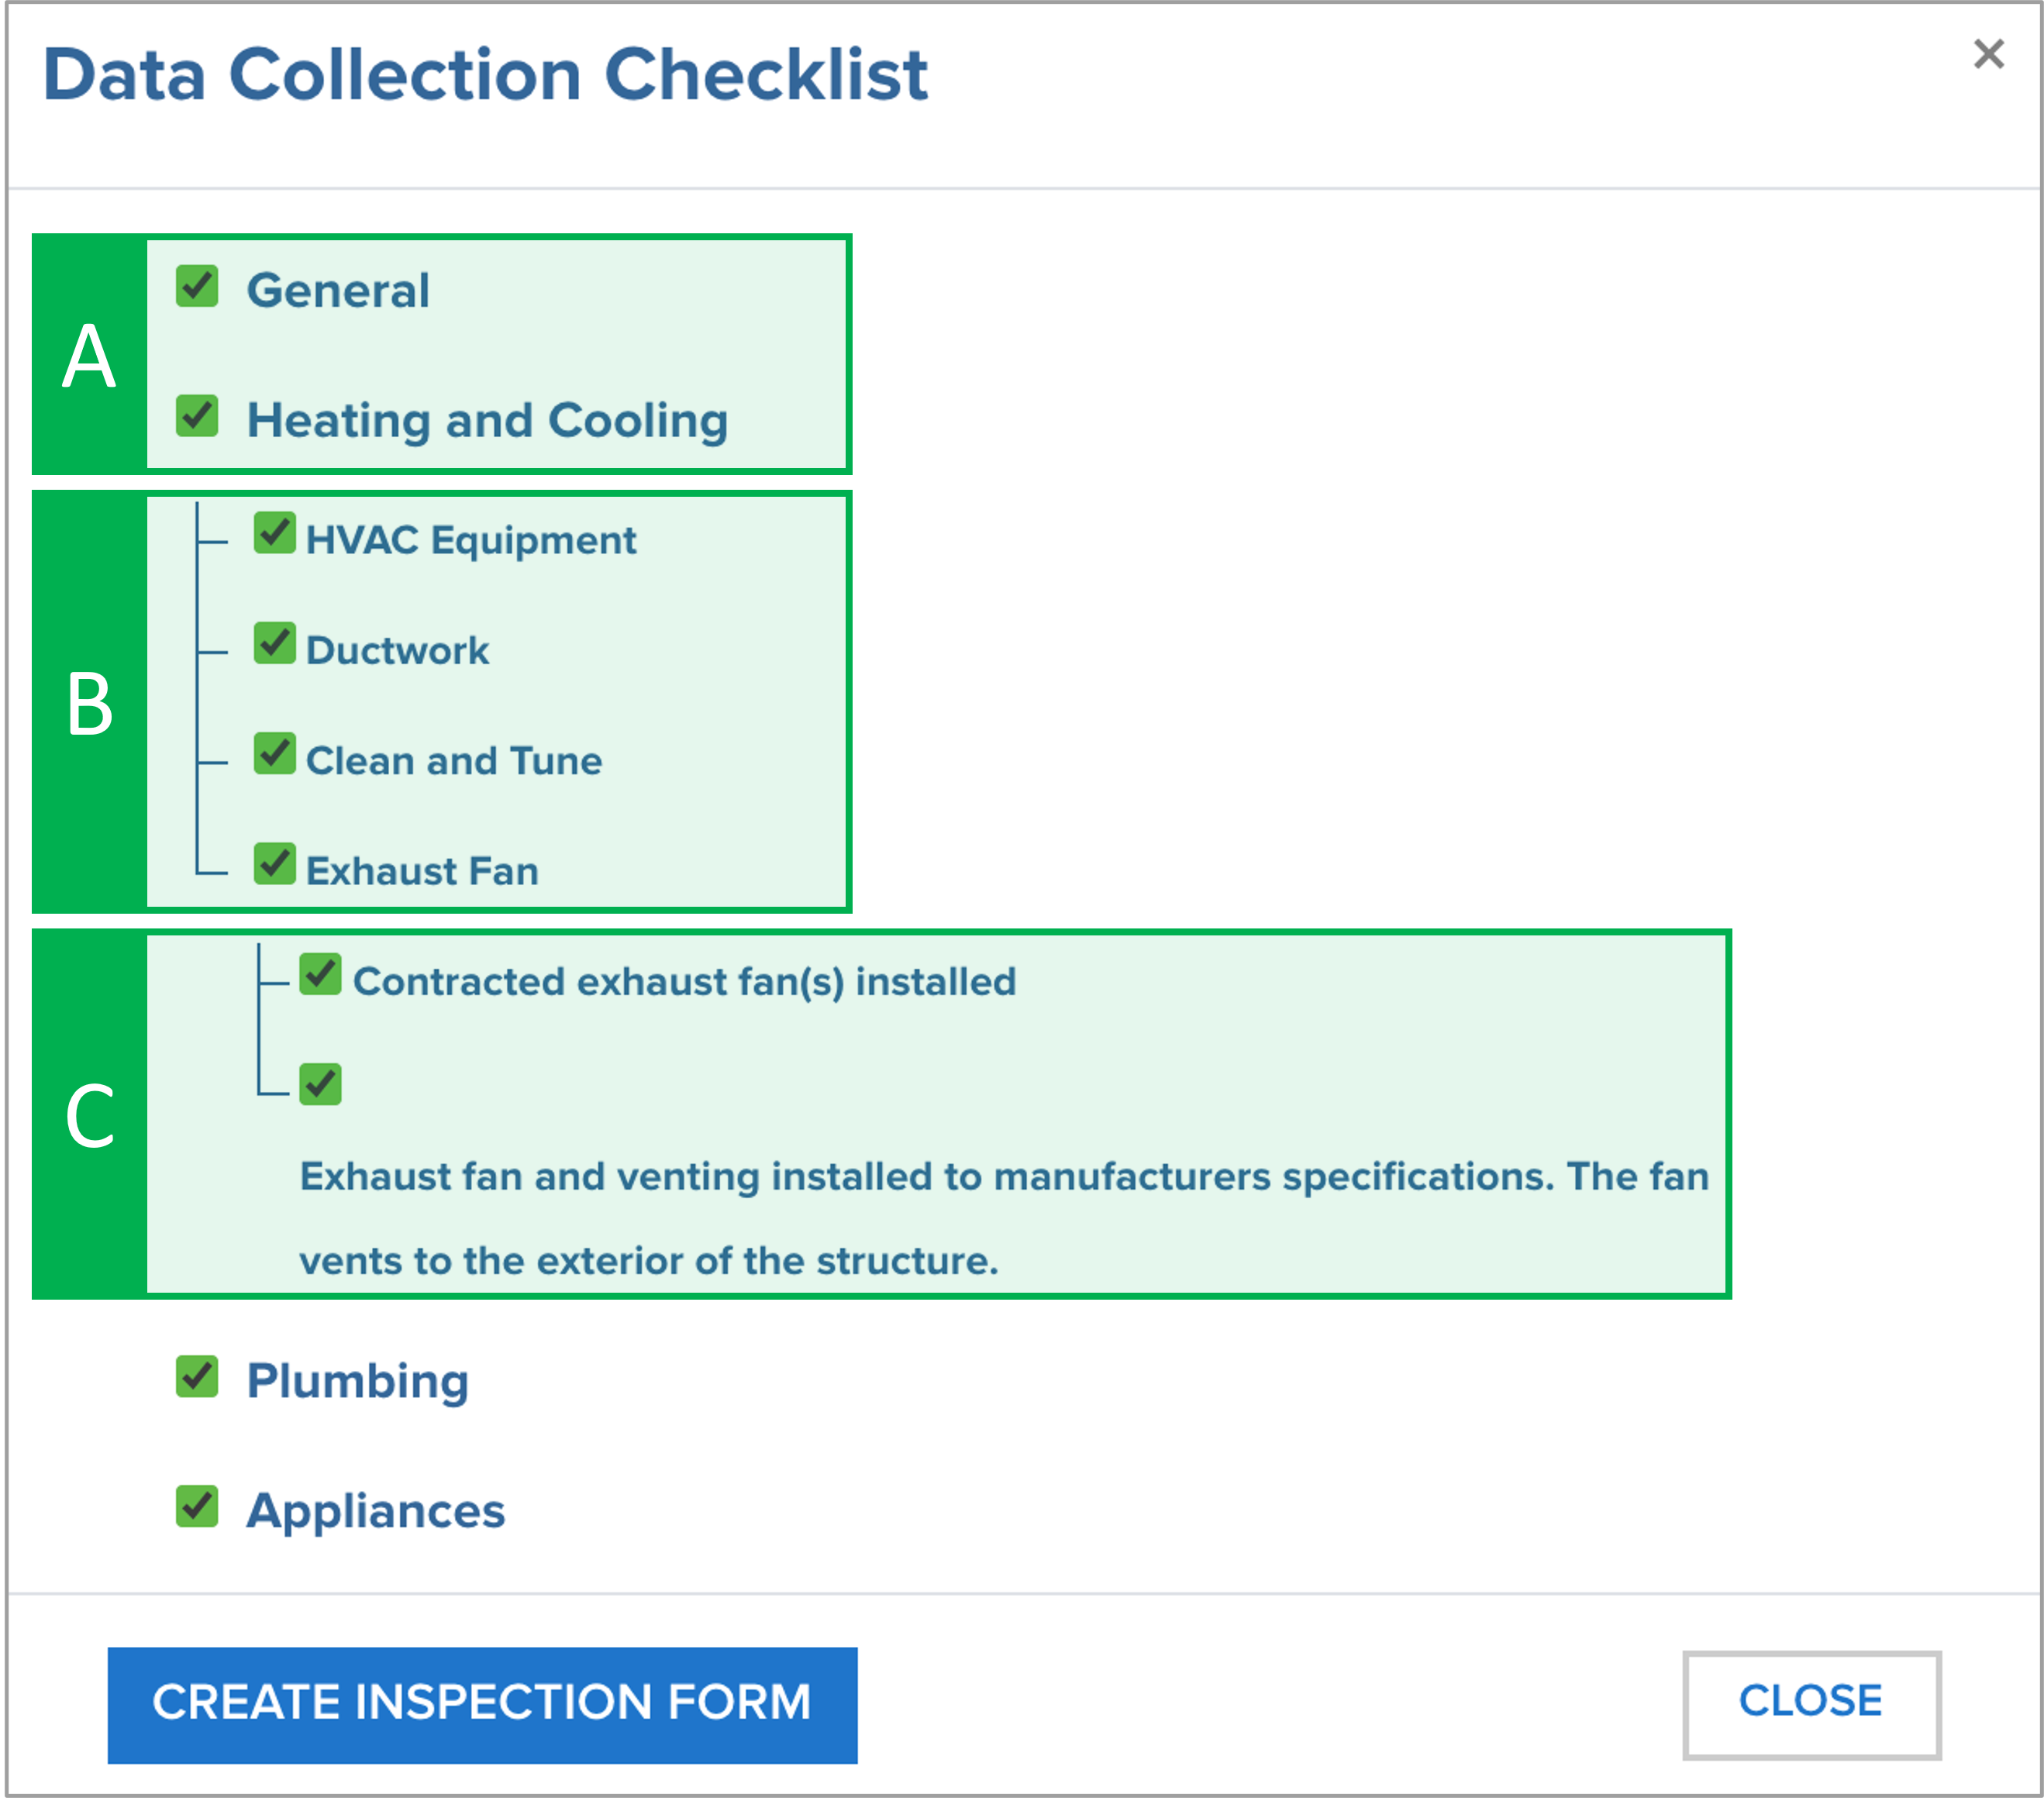
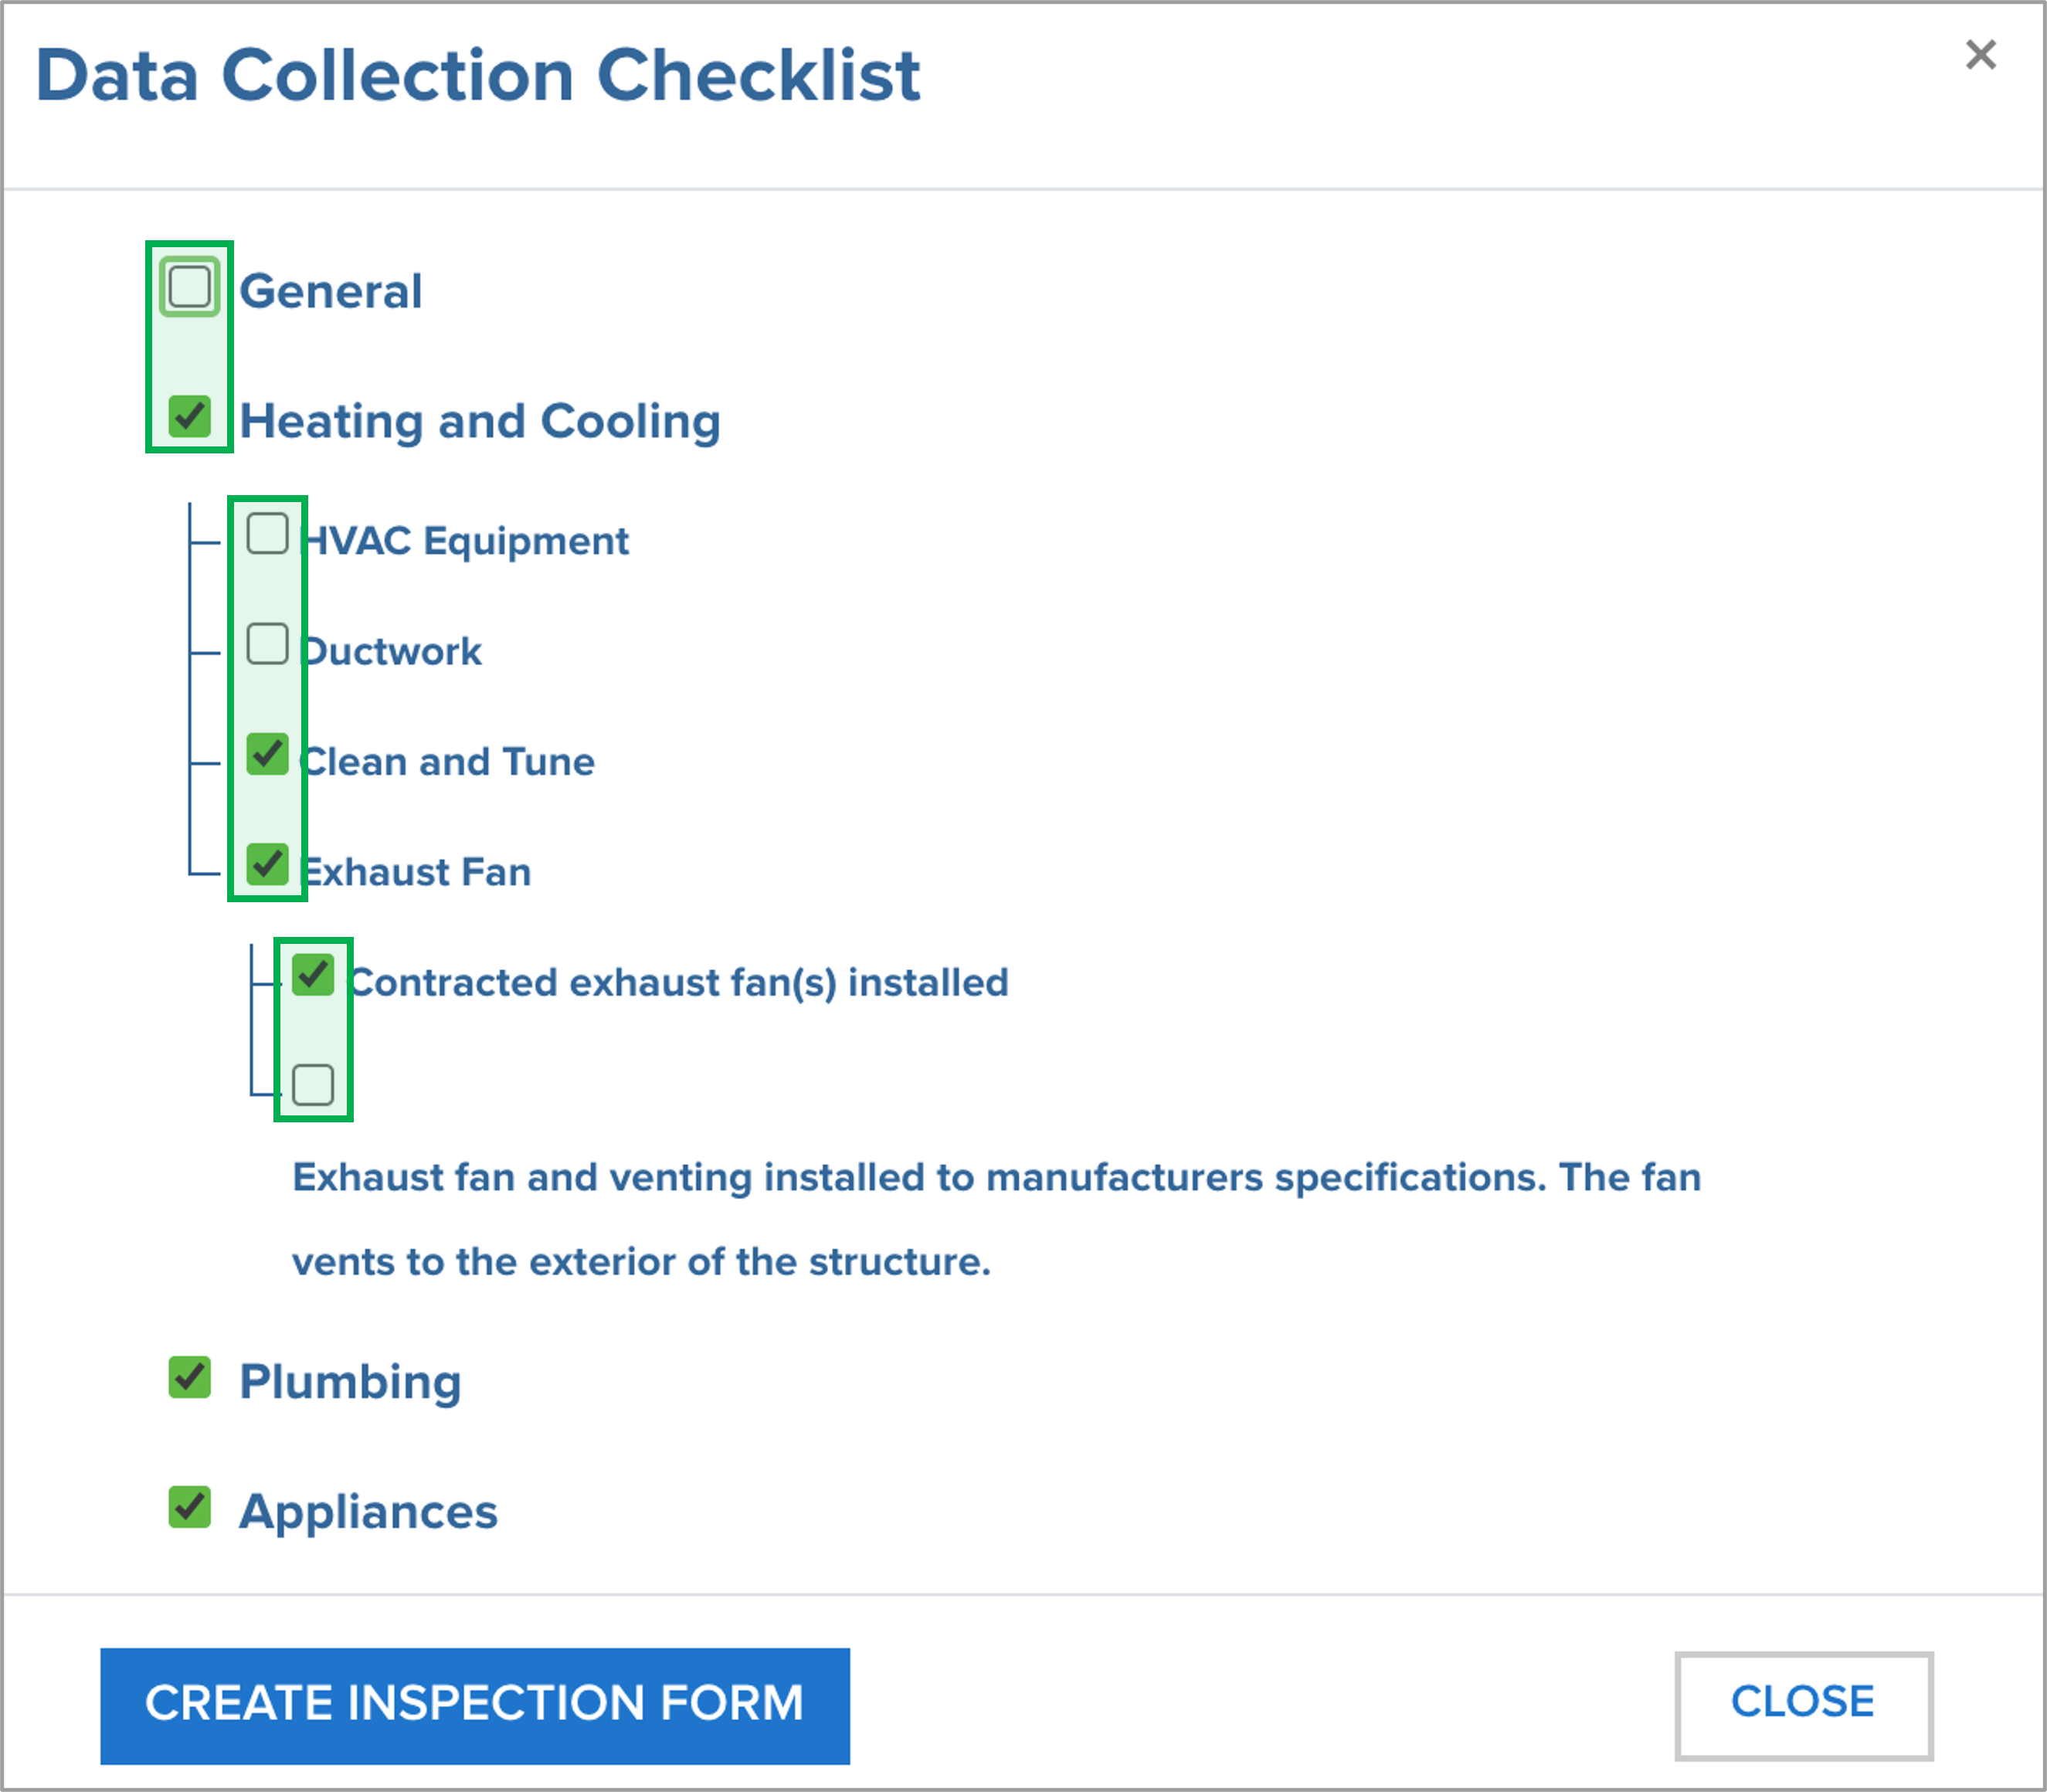
A Data Collection Checklist modal window will open, By default, all inspection Categories are automatically selected. | Expand |
|---|
| title | locating measures and tasks |
|---|
|
| Section |
|---|
| Column |
|---|
|
| A | Click just below the checkbox for any Category to show the corresponding Measures | | B | Click just below the checkbox for any Measure to show the corresponding Tasks | | C | An example of a list of Tasks associated with the selected Category and Measure |
|
| Column |
|---|
| 
|
|
|
|
| UI Step |
|---|
Uncheck boxes for any Category, Measure, or Task that should not be part of the scheduled inspection. | Tip |
|---|
Unchecking an entire Category will also uncheck any associated Measures or Tasks. Similarly, when unchecking an entire Measure, all associated Tasks are also unchecked. |
| Expand |
|---|
| 
|
|
| UI Step |
|---|
When all the correct Categories, Measures, and Tasks are correctly selected, click Create Inspection Form. The Data Collection Checklist modal window will close and you will be returned to the Inspection page. |
|
|
|
| Aura - Tab |
|---|
|
| Panel |
|---|
| borderColor | #002D72 |
|---|
| bgColor | #F3F4F9 |
|---|
| titleColor | #ffffff |
|---|
| borderWidth | 1 |
|---|
| titleBGColor | #002D72 |
|---|
| borderStyle | none |
|---|
| title | QSP Inspectors: Conducting the Inspection |
|---|
|
|
| Aura - Panel |
|---|
| tab | 1 |
|---|
| styles | {"body":{},"header":{"backgroundColor":{"color":"#f3f4f9"}},"headline":{"text":{"text":"Process Step","color":"#002d72","textAlign":"left","fontWeight":"bold","fontSize":18},"alignment":{"horizontal":"start"}},"base":{"backgroundColor":{"color":"#ffffff"},"boxShadow":{"shadows":[{"color":"rgba(0, 0, 0, 0.08)","x":0,"y":1,"blur":1,"spread":0},{"color":"rgba(0, 0, 0, 0.16)","x":0,"y":1,"blur":3,"spread":1}]},"borderRadius":{"radius":4}}} |
|---|
| body | <p><br /></p> |
|---|
| | Embed draw.io Diagram |
|---|
| border | false |
|---|
| diagramName | EAE - SQA Process |
|---|
| aspect | W1AjbQCRicNbGy_aNGse U404tycO2pwq8aiX1deP-3 |
|---|
| includedDiagram | 1 |
|---|
| simpleViewer | false |
|---|
| width | 1200 |
|---|
| aspectHash | fcab23a84f654fc6f7088e187cfbe730de821e81 |
|---|
| links | auto |
|---|
| tbstyle | hidden |
|---|
| pageId | 99877654 |
|---|
| lbox | false |
|---|
|
|
| Aura - Panel |
|---|
| tab | 1 |
|---|
| styles | {"body":{},"header":{"backgroundColor":{"color":"#f3f4f9"}},"headline":{"text":{"text":"Documenting Inspection Results","color":"#002d72","textAlign":"left","fontWeight":"bold","fontSize":18},"alignment":{"horizontal":"start"}},"base":{"backgroundColor":{"color":"#ffffff"},"boxShadow":{"shadows":[{"color":"rgba(0, 0, 0, 0.08)","x":0,"y":1,"blur":1,"spread":0},{"color":"rgba(0, 0, 0, 0.16)","x":0,"y":1,"blur":3,"spread":1}]},"borderRadius":{"radius":4}}} |
|---|
| body | <p><br /></p> |
|---|
|
| Expand |
|---|
|
| UI Steps |
|---|
|
| UI Step |
|---|
Access the Project Inspection Record as described in the Accessing Inspection Records section of the NYSERDA Portal tab on the left side of this page. |
| UI Step |
|---|
Once in the Project Inspection Record, click the Inspection Checklist button. | Expand |
|---|
|
|
|
| UI Step |
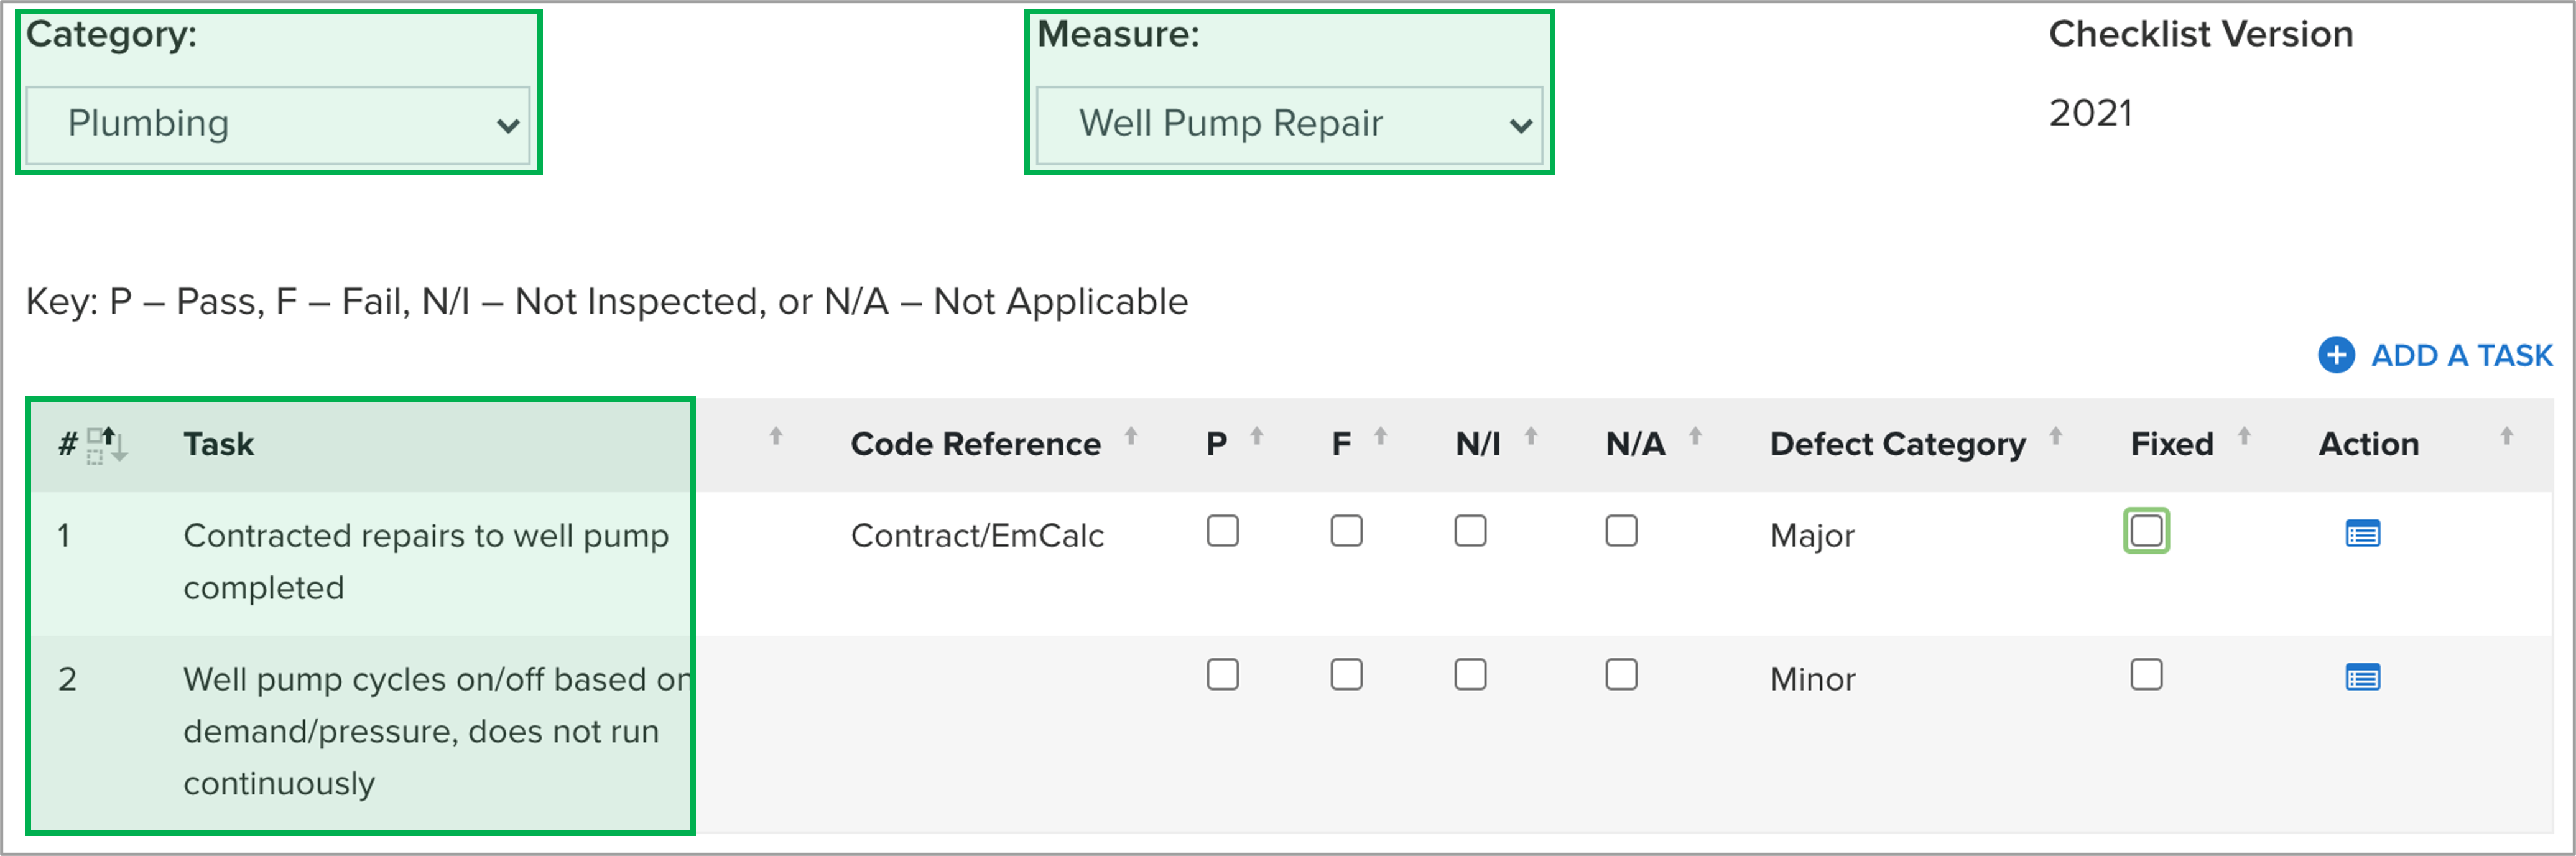
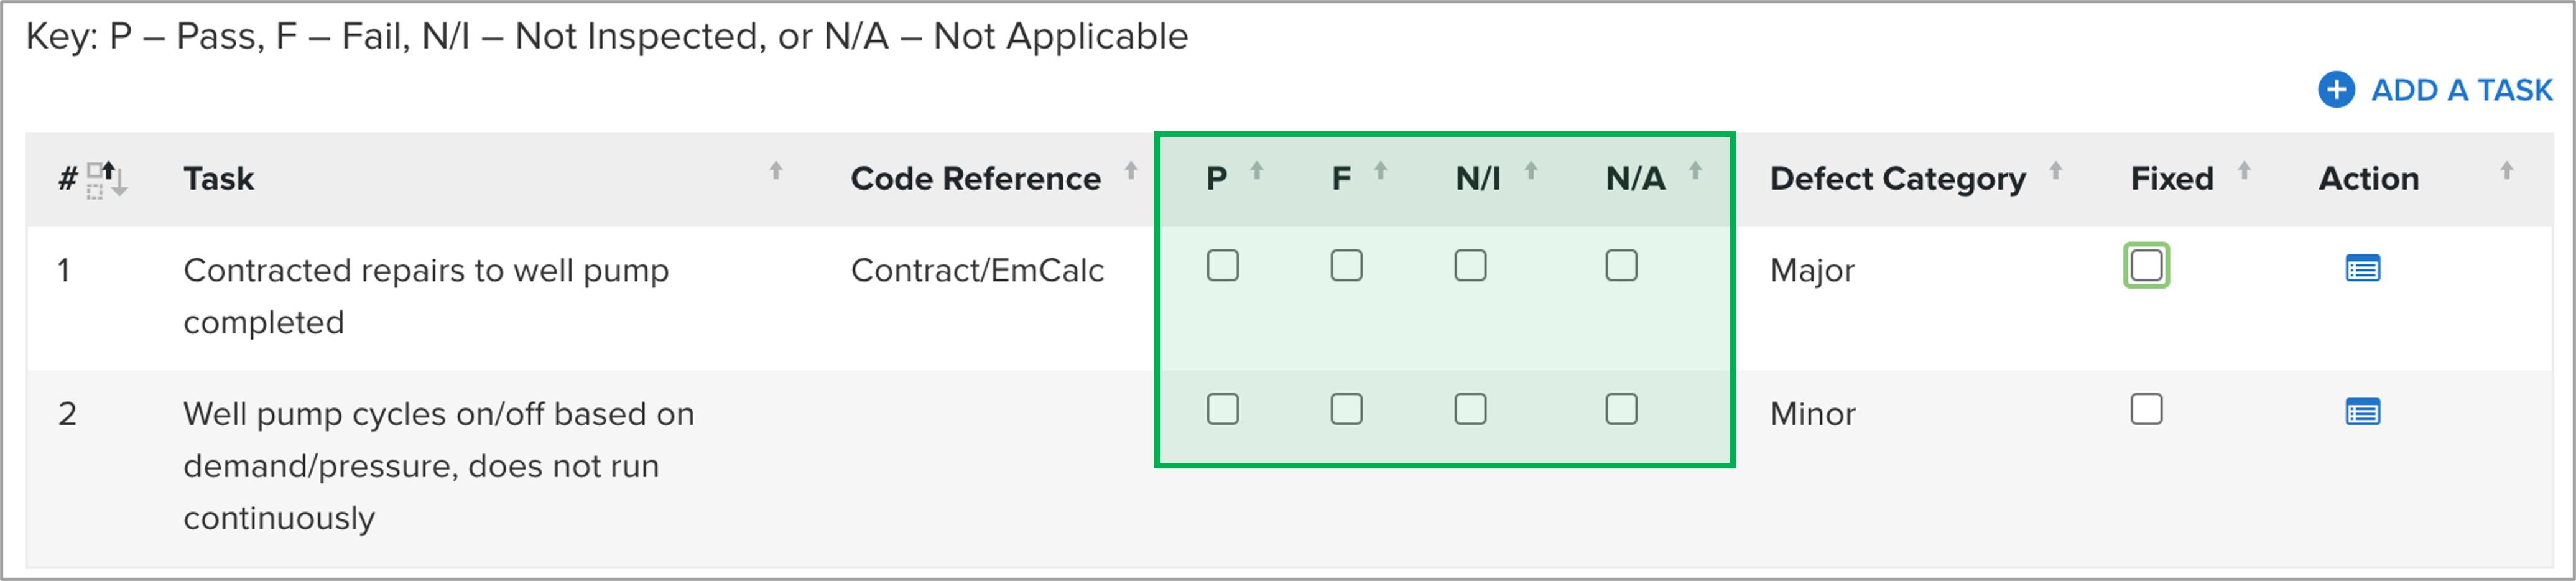
|---|
Every inspection will have a set of Categories that define the scope of the inspection requirements. Additionally, each category contains a sub-set of Measures and each measure contains a sub-set of Tasks. | Expand |
|---|
| 
|
|
| UI Step |
|---|
For each Task listed on the initial page of the Inspection Checklist, review the work done with respect to the specific Task and mark the work as Passed (P), Failed (F), Not Inspected (N/I), or Not Applicable (N/A) as the situation fits. | Tip |
|---|
If the Inspector needs to add an additional Task to the Measure that is not configurable in the Inspection Checklist, use the Add A Task link on the top-right of the Task table to open a modal window and document the details of the additional Task. |
| Expand |
|---|
| 
|
|
| UI Step |
|---|
For Tasks that are marked as Passed, Not Inspected, or Not Applicable, no additional action is needed by the Inspector. Review the instructions in the Failed Checklist Tasks section below to learn what must be done by the Inspector if a Task must be marked as Failed. All Failed Tasks require photo documentation by the Inspector. Photos of Failed Tasks should be taken at this stage of the process. |
| UI Step |
|---|
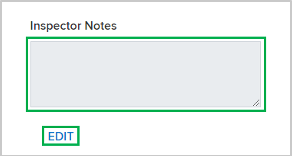
Inspectors may want to document a note to the Measure if additional information or explanations should be communicated with others throughout the inspection process. To add a Measure note, click Edit underneath the Inspector Note section to input a message, then click Save. | Tip |
|---|
The Edit link turns into a Save link and Cancel link when clicked. |
| Expand |
|---|
| 
|
|
| UI Step |
|---|
Once all Tasks for a Measure are completed, click the Save & Next button to advance to the next Measure and repeat steps 4-6 above for all additional Categories, Measures and Tasks. | Tip |
|---|
It is best practice to work advance through the Inspection Checklist using the Save & Next button as it will advance you through each Category and Measure associated with the Inspection Checklist and ensure that you do not miss any inspection Tasks. |
|
|
|
|
| Aura - Panel |
|---|
| tab | 1 |
|---|
| styles | {"body":{},"header":{"backgroundColor":{"color":"#f3f4f9"}},"headline":{"text":{"text":"Failed Checklist Tasks","color":"#002d72","textAlign":"left","fontWeight":"bold","fontSize":18},"alignment":{"horizontal":"start"}},"base":{"backgroundColor":{"color":"#ffffff"},"boxShadow":{"shadows":[{"color":"rgba(0, 0, 0, 0.08)","x":0,"y":1,"blur":1,"spread":0},{"color":"rgba(0, 0, 0, 0.16)","x":0,"y":1,"blur":3,"spread":1}]},"borderRadius":{"radius":4}}} |
|---|
| body | <p><br /></p> |
|---|
|
| Expand |
|---|
|
| Info |
|---|
All Failed Tasks require photo documentation by the Inspector. Before continuing on with the instructions below, be sure that photos of the Failed Tasks have already been taken. |
| UI Steps |
|---|
|
| UI Step |
|---|
When a Task on the Inspection Checklist is marked as Failed, a new modal window will automatically open requiring the Inspector to document the reason for the Task Failure and attach photo evidence of the Failed task. | Expand |
|---|
| 
|
|
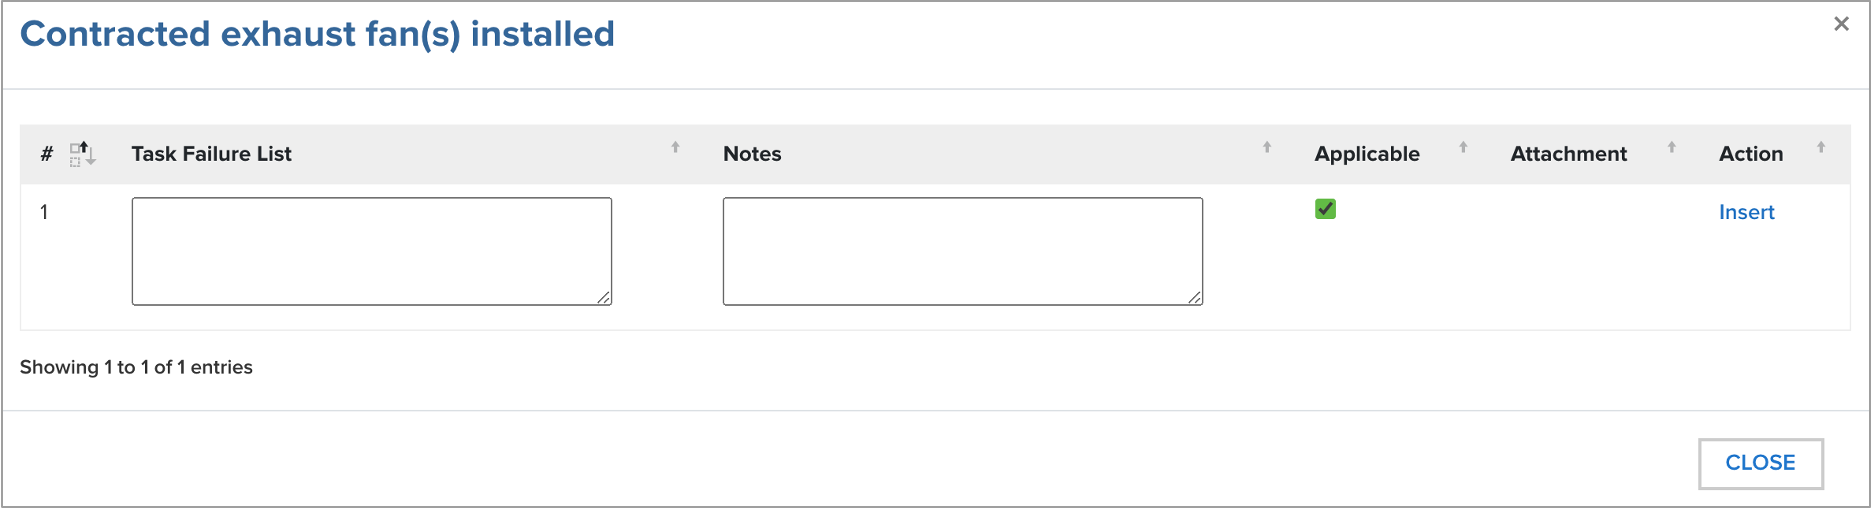
| UI Step |
|---|
In the Task Failure List field, enter in details to indicate the specific reason for the Task Failure. Use the Notes field, as needed, to provide additional clarity regarding the Task Failure. Then, click the Insert link in the Action column. | Expand |
|---|
| 
|
|
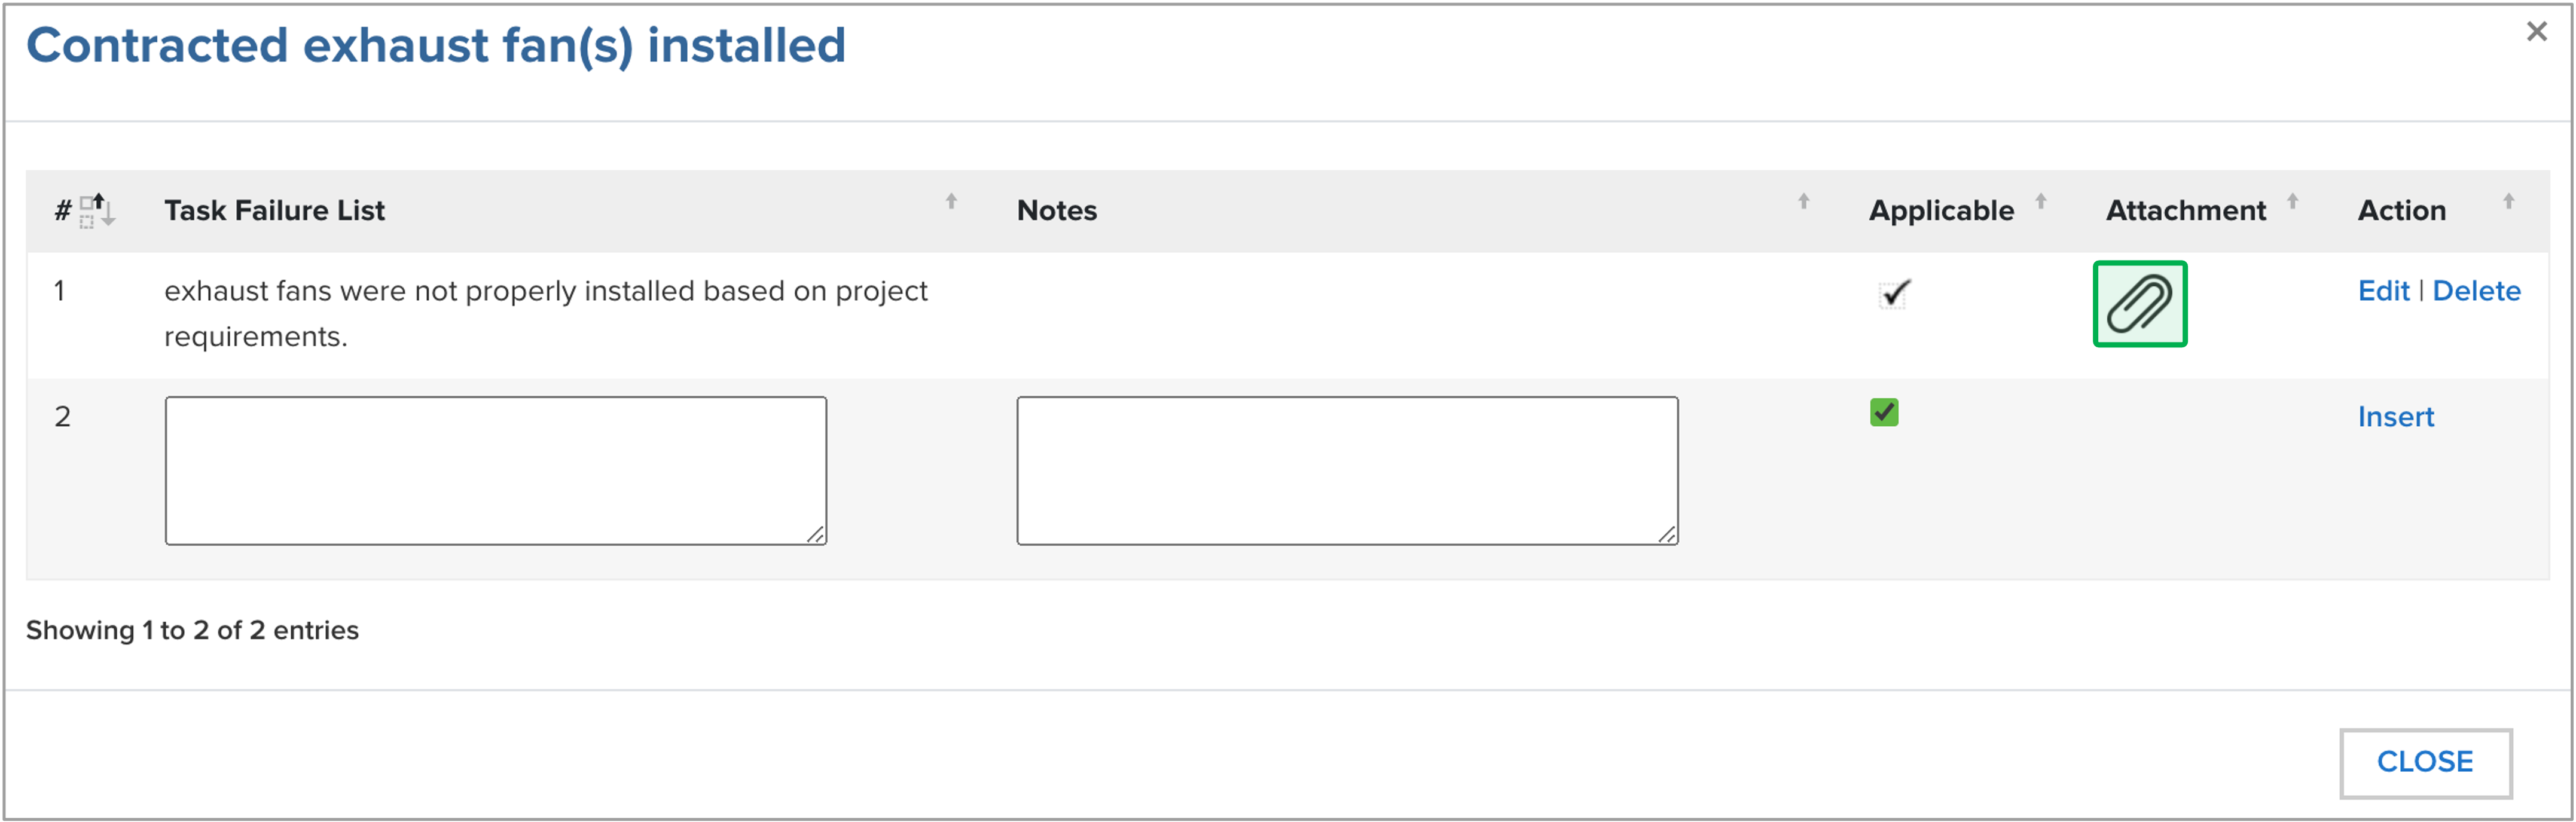
| UI Step |
|---|
The window will refresh and the line item you inserted will be added. To attach photo evidence of the Failed Task, click the Paperclip icon in the Attachment column for thr newly added line item. A new modal window will open. | Expand |
|---|
| 
|
|
| UI Step |
|---|
In the new window, click the Choose Files button, then locate and select the photo(s) for upload. When all files have been selected, click the Upload button to attach the photos to the record. The window will display a confirmation message if successful. Click Close to complete the process, close the window, and return to the Inspection Checklist to work on other inspection tasks. | Warning |
|---|
Uploaded photos will not be visible on this window. The confirmation message is the only indication you will receive that the photo(s) were uploaded successfully. Additionally, this confirmation message will automatically disappear after a few seconds. |
| Expand |
|---|
| 
|
|
| UI Step |
|---|
Then, click either the Back button (to return to the Task Failure window) or click Close to return to the Inspection Checklist. |
|
|
|
| Aura - Panel |
|---|
| tab | 1 |
|---|
| styles | {"body":{},"header":{"backgroundColor":{"color":"#f3f4f9"}},"headline":{"text":{"text":"Submitting Inspections","color":"#002d72","textAlign":"left","fontWeight":"bold","fontSize":18},"alignment":{"horizontal":"start"}},"base":{"backgroundColor":{"color":"#ffffff"},"boxShadow":{"shadows":[{"color":"rgba(0, 0, 0, 0.08)","x":0,"y":1,"blur":1,"spread":0},{"color":"rgba(0, 0, 0, 0.16)","x":0,"y":1,"blur":3,"spread":1}]},"borderRadius":{"radius":4}}} |
|---|
| body | <p><br /></p> |
|---|
|
| Expand |
|---|
|
| UI Steps |
|---|
|
| UI Step |
|---|
After completing all Inspection Categories, Measures, and Tasks, scroll to the bottom of the Inspection Checklist and click Submit. This action generates an Inspection Report and is appended automatically to the Project Inspection Record. | Tip |
|---|
When you have reached the last page of the Inspection Checklist the Save & Next Button will no longer be visible. |
| Expand |
|---|
| 
|
|
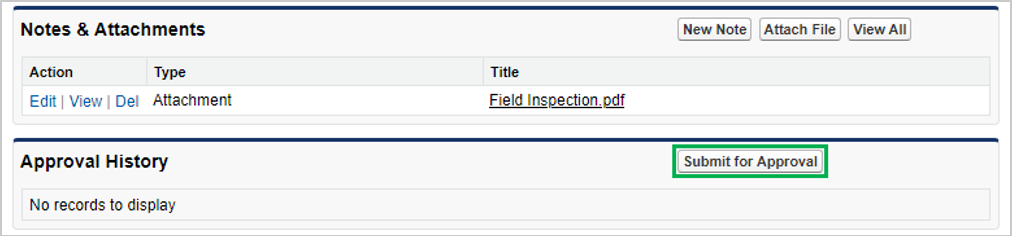
| UI Step |
|---|
Click the Back to Inspection button to return to the Project Inspection record. |
| UI Step |
|---|
On the Project Inspection record, click the Submit for Approval button in the Approval History section to complete the inspection process. | Warning |
|---|
Salesforce will display a submission error if no QA Manager was selected during the Inspection Scheduling process. Please review Procedure 1: Updating Scheduled Inspection to make the correction before proceeding. |
| Expand |
|---|
| 
|
|
|
|
|
| Aura - Panel |
|---|
| tab | 1 |
|---|
| styles | {"body":{},"header":{"backgroundColor":{"color":"#f3f4f9"}},"headline":{"text":{"text":"Post Inspection Report","color":"#002d72","textAlign":"left","fontWeight":"bold","fontSize":18},"alignment":{"horizontal":"start"}},"base":{"backgroundColor":{"color":"#ffffff"},"boxShadow":{"shadows":[{"color":"rgba(0, 0, 0, 0.08)","x":0,"y":1,"blur":1,"spread":0},{"color":"rgba(0, 0, 0, 0.16)","x":0,"y":1,"blur":3,"spread":1}]},"borderRadius":{"radius":4}}} |
|---|
| body | <p><br /></p> |
|---|
|
| Expand |
|---|
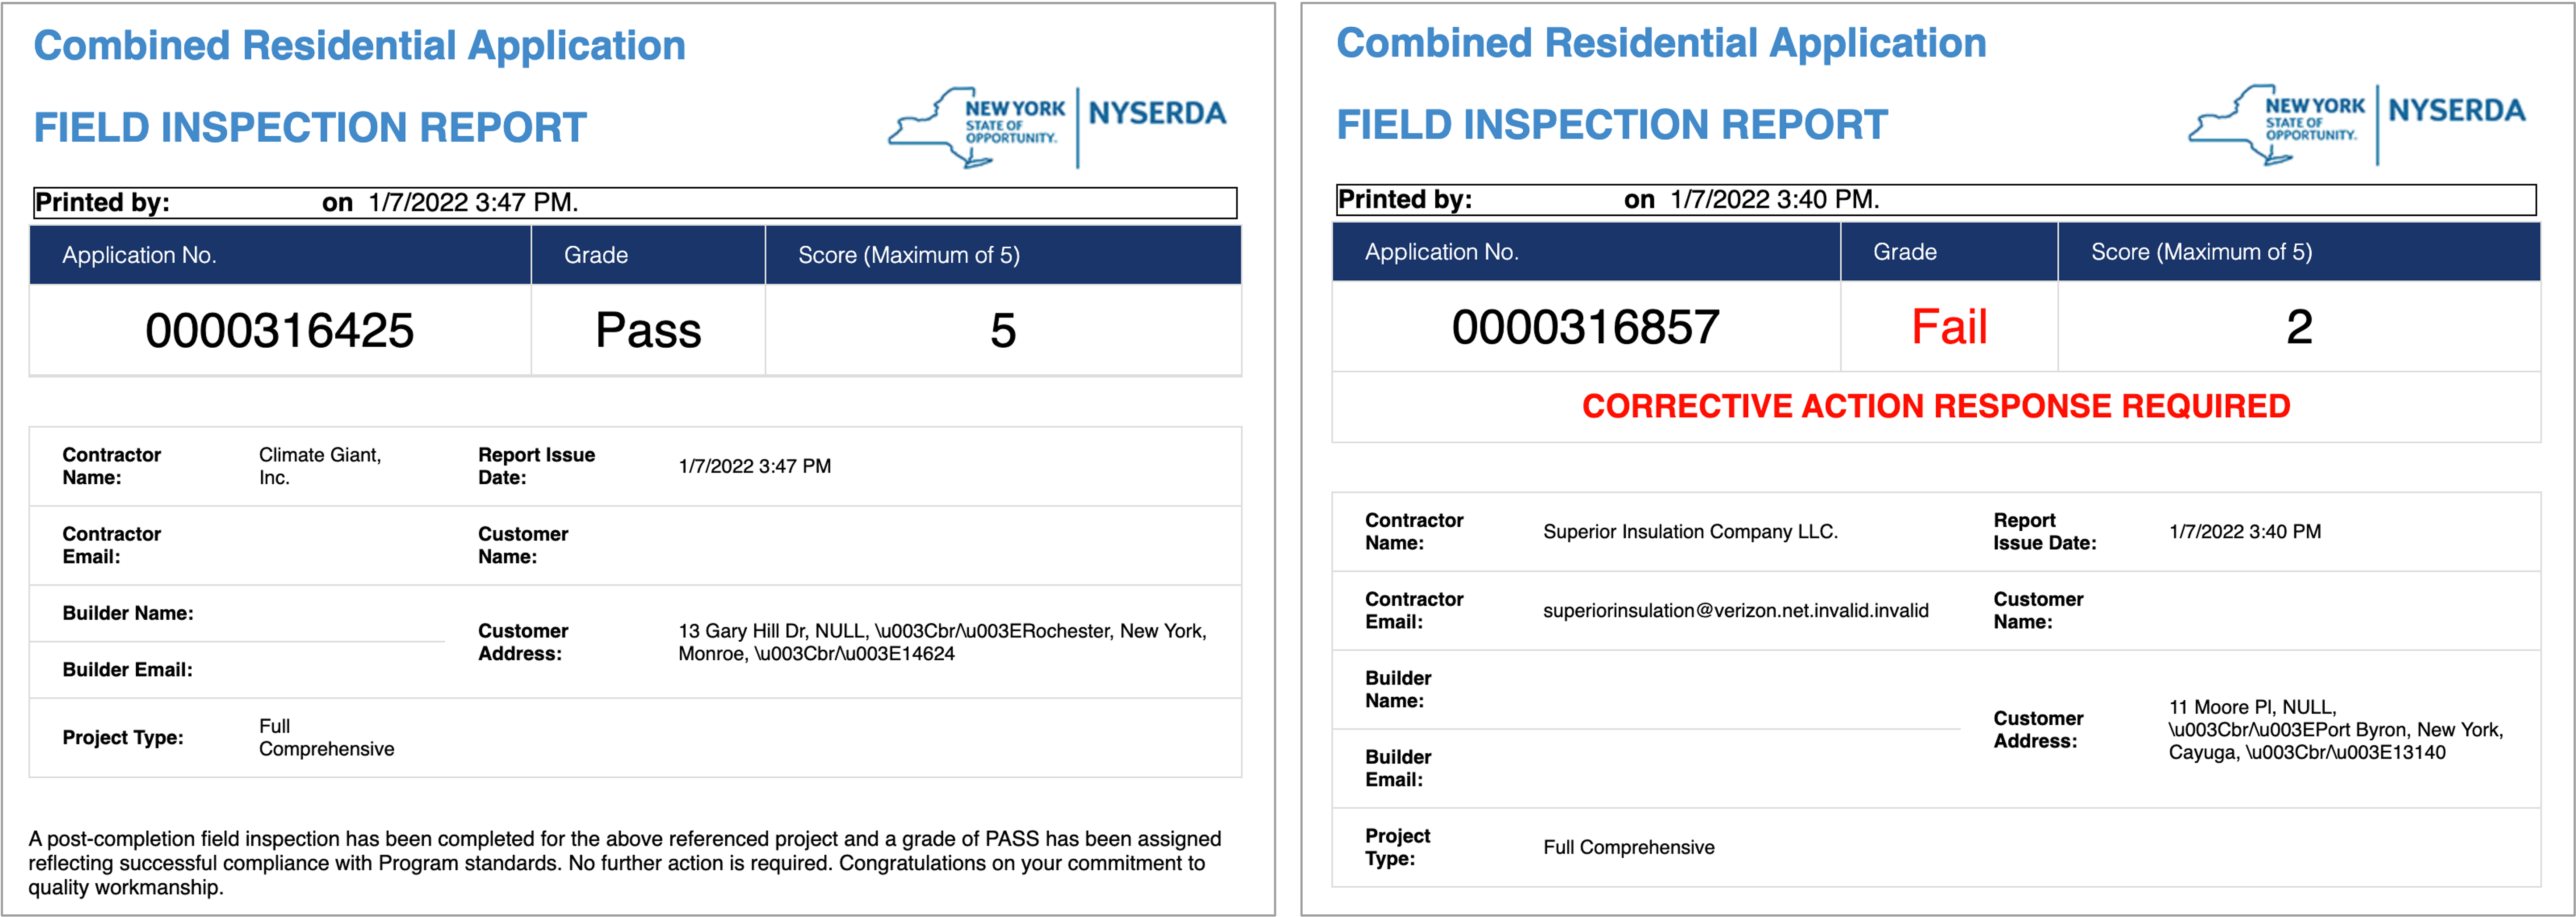
| Once an inspection has been completed and submitted by the Inspector, and is reviewed and approved by the QSP QA Manager, an Inspection Report is generated and appended to the Project Inspection Record. An email is systematically sent to the Contractor with a link to the Inspection Report. | Info |
|---|
Below are examples of the heading for an Inspection Report for both a passed and failed inspection. In an actual Inspection Report, below the Pass/Fail heading displays details on all aspects of the inspection results. |
|
|
|
| Aura - Tab |
|---|
|
| Panel |
|---|
| borderColor | #002D72 |
|---|
| bgColor | #F3F4F9 |
|---|
| titleColor | #ffffff |
|---|
| borderWidth | 1 |
|---|
| titleBGColor | #002D72 |
|---|
| borderStyle | none |
|---|
| title | QSP QA Managers: Reviewing and Approving Inspections |
|---|
|
|
| Info |
|---|
Regardless of the actual score generated once an inspection has been completed and submitted, QSP QA Managers will use the steps below to review and approve submitted inspections. |
| Aura - Panel |
|---|
| tab | 1 |
|---|
| styles | {"body":{},"header":{"backgroundColor":{"color":"#f3f4f9"}},"headline":{"text":{"text":"Process Step","color":"#002d72","textAlign":"left","fontWeight":"bold","fontSize":18},"alignment":{"horizontal":"start"}},"base":{"backgroundColor":{"color":"#ffffff"},"boxShadow":{"shadows":[{"color":"rgba(0, 0, 0, 0.08)","x":0,"y":1,"blur":1,"spread":0},{"color":"rgba(0, 0, 0, 0.16)","x":0,"y":1,"blur":3,"spread":1}]},"borderRadius":{"radius":4}}} |
|---|
| body | <p><br /></p> |
|---|
| | Embed draw.io Diagram |
|---|
| border | false |
|---|
| diagramName | EAE - SQA Process |
|---|
| aspect | W1AjbQCRicNbGy_aNGse U404tycO2pwq8aiX1deP-4 |
|---|
| includedDiagram | 1 |
|---|
| simpleViewer | false |
|---|
| width | 1200 |
|---|
| aspectHash | d87526349788bbd15d9c146db4ef0ef833cd04bc |
|---|
| links | auto |
|---|
| tbstyle | hidden |
|---|
| pageId | 99877654 |
|---|
| lbox | false |
|---|
|
|
| Aura - Panel |
|---|
| tab | 1 |
|---|
| styles | {"body":{},"header":{"backgroundColor":{"color":"#f3f4f9"}},"headline":{"text":{"text":"Reviewing & Approving the Inspection","color":"#002d72","textAlign":"left","fontWeight":"bold","fontSize":18},"alignment":{"horizontal":"start"}},"base":{"backgroundColor":{"color":"#ffffff"},"boxShadow":{"shadows":[{"color":"rgba(0, 0, 0, 0.08)","x":0,"y":1,"blur":1,"spread":0},{"color":"rgba(0, 0, 0, 0.16)","x":0,"y":1,"blur":3,"spread":1}]},"borderRadius":{"radius":4}}} |
|---|
| body | <p><br /></p> |
|---|
|
| UI Steps |
|---|
|
| UI Step |
|---|
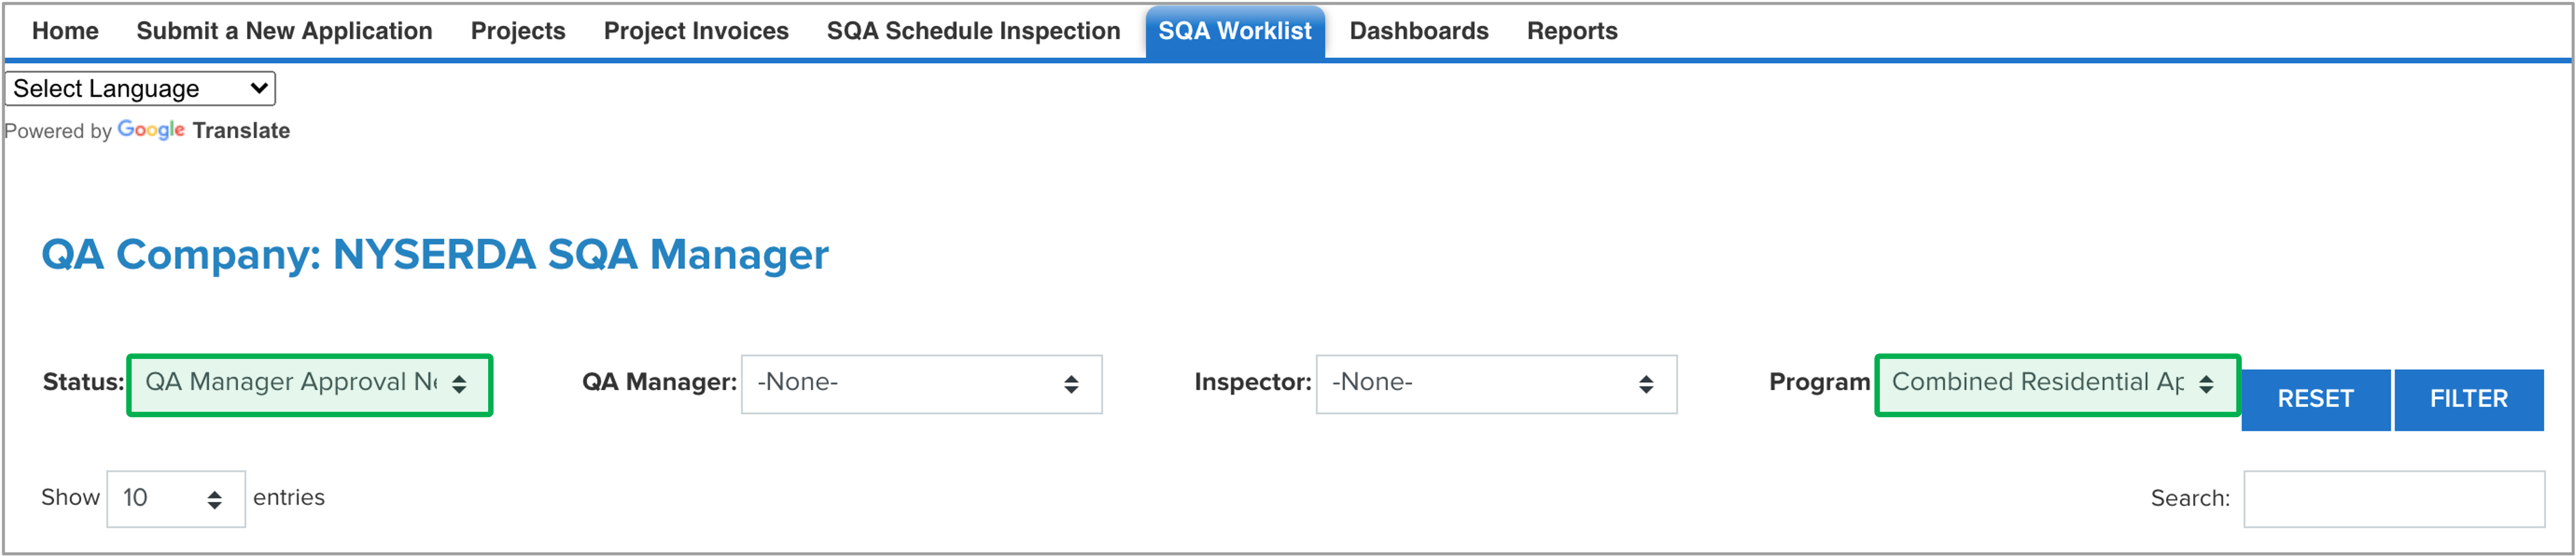
From the SQA Worklist tab in the NYSERDA Partner Portal, set the Status drop-down to QA Manager Approval Needed and the Program drop-down to Combined Residential Application, then click Filter to filter for Project Inspections that require approval. Use any other filters on this page as necessary. | Expand |
|---|
| 
|
|
| UI Step |
|---|
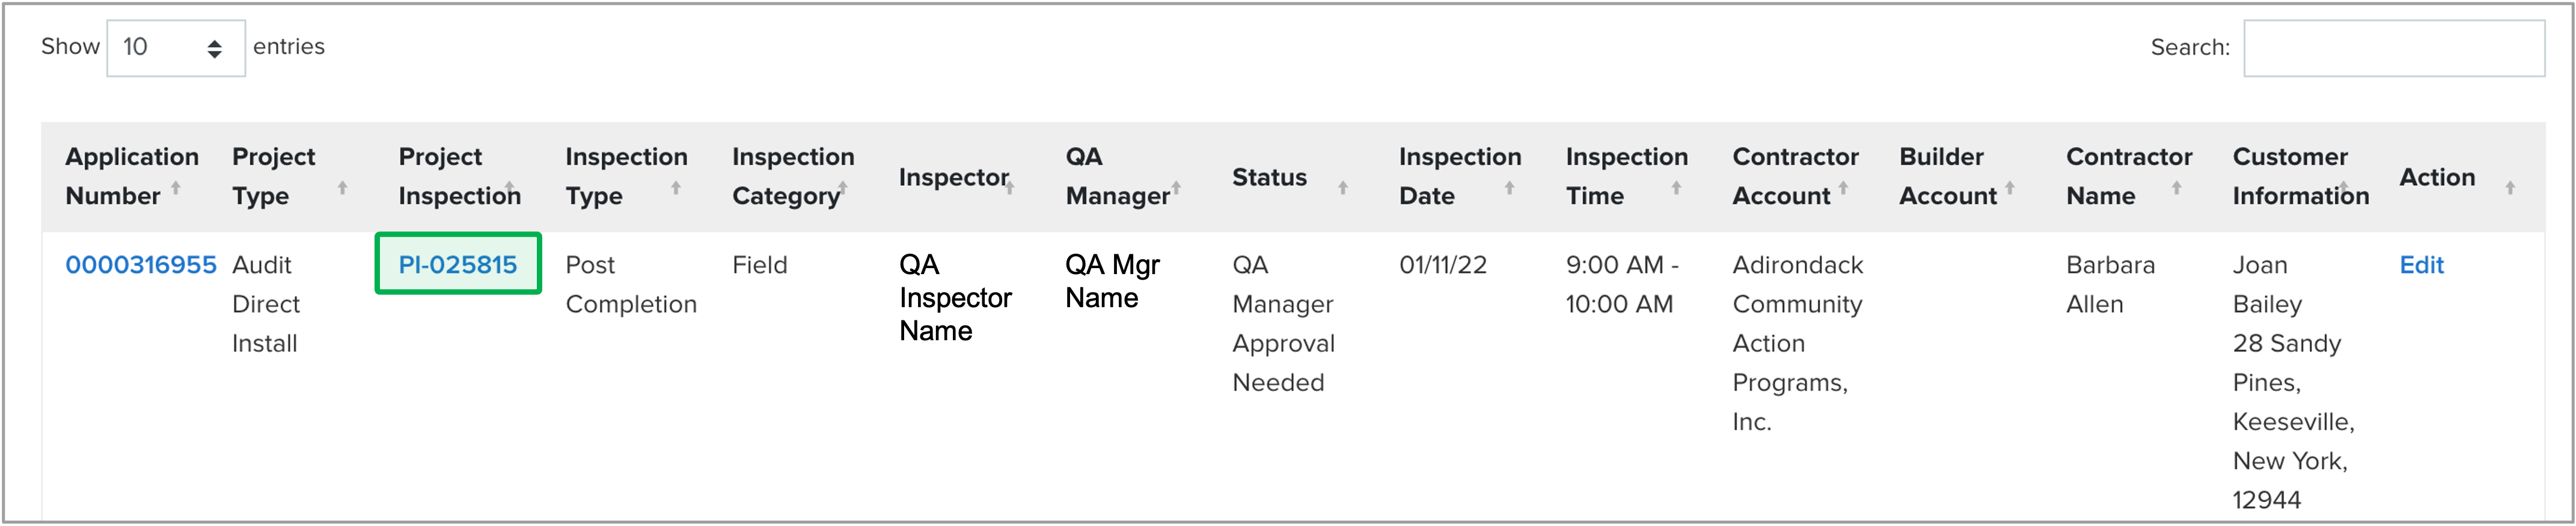
Click the desired Project Inspection link to open the associated Inspection Record. | Expand |
|---|
| 
|
|
| UI Step |
|---|
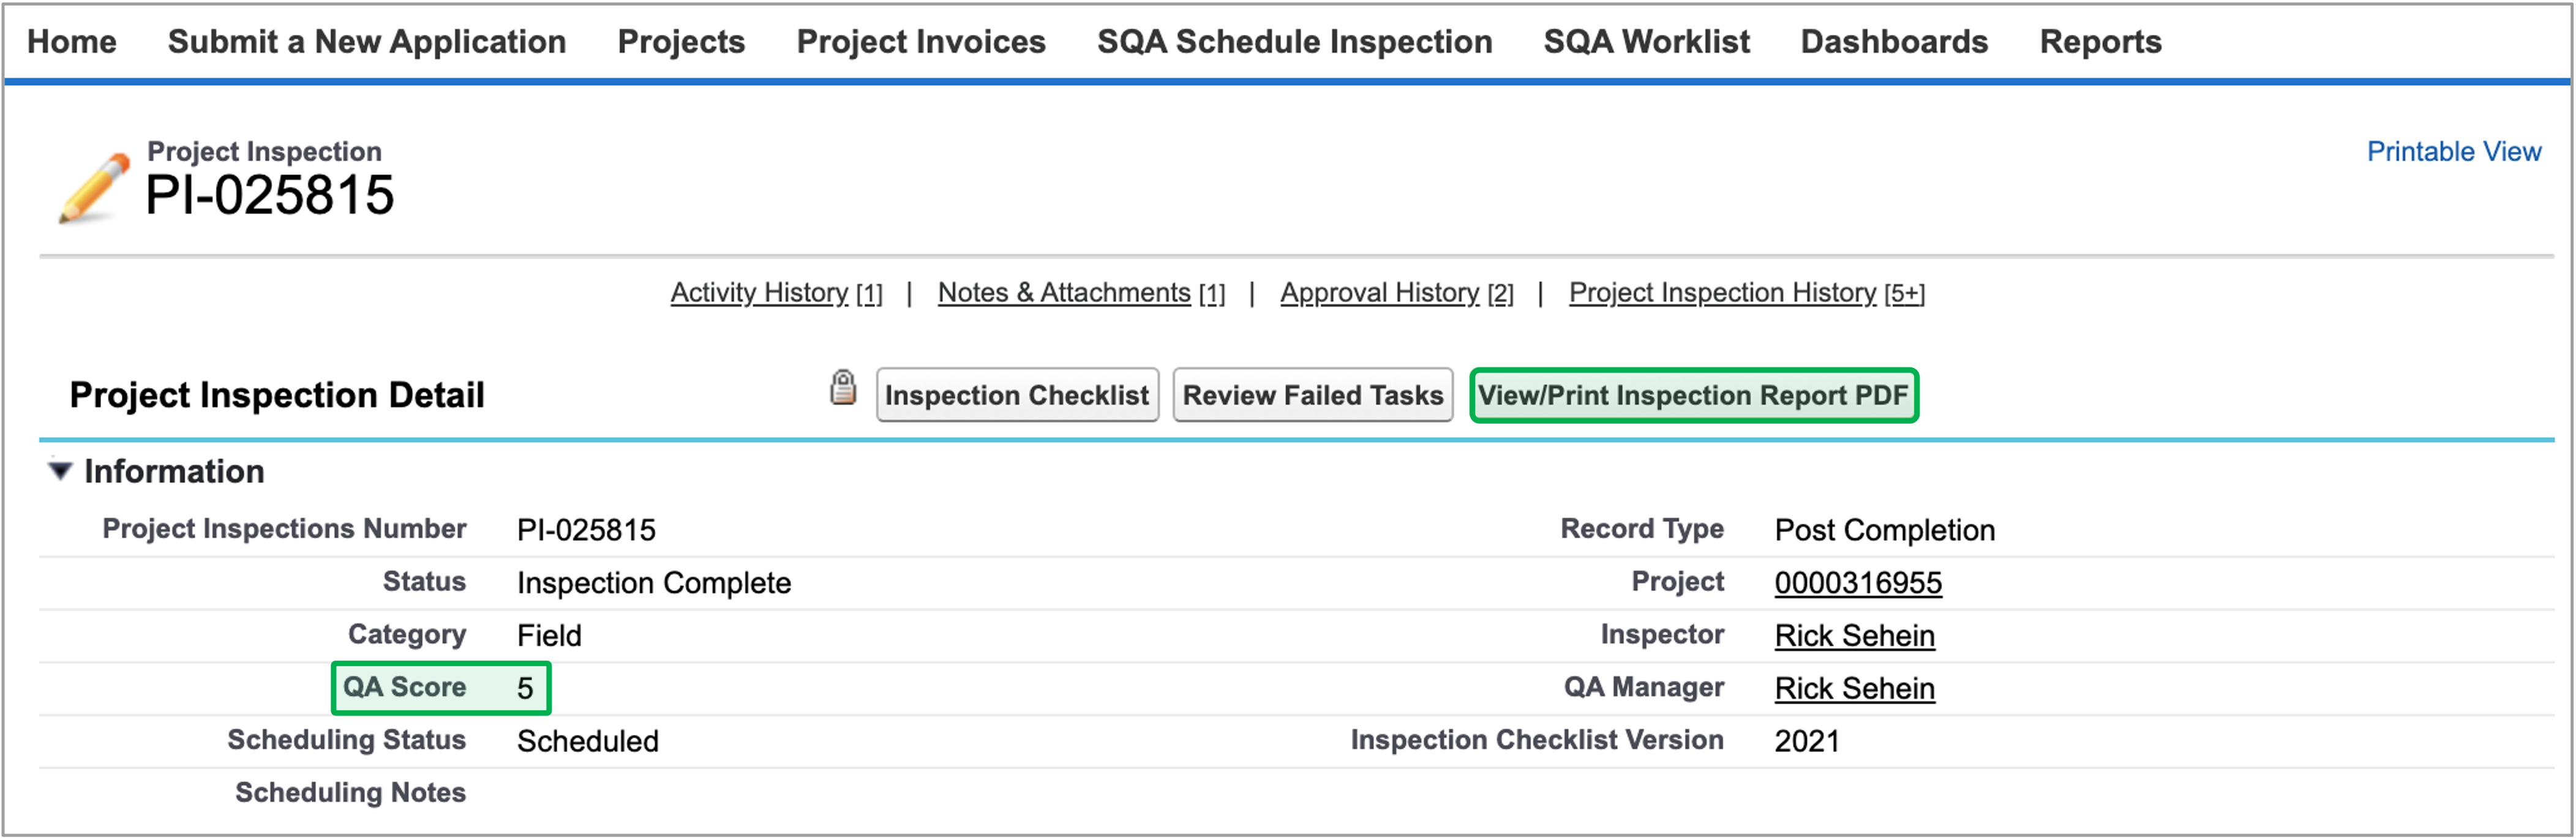
On the Inspection Record, review the QA Score and the Inspection Report. The Inspection Report is accessed from the View/Print Inspection Report PDF, and will open as a PDF in a new tab when the button is clicked. | Expand |
|---|
| 
|
|
| UI Step |
|---|
When you have completed the review of the Inspection Report, scroll down to the Approval History section of the Inspection Record and click the Approve/Reject link to open the Approval Request page. | Expand |
|---|
| 
|
|
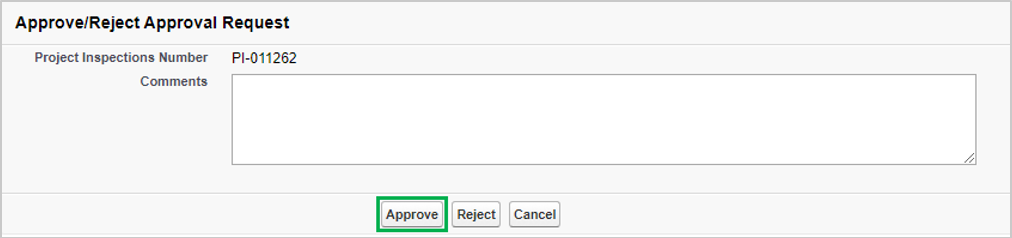
| UI Step |
|---|
On the Approve Request page, document any relevant notes in the Comment field (optional) and click the Approve button. | Expand |
|---|
| 
| Warning |
|---|
QSP QA Managers can also Reject the inspection by clicking the Reject button. Rejected inspections are returned to the Inspector for revisions. When rejecting inspections, leverage the Comments box to detail the reason(s) for the rejection. |
|
|
| UI Step |
|---|
Clicking Approve will update the Overall Status field for the inspection to Approved on the Inspection Record in the Activity History section. | Expand |
|---|
| 
|
|
|
|
|
| Aura - Tab |
|---|
|
| Panel |
|---|
| borderColor | #002D72 |
|---|
| bgColor | #F3F4F9 |
|---|
| titleColor | #ffffff |
|---|
| borderWidth | 1 |
|---|
| titleBGColor | #002D72 |
|---|
| borderStyle | none |
|---|
| title | Contractors: Responding to Corrective Action Required (CAR) Responses |
|---|
|
|
| Info |
|---|
This content will live in the PUBLIC Knowledge Base for Contractor access. When complete, those materials will be linked her so that the QSP Company, CLEAResult, and NYSERDA Program Staff know what to expect during this phase. |
| Aura - Panel |
|---|
| tab | 1 |
|---|
| styles | {"body":{},"header":{"backgroundColor":{"color":"#f3f4f9"}},"headline":{"text":{"text":"Process Step","color":"#002d72","textAlign":"left","fontWeight":"bold","fontSize":18},"alignment":{"horizontal":"start"}},"base":{"backgroundColor":{"color":"#ffffff"},"boxShadow":{"shadows":[{"color":"rgba(0, 0, 0, 0.08)","x":0,"y":1,"blur":1,"spread":0},{"color":"rgba(0, 0, 0, 0.16)","x":0,"y":1,"blur":3,"spread":1}]},"borderRadius":{"radius":4}}} |
|---|
| body | <p><br /></p> |
|---|
| | Embed draw.io Diagram |
|---|
| border | false |
|---|
| diagramName | EAE - SQA Process |
|---|
| aspect | W1AjbQCRicNbGy_aNGse U404tycO2pwq8aiX1deP-5 |
|---|
| includedDiagram | 1 |
|---|
| simpleViewer | false |
|---|
| width | 1200 |
|---|
| aspectHash | d4e71a74f57f3e9734df1d773f7f89a8b056f9c2 |
|---|
| links | auto |
|---|
| tbstyle | hidden |
|---|
| pageId | 99877654 |
|---|
| lbox | false |
|---|
|
|
| Aura - Panel |
|---|
| tab | 1 |
|---|
| styles | {"body":{},"header":{"backgroundColor":{"color":"#f3f4f9"}},"headline":{"text":{"text":"Contractor Responsibilities","color":"#002d72","textAlign":"left","fontWeight":"bold","fontSize":18},"alignment":{"horizontal":"start"}},"base":{"backgroundColor":{"color":"#ffffff"},"boxShadow":{"shadows":[{"color":"rgba(0, 0, 0, 0.08)","x":0,"y":1,"blur":1,"spread":0},{"color":"rgba(0, 0, 0, 0.16)","x":0,"y":1,"blur":3,"spread":1}]},"borderRadius":{"radius":4}}} |
|---|
| body | <p><br /></p> |
|---|
| During this step, NYSERDA Program staff can expect the following to occur: - Contractors will review the automated email provided post-inspection. This email contains a link to the Inspection Report.
- Contractors will review the Inspection report, locating tasks that were marked as Failed.
- Contractors may either:
- Fix the documented errors and provide proof of completion, or
- Contest Corrective Action Required (CAR) Tasks.
To review the instructions Contractors would follow for this Procedure, or if you would like to provide a link to Contractors or other external stakeholder, access the content in the Public Knowledge Base below. | UI Button |
|---|
| color | blue |
|---|
| size | small |
|---|
| title | Standards & Quality Assurance: Contractor Resources |
|---|
| url | https://knowledge.nyserda.ny.gov/pages/viewpage.action?pageId=99877654 |
|---|
|
To advance to the next step in the process, please click the Procedure 6 step in the workflow above. |
|
| Aura - Tab |
|---|
|
| Panel |
|---|
| borderColor | #002D72 |
|---|
| bgColor | #F3F4F9 |
|---|
| titleColor | #ffffff |
|---|
| borderWidth | 1 |
|---|
| titleBGColor | #002D72 |
|---|
| borderStyle | none |
|---|
| title | Program Implementors: Reviewing and Approving CAR Responses |
|---|
|
|
| Info |
|---|
Certain inspections have a Corrective Action Required (CAR) status. Any inspection with a QA score of 1 or 2 is considered CAR Eligible. After contractors resubmit CAR Tasks as either Resolved or Contested, Program Implementers are required to review, and approve or reject the failed tasks. |
| Aura - Panel |
|---|
| tab | 1 |
|---|
| styles | {"body":{},"header":{"backgroundColor":{"color":"#f3f4f9"}},"headline":{"text":{"text":"Process Step","color":"#002d72","textAlign":"left","fontWeight":"bold","fontSize":18},"alignment":{"horizontal":"start"}},"base":{"backgroundColor":{"color":"#ffffff"},"boxShadow":{"shadows":[{"color":"rgba(0, 0, 0, 0.08)","x":0,"y":1,"blur":1,"spread":0},{"color":"rgba(0, 0, 0, 0.16)","x":0,"y":1,"blur":3,"spread":1}]},"borderRadius":{"radius":4}}} |
|---|
| body | <p><br /></p> |
|---|
| | Embed draw.io Diagram |
|---|
| border | false |
|---|
| diagramName | EAE - SQA Process |
|---|
| aspect | W1AjbQCRicNbGy_aNGse U404tycO2pwq8aiX1deP-6 |
|---|
| includedDiagram | 1 |
|---|
| simpleViewer | false |
|---|
| width | 1200 |
|---|
| aspectHash | 65337be0b373a5260121bbee883680eee621087b |
|---|
| links | auto |
|---|
| tbstyle | hidden |
|---|
| pageId | 99877654 |
|---|
| lbox | false |
|---|
|
|
| Aura - Panel |
|---|
| tab | 1 |
|---|
| styles | {"body":{},"header":{"backgroundColor":{"color":"#f3f4f9"}},"headline":{"text":{"text":"Program Implementer Contested CAR Task Review & Approval","color":"#002d72","textAlign":"left","fontWeight":"bold","fontSize":18},"alignment":{"horizontal":"start"}},"base":{"backgroundColor":{"color":"#ffffff"},"boxShadow":{"shadows":[{"color":"rgba(0, 0, 0, 0.08)","x":0,"y":1,"blur":1,"spread":0},{"color":"rgba(0, 0, 0, 0.16)","x":0,"y":1,"blur":3,"spread":1}]},"borderRadius":{"radius":4}}} |
|---|
| body | <p><br /></p> |
|---|
|
| Expand |
|---|
|
| UI Steps |
|---|
|
| UI Step |
|---|
From the SQA Worklist tab in Salesforce, click the Status dropdown list and select Program Implementer Approval Needed to identify the Project Inspections that require review/approval. |
| UI Step |
|---|
Click Filter to filter the list based on the dropdown item selected, then click Claim to select a record. |
| UI Step |
|---|
Click the Project Inspection link in the same column to open the record. |
| UI Step |
|---|
In the record, click Review Failed Tasks. |
| UI Step |
|---|
Review each failed task and click the Action dropdown list to either approve or deny. The system will notify the contractor/builder about any denied tasks that require additional corrections. |
| UI Step |
|---|
When all Failed tasks have been responded to using the above steps, click Submit to update the Inspection and return to the Inspection Record. |
| UI Step |
|---|
Click the Status field to edit it and select the appropriate status from the options below: | Warning |
|---|
If the record status is listed as Completed or Report Issued - Corrective Action Needed, also click Send an Email to notify the contractor. |
| QA Manager Approval Needed | Select if you have approved at least one contested task | | Completed | Select if all CAR eligible tasks have been marked as Approve/Resolved Task | | Report Issued - Corrective Action Needed | Select if you have marked any failed task as Deny Contested Task |
|
|
|
|
| Aura - Panel |
|---|
| tab | 1 |
|---|
| styles | {"body":{},"header":{"backgroundColor":{"color":"#f3f4f9"}},"headline":{"text":{"text":"Program Implementer Contested CAR Task Approval","color":"#002d72","textAlign":"left","fontWeight":"bold","fontSize":18},"alignment":{"horizontal":"start"}},"base":{"backgroundColor":{"color":"#ffffff"},"boxShadow":{"shadows":[{"color":"rgba(0, 0, 0, 0.08)","x":0,"y":1,"blur":1,"spread":0},{"color":"rgba(0, 0, 0, 0.16)","x":0,"y":1,"blur":3,"spread":1}]},"borderRadius":{"radius":4}}} |
|---|
| body | <p><br /></p> |
|---|
|
| Expand |
|---|
|
| Info |
|---|
The instructions for the NYSERDA QA Manager to perform the final review/approval is identical to the steps the Program Implementer follows in the Program Implementer Review/Approval section with the exception of the identified steps below: |
| UI Steps |
|---|
|
| UI Step |
|---|
From the SQA Worklist tab in Salesforce, click the Status dropdown list and select Contested-NYSERDA QA Manager Review Needed to identify the Project Inspections that require review/approval. |
| UI Step |
|---|
When the review of all Failed tasks is complete, click Generate Final Report to update the report in the Project Inspection record. |
| UI Step |
|---|
Click the Status field to edit it and select Completed. |
| UI Step |
|---|
Click Save, then click Send an Email and use the SQA templates to notify the contractor. |
|
|
|
|
| Aura - Tab |
|---|
|
| Panel |
|---|
| borderColor | #002D72 |
|---|
| bgColor | #F3F4F9 |
|---|
| titleColor | #ffffff |
|---|
| borderWidth | 1 |
|---|
| titleBGColor | #002D72 |
|---|
| borderStyle | none |
|---|
| title | Training Resources |
|---|
|
|
| Info |
|---|
Training was provided to Honeywell on January 20, 2022. A recording of that session can be accessed below: |
| Aura - Panel |
|---|
| tab | 1 |
|---|
| styles | {"body":{"text":{"color":"#002d72","textAlign":"left","fontWeight":"normal","fontSize":14}},"header":{"backgroundColor":{"color":"#f3f4f9"}},"headline":{"text":{"text":"Training Video","color":"#002d72","textAlign":"left","fontWeight":"bold","fontSize":18},"alignment":{"horizontal":"start"}},"base":{"boxShadow":{"shadows":[{"color":"rgba(0, 0, 0, 0.08)","x":0,"y":1,"blur":1,"spread":0},{"color":"rgba(0, 0, 0, 0.16)","x":0,"y":1,"blur":3,"spread":1}]}}} |
|---|
| body | |
|---|
| The video below is a recording of the training session provided to Honeywell on January 20, 2022. Click the Play button on the video to being watching the recording. You can also click the full window icon in the lower-right hand corner to open the video in full-screen mode. | Expand |
|---|
| | Multimedia |
|---|
| name | NYSERDA Standards and Quality Assurance (SQA) Training for Honeywell.mp4 |
|---|
| width | 100% |
|---|
| page | External Guide Video Library |
|---|
| height | 100% |
|---|
|
|
|
| Aura - Panel |
|---|
| tab | 1 |
|---|
| styles | {"body":{"text":{"color":"#002d72","textAlign":"left","fontWeight":"normal","fontSize":14}},"header":{"backgroundColor":{"color":"#f3f4f9"}},"headline":{"text":{"text":"Training Presentation","color":"#002d72","textAlign":"left","fontWeight":"bold","fontSize":18},"alignment":{"horizontal":"start"}},"base":{"boxShadow":{"shadows":[{"color":"rgba(0, 0, 0, 0.08)","x":0,"y":1,"blur":1,"spread":0},{"color":"rgba(0, 0, 0, 0.16)","x":0,"y":1,"blur":3,"spread":1}]}}} |
|---|
| body | |
|---|
| The below presentation was used during the live training session to Honeywell. To read through the presentation, click once to open in full-screen mode, then scroll down to review additional slides. Do not use the arrows to the right and left after opening the presentation in full-screen mode as it will navigate to other attachments on this page. | Expand |
|---|
| | View file |
|---|
| name | RES SQA Training Presentation - Honeywell.pdf |
|---|
| page | External Guide Attachment Library |
|---|
| height | 250 |
|---|
|
|
|
|
|