| Aura - Tab |
|---|
| title | Accessing the ApplicationIntroduction |
|---|
|
| Panel |
|---|
| borderColor | #002D72 |
|---|
| bgColor | #F3F4F9 |
|---|
| titleColor | #ffffff |
|---|
| borderWidth | 1 |
|---|
| titleBGColor | #002D72 |
|---|
| borderStyle | none |
|---|
| title | Introduction |
|---|
|
|
| Info |
|---|
The content below provides guidance when beginning, and navigating through, the online application. Please review before accessing any of the Application Instruction tabs to the left. |
Accessing the Application:| UI Steps |
|---|
|
| UI Step |
|---|
Log into your Salesforce Portal account Can I get a link to the login page for Businesses/Contractors? |
| UI Step |
|---|
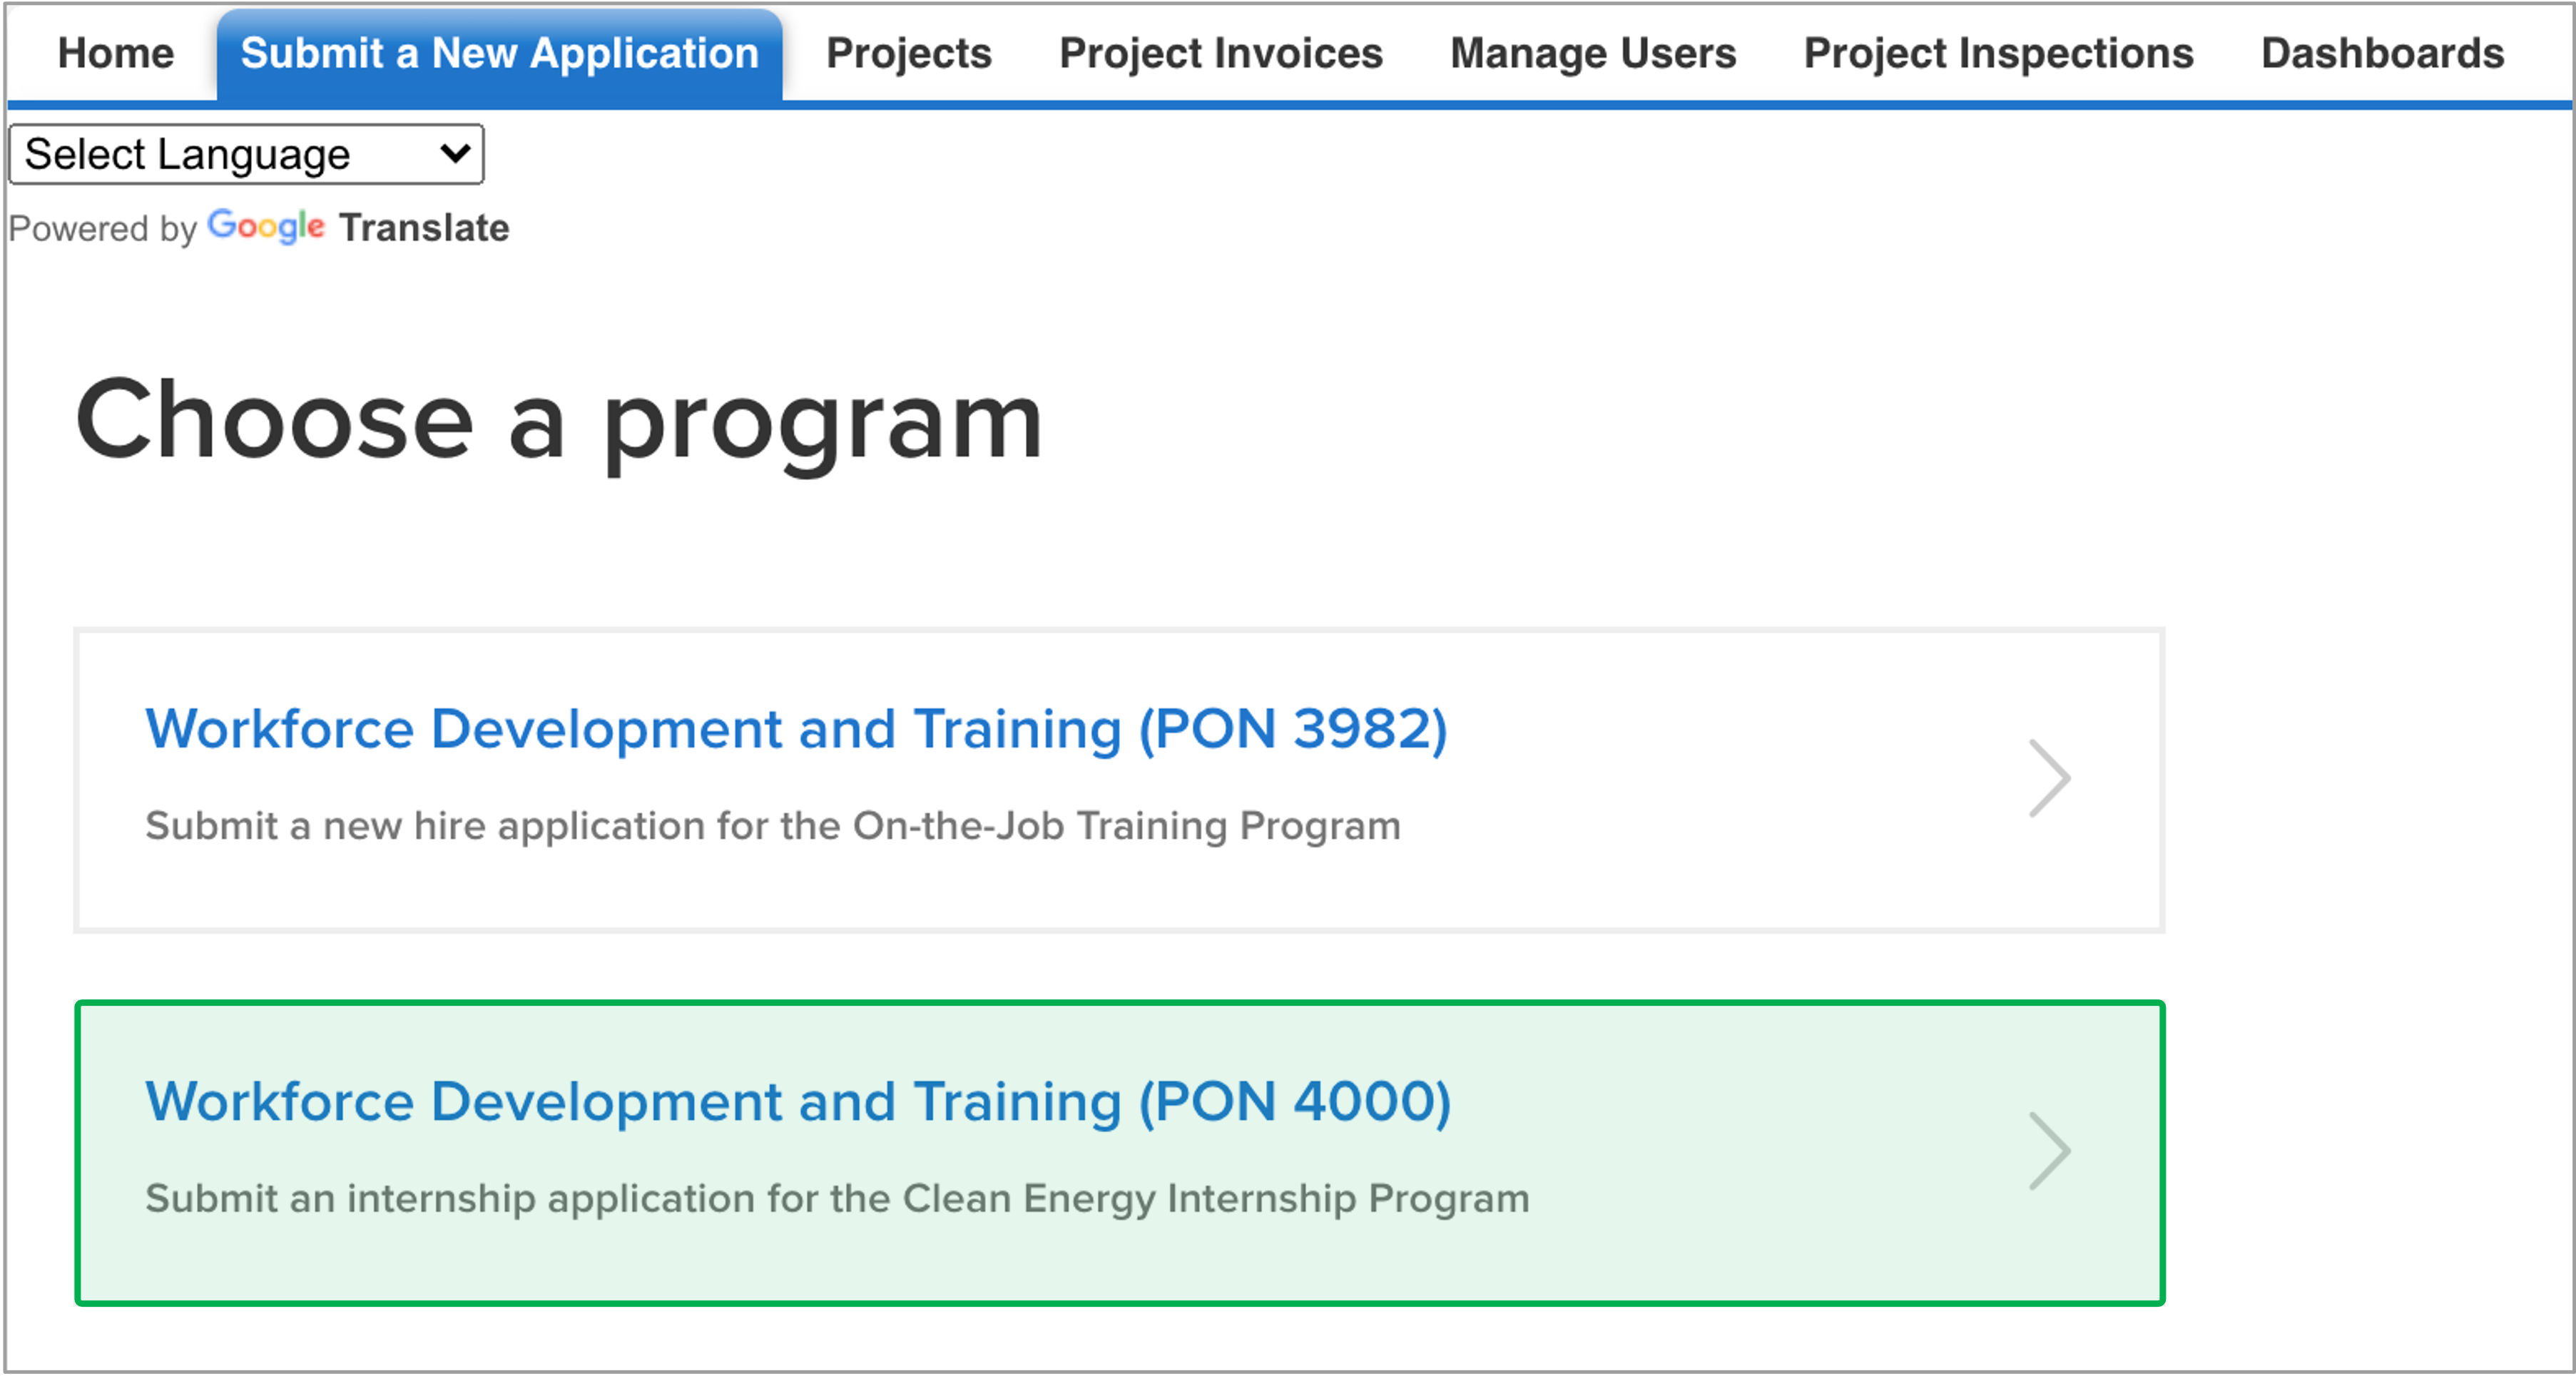
Once in your Salesforce Portal account, access the Submit a New Application tab and select the Workforce Development and Training (PON4000) option. | Info |
|---|
Businesses will only see multiple application options if they have been approved to participate in both the New Hire and Internship programs. |
| Expand |
|---|
| 
|
|
|
Checking Your Application Progress:The application is comprised of six pages, or steps. Your progress throughout the application can be viewed in the upper right-hand corner where progress is denoted with a black circle. Additionally, these can be used to navigate to completed pages. To navigate this way, click the circle representing the required page. | Expand |
|---|
|  Image Added Image Added
|
Navigating the Application: Every page contains both a Previous and Continue button. Some pages also contain a Save button allowing applicants to save their progress. - The Previous button enables to applicant to return to previous pages should it be necessary to update information on pages that have already been completed.
- The Continue button allows applicants to navigate to next page, or step, of the application. Applicants cannot advance to the next page if any required fields on the page have not been completed.
- The Save button allows applicants to save the application progress, returning to it later if it cannot be completed in one sitting.
Special Notes:Content on this page with an associated camera icon indicates a screenshot, or other content, has been placed within a Tool-Tip. To access the content in a Tool-Tip, simply hover your cursor over the camera icon. Try it with this camera icon: | Tooltip |
|---|
| onlyIcon | true |
|---|
| appendIcon | camera |
|---|
| iconColor | #0073a4 |
|---|
| Success! You have accessed the content within this Tool-Tip! |
|
| Aura - Tab |
|---|
|
| Panel |
|---|
| borderColor | #002D72 |
|---|
| bgColor | #F3F4F9 |
|---|
| titleColor | #ffffff |
|---|
| borderWidth | 1 |
|---|
| titleBGColor | #002D72 |
|---|
| borderStyle | none |
|---|
| title | Application Page 1: Company InformationSelect Intern |
|---|
|
|
| Info |
|---|
The first page of the application requires you to document your company information. All required fields on this page are denoted by a red asterisk *. |
| Section |
|---|
| Column |
|---|
|
| UI Steps |
|---|
| | UI Step |
|---|
Begin by entering in your company's name and address information. |
| UI Step |
|---|
Next, select the kind of business for the company. Options in the field drop-down are: - Corporation
- Disregarded Entity
- Federal, State, or Local Government
- Individual / Sole Proprietor
- Limited Lability Co.
- Not For Profit
- Partnership
- Public Authority
- Trust / Estates
|
| UI Step |
|---|
Then, specify if the company is New York State registered or New York City certified Minority, Women, or Service-Disabled Veteran owned business, if applicable. |
| UI Step |
|---|
Input your company's Exempt Payee Code, if applicable. |
| UI Step |
|---|
Lastly, check the appropriate Tax Identification Type for the company. Employer Identification Number: If selecting this option, an additional field will become visible. Input the company's Employer Identification Number. Social Security Number: If selecting this option, a note will appear. Your Social Security Number cannot be input within the application. Instead, you should mail your W9 to NYSERDA at the address provided within the note associated with this field. |
| UI Step |
|---|
After completing all required and applicable fields on this page, click Continue to move onto the next page of the application. Click the next tab on this page to advance to the instructions for Application Page 2: Contact Information. |
|
|
|
| Column |
|---|
|  Image Removed Image Removed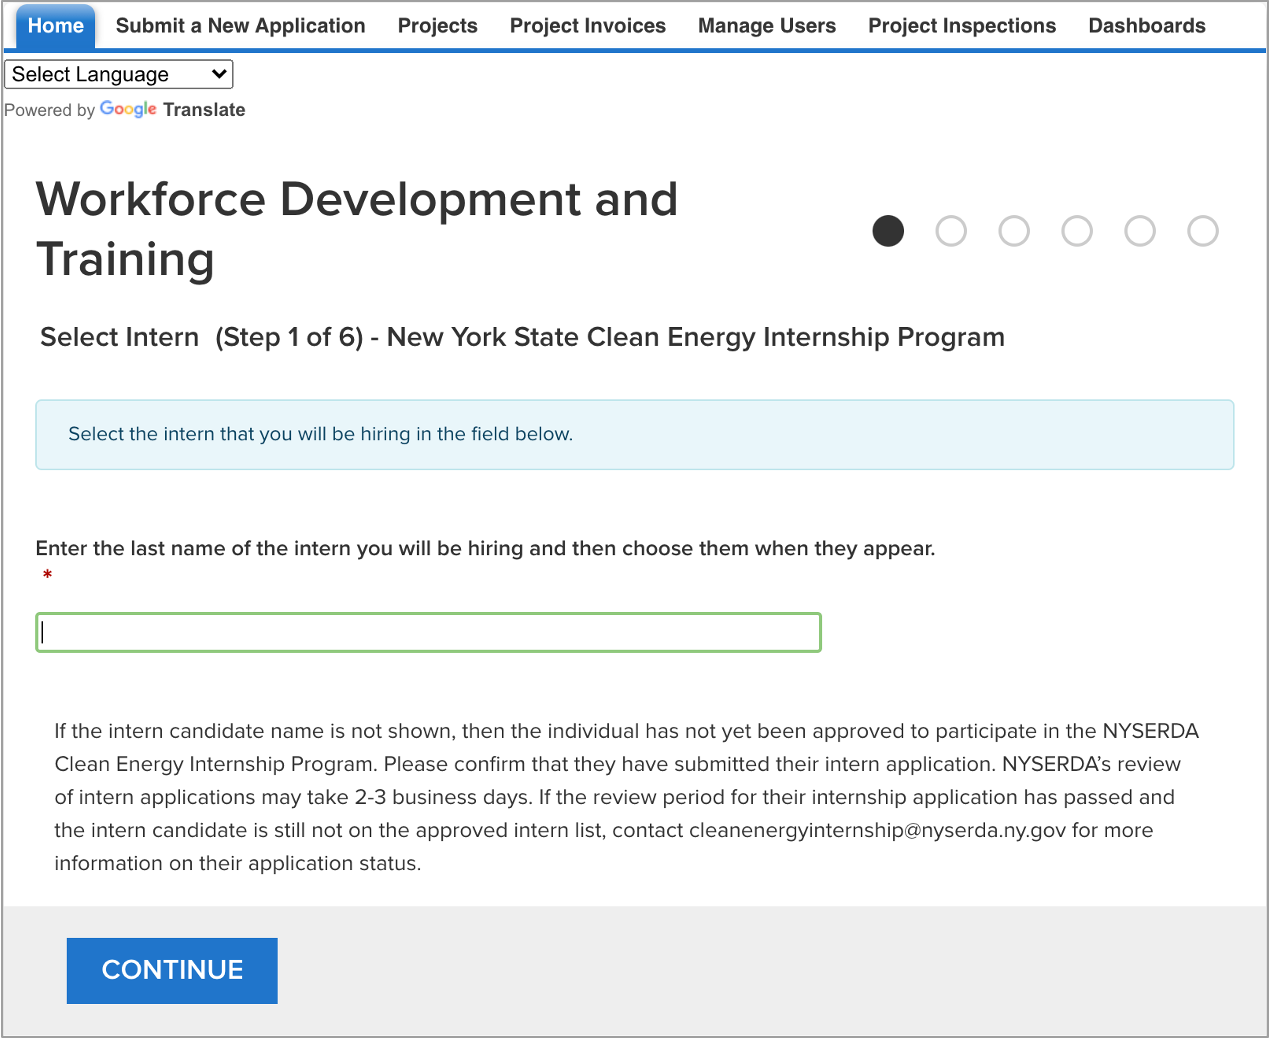 Image Added Image Added
|
|
|
| Aura - Tab |
|---|
|
| Panel |
|---|
| borderColor | #002D72 |
|---|
| bgColor | #F3F4F9 |
|---|
| titleColor | #ffffff |
|---|
| borderWidth | 1 |
|---|
| titleBGColor | #002D72 |
|---|
| borderStyle | none |
|---|
| title | Application Page 2: Contact InformationProject Contacts |
|---|
|
|
| Info |
|---|
The second page establishes the Primary, Accounts Receivable, and Authorize Signatory contacts associated with the application. Should NYSERDA require additional information for the application, the Primary Contact will be contacted. All required fields on this page are denoted by a red asterisk *. |
| Section |
|---|
| Column |
|---|
|
| UI Steps |
|---|
|
| UI Step |
|---|
Enter in contact information for the Primary Contact for the company. The Primary Contact will be the recipient of any future NYSERDA communications. | | UI Step |
|---|
Next, enter in the contact information for the company's Accounts Receivable Contact. This individual will receive all communications regarding invoicing. tip |
|---|
The Primary Contact can also act as the Accounts Receivable Contact. If this is the case, check the Accounts Receivable Contact is same as Primary Contact checkbox. | | UI Step |
|---|
Lastly, enter in the contact information for the company's Authorized Signatory Contact. This individual will be the company's approved signatory should approval or decisions requiring an authorize signatory be necessary. | Tip |
|---|
The Primary Contact can also act as the Authorized Signatory Contact. If this is the case, be sure to check the Authorized Signatory Contact is same as Primary Contact checkbox. |
| UI Step |
|---|
After completing all required and applicable fields on this page, click Continue to move onto the next page of the application. Click the next tab on this page to advance to the instructions for Application Page 3: Business Details. |
|
|
| Column |
|---|
| 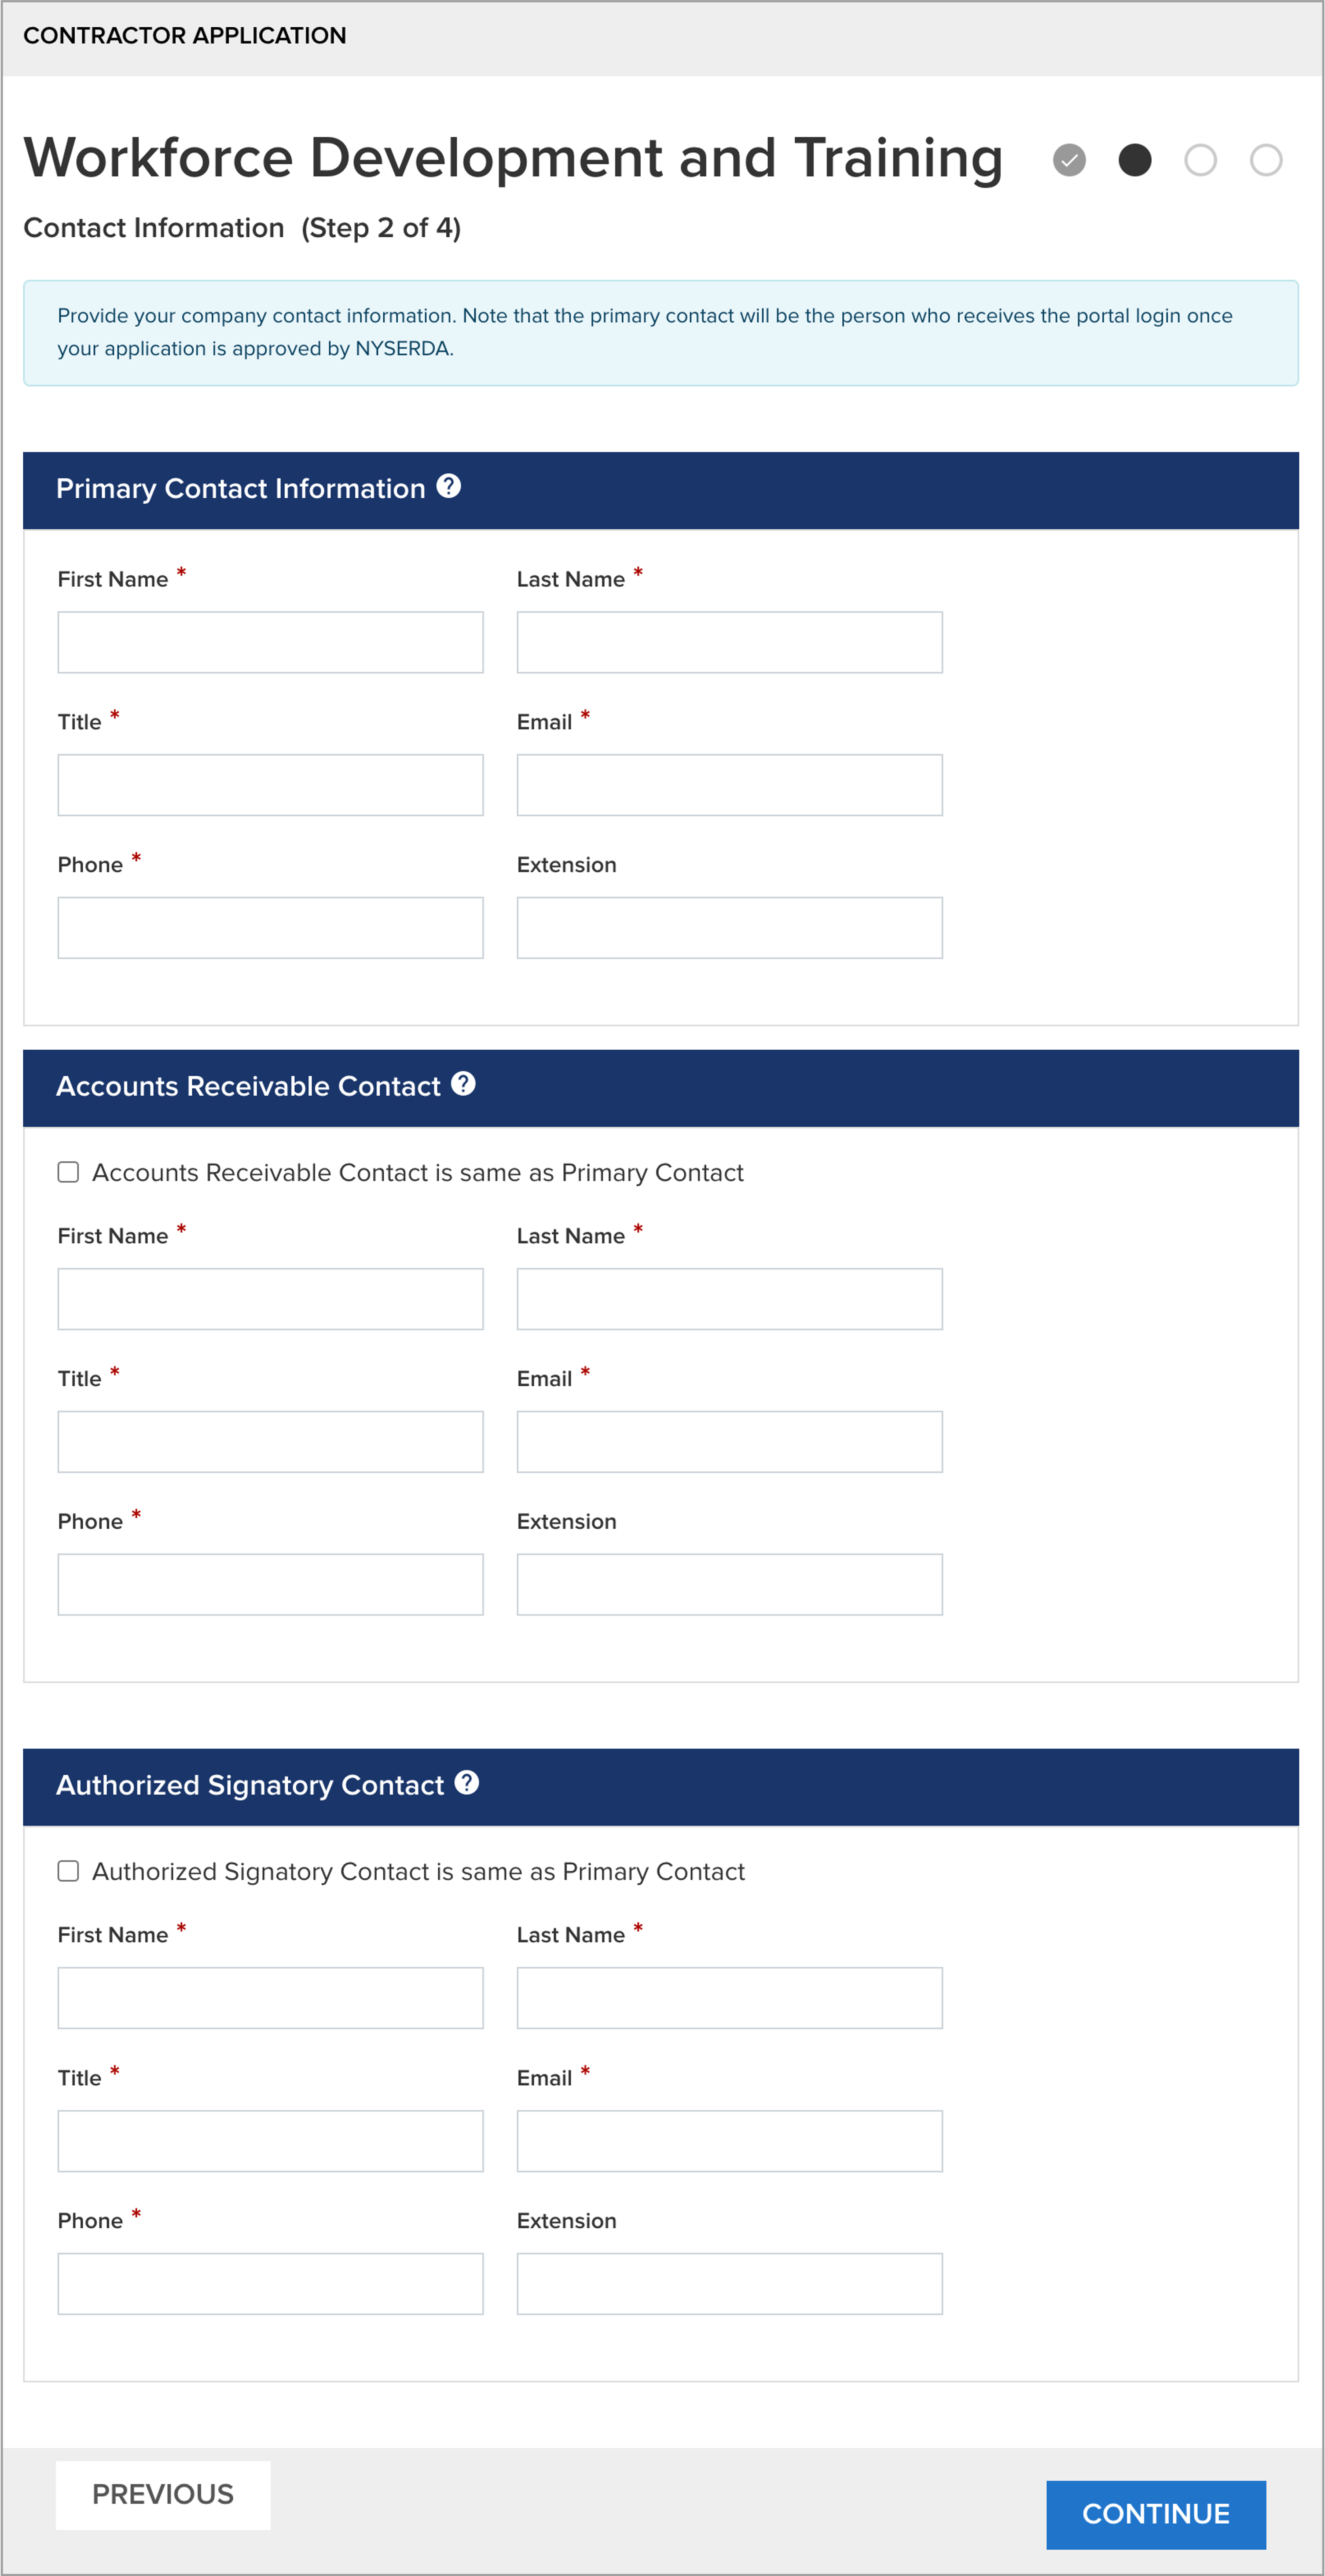 Image Removed Image Removed Image Added Image Added
|
|
|
| Aura - Tab |
|---|
|
| Panel |
|---|
| borderColor | #002D72 |
|---|
| bgColor | #F3F4F9 |
|---|
| titleColor | #ffffff |
|---|
| borderWidth | 1 |
|---|
| titleBGColor | #002D72 |
|---|
| borderStyle | none |
|---|
| title | Application Page 3: Business DetailsInternship Location |
|---|
|
|
| Info |
|---|
The third page establishes some basic demographics of the company that are required to review, process, and approve applications. All fields on this page are required. |
| Section |
|---|
| Column |
|---|
|
| UI Steps |
|---|
|
| UI Step |
|---|
Complete all fields on this page, leveraging the tool-tips, as described in the Introduction tab, to review additional field requirements or information if needed. |
| UI Step |
|---|
Be as specific as possible for the first and last fields on this page as they relate specifically to eligibility requirements and will be reviewing by the NYSERDA Program Team prior to approving any applications. For the last field, NYSERDA will perform an internal review to cross-check programs your company is currently participating in at NYSERDA. |
| UI Step |
|---|
After completing all fields on this page, click Continue to move onto the next page of the application. Click the next tab on this page to advance to the instructions for Application Page 4: Application Review. |
|
|
| Column |
|---|
| 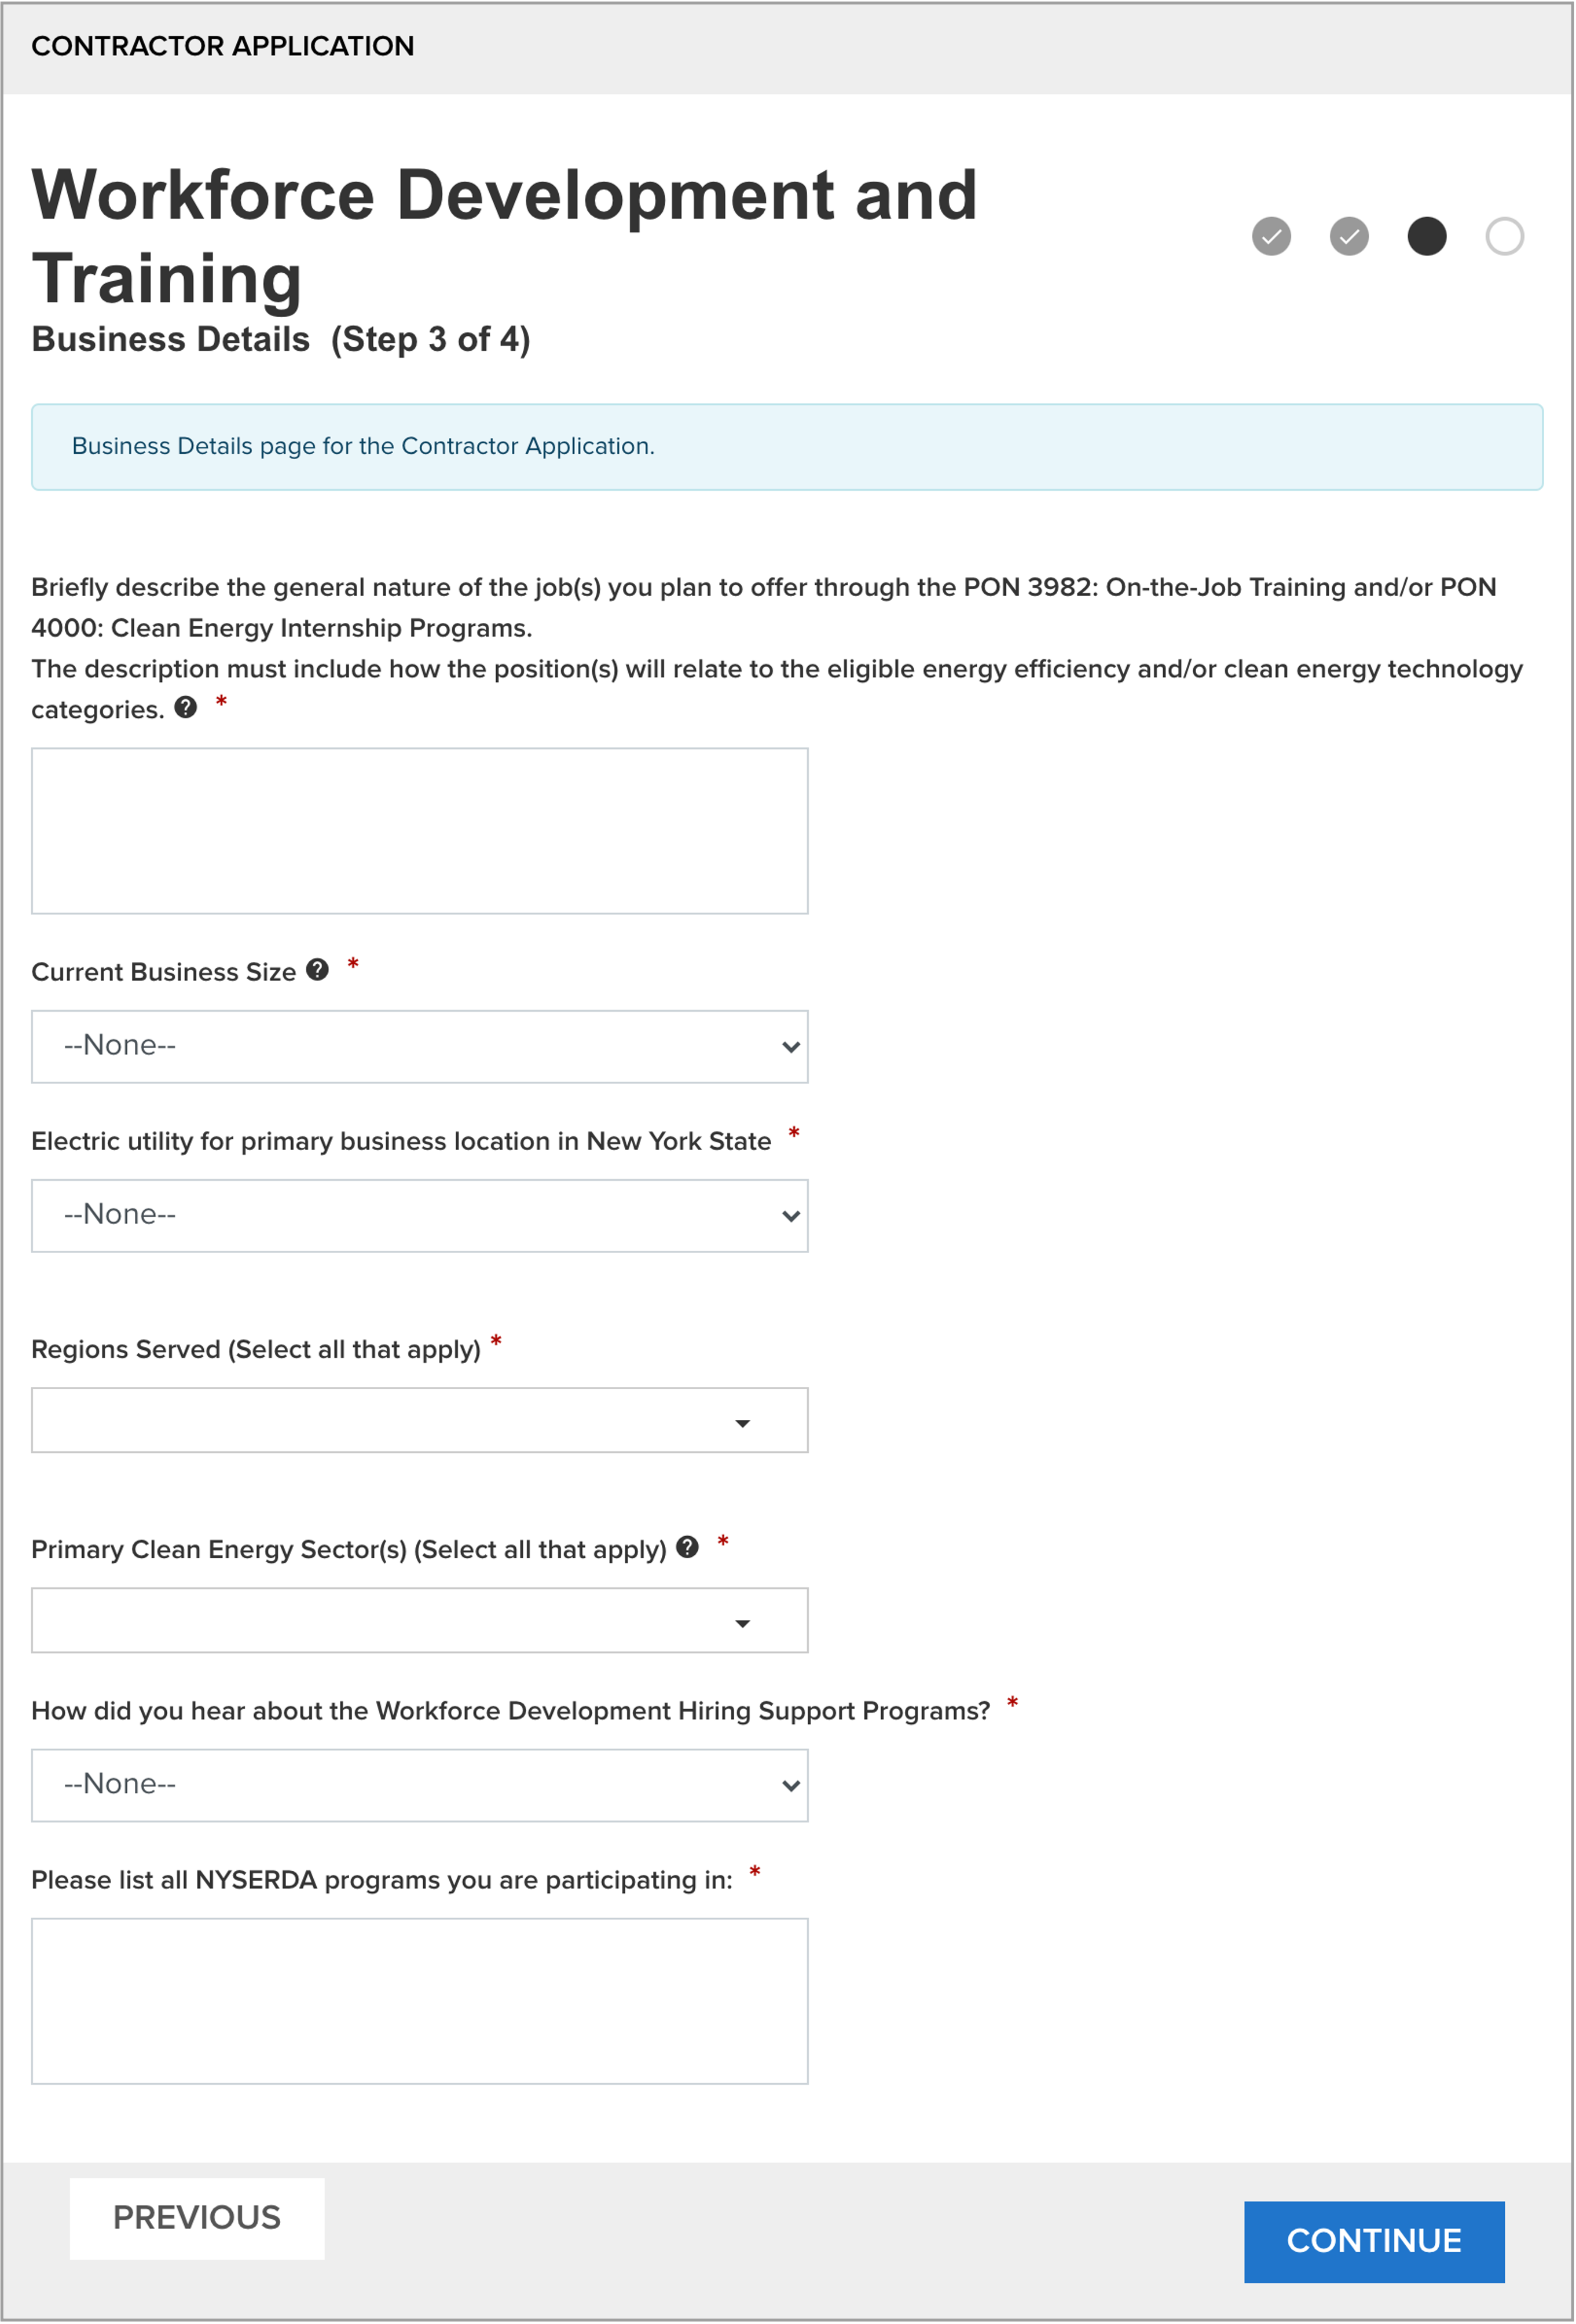 Image Removed Image Removed |
|
|
|
| Aura - Tab |
|---|
|
| Panel |
|---|
| borderColor | #002D72 |
|---|
| bgColor | #F3F4F9 |
|---|
| titleColor | #ffffff |
|---|
| borderWidth | 1 |
|---|
| titleBGColor | #002D72 |
|---|
| borderStyle | none |
|---|
| title | Application Page 4: Application ReviewInternship Details |
|---|
|
|
| Info |
|---|
The last page provides an opportunity for applications to review all submitted information before signing and submitting the application. All fields on this page are required. |
| Section |
|---|
| Column |
|---|
|
| UI Steps |
|---|
|
| UI Step |
|---|
Begin by viewing or downloading the two documents in the blue message box. Once reviewed, check the box attesting that you have read and understand the program requirements. You cannot submit your application until this has been completed. |
| UI Step |
|---|
Then, answer the four required questions. |
| UI Step |
|---|
Click the Print button at the bottom of the page to open a PDF version of your completed, but unsigned, application. Review all application information for accuracy. Return to the online application, read the disclosure and check the box to attest that you agree to the terms and conditions. |
| UI Step |
|---|
Next, sign the application. There are two ways to accomplish this: | Expand |
|---|
| | title | Electronic Signature |
|---|
| Click the Electronic Signature button. You will be directed to DocuSign to provide your electronic signature. On the first DocuSign page, check the agreement box, then click Continue. | Tooltip |
|---|
| onlyIcon | true |
|---|
| appendIcon | camera |
|---|
| iconColor | #0073a4 |
|---|
| linkText | screenshot |
|---|
|  Image Removed Image Removed
|
The application will appear. Click Start. | Tooltip |
|---|
| onlyIcon | true |
|---|
| appendIcon | camera |
|---|
| iconColor | #0073a4 |
|---|
|  Image Removed Image Removed
|
You'll be directed to the signature portion of the application. Click Sign. | Tooltip |
|---|
| onlyIcon | true |
|---|
| appendIcon | camera |
|---|
| iconColor | #0073a4 |
|---|
|  Image Removed Image Removed
|
A modal window will appear requesting your signature preference. Your Name and initials will pre-populate. Choose your signature option and click Adopt and Sign when ready. | Tooltip |
|---|
| onlyIcon | true |
|---|
| appendIcon | camera |
|---|
| iconColor | #0073a4 |
|---|
|  Image Removed Image Removed
|
You'll return to the application in DocuSign where your signature will display in the signature field. Click Finish. | Tooltip |
|---|
| onlyIcon | true |
|---|
| appendIcon | camera |
|---|
| iconColor | #0073a4 |
|---|
|  Image Removed Image Removed
|
You'll be returned to the Application Review page. A message stating Application is signed will be visible. | Tooltip |
|---|
| onlyIcon | true |
|---|
| appendIcon | camera |
|---|
| iconColor | #0073a4 |
|---|
|  Image Removed Image Removed
|
| Expand |
|---|
| - Use the pdf version of the completed, but unsigned, application from step 3 above. Print the pdf.
- Physically sign the printed pdf application.
- Scan all pages of the completed and signed application to your computer. You can use photos of the application.
- At the bottom of page 4 of the application, click the Choose File button in the Signed Application section to locate the file of the signed application on your computer.
- Upload the file.
- Click the Save button to save the uploaded file to the online application tool.
|
| UI Step |
|---|
Finally, to complete the application process, click the Submit button at the bottom of the page. |
| UI Step |
|---|
Once submitted, the Primary Contact for the application will receive an email confirming the application has been submitted. | Tooltip |
|---|
| onlyIcon | true |
|---|
| appendIcon | camera |
|---|
| iconColor | #0073a4 |
|---|
|  Image Removed Image Removed
|
|
|
|
| Aura - Tab |
|---|
|
| Panel |
|---|
| borderColor | #002D72 |
|---|
| bgColor | #F3F4F9 |
|---|
| titleColor | #ffffff |
|---|
| borderWidth | 1 |
|---|
| titleBGColor | #002D72 |
|---|
| borderStyle | none |
|---|
| title | Application Page 4: Internship Documents |
|---|
|
|
| Info |
|---|
The last page provides an opportunity for applications to review all submitted information before signing and submitting the application. All fields on this page are required. |
| Section |
|---|
| Column |
|---|
|
| UI Steps |
|---|
|
| UI Step |
|---|
Begin by viewing or downloading the two documents in the blue message box. Once reviewed, check the box attesting that you have read and understand the program requirements. You cannot submit your application until this has been completed. |
|
|
|
|
| Aura - Tab |
|---|
|
| Panel |
|---|
| borderColor | #002D72 |
|---|
| bgColor | #F3F4F9 |
|---|
| titleColor | #ffffff |
|---|
| borderWidth | 1 |
|---|
| titleBGColor | #002D72 |
|---|
| borderStyle | none |
|---|
| title | Application Page 4: Application Review |
|---|
|
|
| Info |
|---|
The last page provides an opportunity for applications to review all submitted information before signing and submitting the application. All fields on this page are required. |
| Section |
|---|
| Column |
|---|
|
| UI Steps |
|---|
|
| UI Step |
|---|
Begin by viewing or downloading the two documents in the blue message box. Once reviewed, check the box attesting that you have read and understand the program requirements. You cannot submit your application until this has been completed. |
|
|
| Column |
|---|
| | Column |
|---|
| 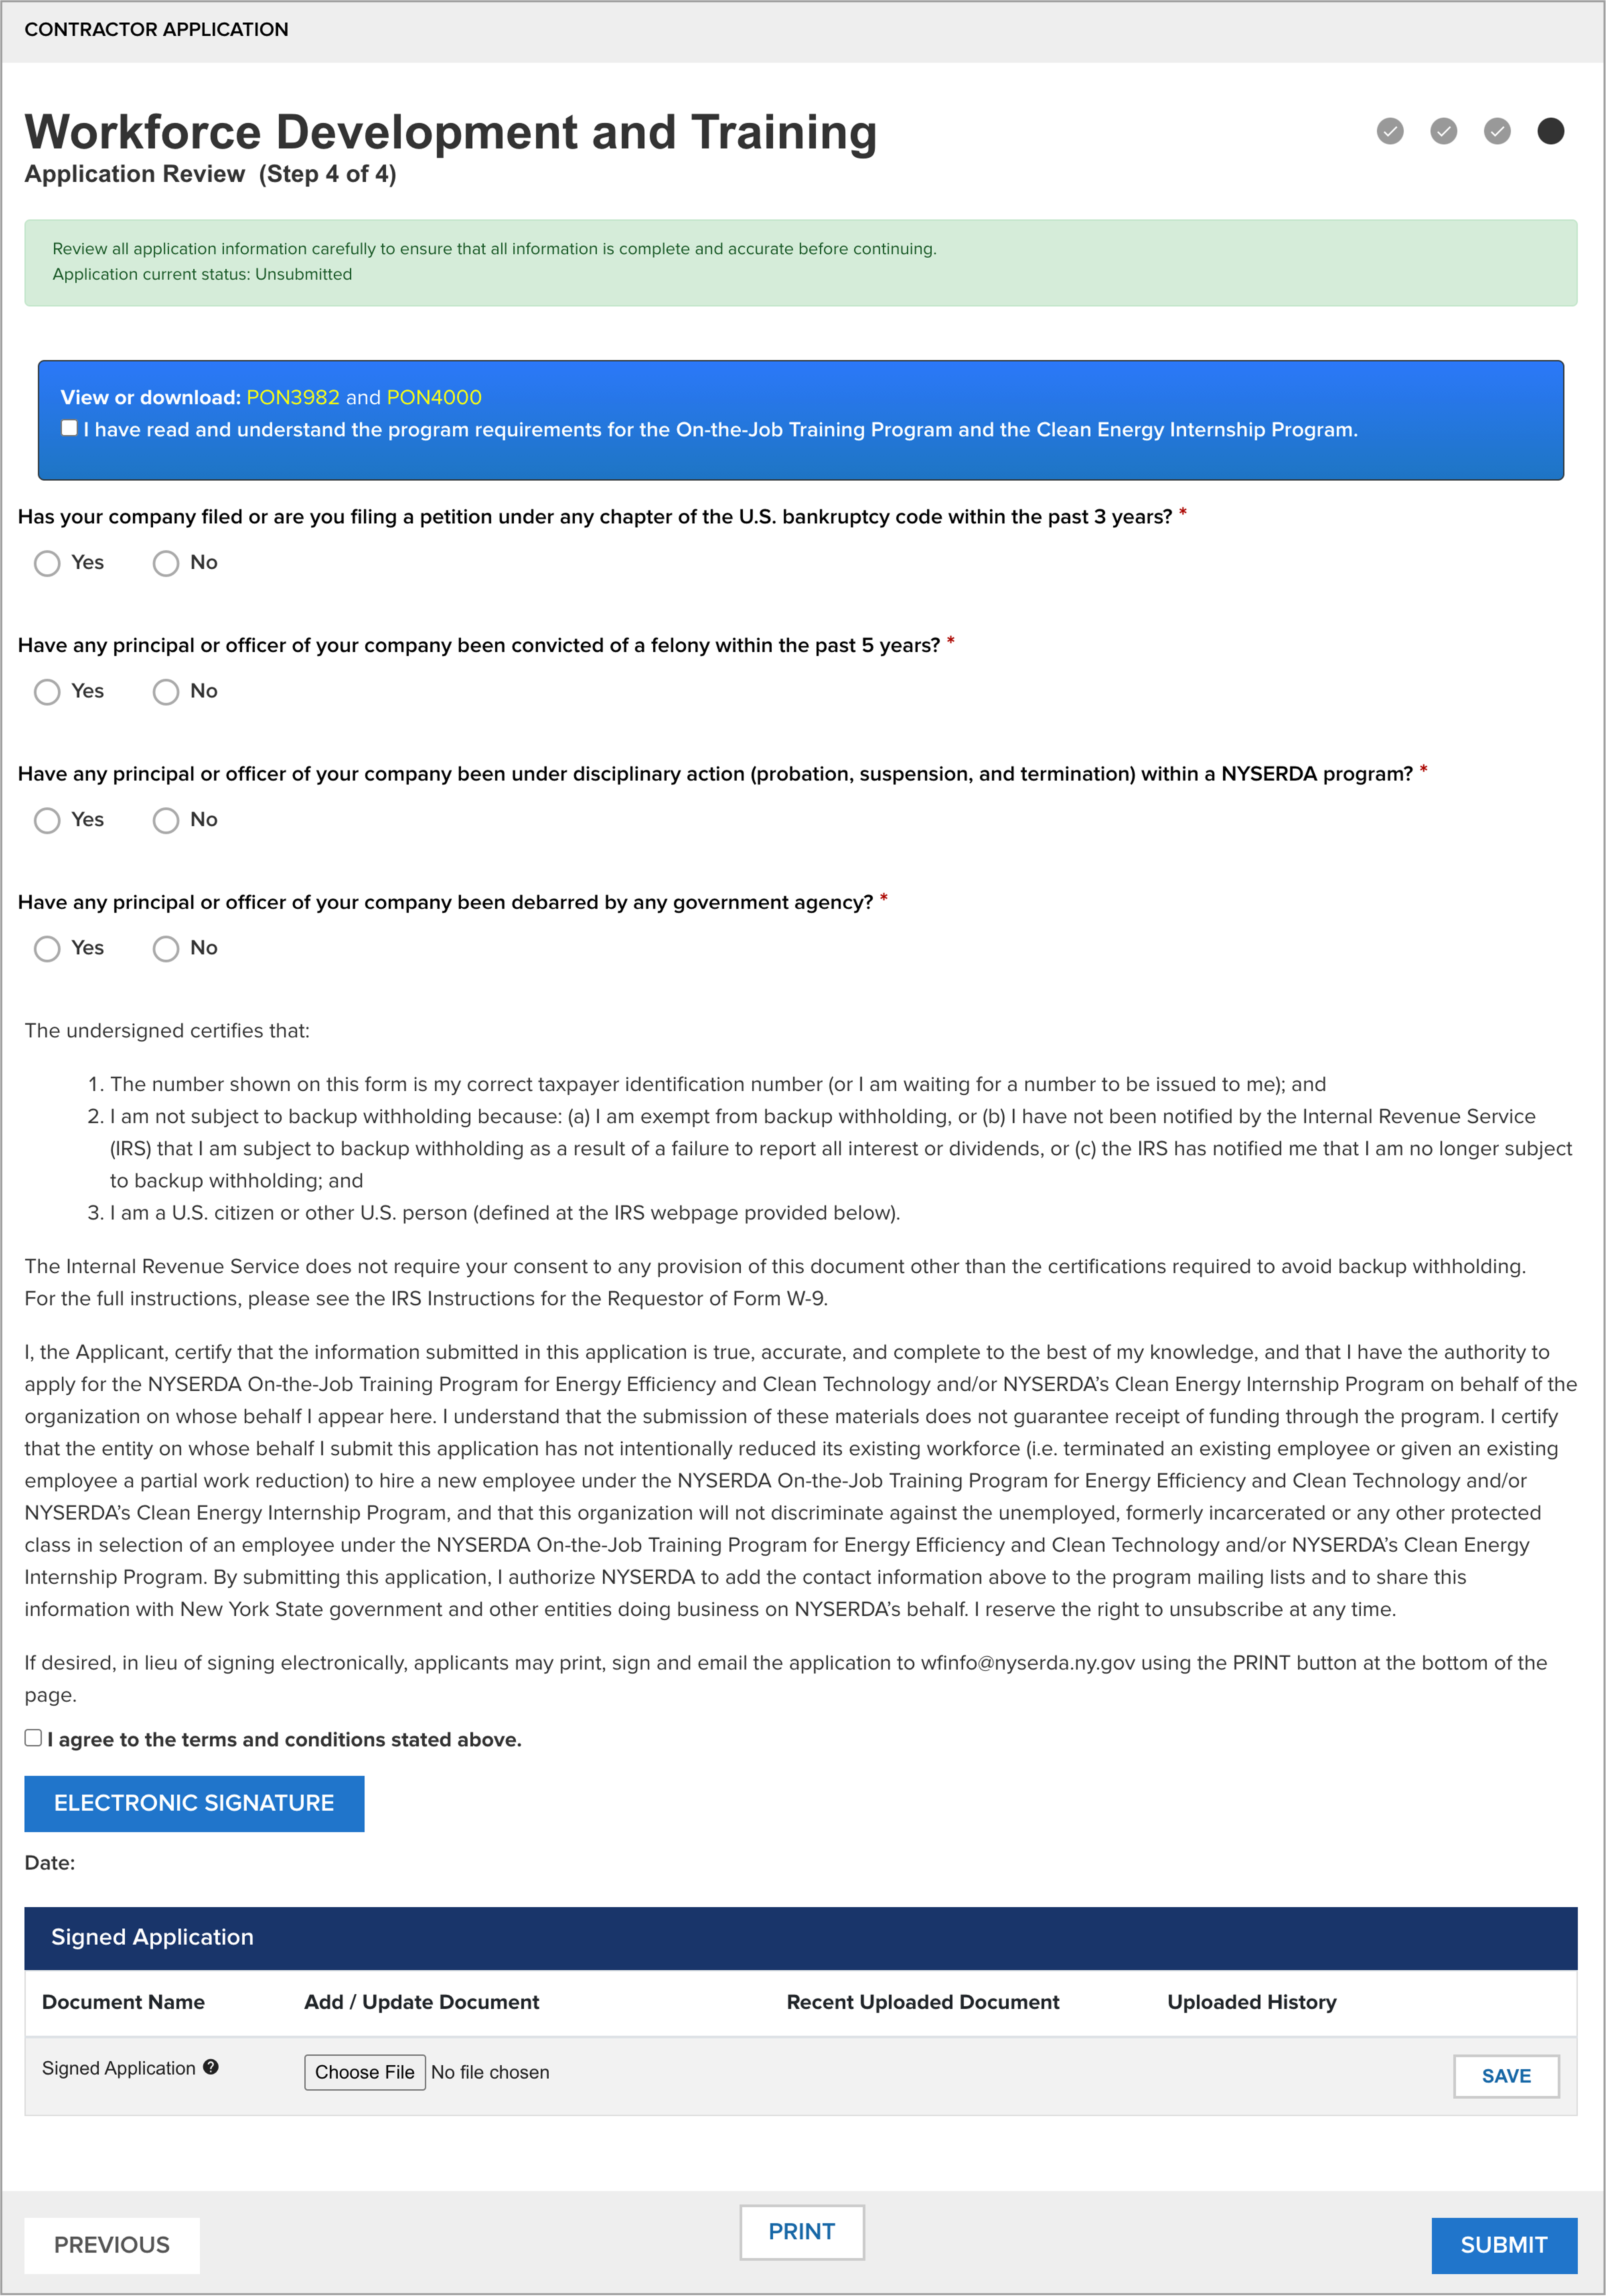 Image Removed Image Removed |
|
|
|
| Aura - Tab |
|---|
|
| Panel |
|---|
| borderColor | #002D72 |
|---|
| bgColor | #F3F4F9 |
|---|
| titleColor | #ffffff |
|---|
| borderWidth | 1 |
|---|
| titleBGColor | #002D72 |
|---|
| borderStyle | none |
|---|
| title | Next Steps |
|---|
|
|
Now that you have submitted your application:- It will be reviewed by first by NYSERDA Program Staff and then by the New York State Department of Labor.
- The Primary Contact associated with the application will continue to receive communications throughout the review and approval process regarding updates to the application process.
- Check the email address associated with the application regularly for communication updates. If either NYSERDA or the Department of Labor need additional information or clarity on any of your responses to the application, it will be requested through email, with instructions on what actions you need to take.
- If your application is approved, you will receive an email communication with additional steps or instructions, if any. If your application is rejected, the email communication received will outline the specific reasons for rejection.
|
|