| Aura - Tab |
|---|
|
| Panel |
|---|
| borderColor | #002D72 |
|---|
| bgColor | #F3F4F9 |
|---|
| titleColor | #ffffff |
|---|
| borderWidth | 1 |
|---|
| titleBGColor | #002D72 |
|---|
| borderStyle | none |
|---|
| title | Introduction |
|---|
|
|
| Info |
|---|
The content below provides guidance when beginning, and navigating through, the online application. Please review before accessing any of the the following and then continue with the Application Instruction tabs to the left. |
Accessing the Application:Choosing Interns| Expand |
|---|
| Within the NYSERDA Portal, businesses can access a list of eligible intern candidate who have applied for, and | | UI Steps |
|---|
| | UI Step |
|---|
Log into your | UI Button |
|---|
| color | blue |
|---|
| newWindow | true |
|---|
| size | small |
|---|
| icon | link |
|---|
| title | Salesforce Portal |
|---|
| url | https://portal.nyserda.ny.gov/login |
|---|
|
account. |
| UI Step |
|---|
Once in your Salesforce Portal account, access the Submit a New Application tab and select the Workforce Development and Training (PON4000) option. | Info |
|---|
Businesses will only see multiple application options if they have been approved to participate in both the New Hire and Internship programs.| Expand |
|---|
| 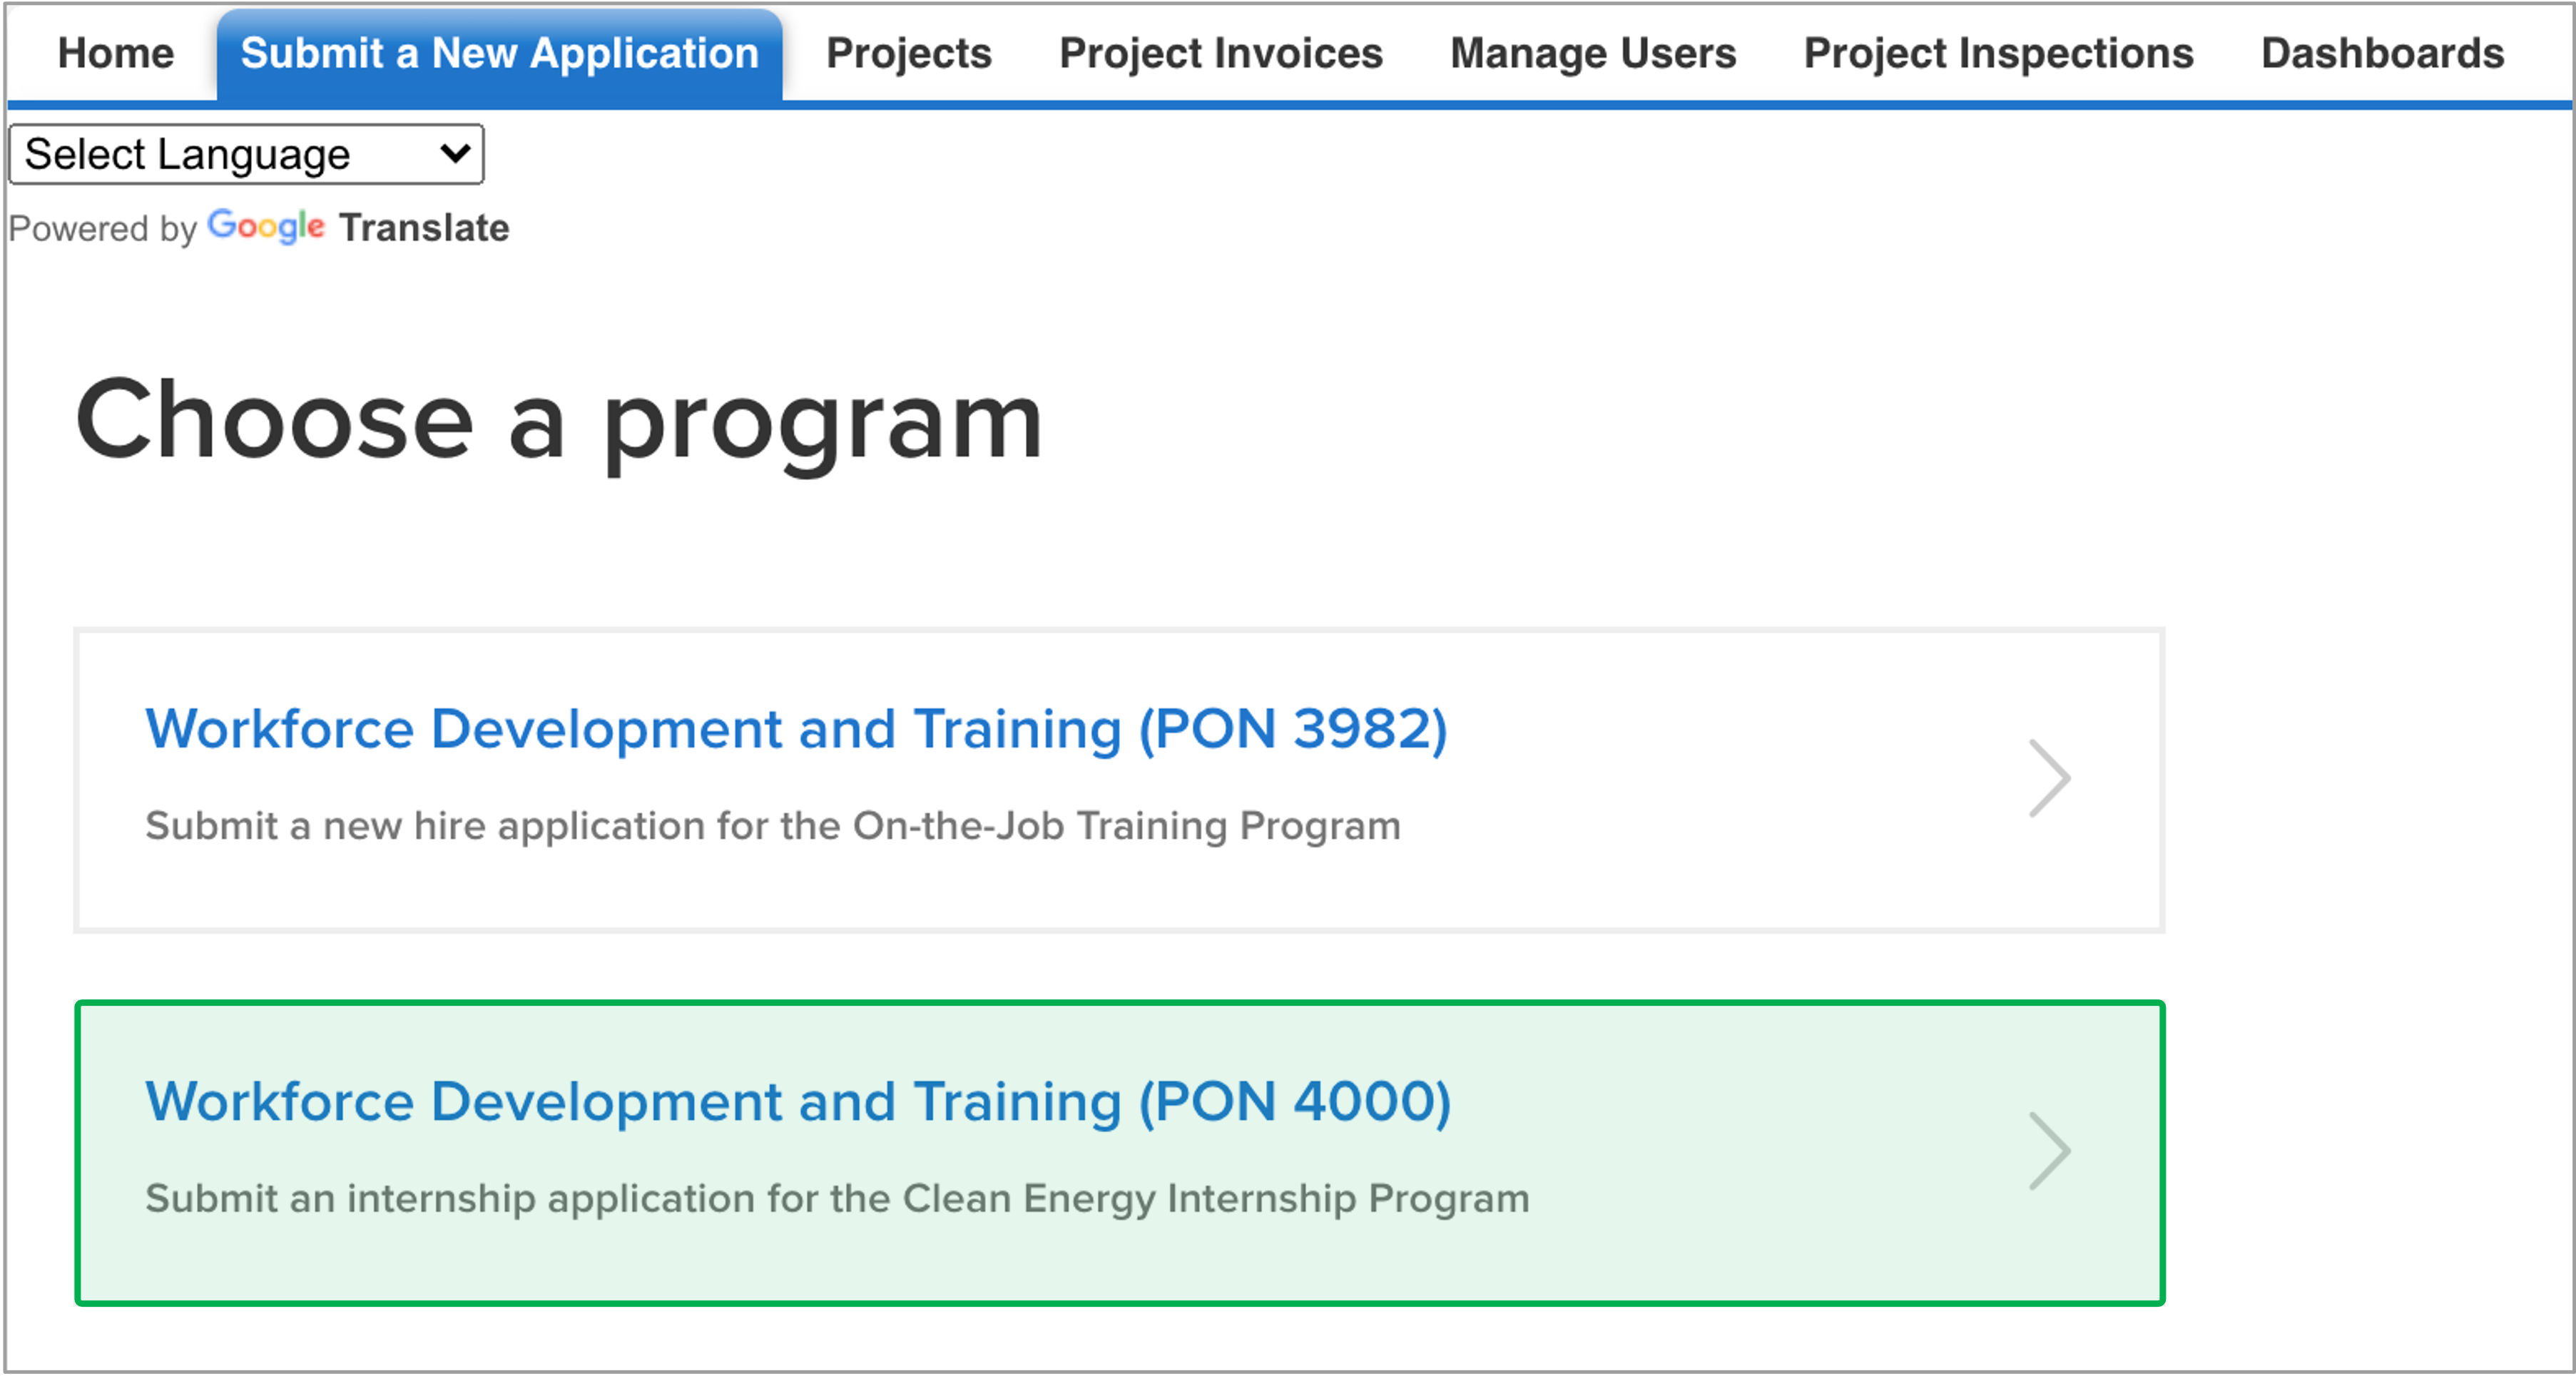 Image Removed Image Removed
|
|
Checking Your Application Progress:The application is comprised of six pages, or steps. Your progress throughout the application can be viewed in the upper right-hand corner where progress is denoted with a black circle. Additionally, these can be used to navigate to completed pages. To navigate this way, click the circle representing the required page. | Expand |
|---|
|  Image Removed Image Removed
|
Navigating the Application:Every page contains both a Previous and Continue button. Some pages also contain a Save button allowing applicants to save their progress. The Previous button enables to applicant to return to previous pages should it be necessary to update information on pages that have already been completed.The Continue button allows applicants to navigate to next page, or step, of the application. Applicants cannot advance to the next page if any required fields on the page have not been completed.The Save button allows applicants to save the application progress, returning to it later if it cannot be completed in one sitting. | Info |
|---|
- Business who close the application from page 1 to 3 will not have their progress saved and cannot return to complete the application at a later date or time.
- Businesses must reach page four of the application before progress can be saved.
- Applicants receive an email notification after 24 hours for incomplete application. Be sure to Save your progress when you reach a Save point, so you can return to your application and submit when complete.
|
Special Notes:Content on this page with an associated camera icon indicates a screenshot, or other content, has been placed within a Tool-Tip. To access the content in a Tool-Tip, simply hover your cursor over the camera icon. Try it with this camera icon: | Tooltip |
|---|
| onlyIcon | true |
|---|
| appendIcon | camera |
|---|
| iconColor | #0073a4 |
|---|
| Success! You have accessed the content within this Tool-Tip! |
, the Clean Energy Internship Program but have not yet been submitted to NYSERDA for an internship role by another business. The instructions below review how to access the eligible Intern Candidate list. | UI Steps |
|---|
|
| UI Step |
|---|
Log into your | UI Button |
|---|
| color | blue |
|---|
| newWindow | true |
|---|
| size | small |
|---|
| icon | link |
|---|
| title | NYSERDA Portal |
|---|
| url | https://portal.nyserda.ny.gov/login |
|---|
|
account. |
| UI Step |
|---|
From the NYSERDA Portal home screen, click View Eligible Interns. You will be directed to the Clean Energy Internship Program - Intern Candidate Directory. | Expand |
|---|
| 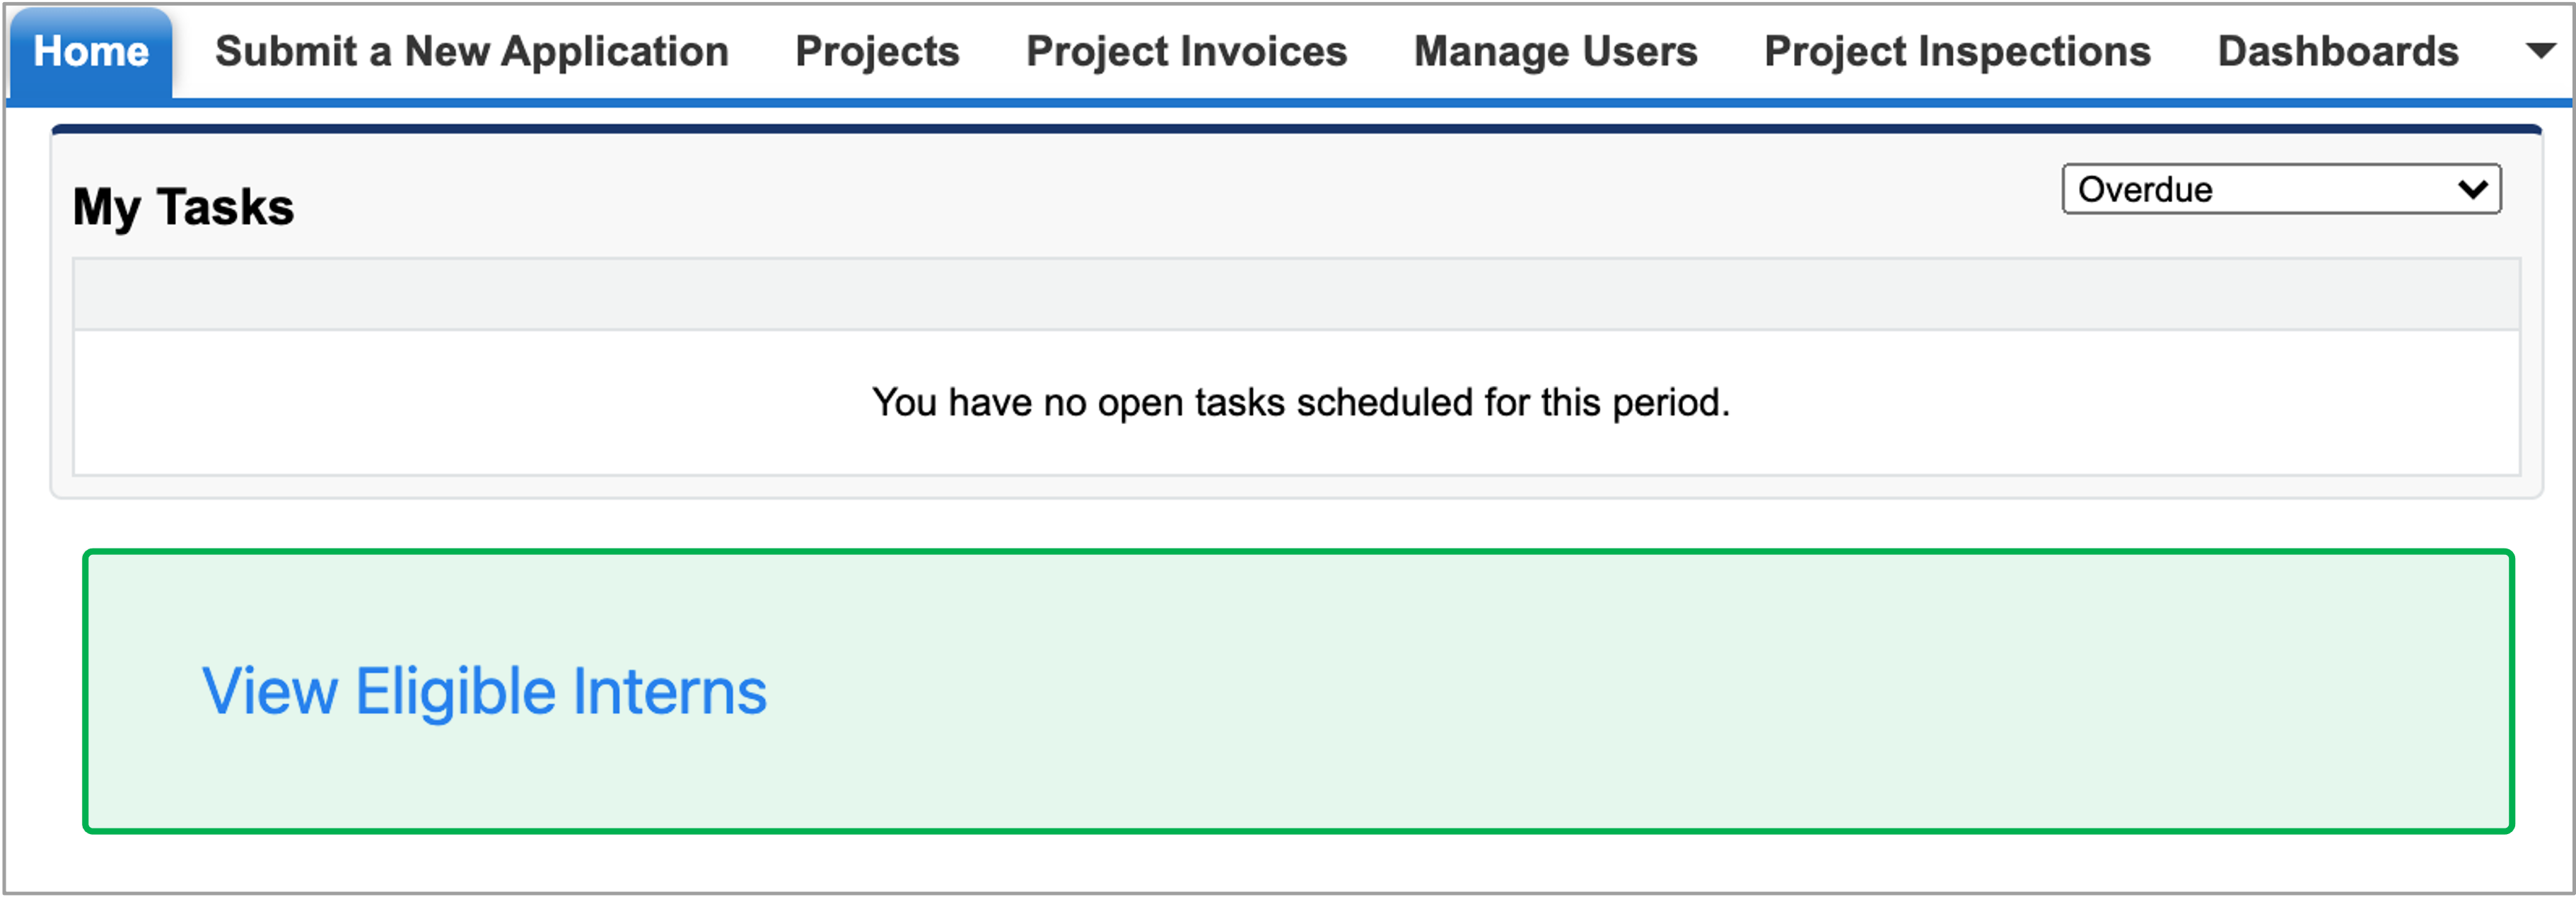 Image Added Image Added
|
|
| UI Step |
|---|
This list can be filtered using the County and Season boxes at the top of the page and an intern's Resume and/or Cover Letter can be accessed using the respective links in the last column. To search using other intern candidate information, such as Major or Employment Areas of Interest, press Ctrl + F on your keyboard to use the find/search function of your browser. | Expand |
|---|
|  Image Added Image Added
|
|
| UI Step |
|---|
Business must contact intern candidates directly to confirm their interest and availability for an internship. |
| UI Step |
|---|
If you expect to see an intern candidate on the list but cannot find them, it is an indication that the individual has not yet been approved to participate in the program. If this is the case, please confirm that the individual has submitted their intern application. NYSERDA's review of intern applications may take 2-3 business days. If the review period for their internships application has passed and the intern candidate is still not on the approved intern list, contact [email protected] for more information on their application status. |
|
|
Accessing the Application| Expand |
|---|
|
| UI Steps |
|---|
|
| UI Step |
|---|
Log into your | UI Button |
|---|
| color | blue |
|---|
| newWindow | true |
|---|
| size | small |
|---|
| icon | link |
|---|
| title | NYSERDA Portal |
|---|
| url | https://portal.nyserda.ny.gov/login |
|---|
|
account.| Info |
|---|
If an individual at your organization, other than the Primary Contact listed on your Business Application, would like an account, please email [email protected] with the details of your request. |
|
| UI Step |
|---|
Once in your NYSERDA Portal account, access the Submit a New Application tab. Select the Workforce Development and Training (PON4000) option. | Info |
|---|
Businesses will only see multiple program application options if they have been approved to participate in both the On-the-Job Training and Internship programs. |
| Expand |
|---|
| Image Added |
|
|
|
Checking Your Application Progress| Expand |
|---|
| The application has six pages, or steps. Your progress throughout the application can be viewed in the upper right-hand corner where progress is denoted with a black circle. Additionally, these circles can be used to navigate to completed pages by clicking the circle representing the required page. | Expand |
|---|
| Image Added |
|
Navigating the Application| Expand |
|---|
| Every page contains both a Previous and Continue button. Some pages also contain a Save button allowing applicants to save their progress. |
Special Notes| Expand |
|---|
| Content on this page with an associated camera icon indicates a screenshot, or other content, has been placed within a Tool-Tip. To access the content in a Tool-Tip, hover your cursor over the camera icon. Try it with this camera icon: | Tooltip |
|---|
| onlyIcon | true |
|---|
| appendIcon | camera |
|---|
| iconColor | #0073a4 |
|---|
| Success! You have accessed the content within this Tool-Tip! |
|
|
| Aura - Tab |
|---|
|
| Panel |
|---|
| borderColor | #002D72 |
|---|
| bgColor | #F3F4F9 |
|---|
| titleColor | #ffffff |
|---|
| borderWidth | 1 |
|---|
| titleBGColor | #002D72 |
|---|
| borderStyle | none |
|---|
| title | Application Page 1: Select Intern |
|---|
|
|
| Info |
|---|
The first page of the application requires you to select the Intern you expect to hire. |
| Section |
|---|
| Column |
|---|
|
| UI Steps |
|---|
|
| UI Step |
|---|
Enter the last name of the Intern you expect to hire using the available field. Once you begin entering in the Intern's last name, a drop-down will appear listing Interns with the same last name. Select the correct option from the drop-down list. Review the email address as well as the name to ensure you select the correct individual. |
| UI Step |
|---|
If the Intern's name does not appear after entering in their last name, review the note at the bottom of the page for more information. You cannot proceed at this time with the application until the Intern has been approved to participate in the NYSERDA Clean Energy Internship Program. |
| UI Step |
|---|
If you are able to locate and select the Intern from the list, click Continue to advance to the next page of the application. Access the Application: Page 2 tab for related instructions. |
|
|
| Column |
|---|
| 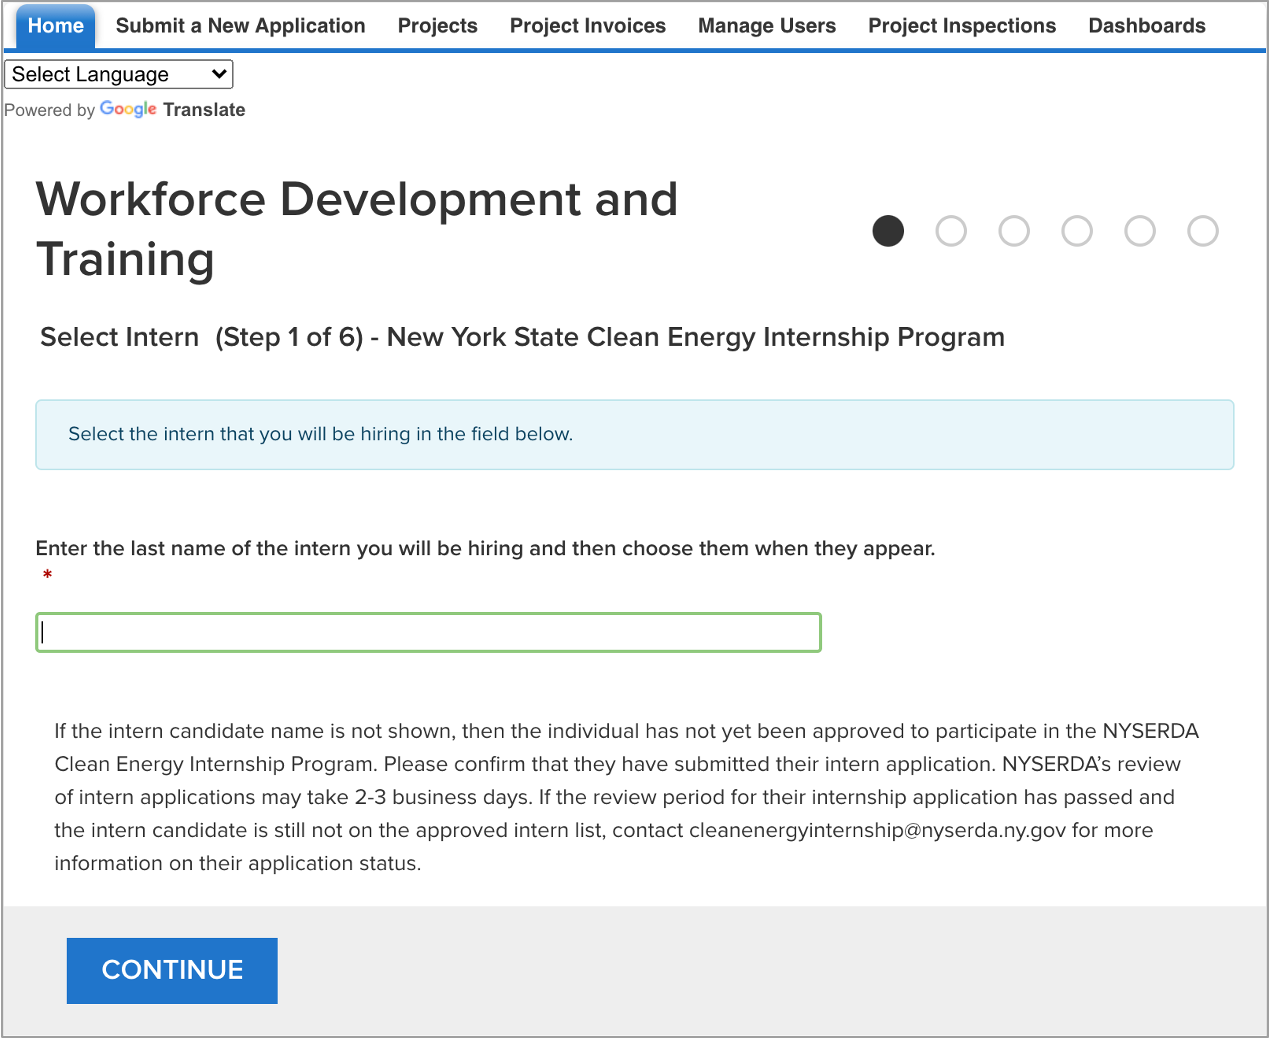 Image Added Image Added
|
|
|
| Aura - Tab |
|---|
|
| Panel |
|---|
| borderColor | #002D72 |
|---|
| bgColor | #F3F4F9 |
|---|
| titleColor | #ffffff |
|---|
| borderWidth | 1 |
|---|
| titleBGColor | #002D72 |
|---|
| borderStyle | none |
|---|
| title | Application Page 2: Project Contacts |
|---|
|
|
| Info |
|---|
The second page establishes the application Contacts.Should NYSERDA require additional information for the application, the Primary Contact in the Contactor role will be contacted. |
| Section |
|---|
| Column |
|---|
|
| UI Steps |
|---|
|
| UI Step |
|---|
Two Contacts will appear on the list. Verify the contact information for the New Employee (the Intern) and the primary Contact for your business (the Contractor) are correct. If you need to edit information for a Contact, click the Edit option to the left of the Contact line item to open the Edit Contact modal window. Make any necessary changes and click Save Changes. The modal window will close. |
| UI Step |
|---|
If you would like to add an additional Contact from your business, click the Add a Contact option to open the Add a Contact modal window. Complete all the information fields, being sure to indicate if the Contact should be listed as the Primary Contact. All Contacts at you business should be listed as Contractor for the Contact Role. After completing the form, click Save Changes to save the new contact. The modal window will close. | Info |
|---|
You can only select on Primary Contact for your business. |
| Tooltip |
|---|
| onlyIcon | true |
|---|
| appendIcon | camera |
|---|
| iconColor | #0073a4 |
|---|
| 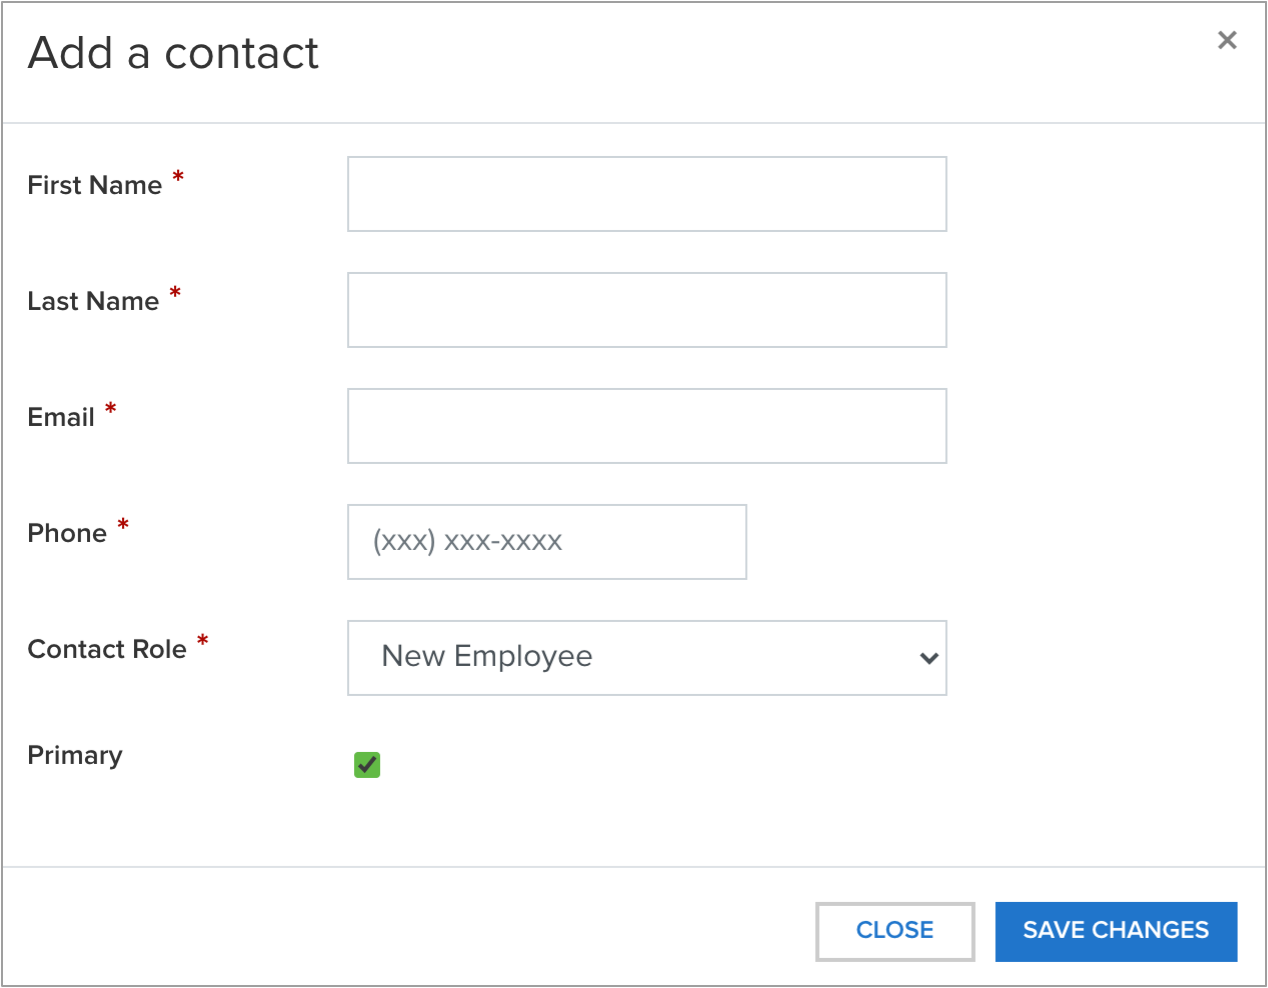 Image Added Image Added
|
|
| UI Step |
|---|
Once all Contacts have been verified and/or added, click Continue to advance to the next page of the application. Access the Application: Page 3 tab to for the next set of instructions. |
|
|
| Column |
|---|
|  Image Added Image Added
|
|
|
| Aura - Tab |
|---|
|
| Panel |
|---|
| borderColor | #002D72 |
|---|
| bgColor | #F3F4F9 |
|---|
| titleColor | #ffffff |
|---|
| borderWidth | 1 |
|---|
| titleBGColor | #002D72 |
|---|
| borderStyle | none |
|---|
| title | Application Page 3: Internship Location |
|---|
|
|
| Info |
|---|
The third page establishes the Project Site, the location where the new Intern will be working. If the intern is working remotely from a residence, enter that residential address as the Internship Location. |
| Section |
|---|
| Column |
|---|
|
| UI Steps |
|---|
|
| UI Step |
|---|
Click Add a Site to open the Add New Project Site modal window. Complete all required fields on the modal window. When you begin typing an address, selections for matchings addresses will appear below the address field. Continue typing the address (including the city) if you do not immediately see the address listed in the initial list of suggestions. If located, click the suggestion. This will populate all other address fields. However, you can manually enter in all address fields if the suggestions continue not to locate the correct address. Click Save when complete. The modal window will close. | Tooltip |
|---|
| onlyIcon | true |
|---|
| appendIcon | camera |
|---|
| iconColor | #0073a4 |
|---|
|  Image Added Image Added
|
|
| UI Step |
|---|
Confirm that the Project Site was added correctly. If you need to make edits, click Edit to the left of the Project Site line item to re-open the Add New Project Site modal window. You can also Delete the Project Site if needed. | Info |
|---|
Only one Project Site can be listed per application. |
|
| UI Step |
|---|
When complete, click Continue to advance to the next page of the application. Access the Application: Page 4 tab for the next set of instructions. |
|
|
| Column |
|---|
| 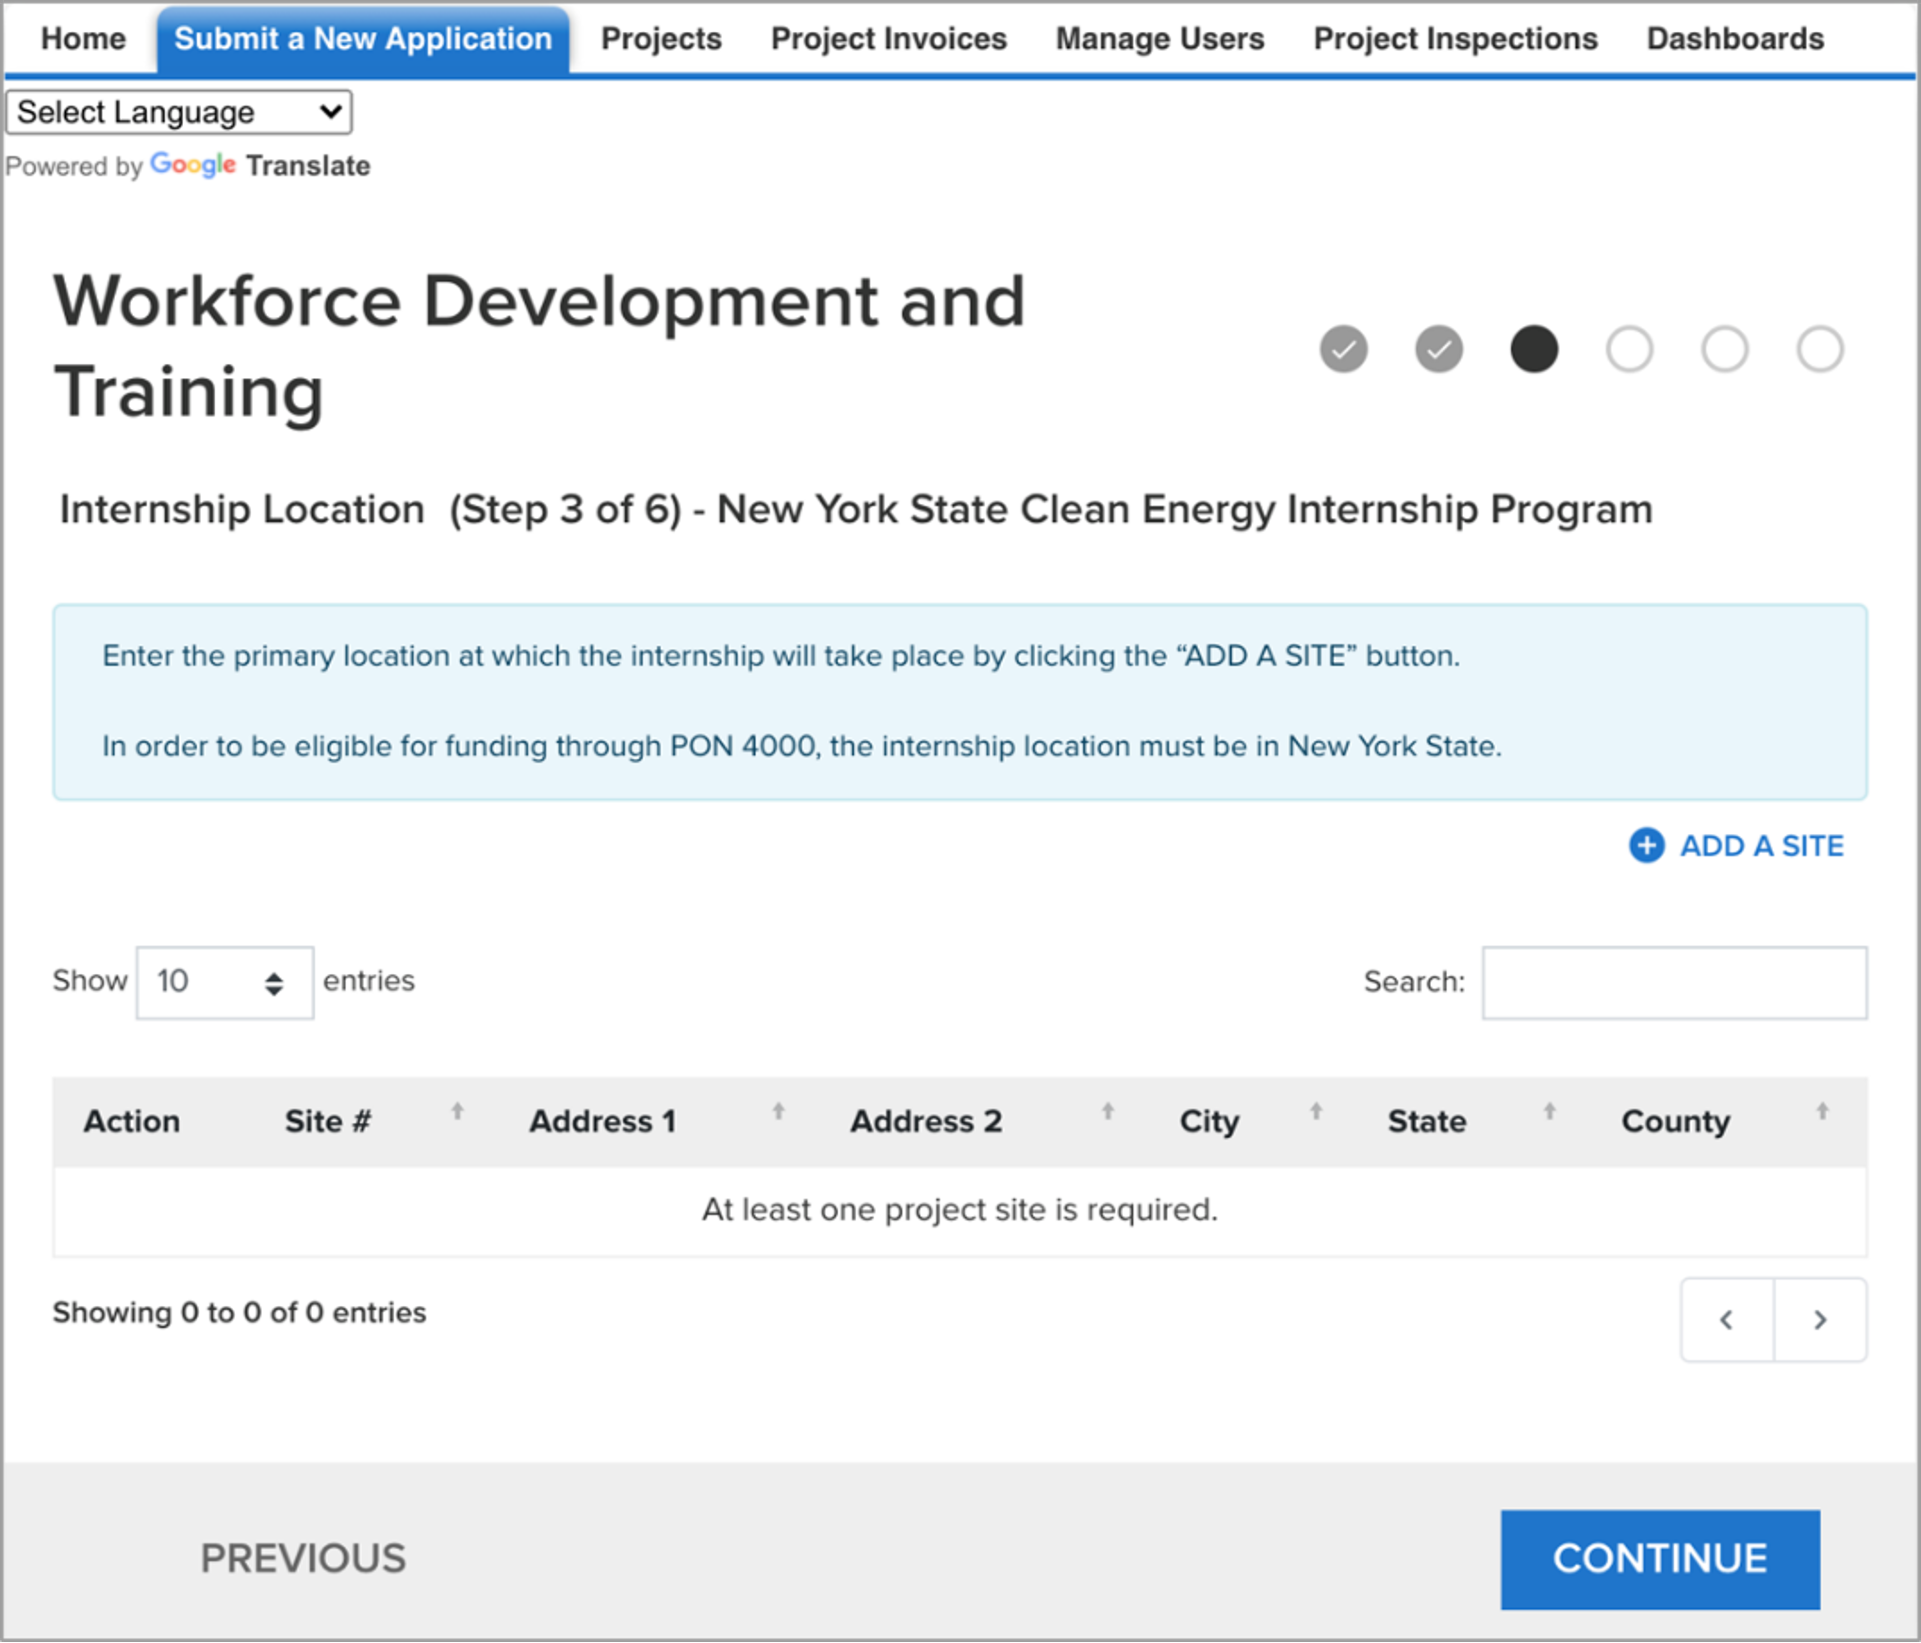 Image Added Image Added
|
|
|
| Aura - Tab |
|---|
|
| Panel |
|---|
| borderColor | #002D72 |
|---|
| bgColor | #F3F4F9 |
|---|
| titleColor | #ffffff |
|---|
| borderWidth | 1 |
|---|
| titleBGColor | #002D72 |
|---|
| borderStyle | none |
|---|
| title | Application Page 4: Internship Details |
|---|
|
|
| Info |
|---|
The fourth page of the application requires applicants to document the Internship details. All required fields on this page are marked with a *. |
| Section |
|---|
| Column |
|---|
|
| UI Steps |
|---|
|
| UI Step |
|---|
Complete all required fields on this page. The Date range of classes during internship field only becomes active when the business replies Yes to the Is the Intern taking one or more classes during the internship question. |
| UI Step |
|---|
This is the first page of the application where a Business can Save their progress to return to the application at a later time. | Info |
|---|
- The Save button can only be clicked if all required fields on the page have been completed.
After clicking Save, the Business can safely close the window if the application cannot be completed at this time. Once Saved, the Business will receive an automated email after 24 hours reminding them to continue the application process.
|
|
| UI Step |
|---|
When all information on this page is complete, click Continue to advance to the next page of the application. Access the Application: Page 5 tab for the next set of instructions. |
|
|
| Column |
|---|
| 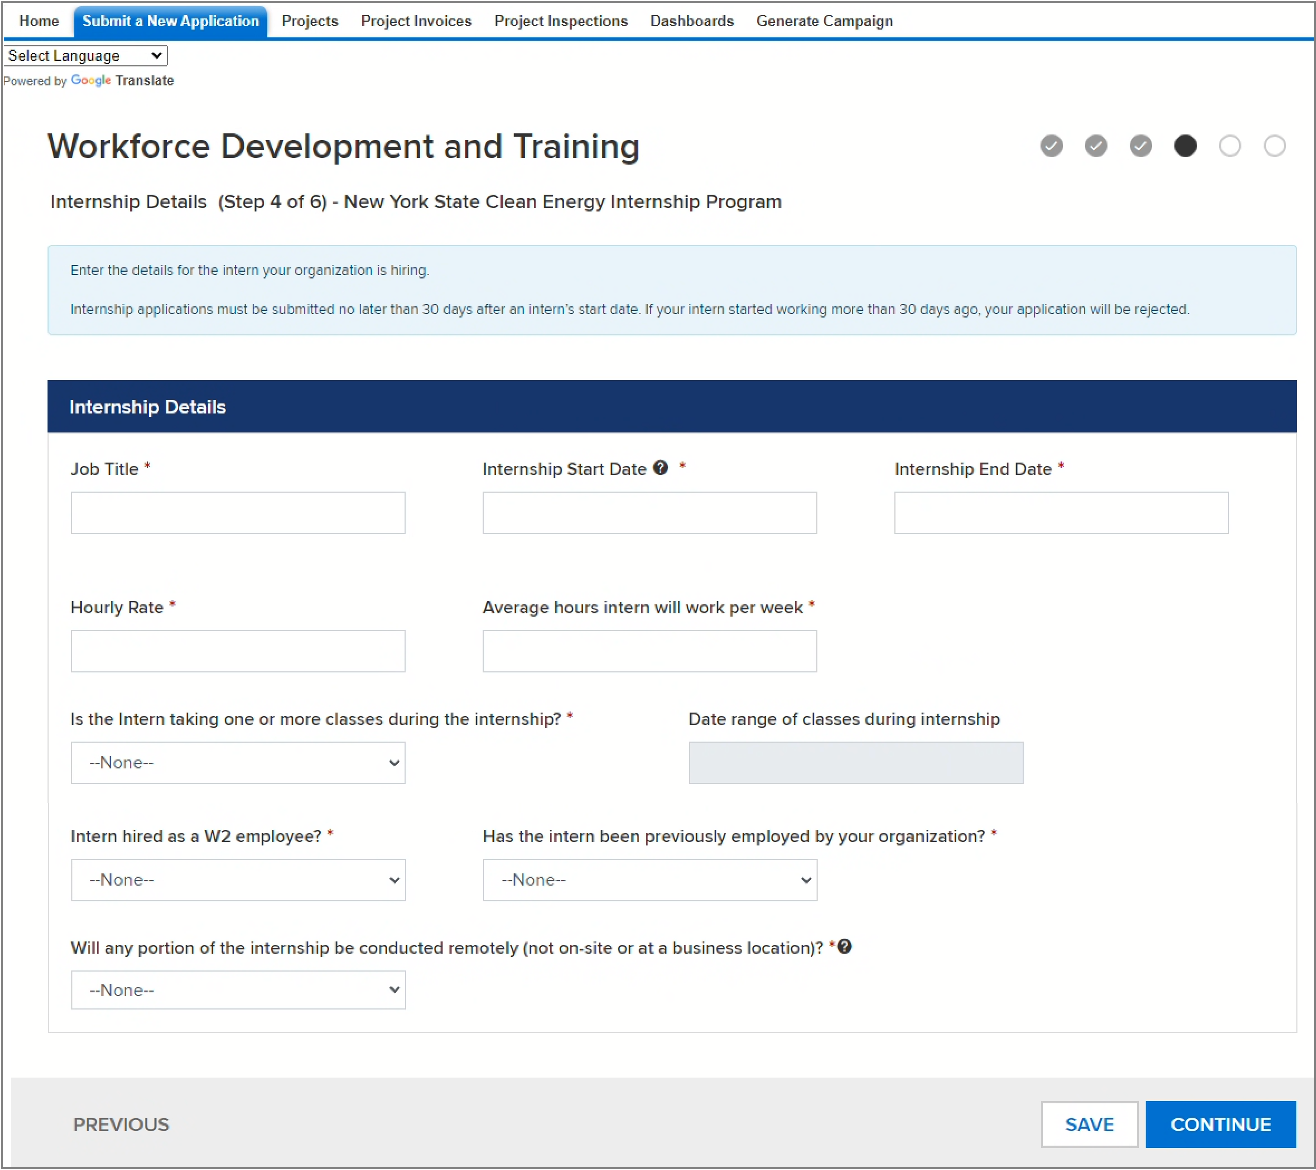 Image Added Image Added
|
|
|
| Aura - Tab |
|---|
|
| Panel |
|---|
| borderColor | #002D72 |
|---|
| bgColor | #F3F4F9 |
|---|
| titleColor | #ffffff |
|---|
| borderWidth | 1 |
|---|
| titleBGColor | #002D72 |
|---|
| borderStyle | none |
|---|
| title | Application Page 5: Internship Documents |
|---|
|
|
| Info |
|---|
The fifth page of the application requires the Business to upload supporting required and optional documentation. |
| Section |
|---|
| Column |
|---|
|
| UI Steps |
|---|
|
| UI Step |
|---|
Use the Choose File buttons for each required document to locate and upload the file from your computer. Once uploaded, the name of the file will appear to the right of each Choose File button. |
| UI Step |
|---|
If an incorrect or outdated file was uploaded, click Choose File again to locate and re-upload the correct or updated file. The newly file will replace the previously uploaded file. A Job Description and a Signed Offer Letter are required for all Internship Applications. A Remote Work Plan is only required if you selected Yes to the questions in Step 4 asking Will any portion of the internship be conducted remotely (not on-site or at a business location)? A remote work must plan must outline how those supervising the intern will engage with the intern during remote work. |
| UI Step |
|---|
By default, only one line item for Other Documents is provided. If additional optional documents are needed, click the Add Another Document option to include a separate line item under Other Documents. |
| UI Step |
|---|
Then, click Save to save your progress and click Continue to advance to the last page of the application. Access the Application: Page 6 tab for |
|
|
|
| | Aura - Tab |
|---|
| | Panel |
|---|
| borderColor | #002D72 |
|---|
| bgColor | #F3F4F9 |
|---|
| titleColor | #ffffff |
|---|
| borderWidth | 1 |
|---|
| titleBGColor | #002D72 |
|---|
| borderStyle | none |
|---|
| title | Application Page 1: Select Intern |
|---|
| | Info |
|---|
The first page of the application requires you to select the Intern you expect to hire. |
| Section |
|---|
| Column |
|---|
| | UI Steps |
|---|
| | UI Step |
|---|
Enter the last name of the Intern you expect to hire using the available field. Once you begin entering in the Intern's last name, a drop-down will appear listing Interns with the same last name. Select the correct option from the drop-down list. |
| UI Step |
|---|
If the Intern's name does not appear after entering in their last name, review the note at the bottom of the page to review next steps. You cannot proceed at this time with the application until the Intern has been approved to participate in the NYSERDA Clean Energy Internship Program. |
| UI Step |
|---|
If you were able to locate and select the Intern from the list, click Continue to advance to the next page of the application and access the Application: Page 2 tab to access the next step of instructions. |
| Column |
|---|
| Image Removed |
| Aura - Tab |
|---|
| | Panel |
|---|
| borderColor | #002D72 |
|---|
| bgColor | #F3F4F9 |
|---|
| titleColor | #ffffff |
|---|
| borderWidth | 1 |
|---|
| titleBGColor | #002D72 |
|---|
| borderStyle | none |
|---|
| title | Application Page 2: Project Contacts |
|---|
| | Info |
|---|
The second page establishes the application Contacts.Should NYSERDA require additional information for the application, the Contacts will be contacted.| Section |
|---|
| Column |
|---|
| | UI Steps |
|---|
| | UI Step |
|---|
If Contacts appear already on the list, confirm they are correct. You may need to edit information for the Contact. If so, click the Edit option to the left of the Contact line item to open the Add a contact modal window. Once open, update any fields as needed. Once complete, click Save Changes to save the next contact. The modal window will close. |
| UI Step |
|---|
If no Contacts appear on the list of if additional Contacts must be added, click the Add a Contact option to open the Add a contact modal window. Complete all the information, being sure to indicate if the Contact should be listed as the Primary Contact. After completing the form, click Save Changes to save the next contact. The modal window will close. | Tooltip |
|---|
| onlyIcon | true |
|---|
| appendIcon | camera |
|---|
| iconColor | #0073a4 |
|---|
| Image Removed |
| UI Step |
|---|
Once all Contacts have been verified and/or added, click Continue to advance to the next page of the application and click on the Application: Page 3 tab to navigate to the next set of instructions. |
|
|
| Column |
|---|
| Image Removed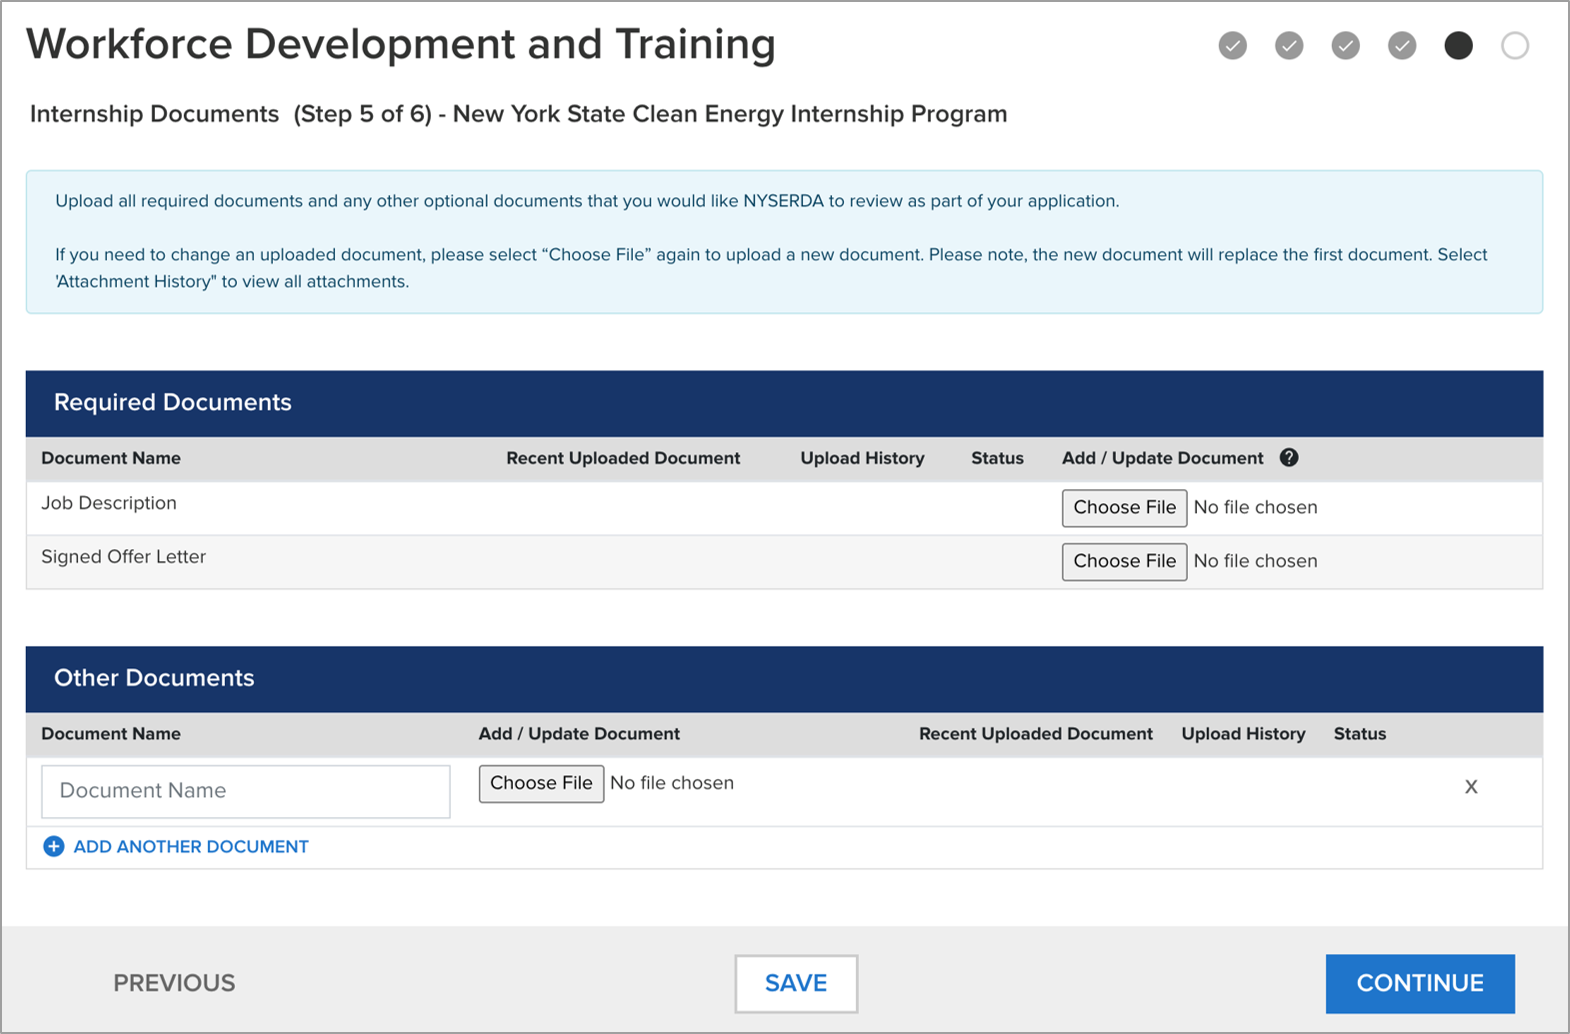 Image Added Image Added |
|
|
| Aura - Tab |
|---|
| title | Application: Page 36 |
|---|
|
| Panel |
|---|
| borderColor | #002D72 |
|---|
| bgColor | #F3F4F9 |
|---|
| titleColor | #ffffff |
|---|
| borderWidth | 1 |
|---|
| titleBGColor | #002D72 |
|---|
| borderStyle | none |
|---|
| title | Application Page 3: Internship Location |
|---|
|
| Info |
|---|
The third page establishes the Project Site, the location where the new Intern will be working. |
| Section |
|---|
| Column |
|---|
| | | UI Steps |
|---|
| | UI Step |
|---|
Click Add a Site to open the Add New Project Site modal window. Complete all required fields on the modal window and click Save when complete. The modal window will close. | Tooltip |
|---|
| onlyIcon | true |
|---|
| appendIcon | camera |
|---|
| iconColor | #0073a4 |
|---|
| Image Removed |
| UI Step |
|---|
Confirm that the Project Site was added correctly. If you need to make edits, click Edit to the left of the Project Site line item to re-open the Add New Project Site modal window. You can also Delete the Project Site if needed. | Tooltip |
|---|
| onlyIcon | true |
|---|
| appendIcon | camera |
|---|
| iconColor | #0073a4 |
|---|
| 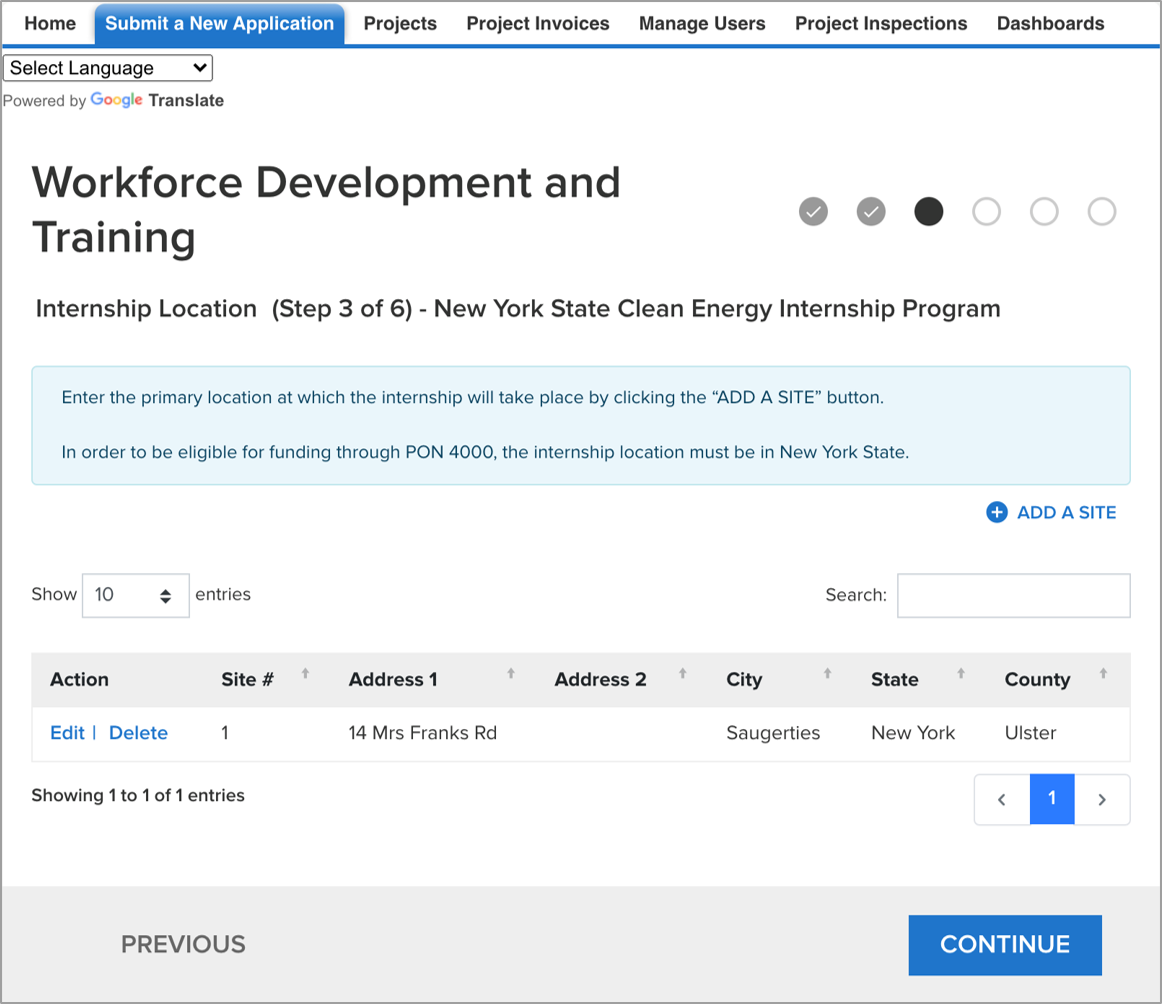 Image Removed Image Removed
|
| UI Step |
|---|
Add any additional Project Sites as needed. |
| UI Step |
|---|
When complete, click Continue to advance to the next page of the application and access the Application: Page 4 tab to review the next set of instructions. |
| Column |
|---|
| 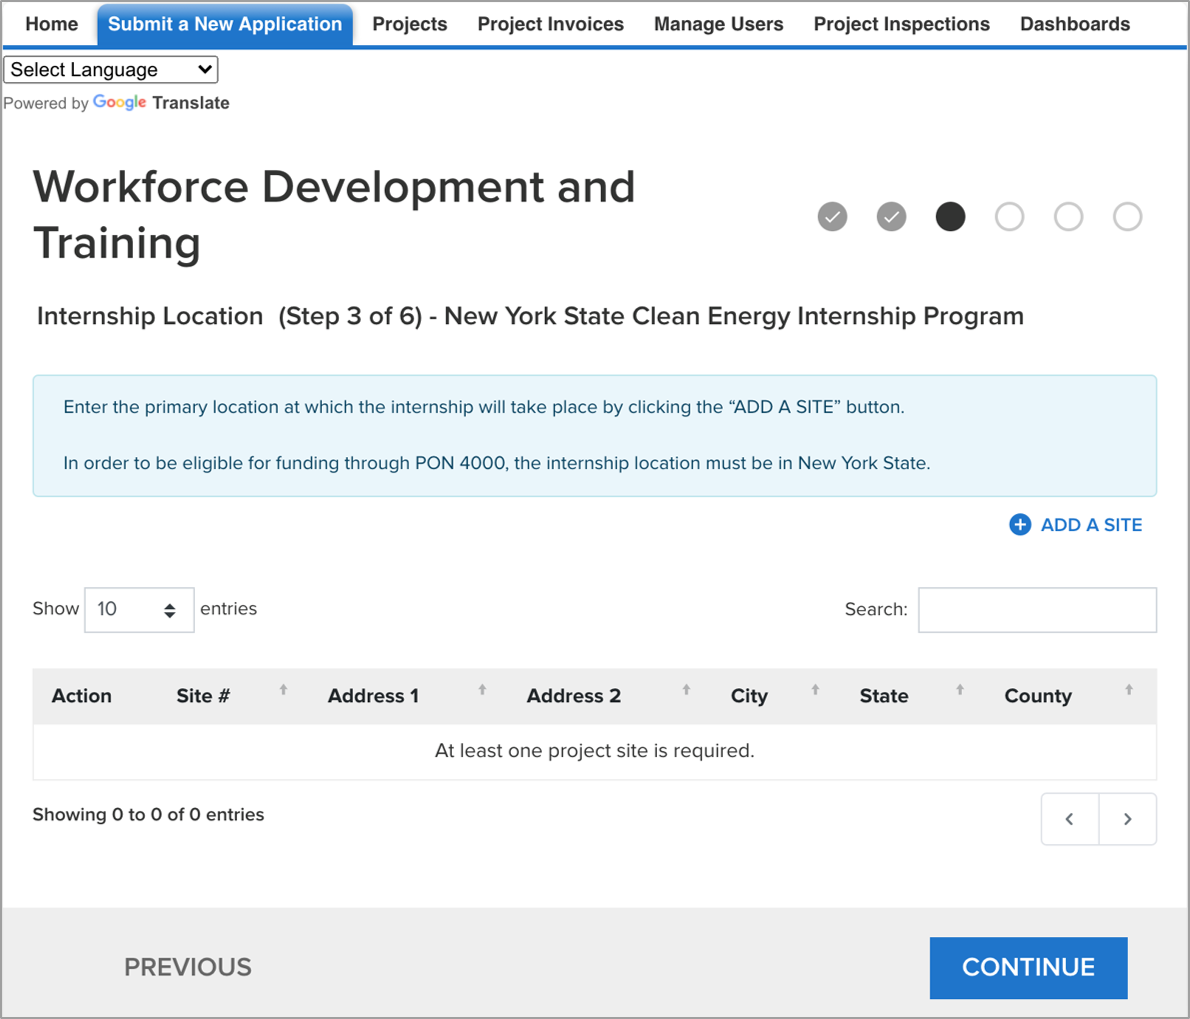 Image Removed Image Removed
|
| Aura - Tab |
|---|
| | Panel |
|---|
| borderColor | #002D72 |
|---|
| bgColor | #F3F4F9 |
|---|
| titleColor | #ffffff |
|---|
| borderWidth | 1 |
|---|
| titleBGColor | #002D72 |
|---|
| borderStyle | none |
|---|
| title | Application Page 4: Internship Details |
|---|
| | Info |
|---|
The fourth page of the application requires applicants to document the Internship details. all required fields on this page are marked with a *. |
| Section |
|---|
| Column |
|---|
| | UI Steps |
|---|
| | UI Step |
|---|
Complete all required fields on this page. The Date range of classes during internship field only becomes active when the business replies Yes to the Is the Intern taking one or more classes during the internship question. |
| UI Step |
|---|
This is the first page of the application where a Business can Save their progress to return to the application at a later time. | Info |
|---|
- The Save button can only be clicked if all required fields on the page have been completed.
After clicking Save, the Business can safely close the window if the application cannot be completed at this time. Once Saved, the Business will receive an automated email after 24 hours reminding them to continue the application process.
|
| UI Step |
|---|
When all information on this page is complete, click Continue to advance to the next page of the application. Then click the Application: Page 5 tab to review the next set of instuctions. |
| Column |
|---|
| 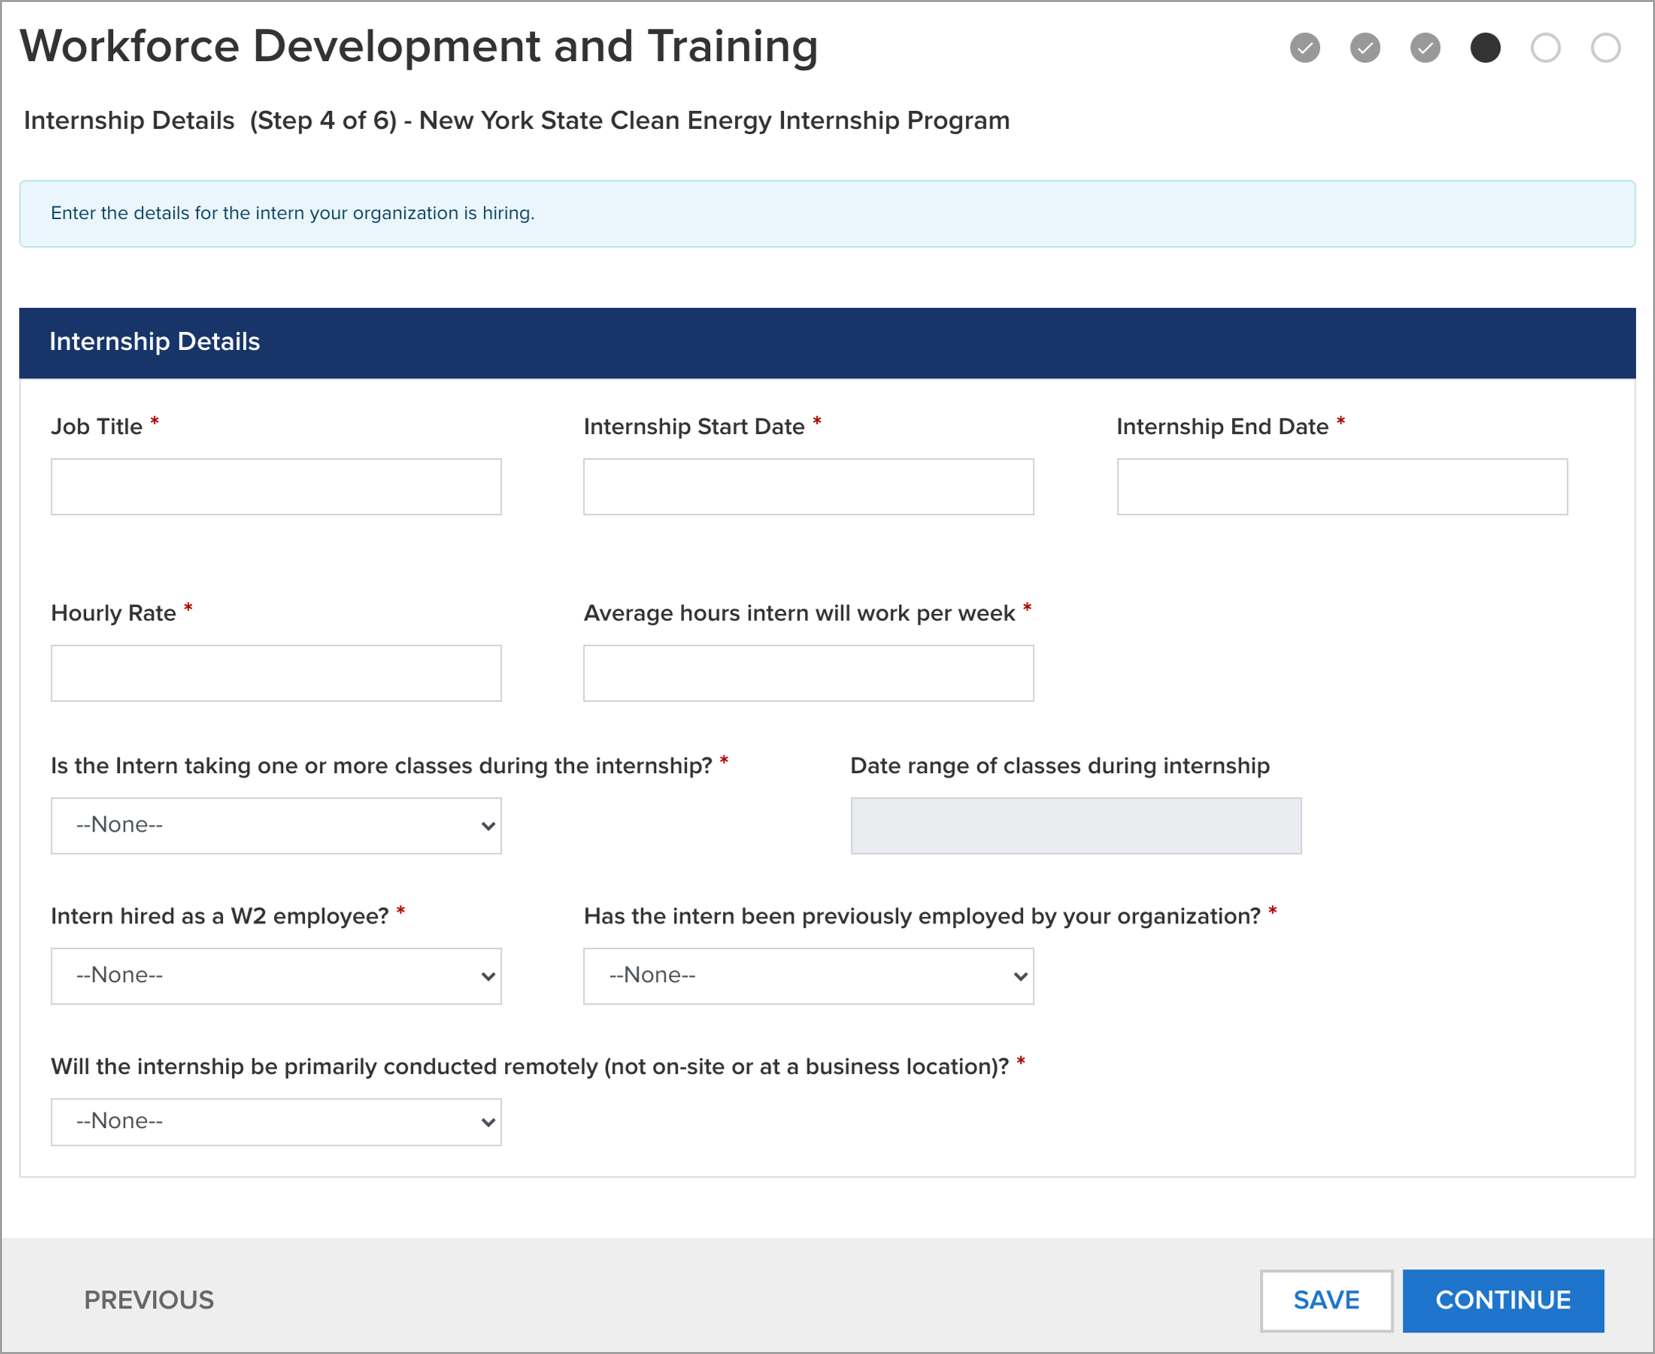 Image Removed Image Removed
|
| Aura - Tab |
|---|
| | Panel |
|---|
| borderColor | #002D72 |
|---|
| bgColor | #F3F4F9 |
|---|
| titleColor | #ffffff |
|---|
| borderWidth | 1 |
|---|
| titleBGColor | #002D72 |
|---|
| borderStyle | none |
|---|
| title | Application Page 5: Internship Documents |
|---|
| | Info |
|---|
The fifth page of the application requires the Business to upload supporting required and optional documentation. |
| Section |
|---|
| Column |
|---|
| | UI Steps |
|---|
| | UI Step |
|---|
Use the Choose File buttons for each required document to locate and upload the file from your computer. Once uploaded, the name of the file will appear to the right of each Choose File button. |
| UI Step |
|---|
If an incorrect or outdated file was uploaded, click Choose File again to locate and re-upload the correct or updated file. The newly file will replace the previously uploaded file. |
| UI Step |
|---|
By default, only one line item for Other Documents is provided. If additional optional documents are needed, click the Add Another Document option to include a separate line item under Other Documents. |
| UI Step |
|---|
Then, click Save to save your progress and click Continue to advance to the last page of the application. Access the Application: Page 6 tab to review the next set of instructions. |
| Column |
|---|
| Image Removed |
| Aura - Tab |
|---|
| | Panel |
|---|
| borderColor | #002D72 |
|---|
| bgColor | #F3F4F9 |
|---|
| titleColor | #ffffff |
|---|
| borderWidth | 1 |
|---|
| titleBGColor | #002D72 |
|---|
| borderStyle | none |
|---|
| title | Application Page 6: Application Review |
|---|
| | Info |
|---|
The last page provides an opportunity for the Business to review all submitted information before submitting the application. |
| Section |
|---|
| Column |
|---|
| | UI Steps |
|---|
| | UI Step |
|---|
Review all information provided in the application for accuracy. If any aspects of the application need to be updated, use the Previous button or the Grey Check Circles at the top-right of the page to navigate to previous pages in the application. When updated, return to the last page of the application. |
| UI Step |
|---|
This page also contains a Certification Statement that the Business should read through. Then, check the I agree to the terms and conditions stated above check box. This box must be checked off before the application cab be submitted. |
| UI Step |
|---|
The Business can click Print to save and print a PDF version of the completed application. Otherwise, click Submit to submit the application. Once submitted, the page will refresh and display a green Application Status message confirming successful submittal. | Tooltip |
|---|
| onlyIcon | true |
|---|
| appendIcon | camera |
|---|
| iconColor | #0073a4 |
|---|
| 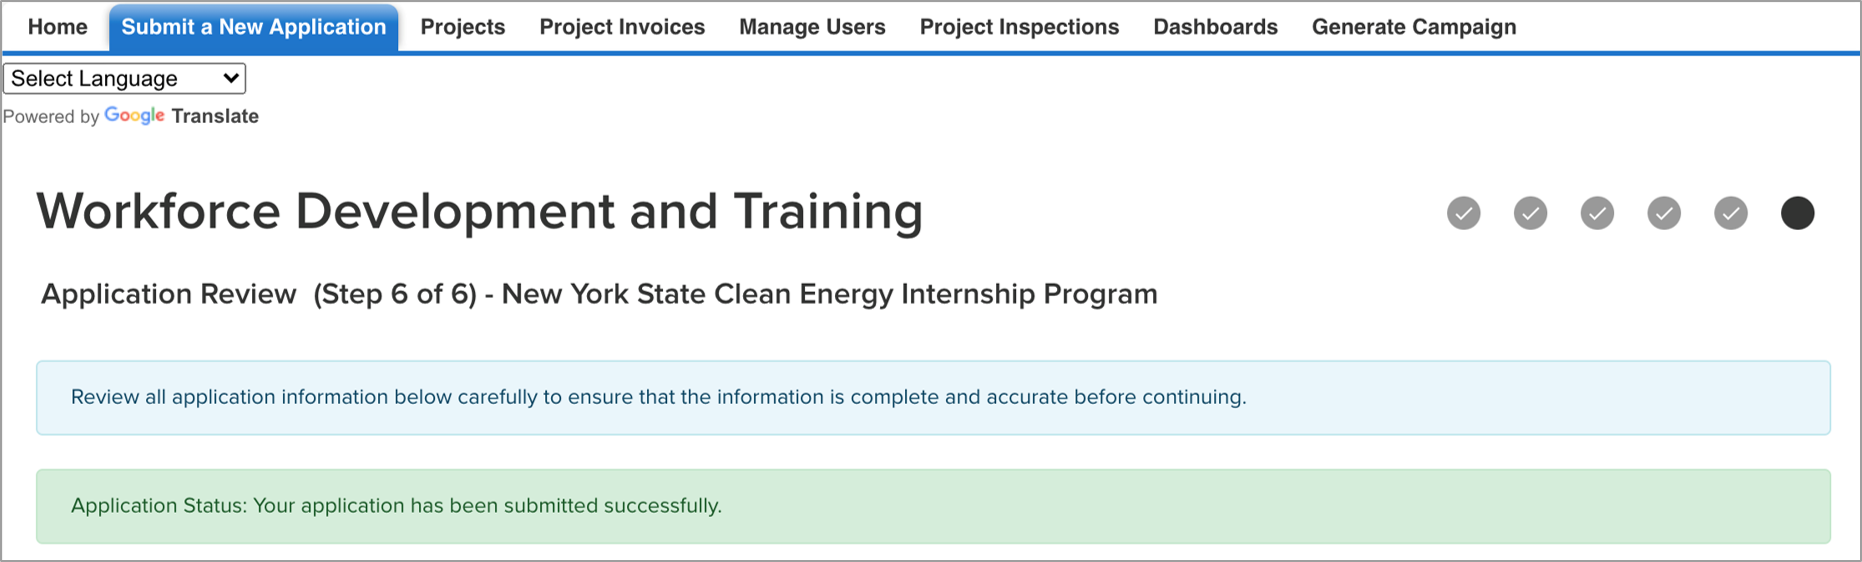 Image Removed Image Removed
|
| Column |
|---|
| 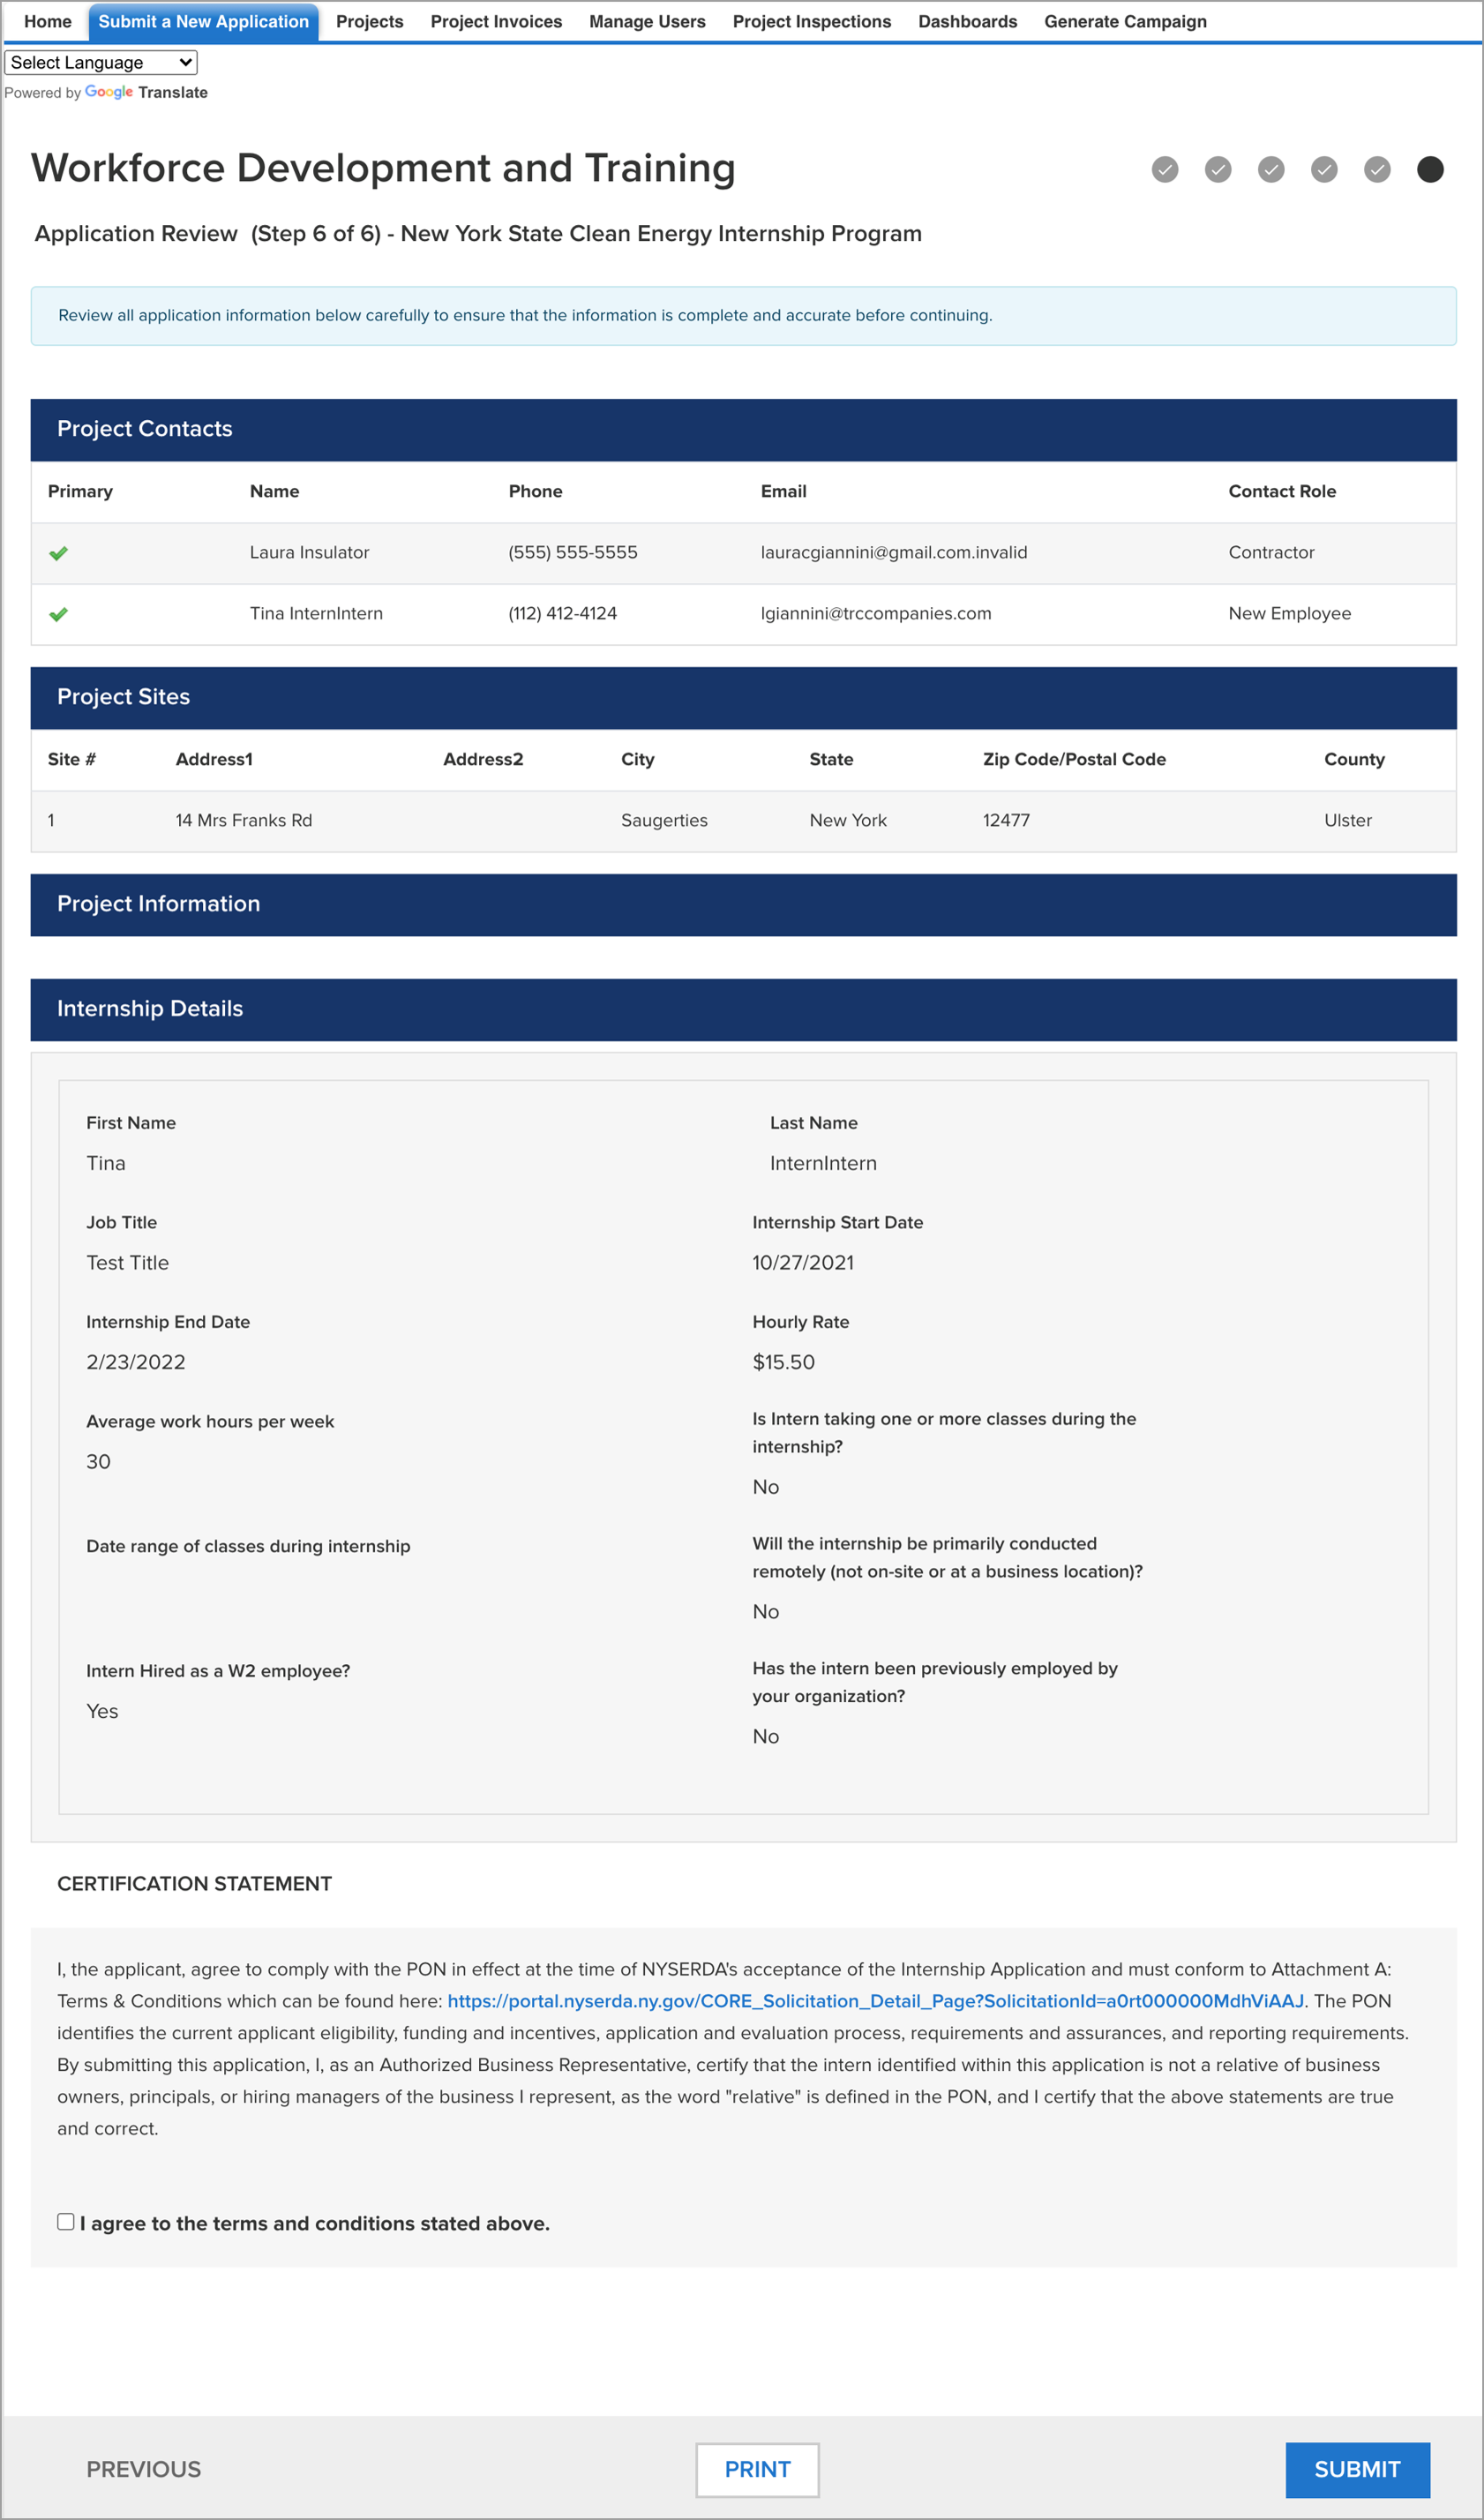 Image Removed Image Removed
|
| Aura - Tab |
|---|
| | Panel |
|---|
| borderColor | #002D72 |
|---|
| bgColor | #F3F4F9 |
|---|
| titleColor | #ffffff |
|---|
| borderWidth | 1 |
|---|
| titleBGColor | #002D72 |
|---|
| borderStyle | none |
|---|
| title | Next Steps |
|---|
| Now that you have submitted your application:TBD | | titleBGColor | #002D72 |
|---|
| borderStyle | none |
|---|
| title | Application Page 6: Application Review |
|---|
|
|
| Info |
|---|
The last page provides an opportunity for the Business to review all submitted information before submitting the application. |
| Section |
|---|
| Column |
|---|
|
| UI Steps |
|---|
|
| UI Step |
|---|
Review all information provided in the application for accuracy. If any aspects of the application need to be updated, use the Previous button or the Grey Check Circles at the top-right of the page to navigate to previous pages in the application. After making an updated, return to the last page of the application. |
| UI Step |
|---|
This page also contains a Certification Statement that the Business should read through. This includes reviewing the Terms and Conditions for the PON 4000: Clean Energy Internship Program with the link provided in the Certification Statement. Then, check the I agree to the terms and conditions stated above check box. This box must be checked off before the application can be submitted. |
| UI Step |
|---|
The Business can click Print to save and/or print a PDF version of the completed application if desired. Click Submit to submit the application. Once submitted, the page will refresh and display a green Application Status message confirming successful submittal. | Tooltip |
|---|
| onlyIcon | true |
|---|
| appendIcon | camera |
|---|
| iconColor | #0073a4 |
|---|
| Image Added |
|
|
|
| Column |
|---|
|  Image Added Image Added
|
|
|
| Aura - Tab |
|---|
|
| Panel |
|---|
| borderColor | #002D72 |
|---|
| bgColor | #F3F4F9 |
|---|
| titleColor | #ffffff |
|---|
| borderWidth | 1 |
|---|
| titleBGColor | #002D72 |
|---|
| borderStyle | none |
|---|
| title | Next Steps |
|---|
|
|
Now that you have submitted your application:- You will receive a confirmation email indicating that NYSERDA has received your application and that it is under review.
- You can expect to receive an email within 10 days after application submission regarding the outcome of the application review and, if applicable, and next steps.
- You may view the status of your application at any time by logging into the NYSERDA Portal and selecting the Project tab.
| Info |
|---|
The submission of an Internship Application does not commit NYSERDA to award funding or make payments related to the application. |
|
| Aura - Tab |
|---|
|
| Panel |
|---|
| borderColor | #002D72 |
|---|
| bgColor | #F3F4F9 |
|---|
| titleColor | #ffffff |
|---|
| borderWidth | 1 |
|---|
| titleBGColor | #002D72 |
|---|
| borderStyle | none |
|---|
| title | Submitting a Revised Document for your Internship Application |
|---|
|
|
| Info |
|---|
NYSERDA may reject individual items from your application and ask you to resubmit a document with items corrected or clarified. If a document is rejected, you will receive notification via email indicating which document has been rejected and what is required for resubmission if you’d like to proceed with your application. We have prepared a short video walking you through the below steps should you prefer which you can access and view below. | Expand |
|---|
| | Multimedia |
|---|
| name | WFD Document Resubmittal.mp4 |
|---|
| width | 100% |
|---|
| page | External Guide Video Library |
|---|
| height | 100% |
|---|
|
|
|
| UI Steps |
|---|
|
| UI Step |
|---|
To upload a revised document, log into your | UI Button |
|---|
| color | blue |
|---|
| newWindow | true |
|---|
| size | small |
|---|
| icon | link |
|---|
| title | NYSERDA Portal |
|---|
| url | https://portal.nyserda.ny.gov/login |
|---|
|
account |
| UI Step |
|---|
Click on the Projects tab. Use the menu to select All Applications Under Review then click the Go button. | Expand |
|---|
|  Image Added Image Added
|
|
| UI Step |
|---|
Click on the Project Name of the Application that needs a new document. | Expand |
|---|
| 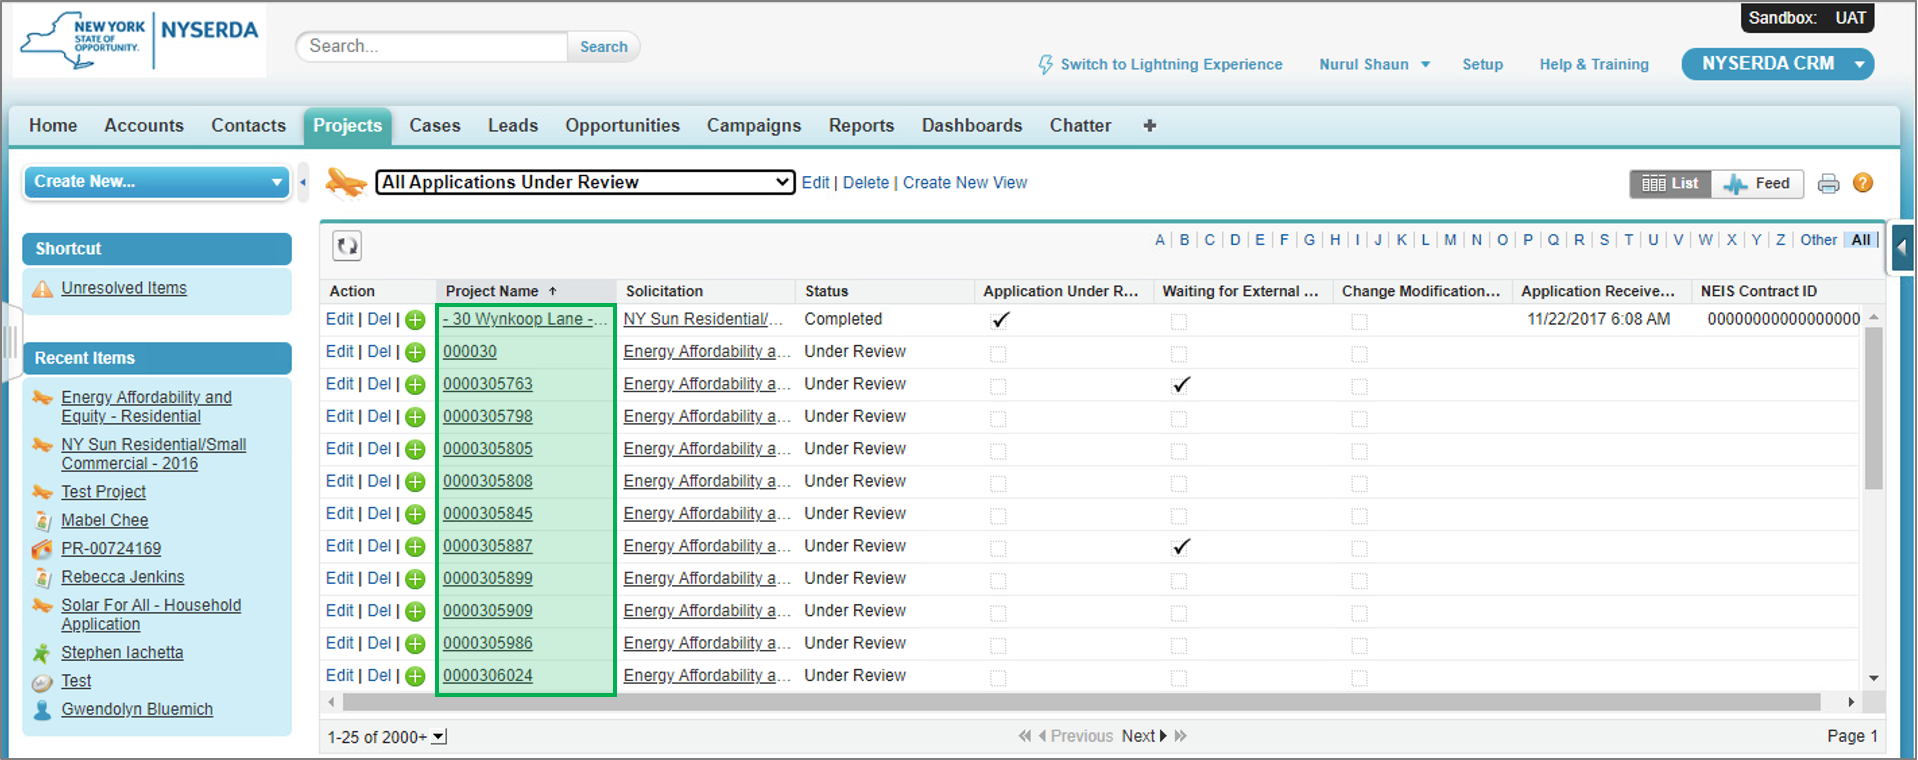 Image Added Image Added
|
|
| UI Step |
|---|
On the Project Details page, scroll down to the Document Infromation section. | Expand |
|---|
|  Image Added Image Added
|
|
| UI Step |
|---|
For each document marked as Rejected, click the Choose File button. | Expand |
|---|
|  Image Added Image Added
|
|
| UI Step |
|---|
A new window will open up. Select the new file you wish to upload and click Open. Repeat for each file that needs to be resubmitted. | Expand |
|---|
| 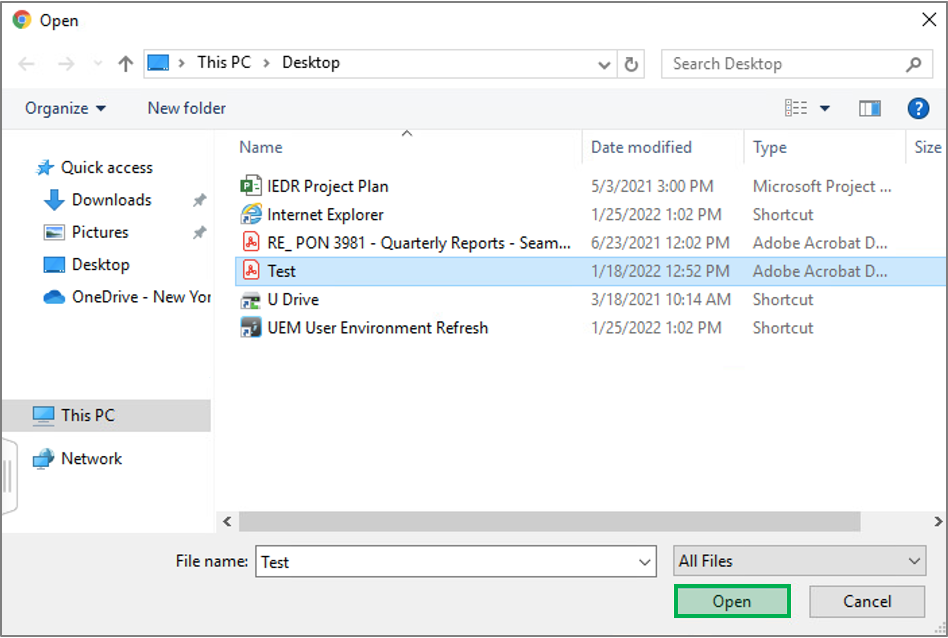 Image Added Image Added
|
|
| UI Step |
|---|
Click the Save Document button. | Tip |
|---|
If you do not see the Save Document button, use the scroll bar for the Document Information section on the right side of the screen and scroll up. |
| Expand |
|---|
| 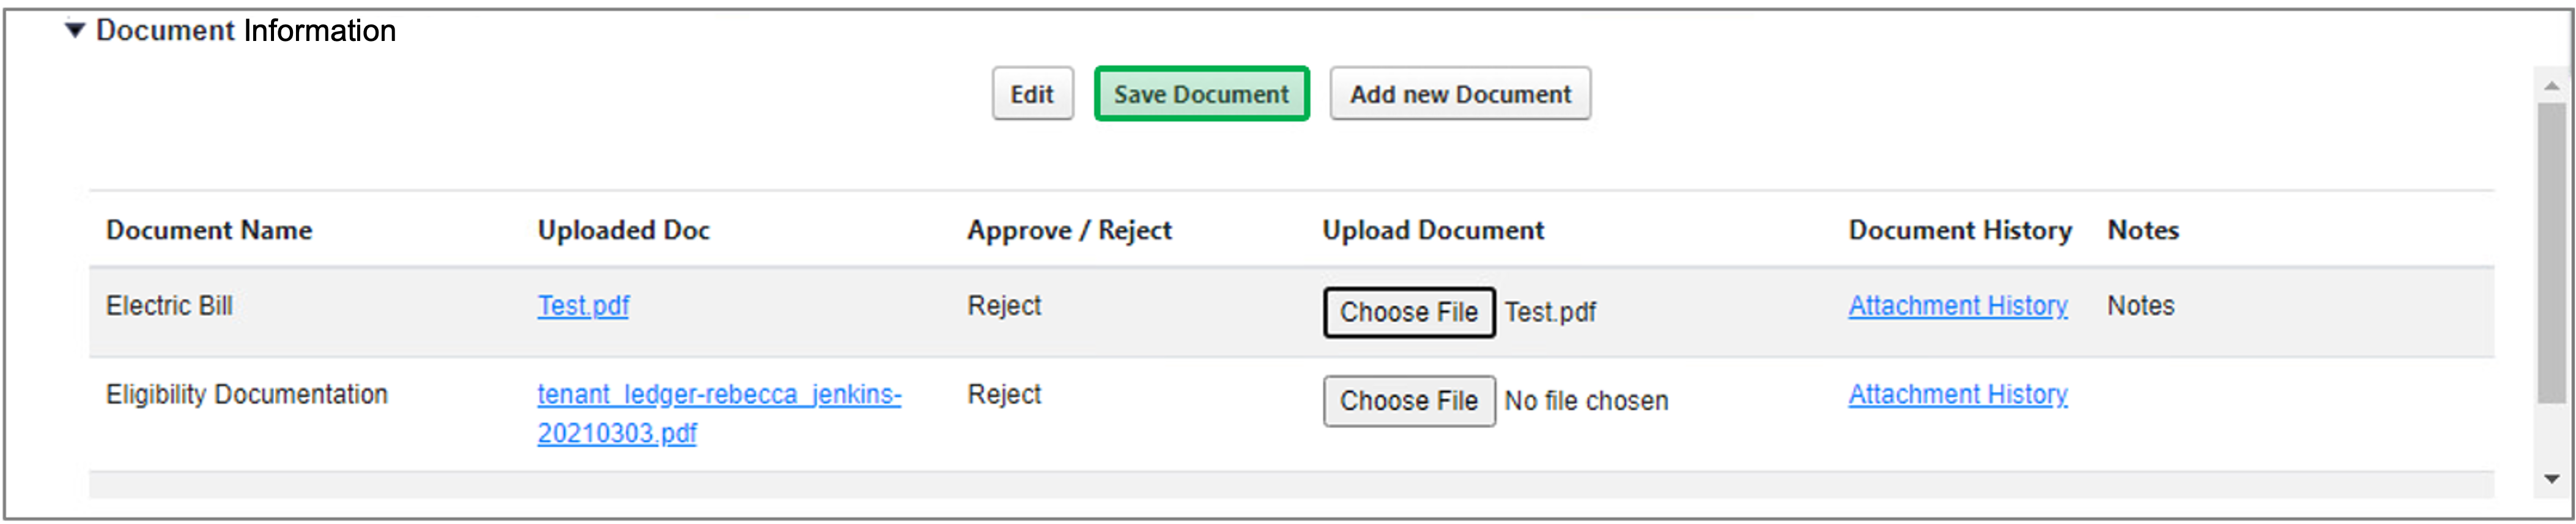 Image Added Image Added
|
|
| UI Step |
|---|
Once you click the Save Document button, the Document Status will change from Rejected to Submitted. | Tip |
|---|
You may review the Attachment History by clicking the Attachment History link for each file. |
| Expand |
|---|
|  Image Added Image Added
|
|
| UI Step |
|---|
Once you upload revised documents, NYSERDA is notified that the application is ready for review. You will be notified of the outcome of the review within 5 business days. |
|
|
|