Versions Compared

Key

  • This line was added.
  • This line was removed.
  • Formatting was changed.


Panel
bgColor#f0f0f0
borderStylesolid

Introduction 

This page provides instructions for completing and submitting the Contracting Form. If you have questions while completing this form, contact your NYSERDA Project Manager listed on the project in the Portal.


Instructions

Aura - Panel
tab1
styles{"body":{"text":{"fontSize":14,"color":"#002d72","textAlign":"left","fontWeight":"normal"}},"header":{"backgroundColor":{"color":"#ffffff"}},"headline":{"text":{"text":"General Instructions","color":"#002d72","textAlign":"left","fontWeight":"normal","fontSize":26}},"base":{"boxShadow":{"shadows":[{"color":"rgba(0, 0, 0, 0.08)","x":0,"y":1,"blur":1,"spread":0},{"color":"rgba(0, 0, 0, 0.16)","x":0,"y":1,"blur":3,"spread":1}]},"borderRadius":{"radius":4},"backgroundColor":{"color":"#ffffff"},"border":{"color":"#002d72","style":"solid","width":4,"bottom":false,"top":false,"left":true,"right":false}}}
body<p><br /></p>


Expand
titlelearn more...


UI Steps
sizesmall


UI Step

Log into Salesforce, then locate and access the correct Project Record.

Expand
titlescreenshot


UI Step

Once in the Project Record, click the Contracting Form button.  

After clicking the Contracting Form button you will click Continue and enter information in the Contracting Form Step 1: General Information.

Expand
titlescreenshot


Aura - Panel
tab1
styles{"body":{"text":{"fontSize":14,"color":"#002d72","textAlign":"left","fontWeight":"normal"}},"header":{"backgroundColor":{"color":"#ffffff"}},"headline":{"text":{"text":"Step 1: General Information","color":"#002d72","textAlign":"left","fontWeight":"normal","fontSize":26}},"base":{"boxShadow":{"shadows":[{"color":"rgba(0, 0, 0, 0.08)","x":0,"y":1,"blur":1,"spread":0},{"color":"rgba(0, 0, 0, 0.16)","x":0,"y":1,"blur":3,"spread":1}]},"borderRadius":{"radius":4},"backgroundColor":{"color":"#ffffff"},"border":{"color":"#002d72","style":"solid","width":4,"bottom":false,"top":false,"left":true,"right":false}}}
body<p><br /></p>


Expand
titlelearn more...


UI Steps
sizesmall


UI Step

Use the small arrows on the right side of the title bar to open each section of the form. 


Project Information – This section is populated based on information provided in the Bid Application and is not editable. If information in this section is not correct, contact the NYSERDA Project Manager. 

Expand
titlescreenshot


UI Step

Seller Information

  1. Seller Legal Business Name – Populated based on information provided in the Bid Application and is not editable. If this information is not correct, please contact the NYSERA Project Manager.
  2. Seller Employer Identification Number (EIN) - Must match/be associated with provided W-9 in the following Step 3 and corresponding Legal Business/Disregarded Entity Name / Seller Legal Business Name.
  3. Legal Name of Taxpayer Parent – Provide only if Seller is a Disregarded Entity in which taxable income should be reported to the Taxable Parent entity.
  4. Taxpayer Parent Employer Identification Number (EIN) – Must match/be associated with Legal Name of Taxable Parent as provided above.
  5. Seller Address – Provide mailing address for Seller. 
Expand
titlescreenshot


UI Step

Developer Information

  1. Developer Company Name – The name of the entity responsible for Developing the project.
  2. Developer Address – The mailing address for the Developer entity provided above. 
Expand
titlescreenshot


UI Step

Once all information is provided, click Continue to progress to Step 2. 

Expand
titlescreenshot


Aura - Panel
tab1
styles{"body":{"text":{"fontSize":14,"color":"#002d72","textAlign":"left","fontWeight":"normal"}},"header":{"backgroundColor":{"color":"#ffffff"}},"headline":{"text":{"text":"Step 2: Contact Information and Project Roles ","color":"#002d72","textAlign":"left","fontWeight":"normal","fontSize":26}},"base":{"boxShadow":{"shadows":[{"color":"rgba(0, 0, 0, 0.08)","x":0,"y":1,"blur":1,"spread":0},{"color":"rgba(0, 0, 0, 0.16)","x":0,"y":1,"blur":3,"spread":1}]},"borderRadius":{"radius":4},"backgroundColor":{"color":"#ffffff"},"border":{"color":"#002d72","style":"solid","width":4,"bottom":false,"top":false,"left":true,"right":false}}}
body<p><br /></p>


Expand
titlelearn more...


UI Steps
sizesmall


UI Step

In this step, you will add, confirm, and/or update the Project Roles associated with the given project. The designated number of Project Roles listed below must be provided in order to progress to the next step. If necessary, contact information may be entered twice for the same individual. You may also request Portal Access at this time.

  • Seller: Project Developer/Origination (designate a minimum of two)
  • Seller: Legal Notice (designate a minimum of two)
  • Authorized Signatory (designate at least one)

    Tip
    iconfalse

    Please note: NYSERDA’s Salesforce portal allows Admin users to control who has access to their project record(s), which may contain commercially sensitive information that you may consider confidential. If you grant Portal Access, those users will have access to this project and all other projects under the "Account". Admin users are responsible for keeping all access current and should revoke access to users who no longer need access to the project(s).

    Expand
    titlescreenshot


UI Step

Click Add A Project Role. 

Expand
titlescreenshot


UI Step

Enter the contact information for the individual and associated Project Role.

Click Save Changes.

Tip
iconfalse

Click Close to exit out of the page without saving the details.

Expand
titlescreenshot


UI Step

Once all Project Roles have been added, click Continue to progress to Step 3.

Expand
titlescreenshot


Aura - Panel
tab1
styles{"body":{"text":{"fontSize":14,"color":"#002d72","textAlign":"left","fontWeight":"normal"}},"header":{"backgroundColor":{"color":"#ffffff"}},"headline":{"text":{"text":"Step 3: Contract Security Details","color":"#002d72","textAlign":"left","fontWeight":"normal","fontSize":26}},"base":{"boxShadow":{"shadows":[{"color":"rgba(0, 0, 0, 0.08)","x":0,"y":1,"blur":1,"spread":0},{"color":"rgba(0, 0, 0, 0.16)","x":0,"y":1,"blur":3,"spread":1}]},"borderRadius":{"radius":4},"backgroundColor":{"color":"#ffffff"},"border":{"color":"#002d72","style":"solid","width":4,"bottom":false,"top":false,"left":true,"right":false}}}


Expand
titlelearn more...


UI Steps
sizesmall


UI Step

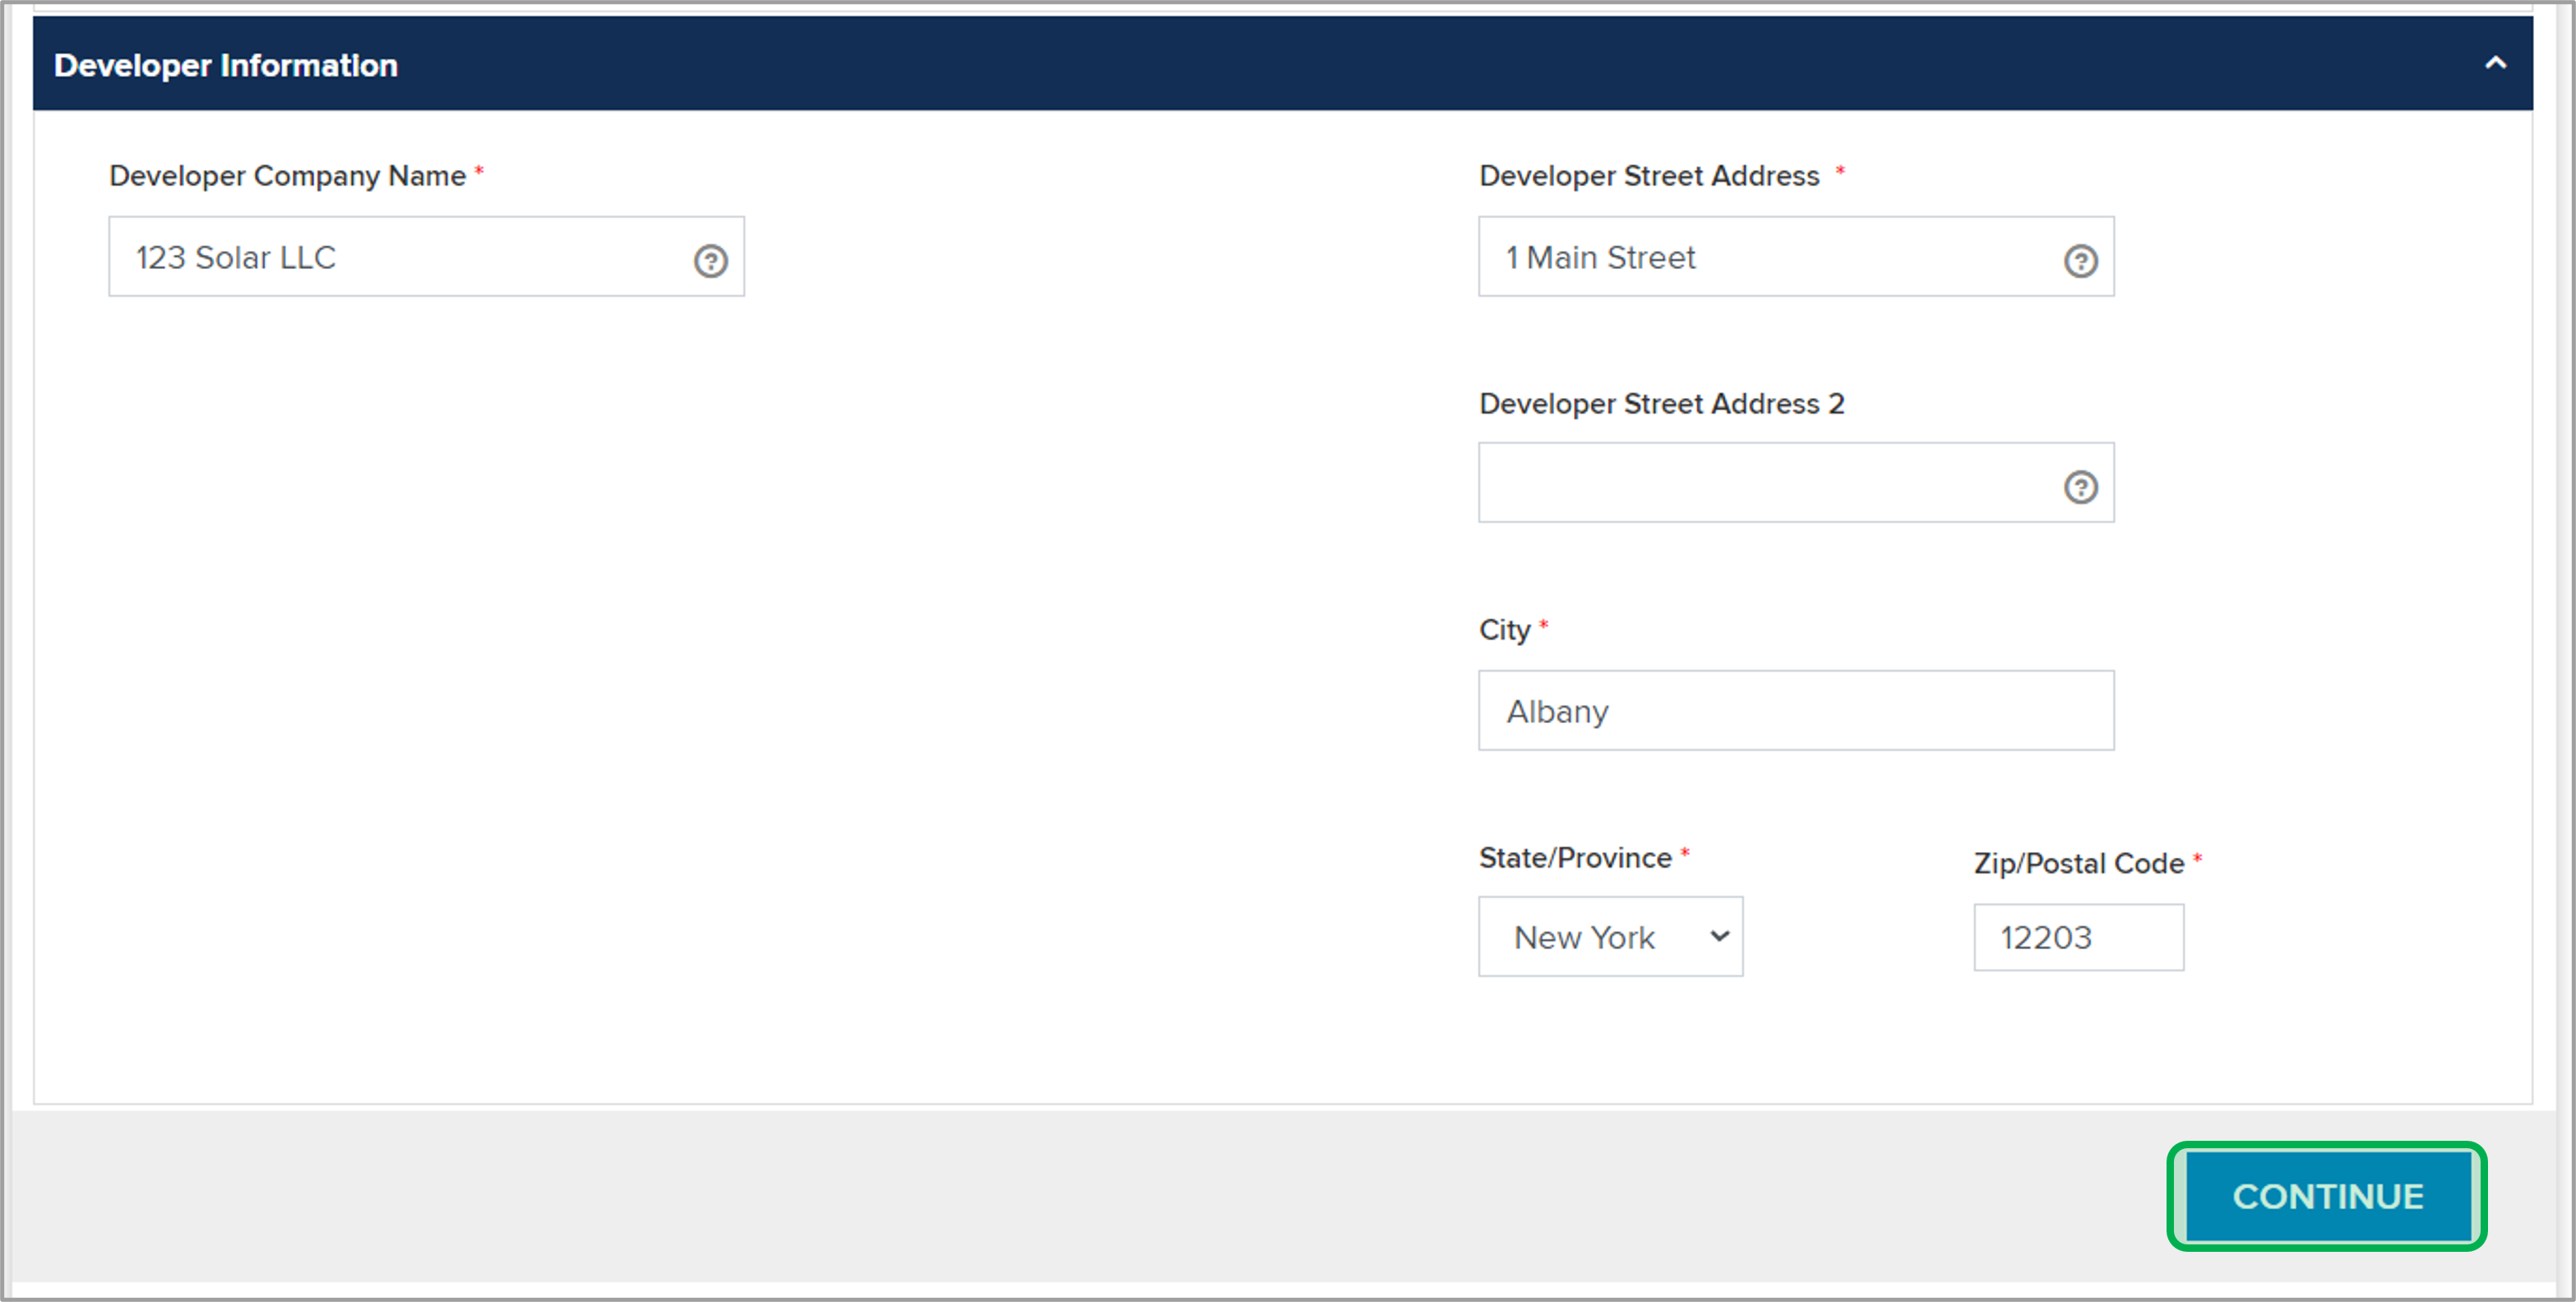
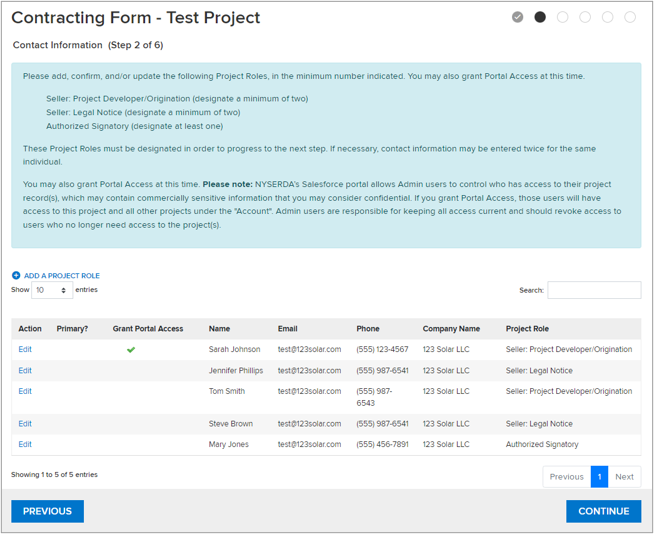
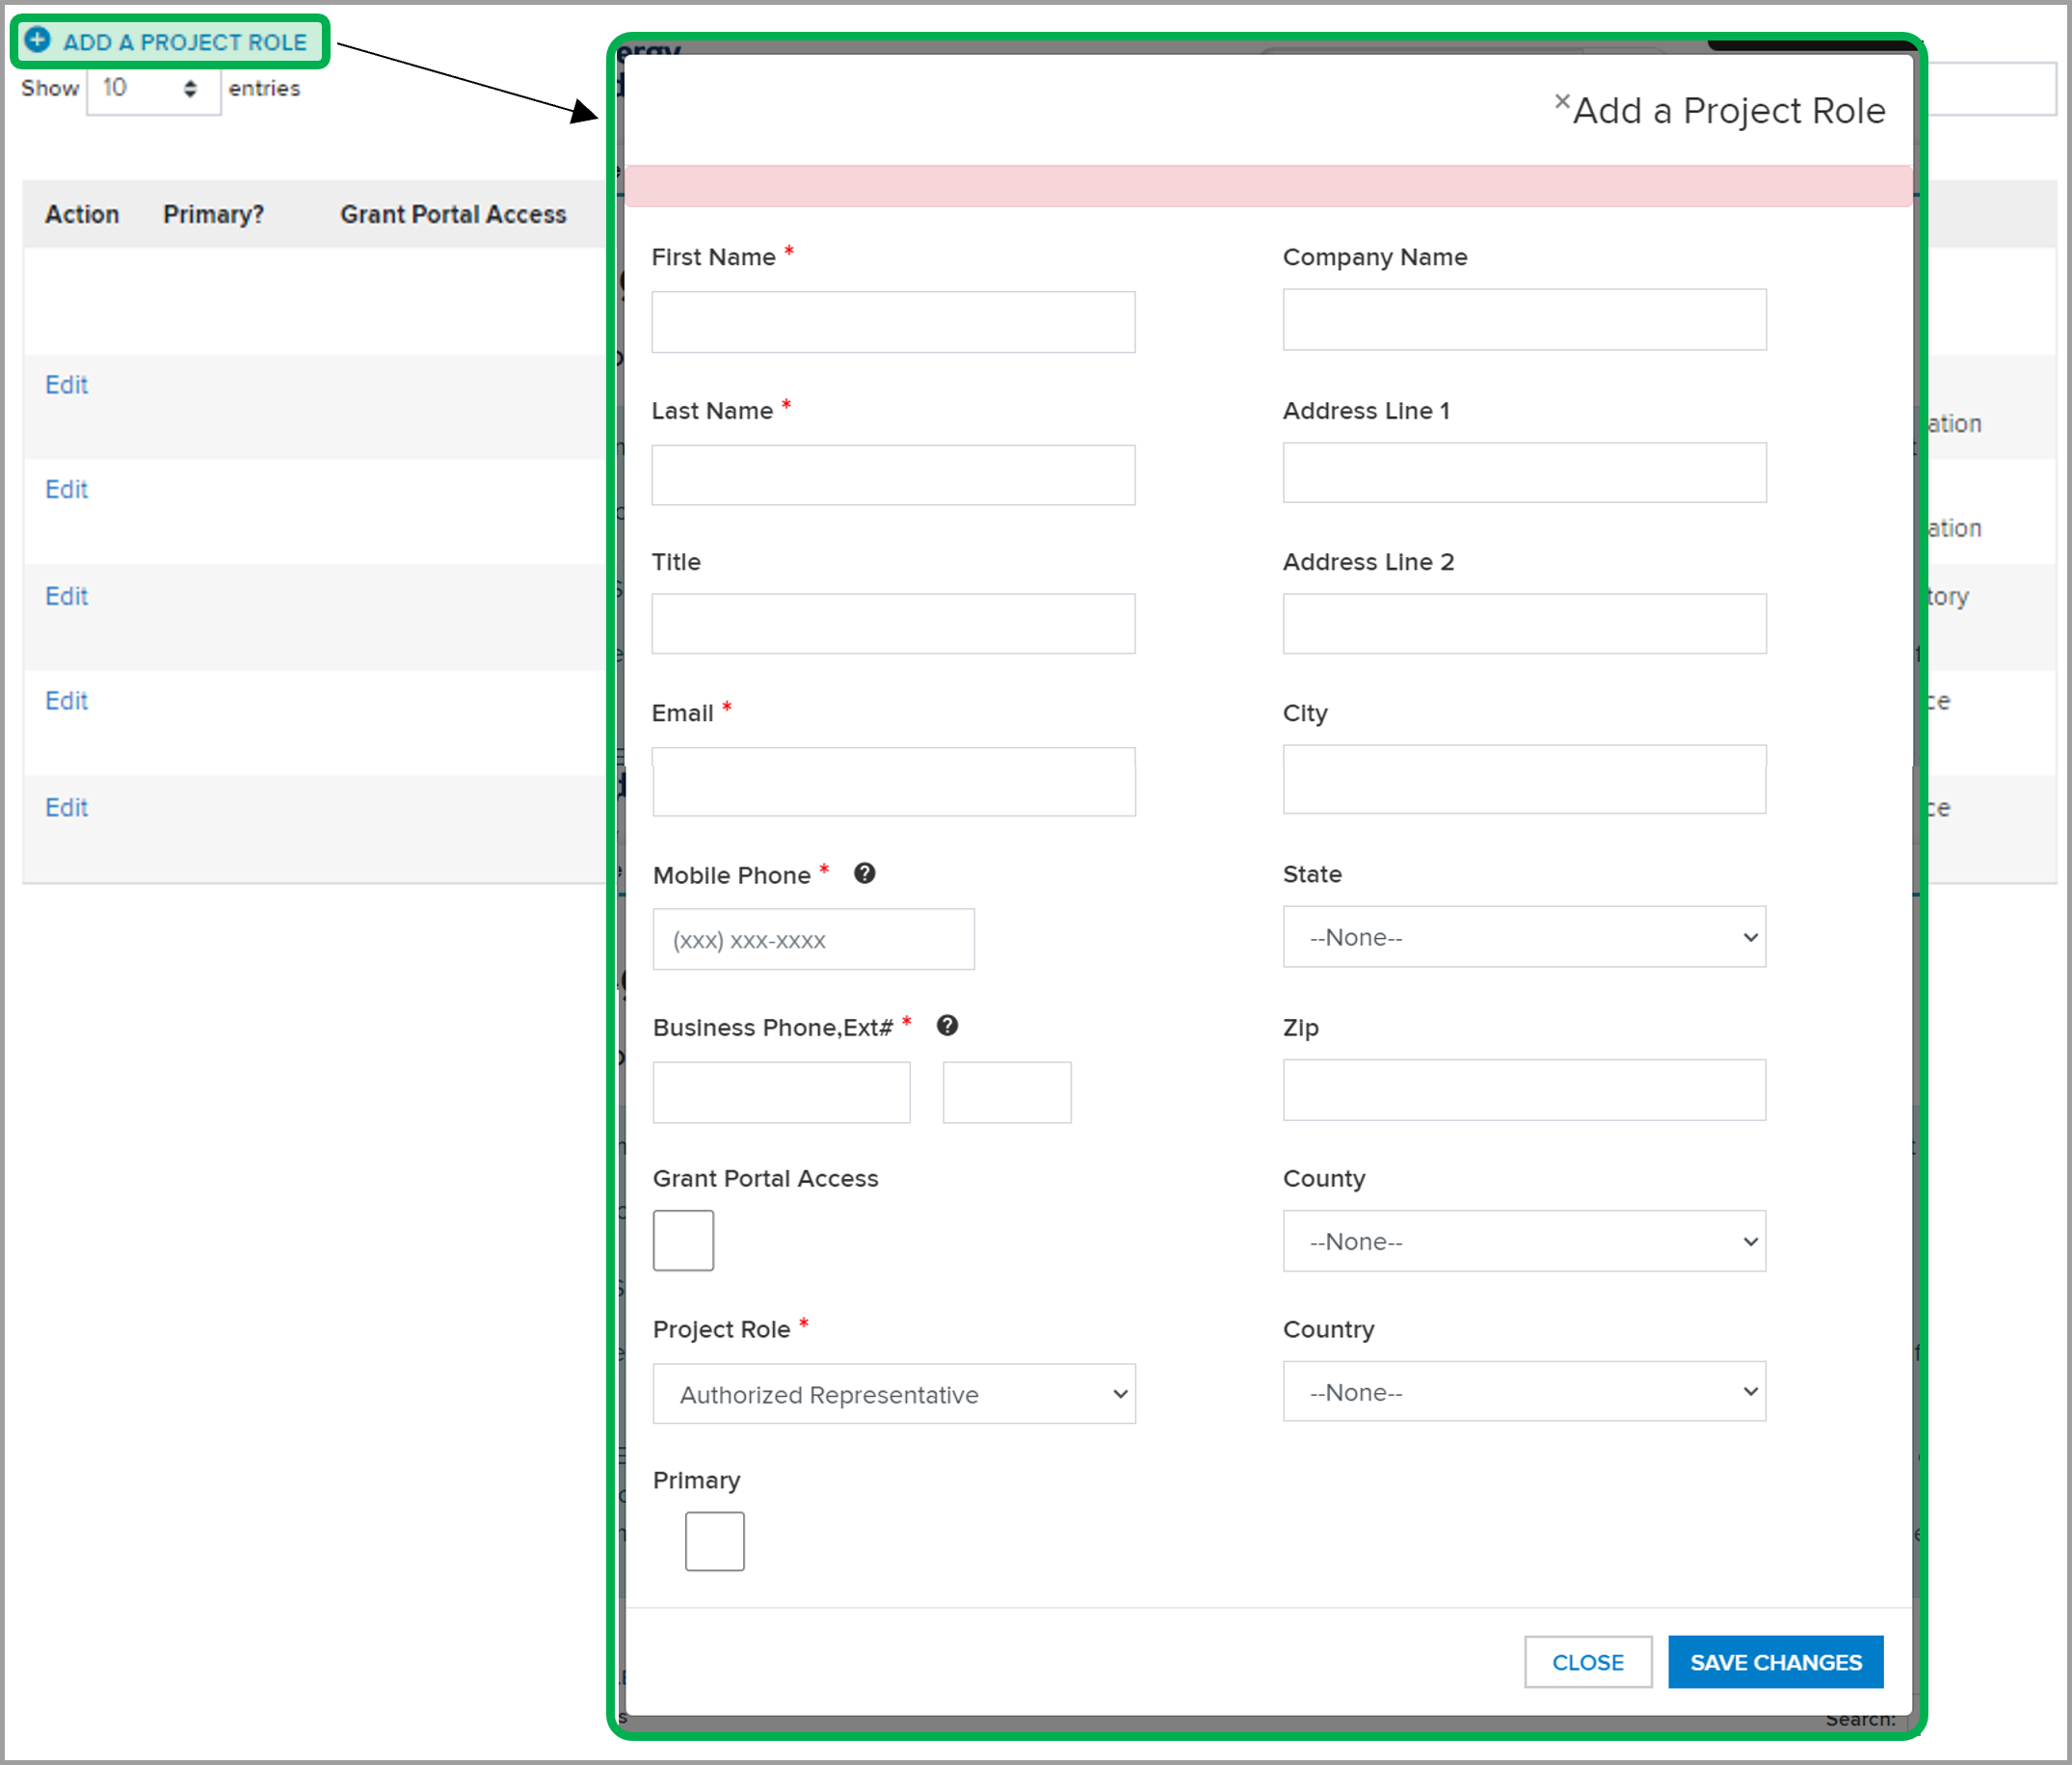
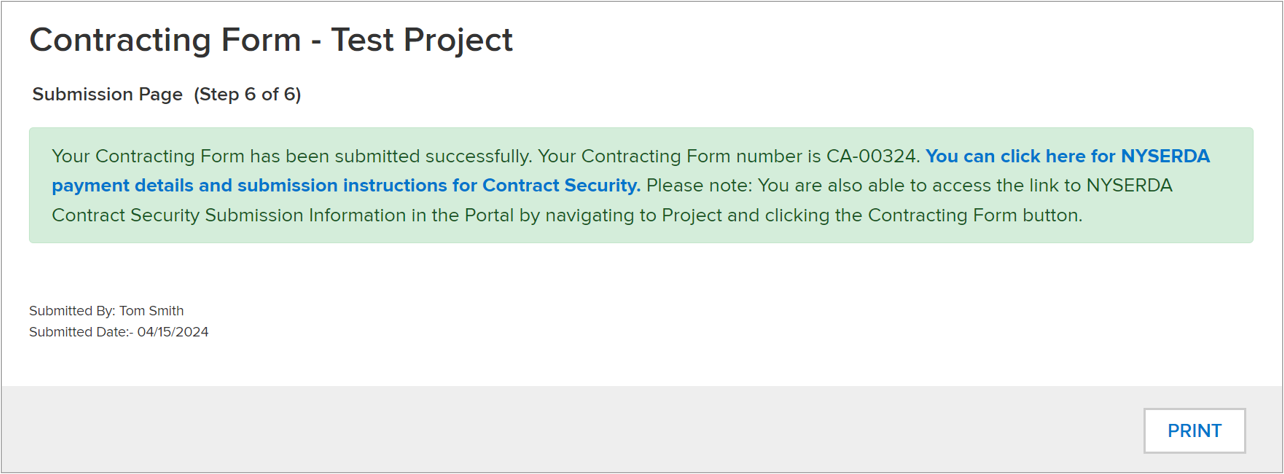
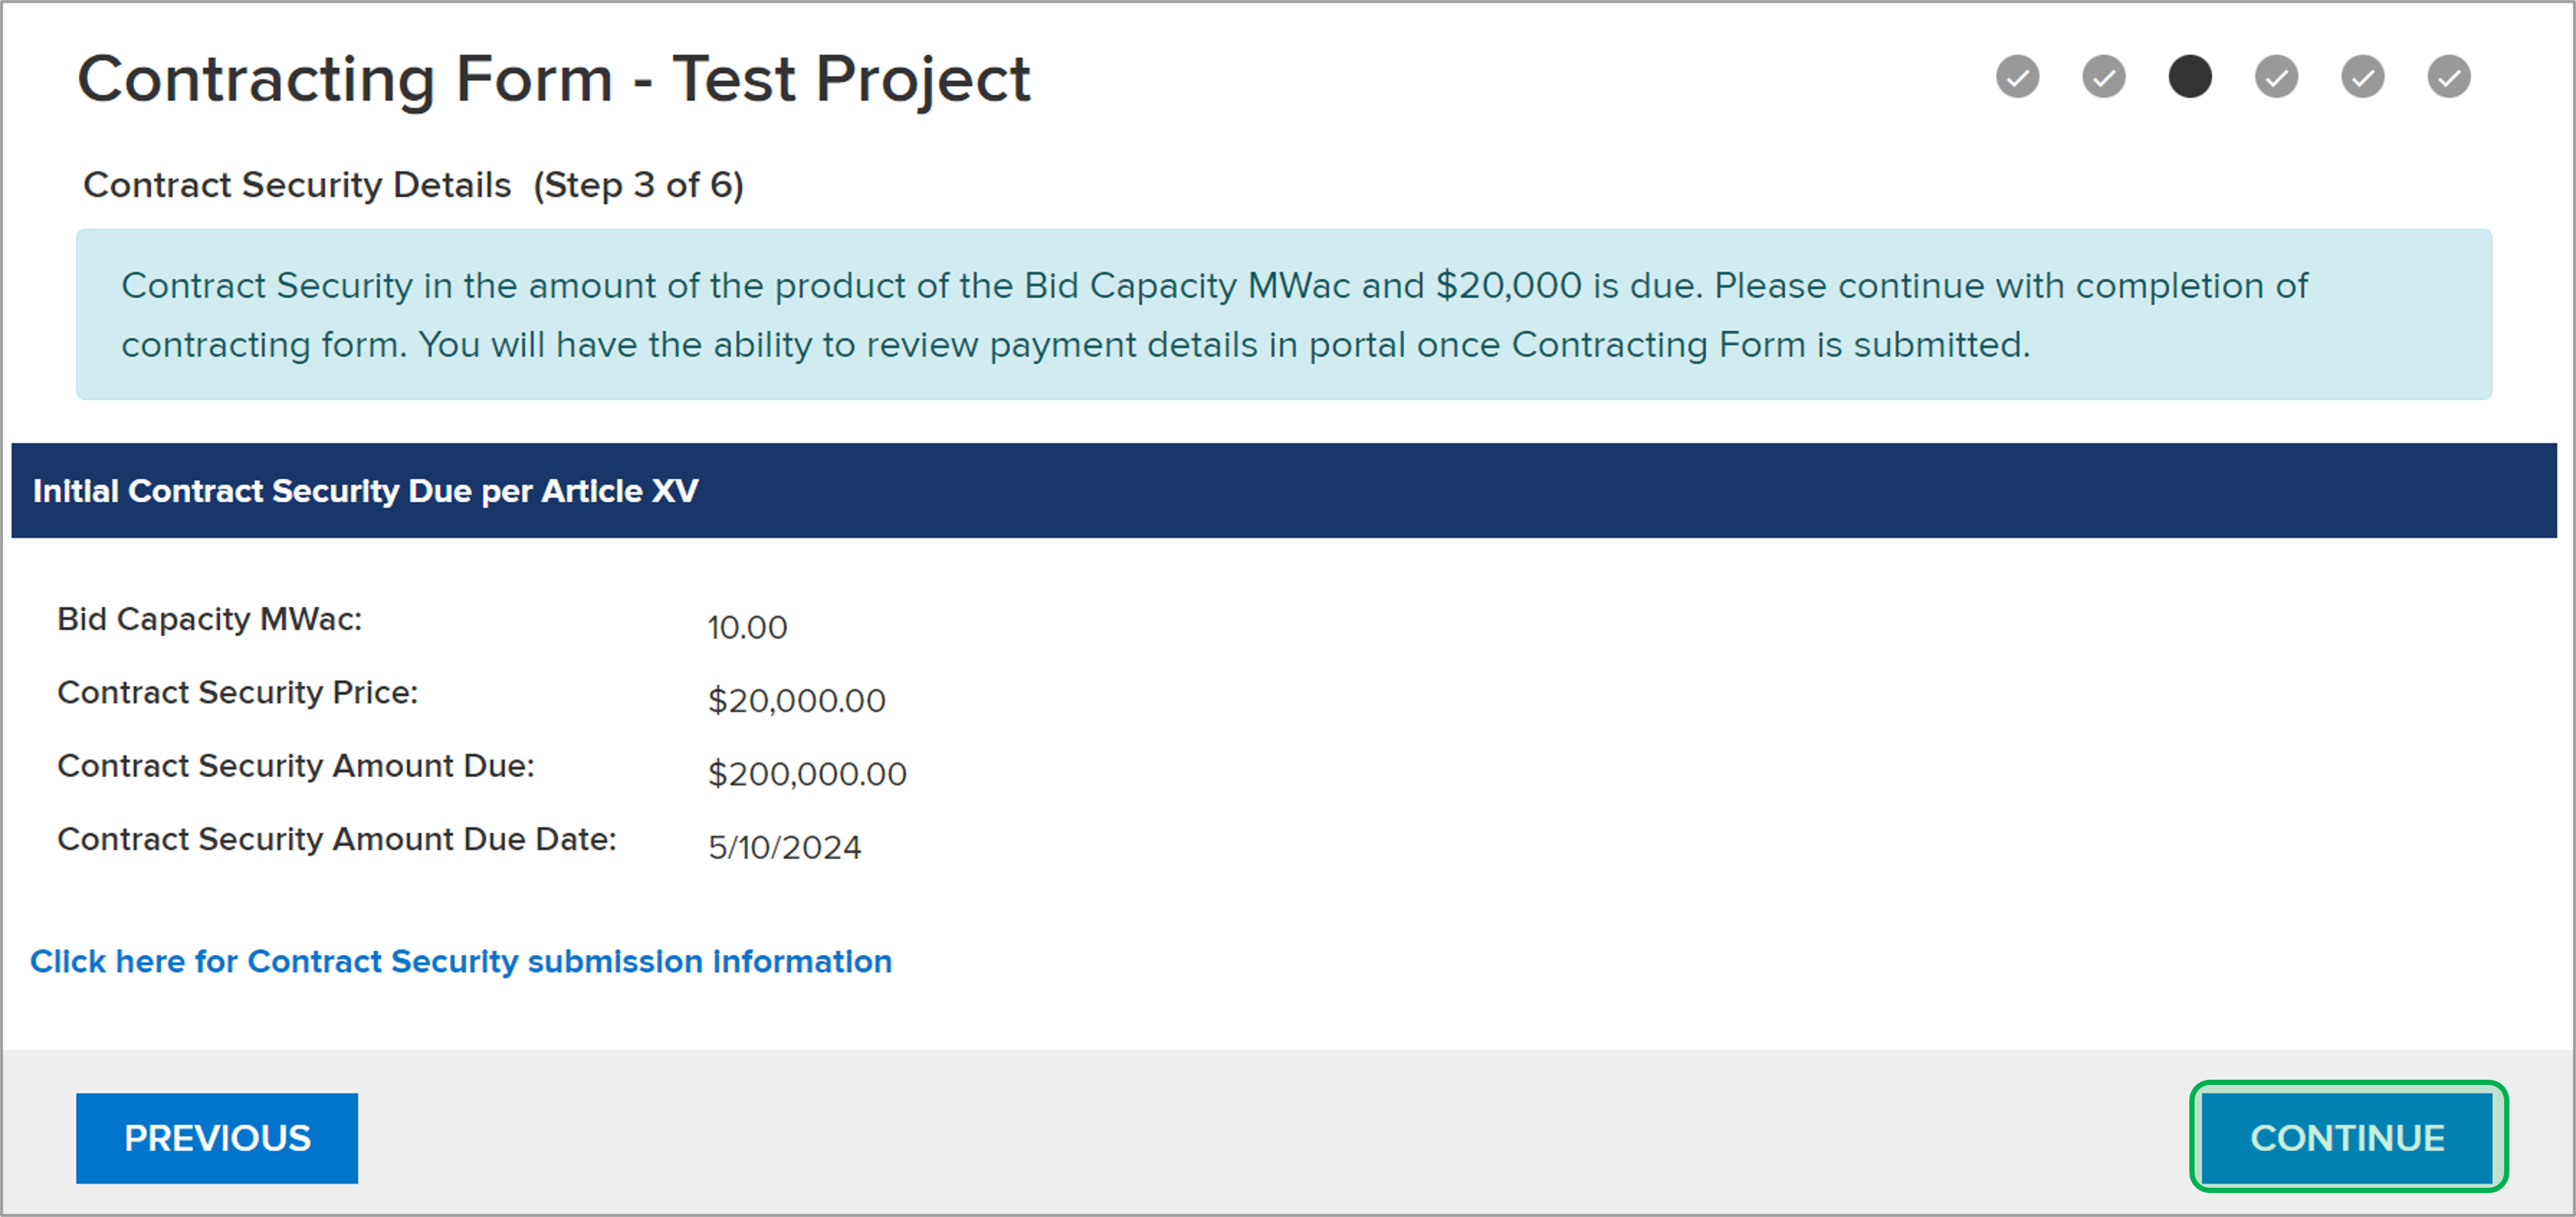
This step provides information on the Contract Security due for this project.

Contract Security in the amount of the product of the Bid Capacity MWac and $20,000. Instructions on how to submit your Contract Security will be available once you submit the Contracting Form, as well as on your Portal home page in the link Financial Instructions. A Word version of the Letter of Credit is also available on the home page of the LSR Portal.

Once you have reviewed this information, click Continue to progress to Step 4.

Expand
titlescreenshot


Aura - Panel
tab1
styles{"body":{"text":{"fontSize":14,"color":"#002d72","textAlign":"left","fontWeight":"normal"}},"header":{"backgroundColor":{"color":"#ffffff"}},"headline":{"text":{"text":"Step 4: Instructions for Required Documents Page","color":"#002d72","textAlign":"left","fontWeight":"normal","fontSize":26}},"base":{"boxShadow":{"shadows":[{"color":"rgba(0, 0, 0, 0.08)","x":0,"y":1,"blur":1,"spread":0},{"color":"rgba(0, 0, 0, 0.16)","x":0,"y":1,"blur":3,"spread":1}]},"borderRadius":{"radius":4},"backgroundColor":{"color":"#ffffff"},"border":{"color":"#002d72","style":"solid","width":4,"bottom":false,"top":false,"left":true,"right":false}}}


Expand
titlelearn more...


UI Steps
sizesmall


UI Step

This step provides instructions and details on the documents that are required to execute the Agreement with NYSERDA.

Expand
titlescreenshot


Aura - Panel
tab1
styles{"body":{"text":{"fontSize":14,"color":"#002d72","textAlign":"left","fontWeight":"normal"}},"header":{"backgroundColor":{"color":"#ffffff"}},"headline":{"text":{"text":"Step 5: Documents Page","color":"#002d72","textAlign":"left","fontWeight":"normal","fontSize":26}},"base":{"boxShadow":{"shadows":[{"color":"rgba(0, 0, 0, 0.08)","x":0,"y":1,"blur":1,"spread":0},{"color":"rgba(0, 0, 0, 0.16)","x":0,"y":1,"blur":3,"spread":1}]},"borderRadius":{"radius":4},"backgroundColor":{"color":"#ffffff"},"border":{"color":"#002d72","style":"solid","width":4,"bottom":false,"top":false,"left":true,"right":false}}}


Expand
titlelearn more...


UI Steps
sizesmall


UI Step

The documents listed below are required in order to submit the Contracting Form. The documents listed in the Optional section should be uploaded if applicable. 

  • Seller W-9
  • Seller Certificate of Incorporation per Article VI
  • Seller Officer Certificate per Article VI
  • NYS-220-CA-Form


UI Step

To upload a document, click Choose File, select the document, then click Open then Save.


UI Step

Once all required documents have been uploaded, click Continue to progress to Step 6.

Expand
titlescreenshot


Aura - Panel
tab1
styles{"body":{"text":{"fontSize":14,"color":"#002d72","textAlign":"left","fontWeight":"normal"}},"header":{"backgroundColor":{"color":"#ffffff"}},"headline":{"text":{"text":"Step 6: Review & Submission of the Contracting Form ","color":"#002d72","textAlign":"left","fontWeight":"normal","fontSize":26}},"base":{"boxShadow":{"shadows":[{"color":"rgba(0, 0, 0, 0.08)","x":0,"y":1,"blur":1,"spread":0},{"color":"rgba(0, 0, 0, 0.16)","x":0,"y":1,"blur":3,"spread":1}]},"borderRadius":{"radius":4},"backgroundColor":{"color":"#ffffff"},"border":{"color":"#002d72","style":"solid","width":4,"bottom":false,"top":false,"left":true,"right":false}}}


Expand
titlelearn more...


UI Steps
sizesmall


UI Step

This is the final step in the Contracting Form.


UI Step

Click Preview to download a PDF copy of the Contracting Form to review all information provided.

Expand
titlescreenshot


UI Step

If edits are necessary, and to navigate back to any of the previous Steps, click on Previous.


UI Step

Once you have confirmed all information provided is correct, you must check off the Acknowledgement statement.


UI Step

To submit the Contracting Form, click Submit.

Expand
titlescreenshot


UI Step

Once the Contracting Form has been submitted, you will receive confirmation. You will also be able to access the instructions for submitting Contract Security, along with ability to Print to save a copy for your records. This final page will be available through the Project Record at any time for future reference.

Expand
titlescreenshot