Versions Compared

Key

  • This line was added.
  • This line was removed.
  • Formatting was changed.
Comment: Reverted from v. 33


Aura - Title
color#002d72
textAlignleft
fontSize28
lineHeight28
cloudTextDemo Title
tagh1
fontWeightbold
NY Home Energy Portal Overview
Aura - Divider
serializedStyles{"alignment":{"horizontal":"start"},"icon":{"name":"faPaperPlane","color":"#333","size":24},"text":{"color":"#333","fontSize":14,"textAlign":"left","fontWeight":"bold","text":"Aura Divider"},"border":{"top":false,"right":false,"bottom":true,"left":false,"color":"#002d72","style":"solid","width":2},"size":{}}
typeregular
Info
iconfalse

Welcome! The NY Home Energy (NYHEP) Portal is NYSERDA’s system for Participating Contractors/Vendors to submit project/enrollments to the Program. This system is intended to be used by Participating Contractors, Regional Clean Energy HUBS, Appliance Vendors and Program Staff. This section will provide an overview of the NYHEP functionality.

Expand
titleImportant Terminology

Excerpt Include
PUBLIC:NY Home Energy Portal: Participating Contractors
nopaneltrue


Excerpt
UI Expand
titleLog In


Info
iconfalse

The instructions below provides guidances on how to access the New York Home Energy Portal (NYHEP) and resetting your account password. 


UI Steps
sizesmall


UI Step


Section


Column
width60%

Logging Into NYHEP

Access the NYHEP and type in your Username and Password. When finished, click the Sign In button to log in.


Column
width40%

Image Modified


UI Step


Section


Column
width60%

Forgot Password

If the contractor forget their password, click the Forgot Password? link on the login page. Type in the User ID then click the Reset It button,

users

users will then receive an email notification with a link and instructions to reset the password.


Column
width40%

Image Modified


UI Expand
titleMy Profile


Info

The My Profile tab can be accessed under the Security tab on the top right of your New York Home Energy Portal (NYHEP).


Section


Column
width40%


UI Steps
sizesmall


UI Step

My Information

This tab allows contractors to update the following:

  • Name
  • Email Address
  • Phone number


UI Step

Email Subscription

Contractors can subscribe and un-subscribe to an email by clicking on the check box, it will automatically activate the subscribtion.


UI Step

Save Changes

Click the Save button to save any changes/updates made under your profile.


Column
width60%

Image Modified


UI Expand
titleChange Password


Info

The Change Password tab can be accessed under the Security tab on the top right of your New York Home Energy Portal (NYHEP).


UI Steps
sizesmall


UI Step


Section


Column
width60%

Change Password

This tab allows contractors to update their password. Enter in your previous password followed by the new password. When ready, click Change Password.


Column
width40%

Image Modified


UI Expand
titleOnline Help


Info
iconfalse

The instructions below provides guidances on how to access the online help page for additional support.


UI Steps
sizesmall


UI Step


Section


Column
width40%

Help Icon

The Help Icon can be access on the top right side of most tabs that you are in.


Column
width60%

Image Modified


UI Step


Section


Column
width40%

Online Help

Use the expandable tabs from the left hand page tree to locate the additional guidance you are looking for.


Column
width60%

Image Modified


UI Step


Section


Column
width40%

Search

The Search option can be used to search for specific words or phrases.


Column
width60%

Image Modified


UI Expand
titleAdd Notes


Excerpt


Info

The instruction below provides guidance on how to add notes within Enrollments and Customer Records. 

Notes added to an enrollment can be accessed during any other workflow step for the same enrollment and are accessible to anyone with access to the specific enrollment.


UI Steps
sizesmall


UI Step

To add a new note, access the Note tab and click the New Note button. A new Note dialog will open. 

Tip

Notes can be added to any Record or Enrollment in the NY HEP where a Note tab is present.


Expand
titlescreenshot

Image Modified


UI Step

Fill in the Notes field. 

Tip

The Note Date and Note Time fields will automatically populate with the current date and time. Users can change these fields if needed. The system will still document the actual date and time the note was created as well.


Expand
titlescreenshot

Image Modified


UI Step

The Who can view this note? field will default to Users with access to this enrollment.

Tip

For Contractors, it does not matter what option is selected for this field as anyone with access to the enrollment will also have access to the workflow step. It is best to leave this field alone.


UI Step

If the This is an Interaction checkbox is checked, a drop-down will appear allowing Contractors to add this note to one of the available reports.

Expand
titlescreenshot

Image Modified


UI Step

Click Save to save the new Note. 

Tip

Once a note is saved, Contractors cannot edit or delete it. Be sure to review the note carefully before clicking save.


Expand
titlescreenshot

Image Modified


UI Expand
titleUpload Documents


Info

The instruction below provides guidances on how to upload document(s) within an enrollment. A red exclamation mark will be displayed under the Required column indicating the document type being a Required Document

Multiple documents can be uploaded at the same time:

PC Users: CTRL + Click

Mac Users: Command + Click


UI Steps
sizesmall


UI Step

To upload a Document, access the enrollment's Documents tab during any step.


UI Step
Click

Click the New button for the Document dialog will open.

Expand
titlescreenshot

Image Modified


UI Step

Click Browse to select a file to upload. 

Tip

Multiple documents can be uploaded at the same time.


Expand
titlescreenshot

Image Modified


UI Step

After the file is uploaded for the Document Type, click Save and then click Close to upload the file and close the dialog. 

Tip

After you’ve selected a file, you can remove it by clicking the x Remove button.


Warning

This is the Contractors last opportunity to click Remove to not upload a specific document. Once Save is clicked, the document becomes a public record and it cannot be edited, deleted, or otherwise overwritten. If the wrong document is uploaded, Contractors will need to upload the correct document and use the Comments fields to let both CLEAResult and NYSERDA know which is the correct document to review.


Expand
titlescreenshot

Image Modified


UI Step

To download and view an uploaded document, click the Document Name Hyperlink.

Expand
titlescreenshot

Image Modified


UI Expand
titleReporting


Info
iconfalse

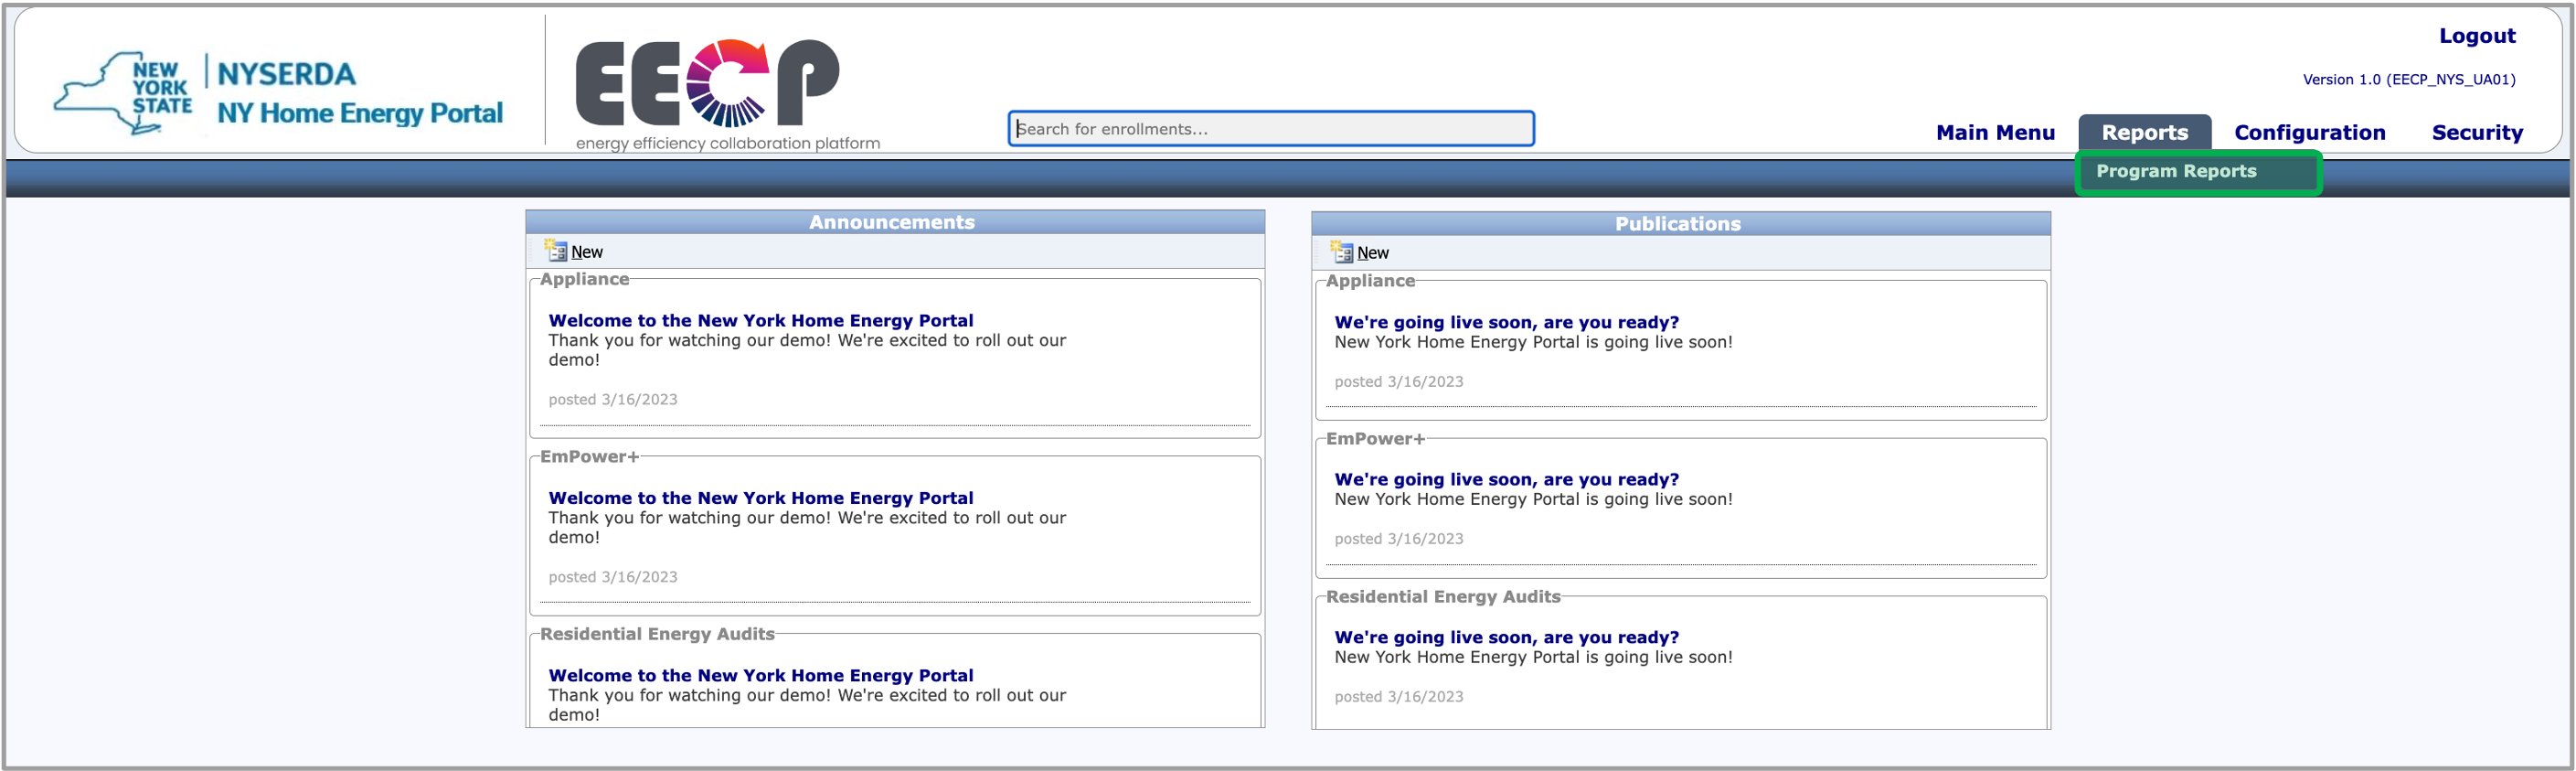
The instructions below provides contractors with guidance on how to run a Report.

The Program Reports option provides an alternate mechanism to access many of the same reports that can be generated during the enrollment process.

For REA Enrollments, the Invoice Report can be used to provide Contractors with everything they will need to know for Loan Proformas.

For EmPower+ Enrollments, the program requires contractors to submit an invoice. This report can be used for this purpose either during the Workscope Submission (for Direct Installs) or during Final Project Submission (for Full Installs).

Expand
titleProgram Report Guide


NameDescription
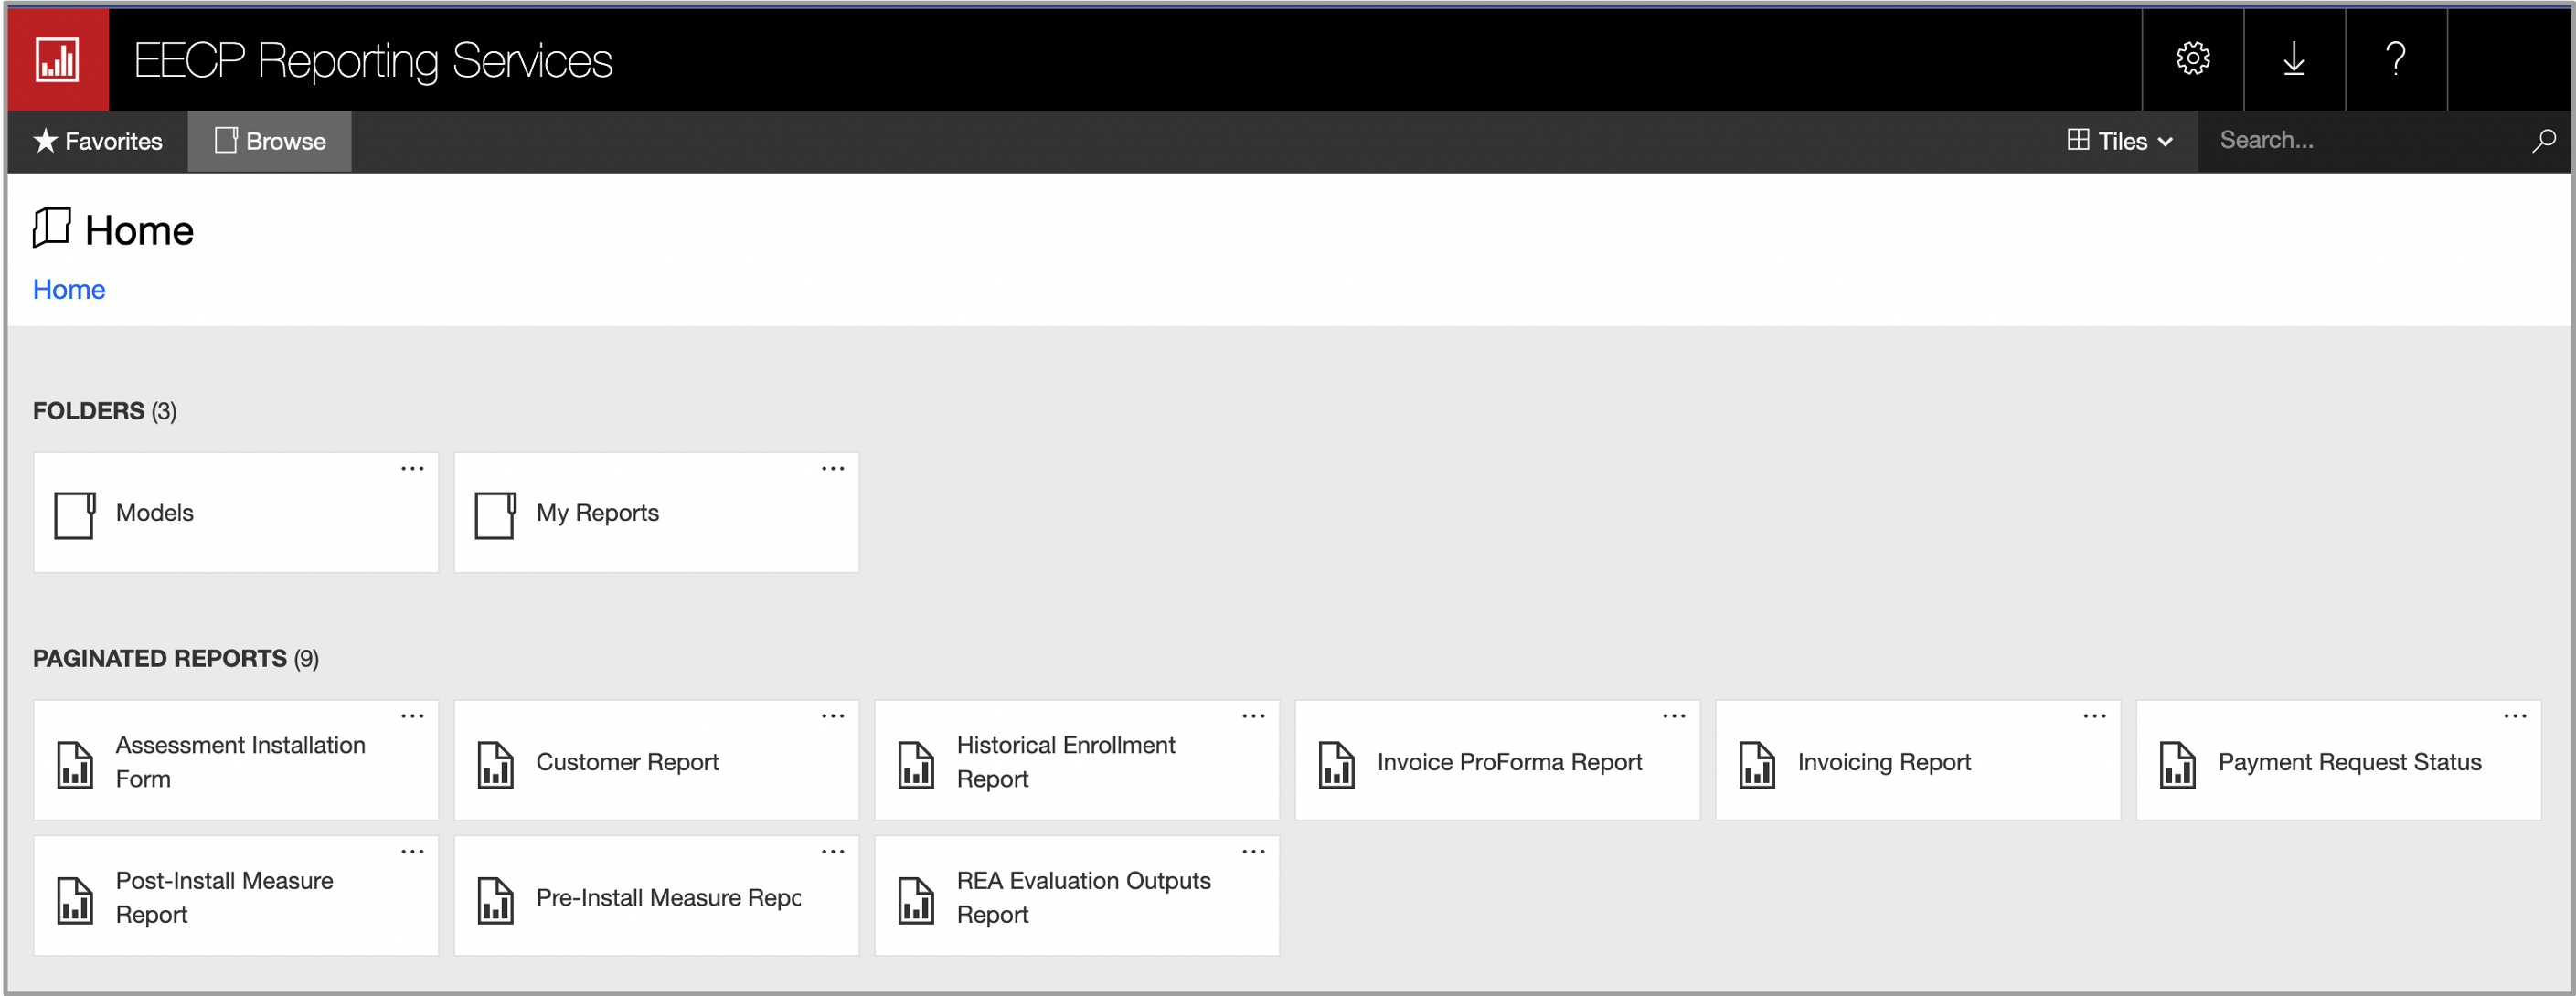
Certificate of Completion Audit and Direct InstallWhile Contractors are able to utilize their own Certificate of Completion, this report can be generated during the Workscope Submission step.
Customer ReportThe Customer Audit Report must be provided to customers. It details the recommended and proposed work determined during Workscope Submission. This report is best generated during the Workscope Submission step from the Reports tab. This report can be re-generated during Final Project Submission if additional changes were made to the Measure/Workscope during Final Project Submission.
Invoicing ReportThis report can be generated for either REA or EmPower+ enrollments and can be used to satisfy the EmPower+ program invoice requirement and it can be used to REA enrollments when contractors are completing the ProForma as this report contains all the inputs contractors will need for that purpose. This report can be generated either during Workscope Submission (EmPower+) or Assessment Submission (REA), or during Final Project Submission.
Post-Install Measure ReportThis is a required report that must be uploaded to the enrollment during Final Project Submission. This report can be generated during Final Project Submission from the Reports tab and required a customer signature before upload. Follow the guidance in the Program Manual regarding customer signatures, particularly if you would like to capture the customer's signature digitally.
Pre-Install Measure ReportThis is a required report that must be uploaded to the enrollment during Final Project Submission. This report can be generated either during Workscope Submission or Final Project Submission from the Reports tab and required a customer signature before upload. Follow the guidance in the Program Manual regarding customer signatures, particularly if you would like to capture the customer's signature digitally.


UI Steps
sizesmall


UI Step

On the portal homepage, click the Program Reports under the Reports tab. A new window will pop-up directing you to the Reporting Services page

Expand
titlescreenshots


UI Step

On the Reporting Services page, locate and click on the your report.

Tip

All All of the reports accessible from this page are also accessible from Enrollments.


Expand
titlescreenshots


HTML
<style type="text/css">  
#title-text { display: none;}
.panelContent {
display: none;
}
.aura-tab-content {
margin-top: 0px!important;
padding-top: 0px!important;
}
.panel, .alertPanel, .infoPanel {
margin-top: 0px!important;
}
.panelHeader {
font-size: 20px;
padding-top: 5px!important;
padding-bottom: 5px!important;
}
.page-metadata-modification-info {display:none!important;}
</style>