| Aura - Tab |
|---|
|
| Panel |
|---|
| borderColor | #002D72 |
|---|
| bgColor | #F3F4F9 |
|---|
| titleColor | #ffffff |
|---|
| borderWidth | 1 |
|---|
| titleBGColor | #002D72 |
|---|
| borderStyle | none |
|---|
| title | Introduction |
|---|
|
|
| Info |
|---|
| The information below reviews how to access and navigate the Salesforce CRM Portal, including helpful definitions, and consolidates specific activities that can be performed in multiple areas. |
| UI Expand |
|---|
| | Multimedia |
|---|
| name | HUBS Introduction.mp4 |
|---|
| width | 100% |
|---|
| height | 100% |
|---|
|
|
Navigation and Core Concepts:| UI Expand |
|---|
| title | Access to and Basic Navigation of the CRM Portal |
|---|
|
| Info |
|---|
Ensure that you have provided a Signed NDA to your Project Manager to gain access to the Salesforce CRM Portal. |
| UI Steps |
|---|
|
| UI Step |
|---|
Log into the Salesforce CRM using the following link: | UI Button |
|---|
| color | blue |
|---|
| size | small |
|---|
| title | Salesforce CRM Portal Login |
|---|
| url | https://portal.nyserda.ny.gov/crm |
|---|
|
|
| UI Step |
|---|
Use the Global Search tool to locate records of any type. When entering in search terms and parameters, search results will begin appearing below the search field. Each result will identify the record type to reduce confusion. | Expand |
|---|
| 
|
|
| UI Step |
|---|
Use the Top Navigation Menu to easily access and interact with specific records types. | Expand |
|---|
| 
|
|
|
|
| UI Expand |
|---|
| title | Important Terms, Acronyms & Definitions |
|---|
|
| Term/Acronym | Definition |
|---|
| Account | All Salesforce contact records have an account. - Persons interested in a program or opportunity should be identified as Individual Account
- Persons representing a business should be identified as Business Account
| | API - Application Programming Interface | This refers to the automation of data transfers from one system to another | | Campaign | A group of accounts, contacts, or leads that: - Are associated with an event(s) or effort (Attendees at a workshop is considered a Campaign)
- Are defined by a similar set of targeted activities (Marketing mailer or Door-to-Door Outreach)
| | Contact | An individual person who has an established relationship with NYSERDA. | | Converting a Lead | When a Lead becomes qualified or meets a certain level of readiness for the program application process, the Lead gets converted into a Contact, and has an associated Account, and Opportunity | | CRM - Customer Relationship Management | This term is often associated with systems or software that helps manage the complete customer relationship | | Customer | An individual or business who reaches out to a Hub for NYSERDA programs and offerings | | Event | A scheduled occurrence that has both a start and end date such as, but not limited to: workshops, conferences, or meetings | | Lead | - A potential Contact who may be interested in NYSERDA programs and offerings
- Also a process to nurture a relationship with a potential Contact. Leads can become Contacts
| | Opportunity | An effort aligned with an Account or Contact that sets and nurtures the interest of NYSERDA Programs through a lifecycle with the end result of application submittal and project initiation | | PPSI - Personal and Protected Sensitive information | A term that refers to customer information that must be protected given its sensitive nature and includes any personal information that is not publicly available or can be used to locate or identify a specific individual | | Task | A single activity, or planned activity, that is scheduled such as, but not limited to: phone calls, emails, or reminders | | UAT - User Acceptance Testing | - Used to describe a comprehensive process that helps evaluate whether a system or tool works as intended
- Most software applications have a UAT environment that mirrors the production environment where functions and activities can be tested without effecting data production
|
|
Universal Functions:| UI Expand |
|---|
| Many record types in the Salesforce CRM Portal can be Followed. When you follow a record, you see updates to the record in your feed. The Feed is displayed on the CRM portal home page next to the Support tab. Leads, Contacts, Opportunities, Campaigns, Accounts, Projects, and Events are all record types that can be Followed (up to 500 records). To Unfollow, select the same button you used to Follow. 
|
| UI Expand |
|---|
| title | Logging Activities through Log a Call Tab |
|---|
|
| Info |
|---|
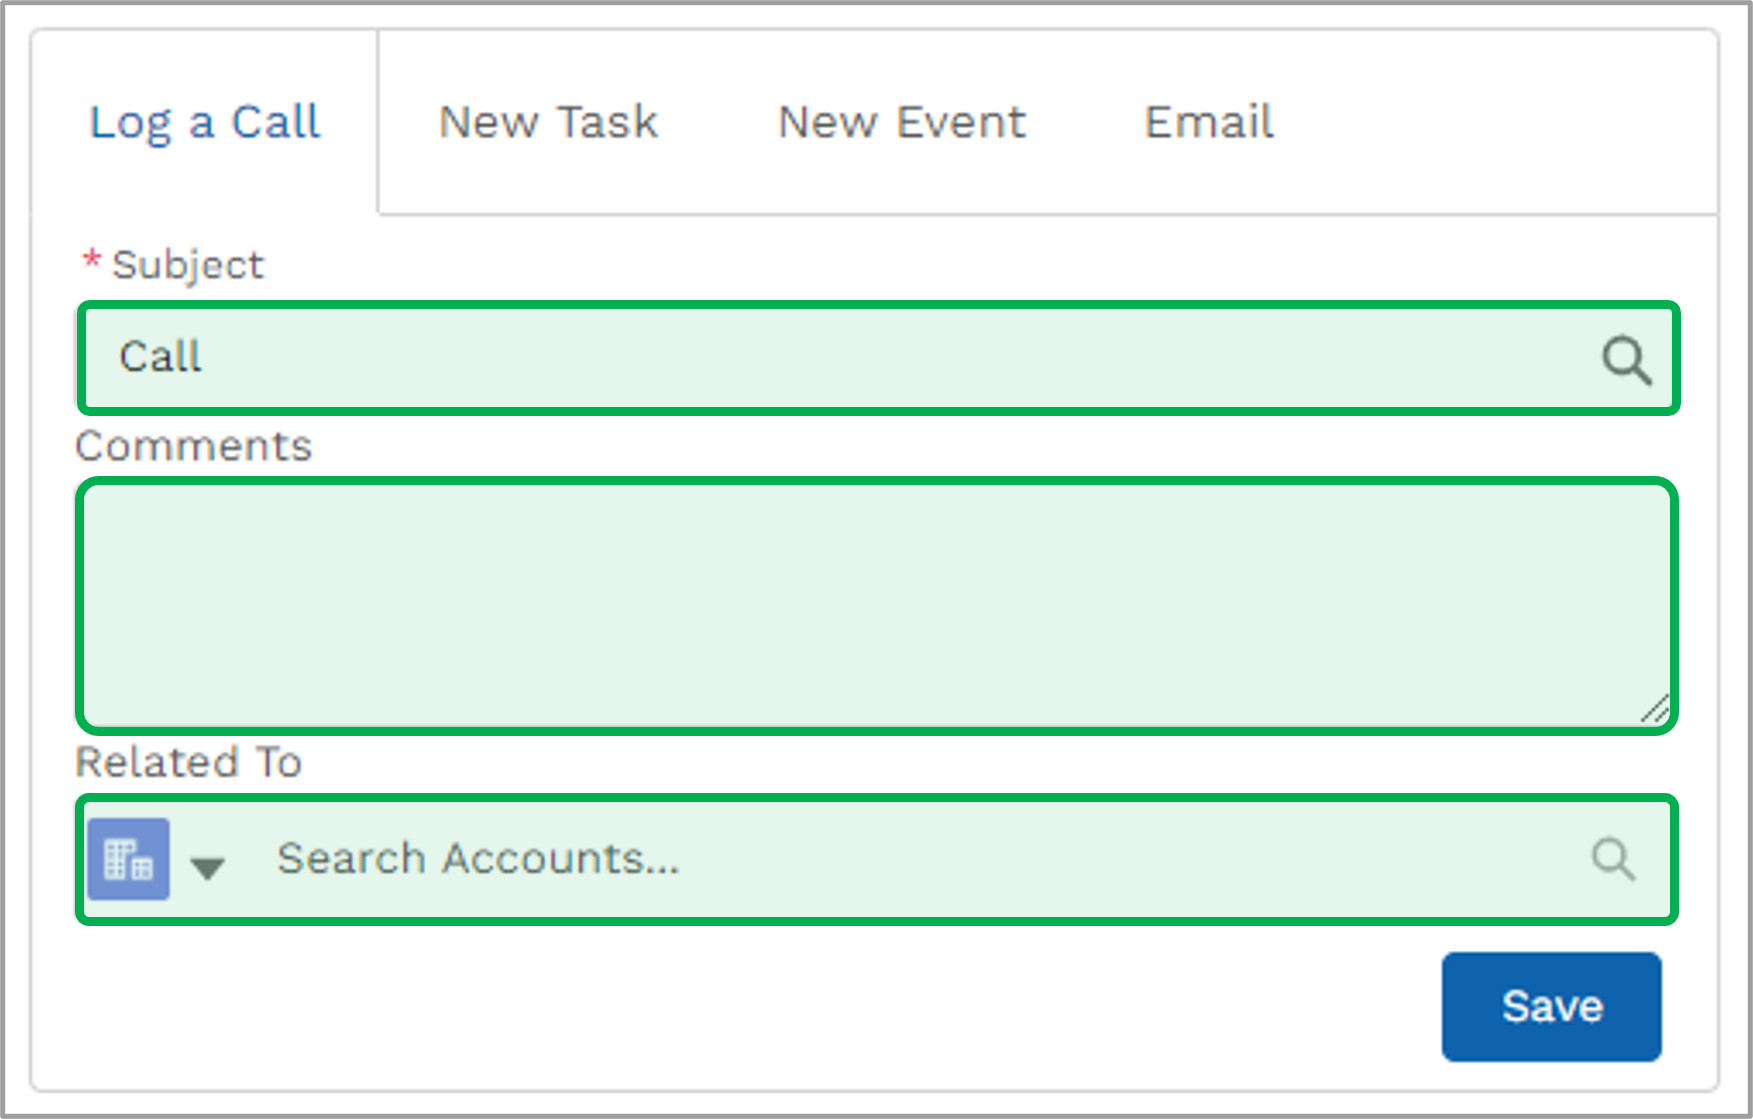
| Although the tab reads Log a Call other customer related activities (emailed, sent a letter, met in person) can be logged. Most record types in the Salesforce CRM Portal provide the ability to Log Activities. When a Activity is Logged within a specific record type, it is automatically related to that record type. For example, when Logging an Activity from a specific Lead Record, that logged activity will automatically be related to the Lead Record. - Logging an Activity provides a record of outreach or follow-up efforts and is an important part of the relationship management process.
- Logging an Activity can be done from the following record types: Leads, Contacts, Opportunities, Accounts, and Projects.
|
| Section |
|---|
| Column |
|---|
|
| UI Steps |
|---|
|
| UI Step |
|---|
When Logging an Activity, select the Log a Call tab. The subject field will be prepopulated with the word Call, delete the text and type in the activity to be recorded. | Warning |
|---|
This field is required and must be complete before the Logged Activity can be saved. |
|
| UI Step |
|---|
Input any comments as needed. This is not a required field. |
| UI Step |
|---|
The Logged Activity can be related to many record types though it will initially default to searching existing Account Records. Use the field to search for existing Account Records or choose another record type to relate the Logged Activity to using the drop-down menu on the right side of this field. |
| UI Step |
|---|
Click Save when complete. |
|
|
| Column |
|---|
|
|
|
|
| UI Expand |
|---|
|
| Info |
|---|
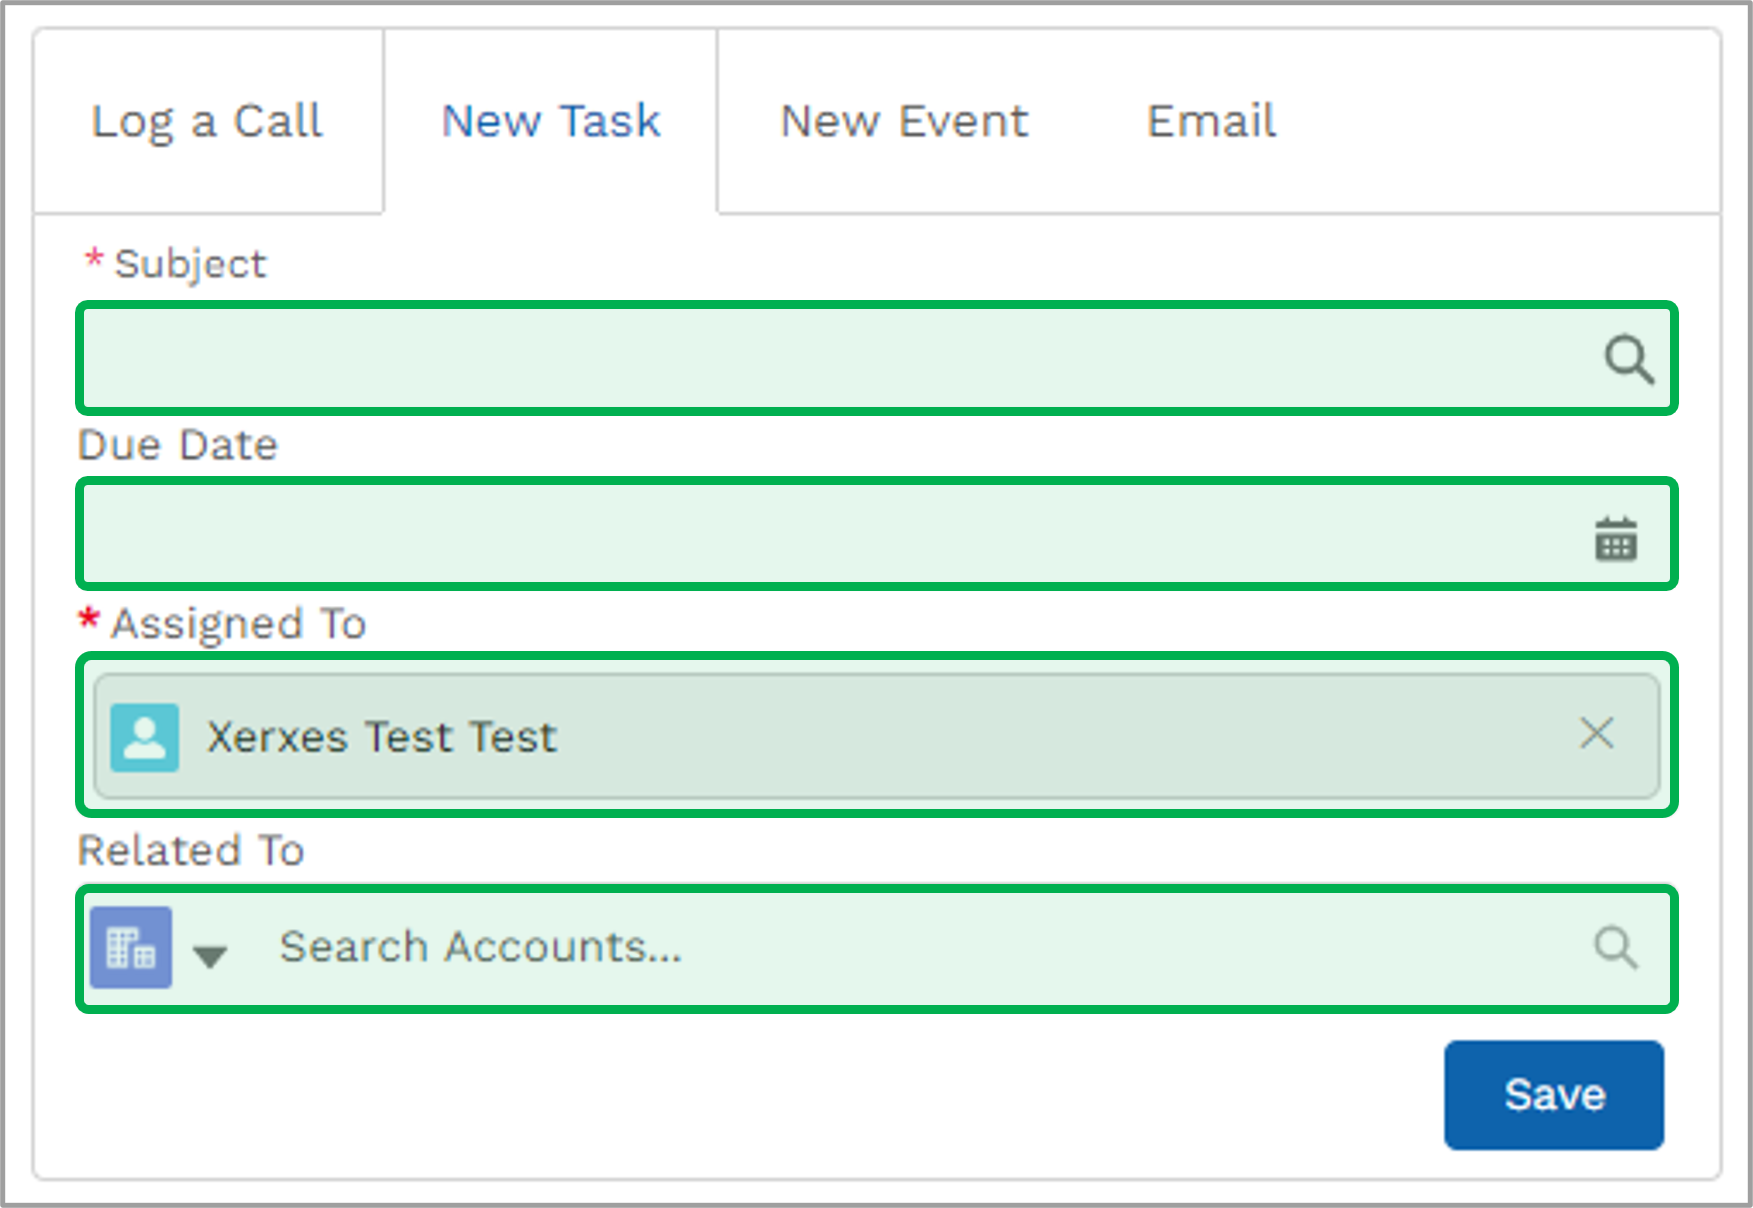
| Most record types in the Salesforce CRM Portal provide the ability to Create Tasks. When a Task is Created within a specific record type, it is automatically related to that record type. For example, when Creating a Task from a specific Lead Record, that task will automatically be related to the Lead Record. - Tasks are an effective way of staying up-to-date with required activities that must or should be completed within a specific timeframe.
- Tasks appear in both the Open Tasks panel on the Salesforce CRM Portal Home Page and in the Events & Tasks page. Only Tasks that have not been completed will appear in the Open Tasks panel.
- Tasks can be created from the following record types: Leads, Contacts, Opportunities, Accounts, and Projects.
- When using a hub queue, the entire team has visibility into the Task.
|
| Section |
|---|
| Column |
|---|
|
| UI Steps |
|---|
|
| UI Step |
|---|
When Creating a Task add a subject. This field is required and must be completed before the Task can be saved. |
| UI Step |
|---|
Input a due date when the Task is expected to be completed. |
| UI Step |
|---|
The Task can be Assigned to either a Hub user or a Hub queue. By default the Task will automatically be Assigned to the current user. To assign to an alternate user, click the X on the left of the current user name to remove the existing assignee, then use the field to search for an alternate Hub user. To assign to a Hub queue, use the drop-down on the right side of the field to switch the assign type from Users to Queues, then use the field to search for a Hub queue. |
| UI Step |
|---|
The Task can be related to many record types though it will initially default to searching existing Account Records. Use the field to search for existing Account Records or choose another record type to relate the Task by using the drop-down menu on the right side of this field. |
| UI Step |
|---|
Click Save when complete. |
|
|
| Column |
|---|
|
|
|
|
| UI Expand |
|---|
|
| Info |
|---|
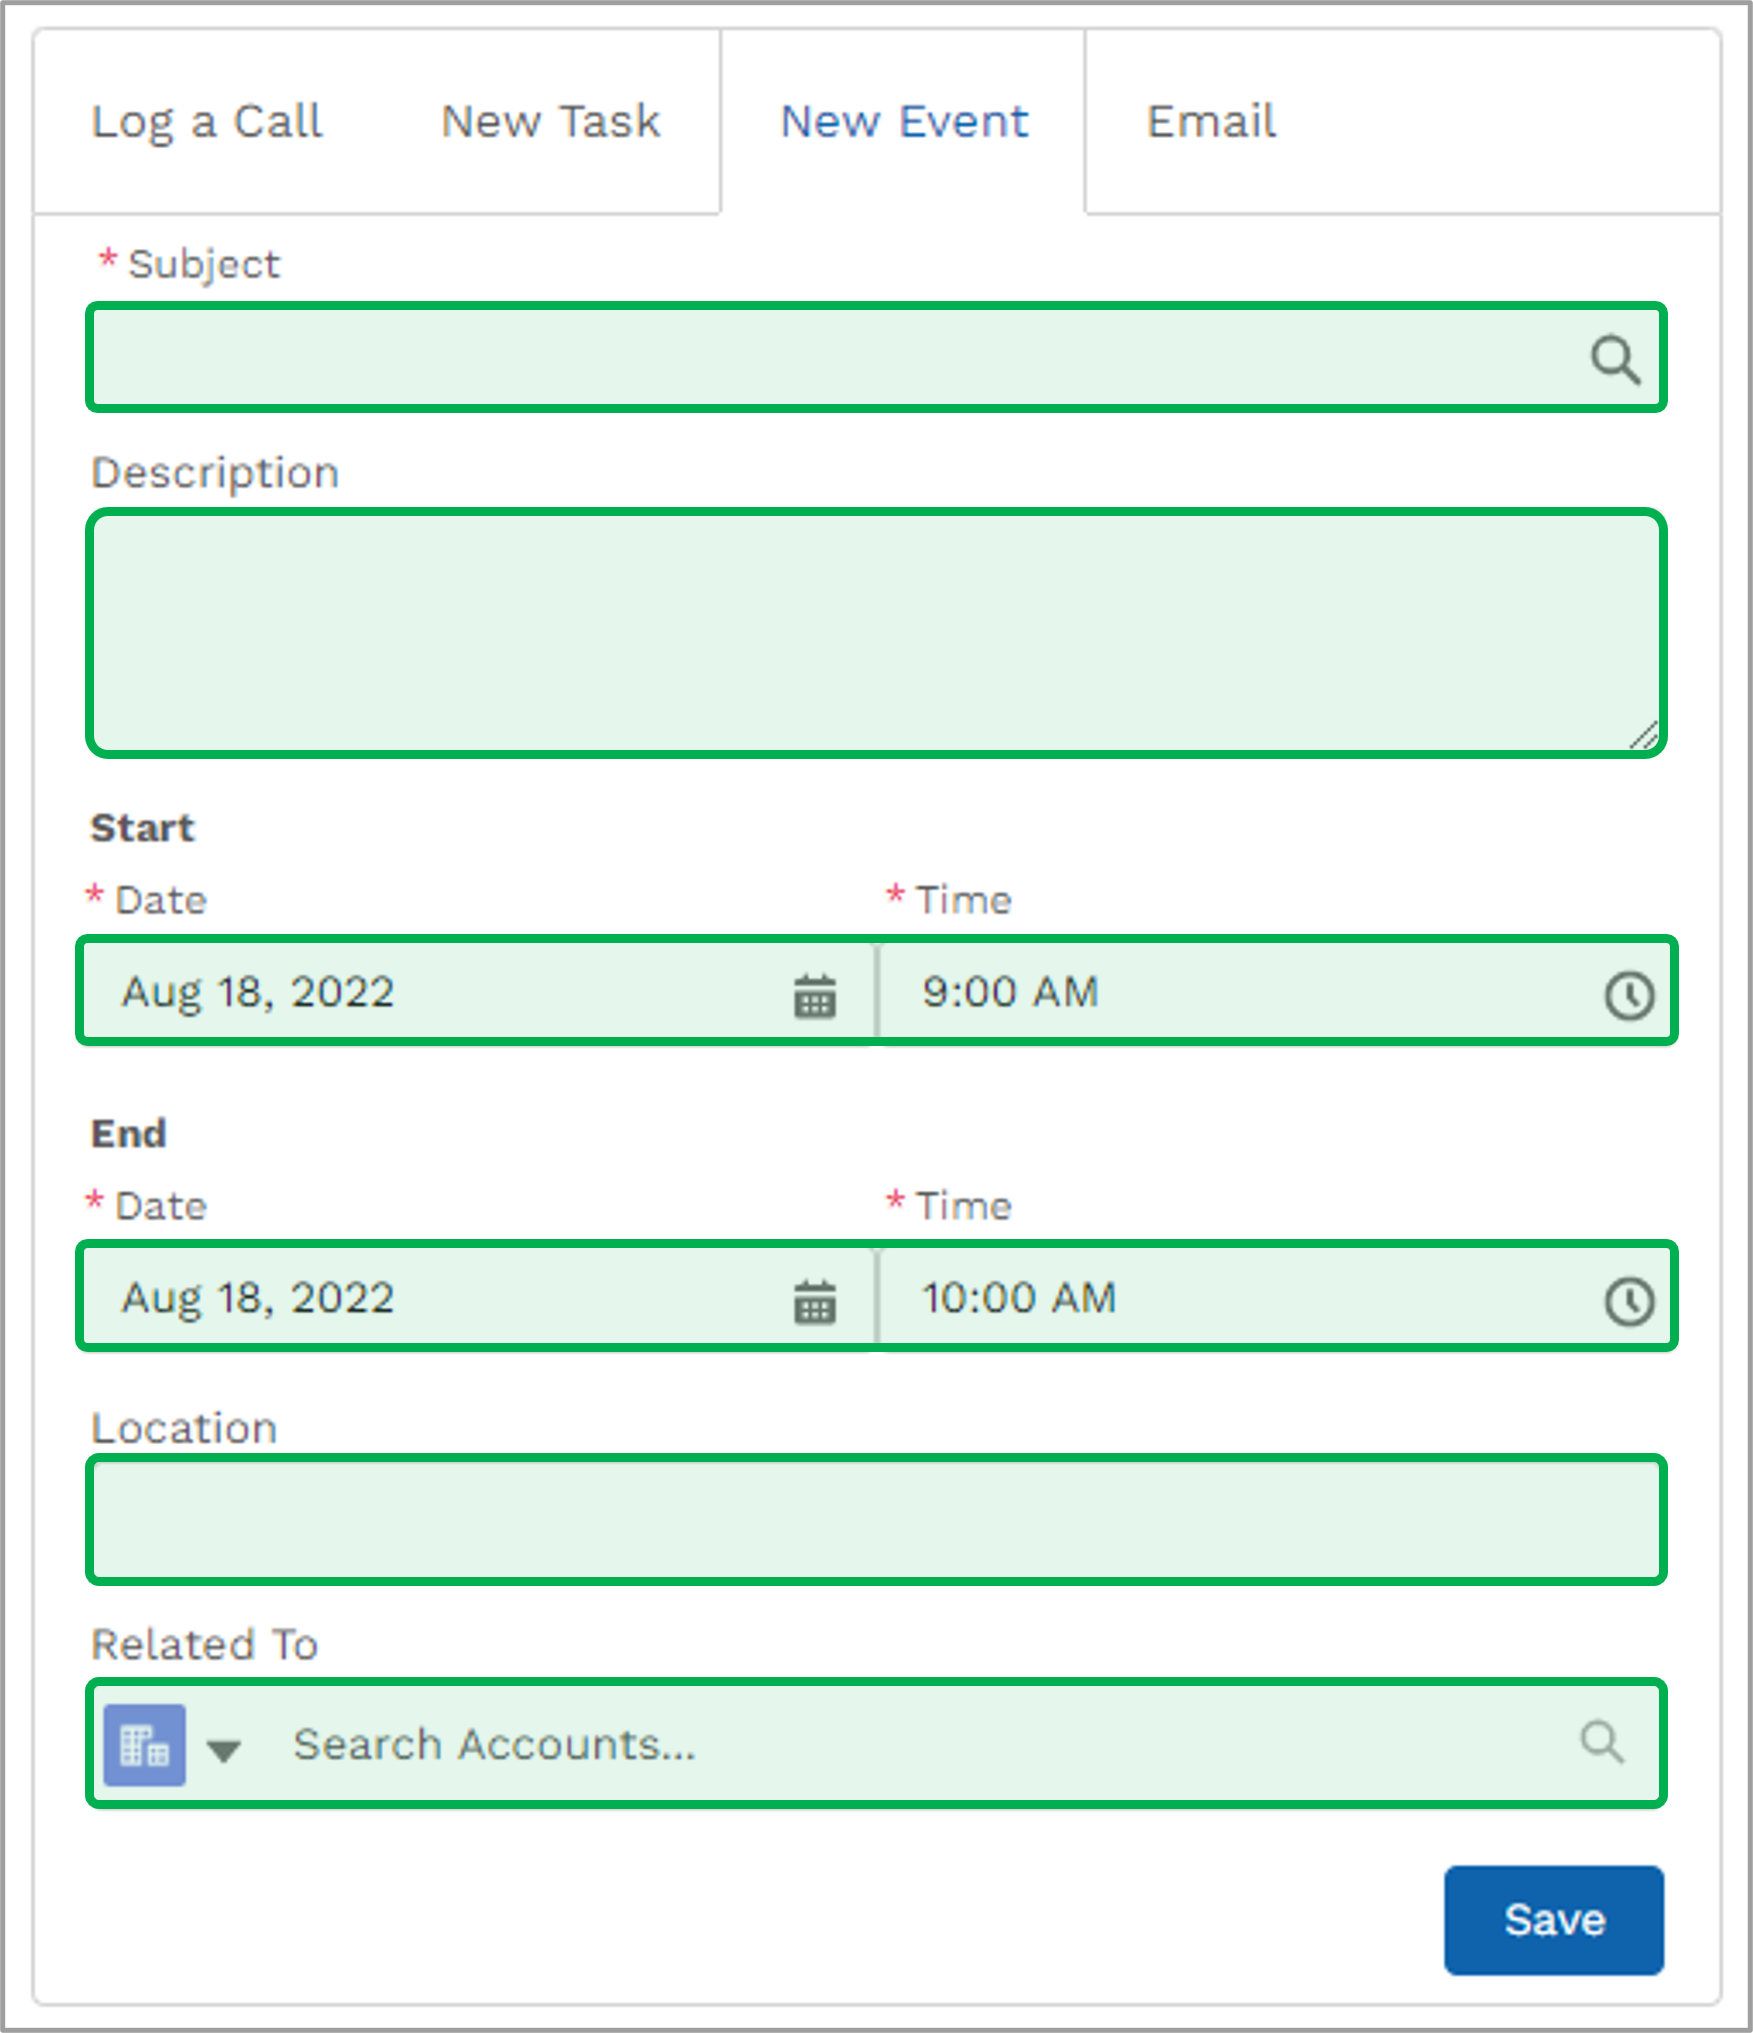
| Most record types in the Salesforce CRM Portal provide the ability to Create New Events. When an Event is Created within a specific record type, it is automatically related to that record type. For example, when Creating New Events from a specific Lead Record, that event will automatically be related to the Lead Record. - New Events appear in both the calendar on the Salesforce CRM Portal and in the Events & Tasks page.
- Events can be created from the following record types: Leads, Contacts, Opportunities, Accounts, and Projects.
- Events will only be seen by the user who created the Event.
|
| Section |
|---|
| Column |
|---|
|
| UI Steps |
|---|
|
| UI Step |
|---|
When Creating an Events add a subject. This field is required and must be completed before the Event can be saved. |
| UI Step |
|---|
Include a description if needed. This is not a required field. |
| UI Step |
|---|
Set the Event start and end details. |
| UI Step |
|---|
Include a location if needed. This is not a required field. |
| UI Step |
|---|
The Event can be related to many record types though it will initially default to searching existing Account Records. Use the field to search for existing Account Records or choose another record type to relate the Event by using the drop-down menu on the right side of this field. |
| UI Step |
|---|
Click Save when complete. |
|
|
| Column |
|---|
|
|
|
|
| UI Expand |
|---|
|
| Info |
|---|
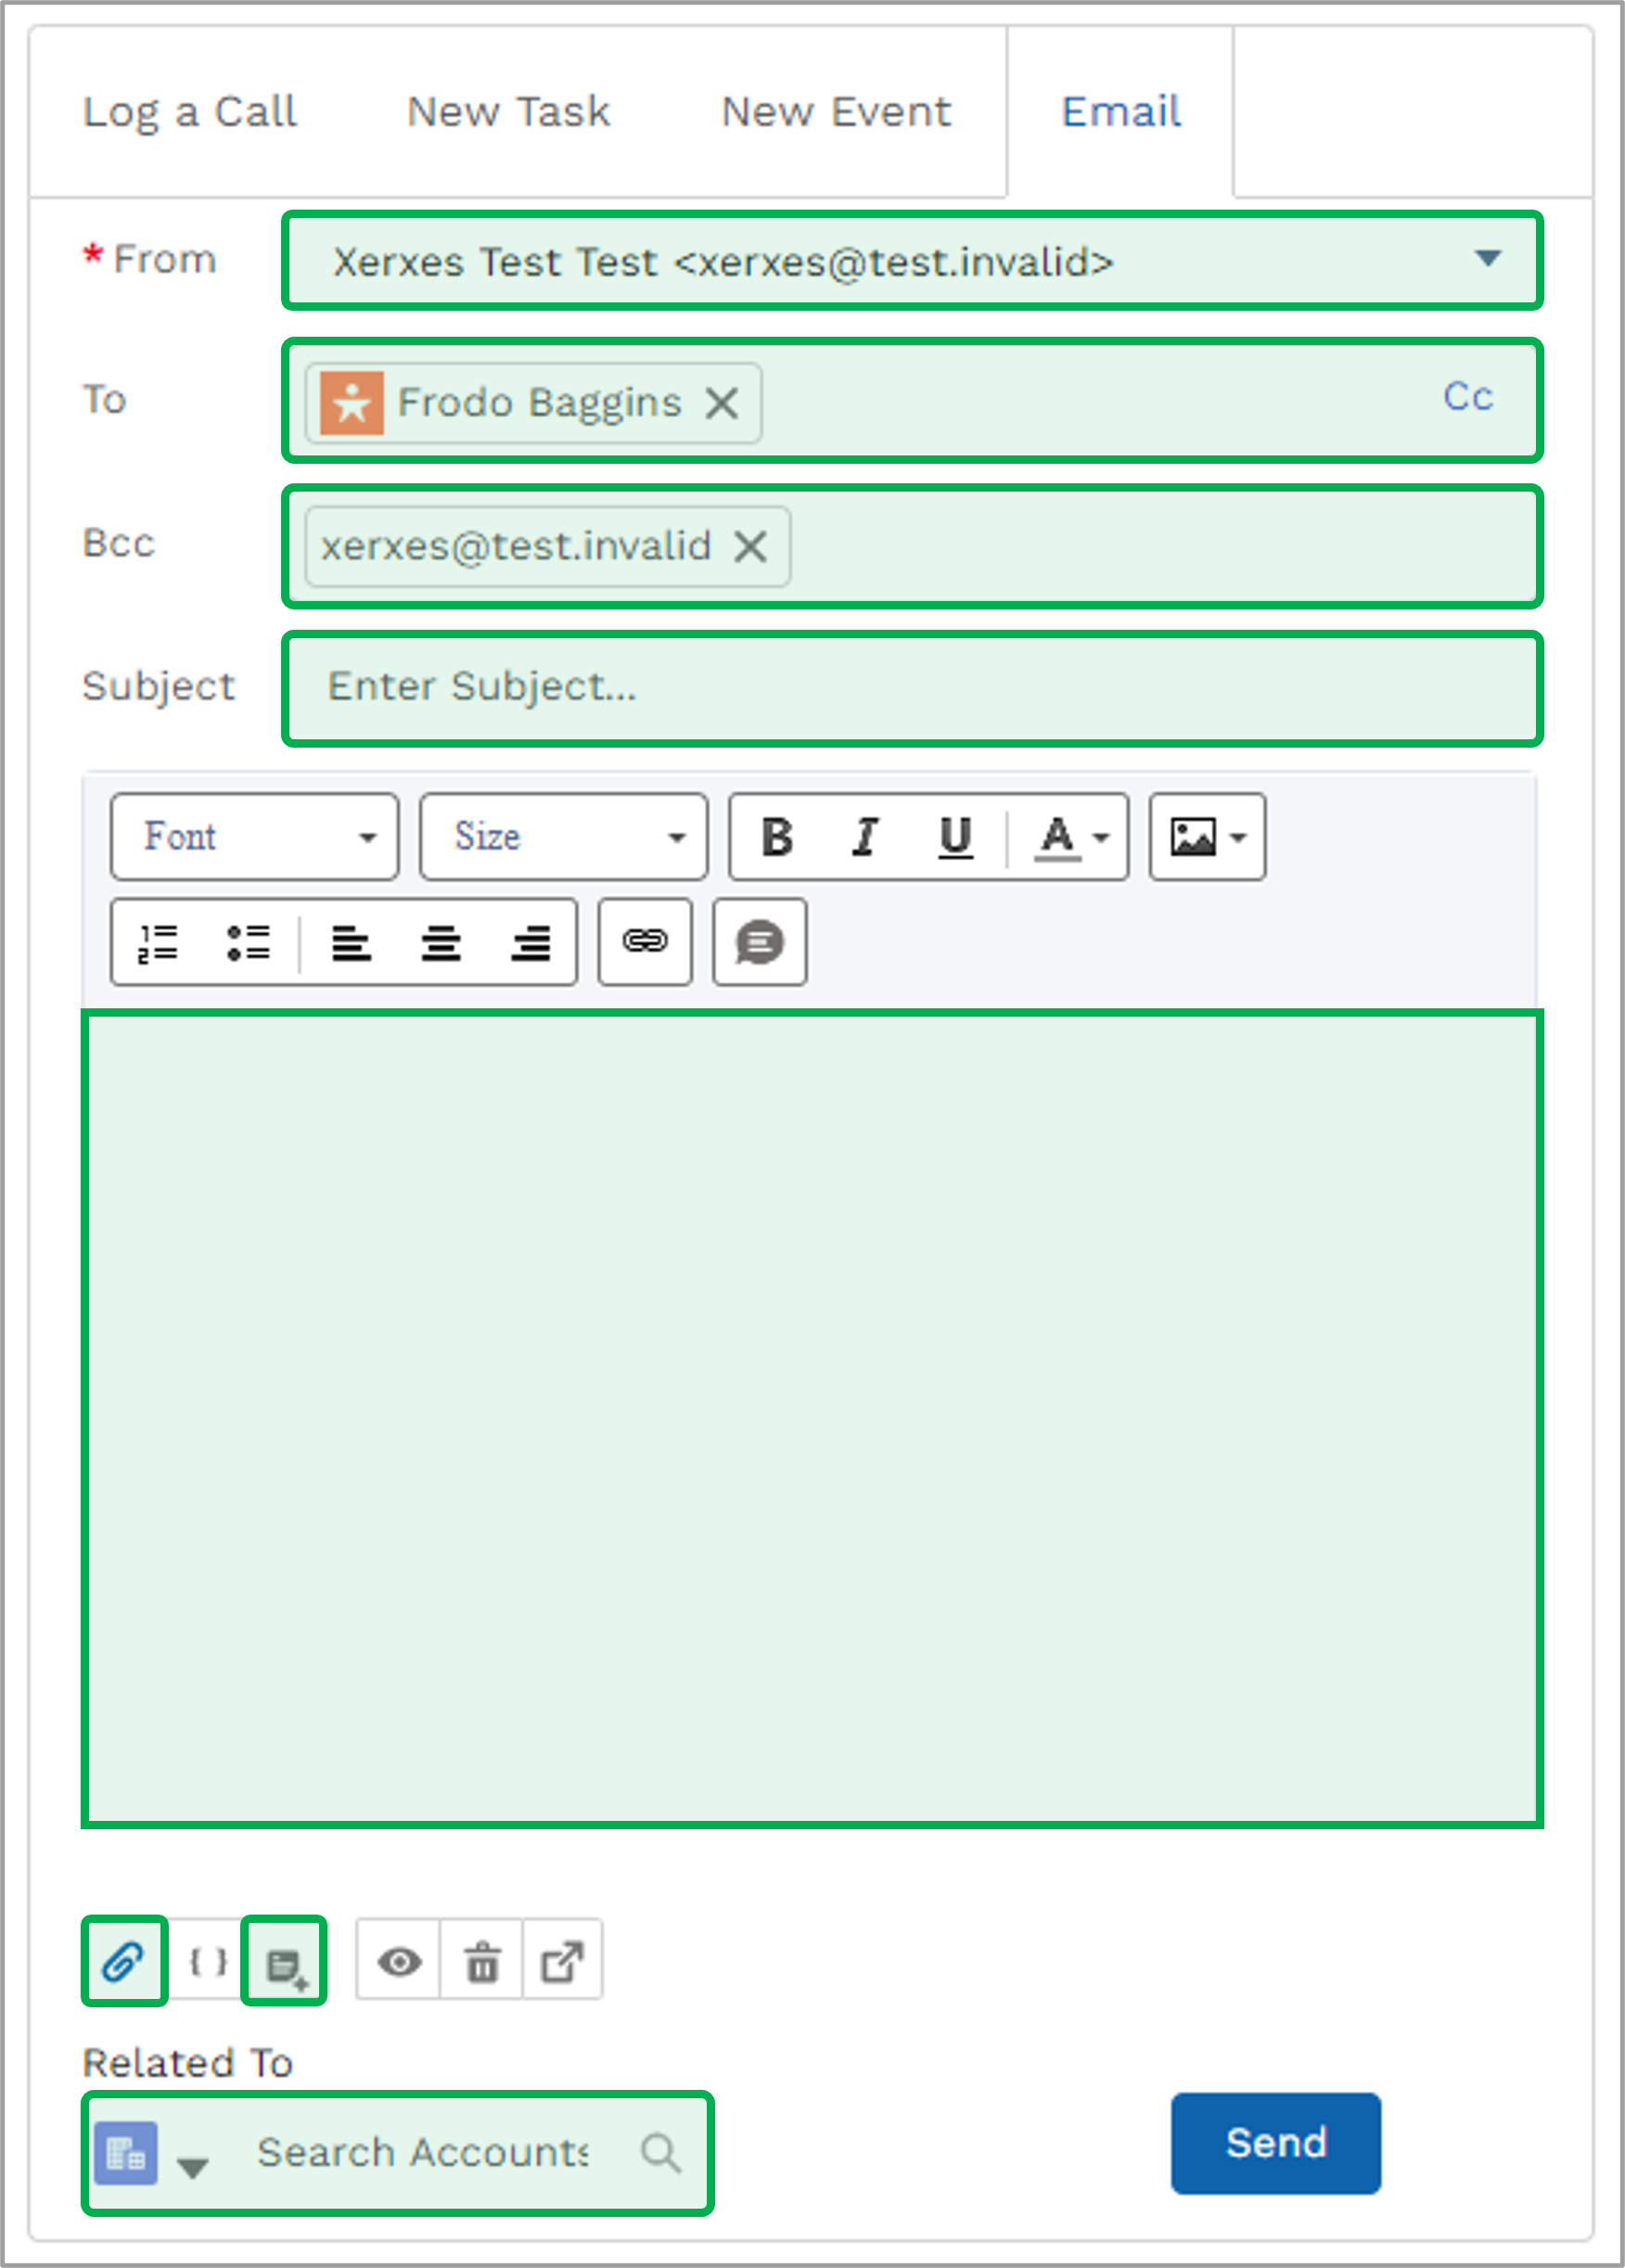
| Most record types in the Salesforce CRM Portal provide the ability to Send Emails. When an Email is Sent within a specific record type, it is automatically related to that record type. For example, when Sending an Email from a specific Lead Record, that email will automatically be related to the Lead Record. - Emails can be sent from the following record types: Leads, Contacts, Opportunities, Accounts, and Projects.
- Salesforce emails do not allow graphics to be inserted.
|
| Section |
|---|
| Column |
|---|
|
| UI Steps |
|---|
|
| UI Step |
|---|
The From field will automatically pre-populate with the current user's email but this can be changed using the drop-down for this field and selecting an alternate option. |
| UI Step |
|---|
The To field will automatically pre-populate with either the current Lead or Contact, or the primary Contact on the Account, Opportunity, or Project record. |
| UI Step |
|---|
The BCC field will automatically pre-populate with the current user. Use the X to remove if needed and add any other BCCs as needed. |
| UI Step |
|---|
Use the Subject field as needed. Note that when using Email Templates, the Subject field will populate based on the specific template used. |
| UI Step |
|---|
Input the body of the email in the large word formatting field. Note that when using Email Templates, the email body will populate based on the specific template used. |
| UI Step |
|---|
Use the Paperclip icon to include an email attachment. |
| UI Step |
|---|
Use the Template icon (the paper icon with the plus sign in the lower right-hand corner) to select from available email templates. |
| UI Step |
|---|
The Email can be related to many record types though it will initially default to searching existing Account Records. Use the field to search for existing Account Records or choose another record type to relate the Email to using the drop-down menu on the right side of this field. |
| UI Step |
|---|
Click Send when complete. |
|
|
| Column |
|---|
|
|
|
|
|
| Aura - Tab |
|---|
|
| Panel |
|---|
| borderColor | #002D72 |
|---|
| bgColor | #F3F4F9 |
|---|
| titleColor | #ffffff |
|---|
| borderWidth | 1 |
|---|
| titleBGColor | #002D72 |
|---|
| borderStyle | none |
|---|
| title | CRM Portal Home Page |
|---|
|
|
| Info |
|---|
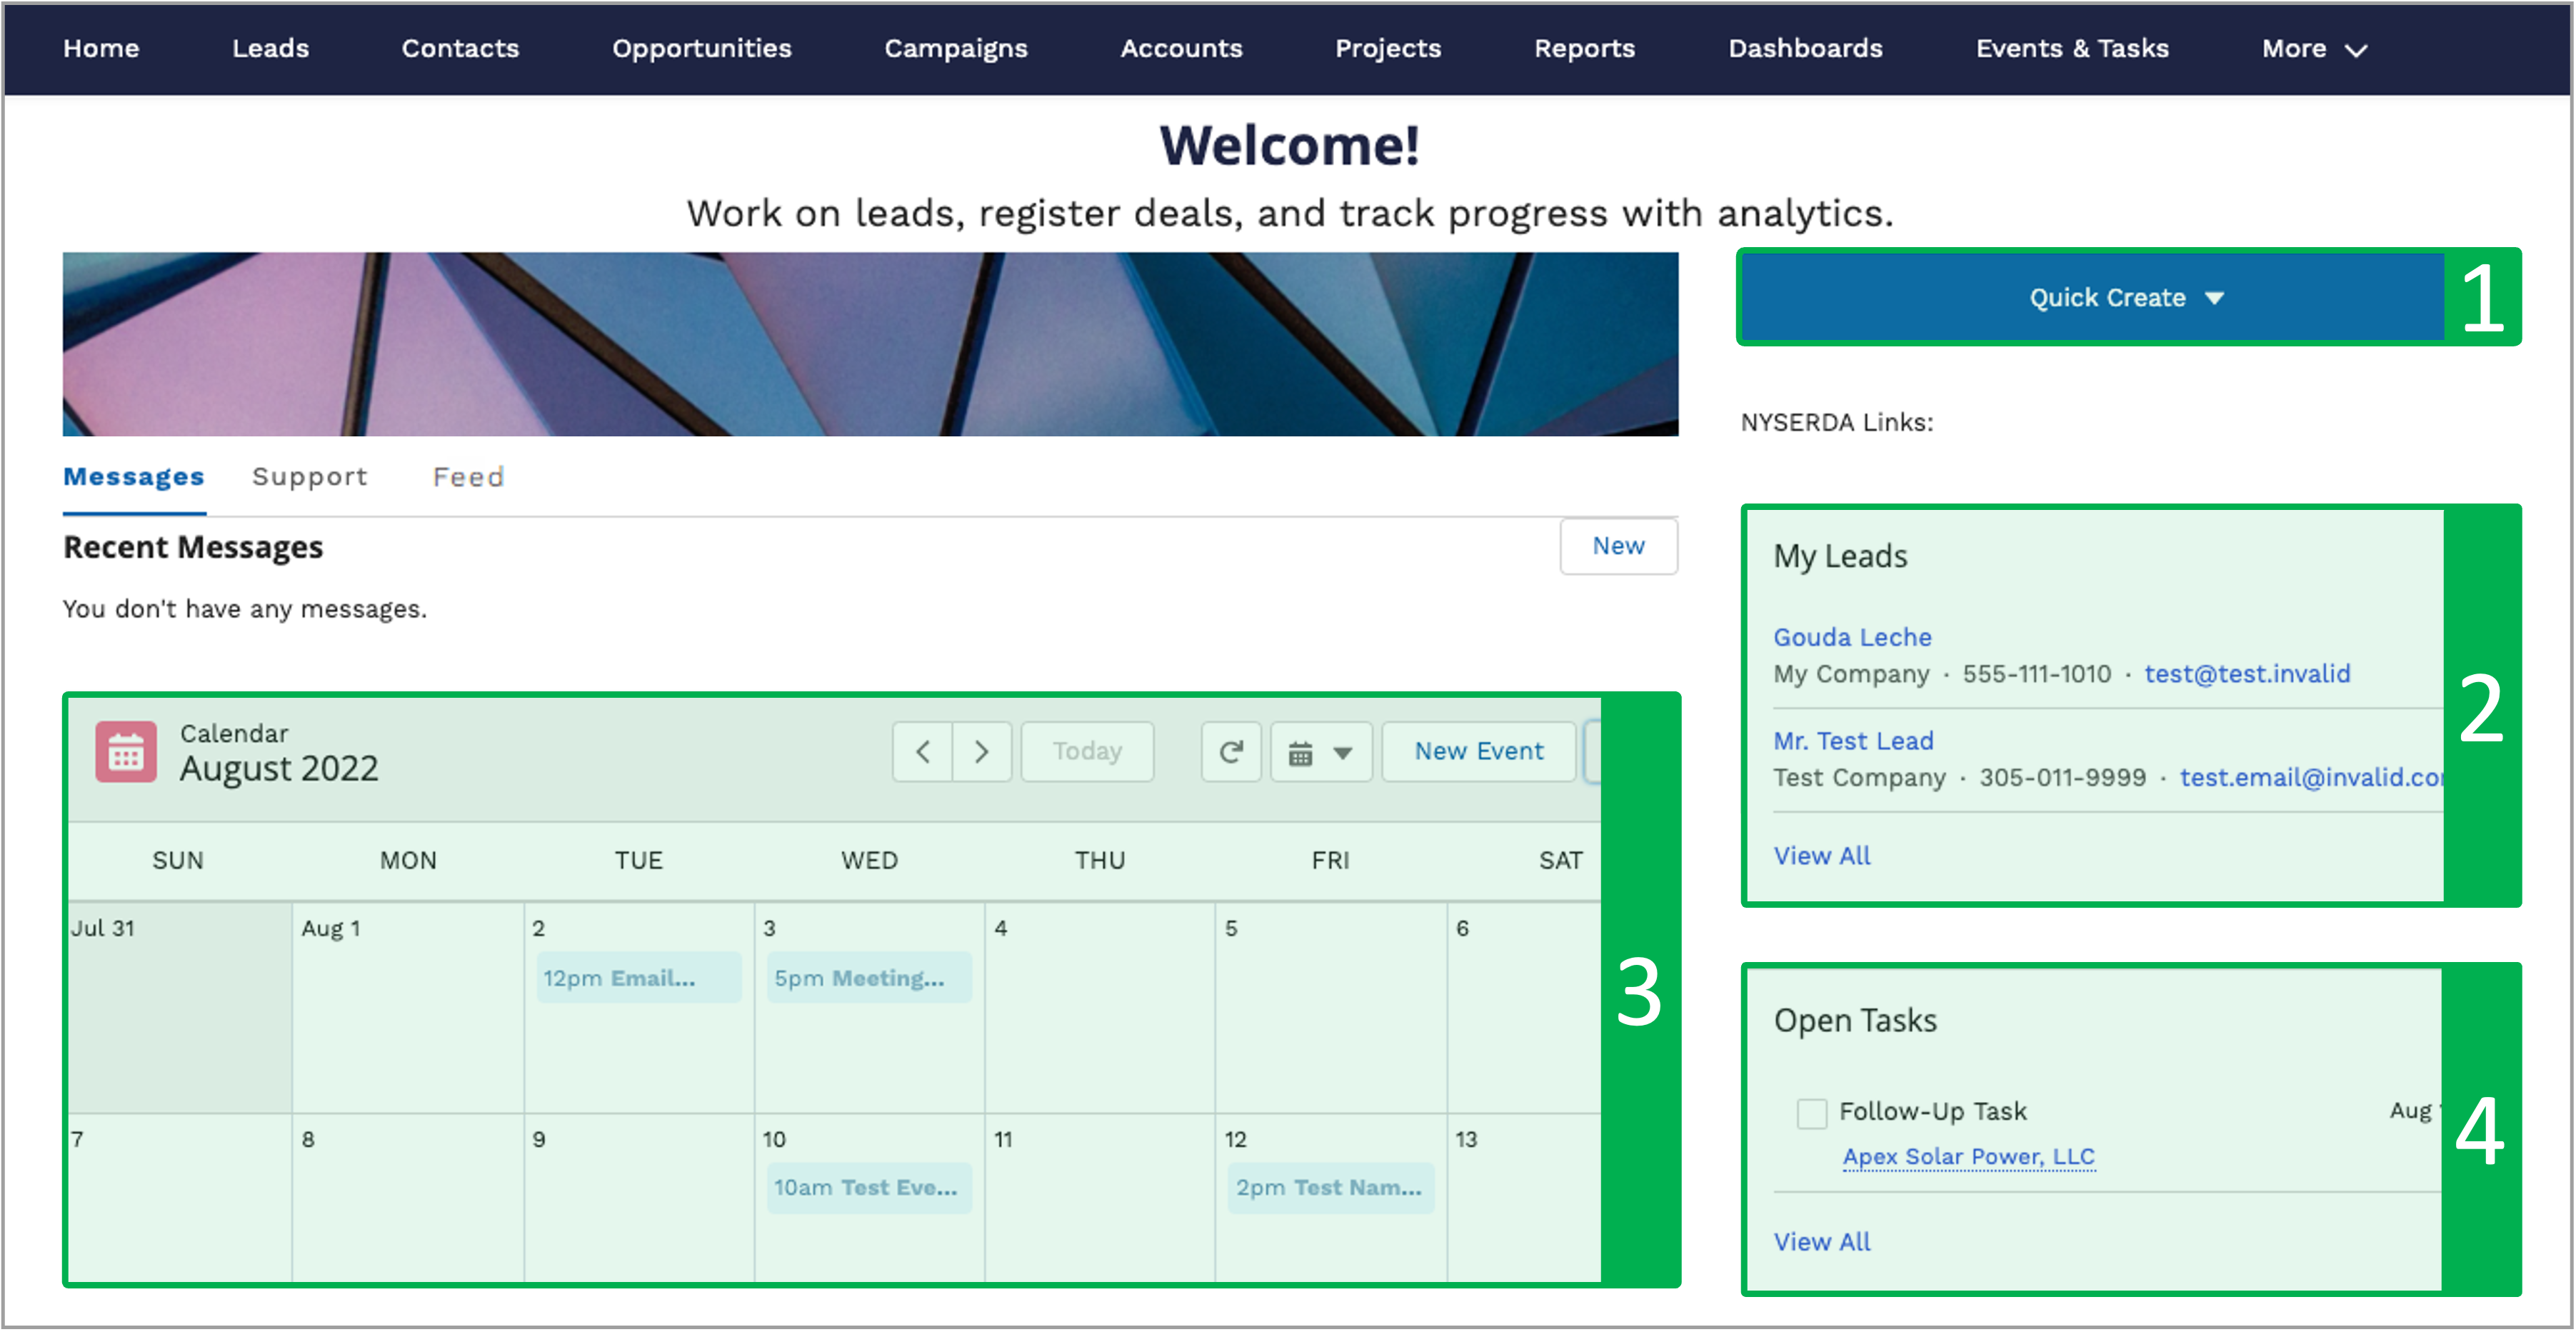
| The CRM Portal Home Page provides a high-level overview of current tasks, events, and leads that can also be easily and quickly created using the Quick Create menu. This is the default page that CRM Portal users will be brought to when signing into the Salesforce CRM Portal. |
| UI Expand |
|---|
| title | 1 - Quick Create Menu |
|---|
|
| UI Steps |
|---|
|
| UI Step |
|---|
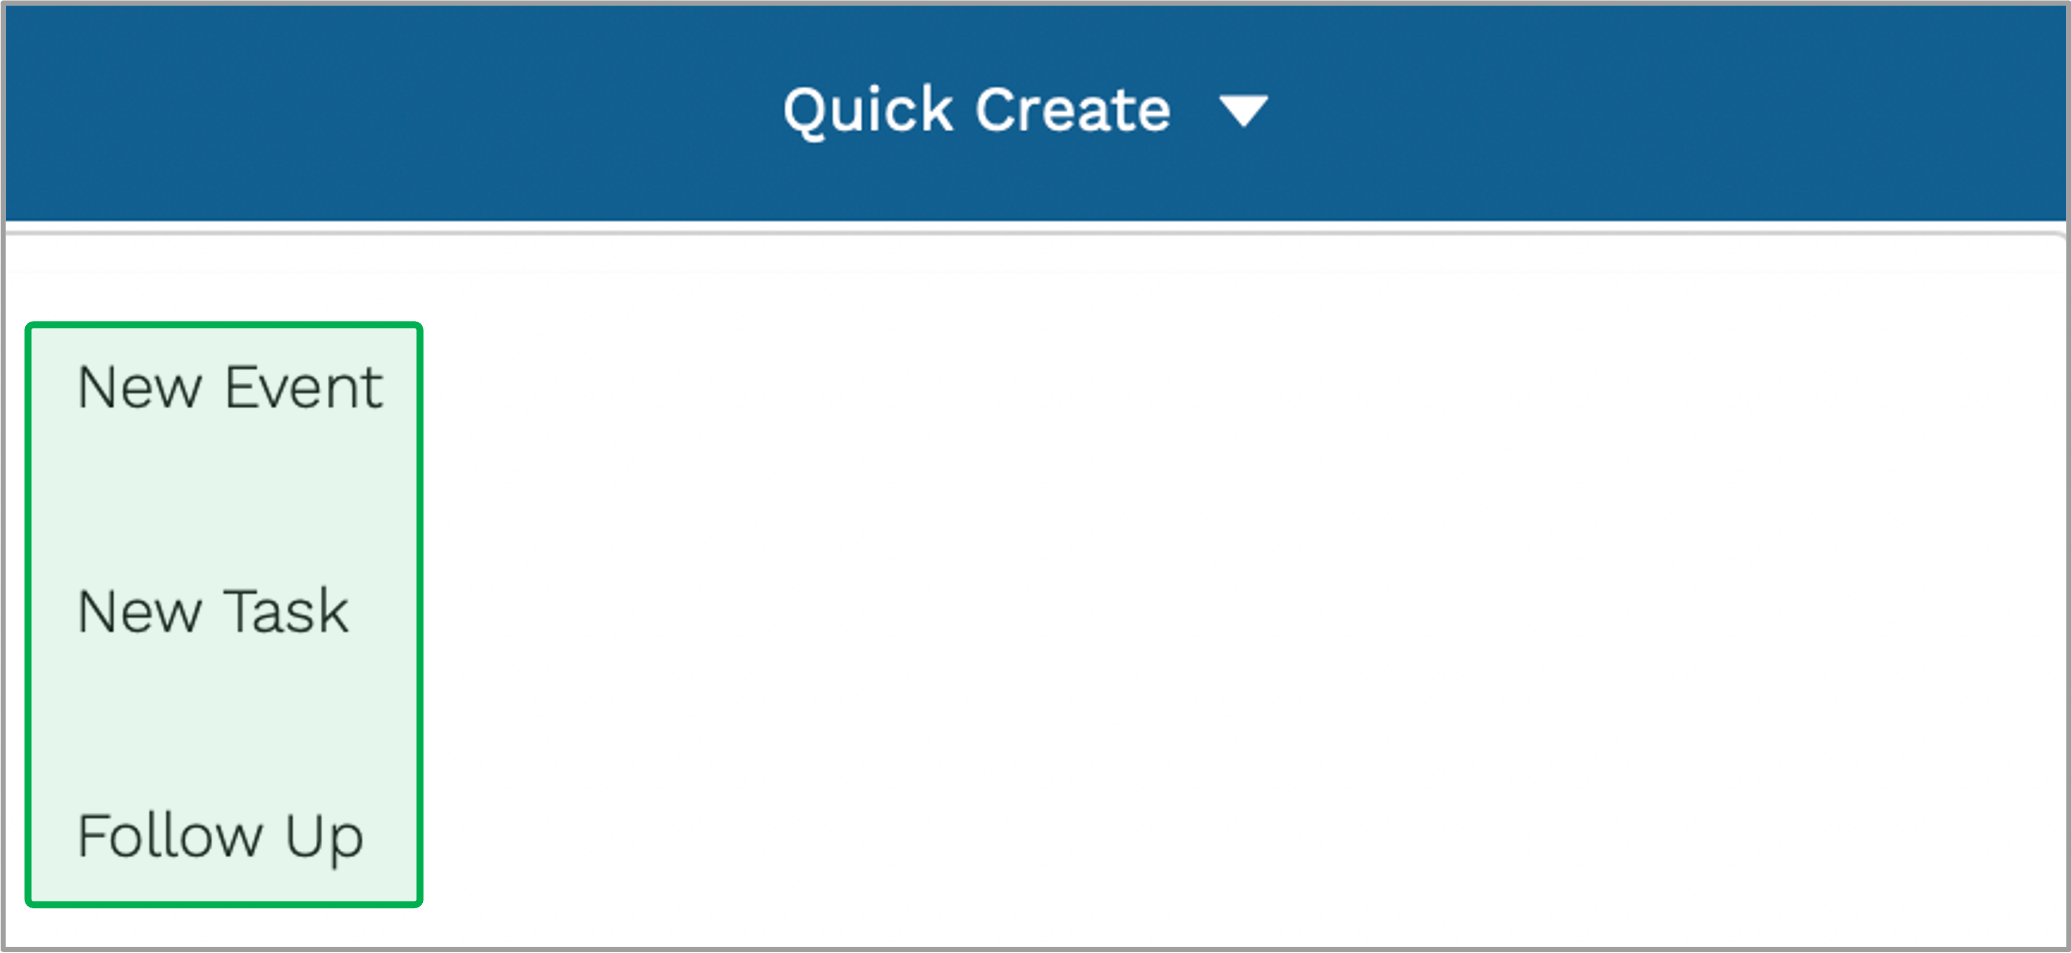
The Quick Create menu provides a quick way to create New Events, New Tasks, and Follow-Up records. | Expand |
|---|
| 
|
|
| UI Step |
|---|
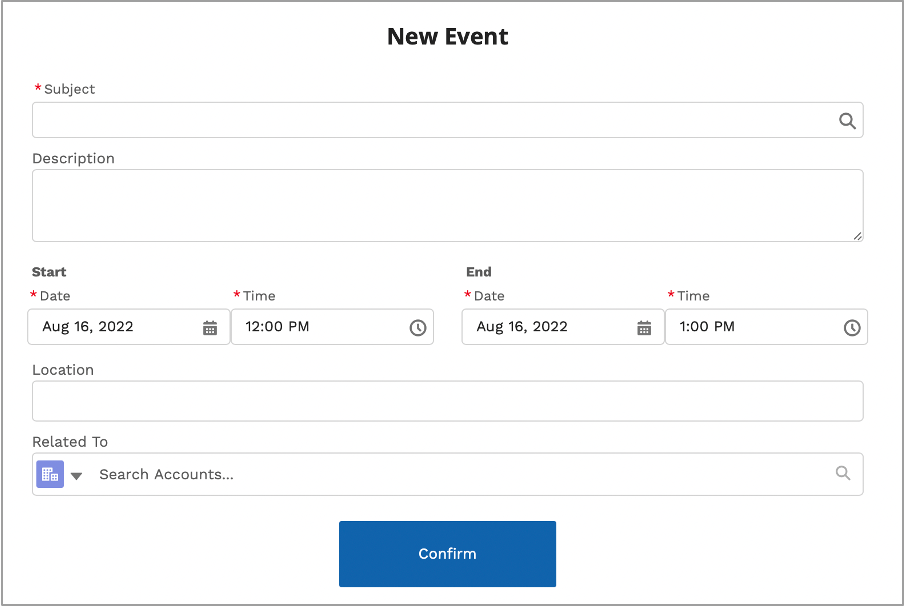
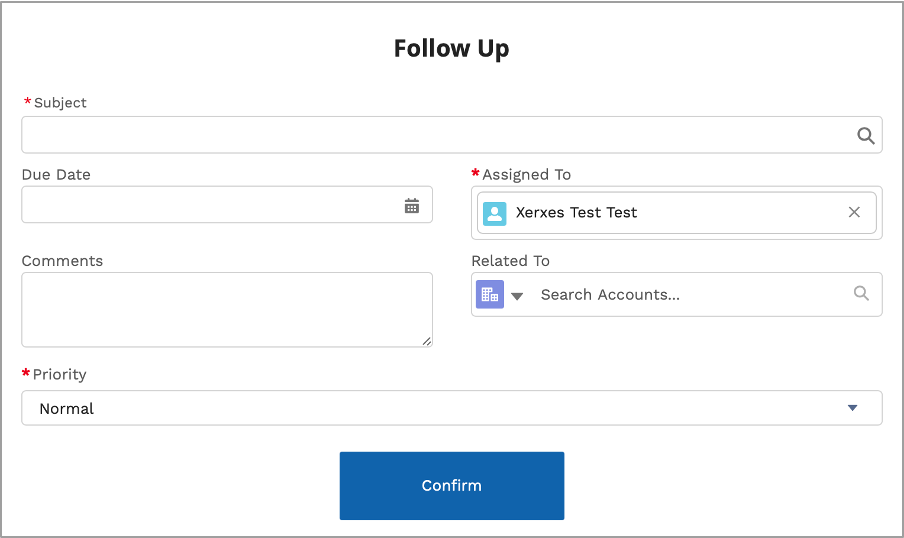
When clicking any of these three options, a modal window will appear to document the details of the New Event, New Task, or Follow-Up record. | Expand |
|---|
| title | New Event screenshot |
|---|
| 
|
| Expand |
|---|
| 
|
| Expand |
|---|
| title | Follow-Up screenshot |
|---|
| 
|
|
| UI Step |
|---|
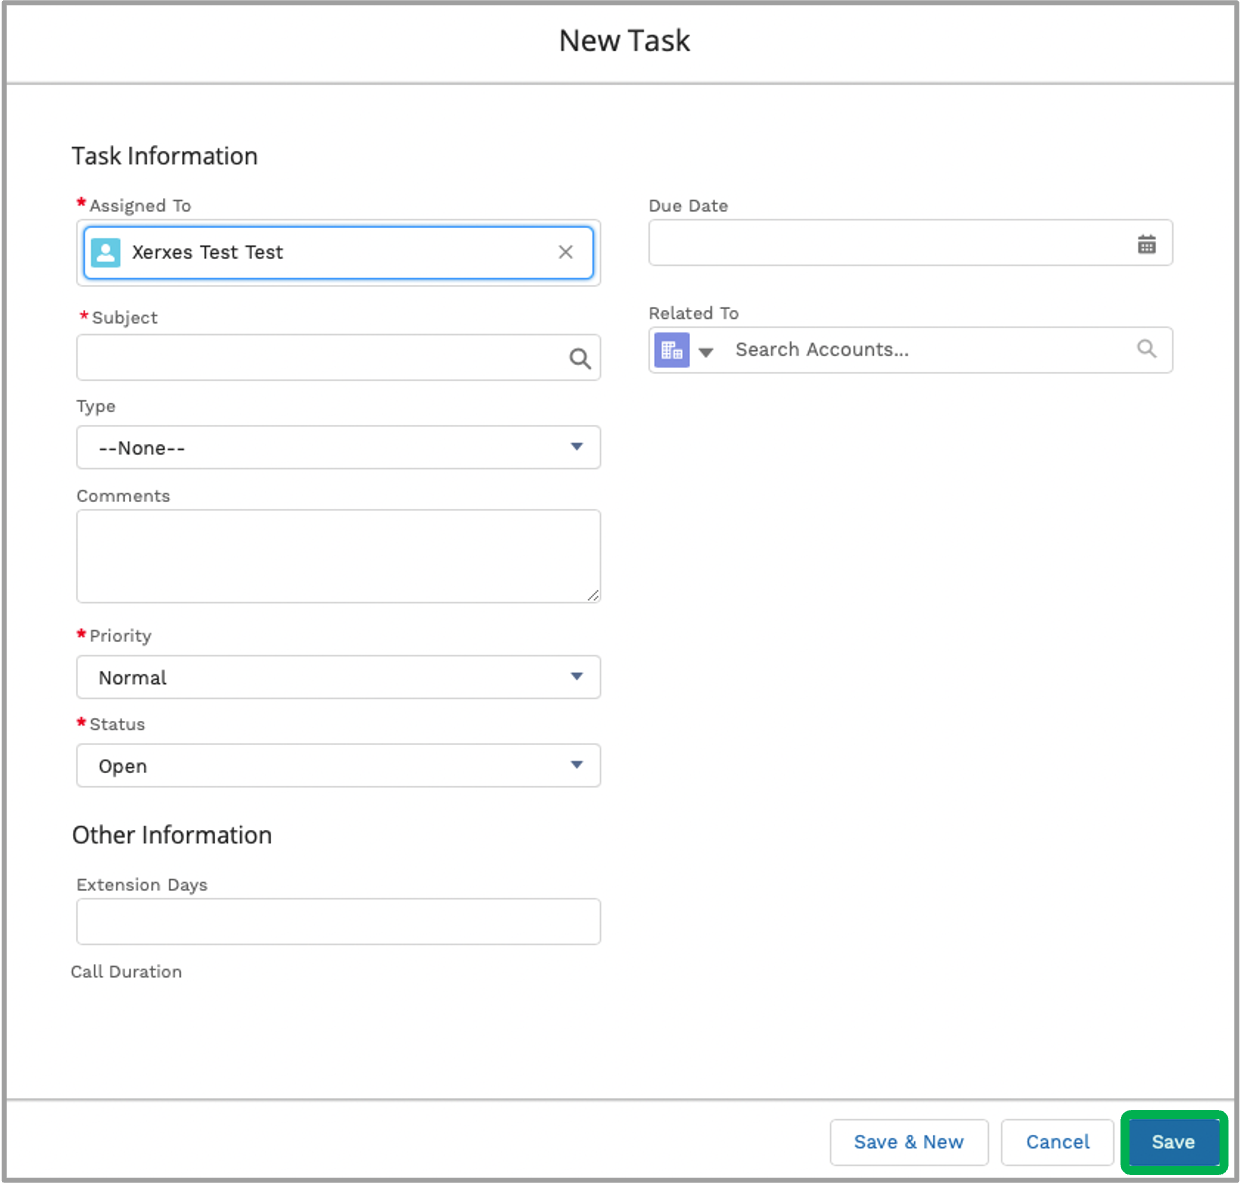
Required information on each modal window is identified by a red asterisk to the left of the field name. |
| UI Step |
|---|
When creating New Task and Follow-Up records, The Assigned To field default to the Hub user creating the record. This can be changed. To assign the record to an alternate Hub member, click the X to the far right of the current assignee. then, begin typing in the name of the alternate Hub user into the same field. Available options will begin to appear below this field. Select the correct user. | Expand |
|---|
| | Multimedia |
|---|
| name | Hubs Reassign Task or Followup.mp4 |
|---|
| width | 100% |
|---|
| height | 100% |
|---|
|
|
|
|
|
| UI Expand |
|---|
|
| Section |
|---|
| Column |
|---|
|
| UI Steps |
|---|
|
| UI Step |
|---|
Click a Lead name to quickly access the specific Lead record. |
| UI Step |
|---|
Click View All to be taken to the Leads page. Please review the Leads tab on the left for more information regarding Leads. |
|
|
| Column |
|---|
| 
|
|
|
| UI Expand |
|---|
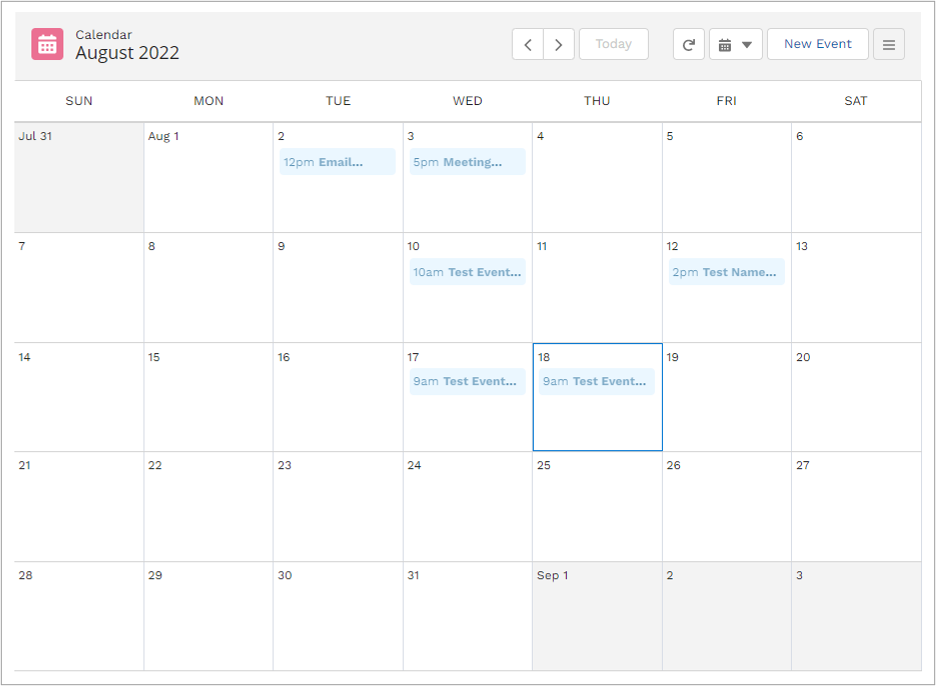
| title | 3 - Event & Task Calendar |
|---|
|
| Section |
|---|
| Column |
|---|
|
| UI Steps |
|---|
|
| UI Step |
|---|
The Calendar will show only active Events that have been created and will only show those Events that have been assigned to the current user. |
| UI Step |
|---|
Use the backward and forward arrows to navigate between Calendar months. |
| UI Step |
|---|
Use the Calendar icon drop-down to change the Calendar view options (day, week, month). |
| UI Step |
|---|
Use the New Event button to create a new Event. This is a similar process to using the Quick Create menu to create a new Event. |
| UI Step |
|---|
Clicking a specific Event within the Calendar will direct you to the specific Event record. |
|
|
| Column |
|---|
|
|
|
|
| UI Expand |
|---|
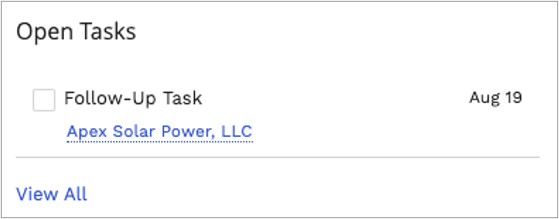
| title | 4 - Open Tasks Panel |
|---|
|
| Section |
|---|
| Column |
|---|
|
| UI Steps |
|---|
|
| UI Step |
|---|
Only active, incomplete Tasks will appear in this panel. |
| UI Step |
|---|
Click the Checkbox to the left of the Task name to mark as complete. Note that when checking the box, a modal window will appear to select an appropriate Task status. Currently the options are: Approved, Reject, and Completed. |
| UI Step |
|---|
Once a Task is marked as complete, the task will be crossed out. A simple page refresh will remove the completed Task from the panel. |
| UI Step |
|---|
Click View All to be taken to the Events & Tasks page. Please review the Events & Tasks tab on the left for more information regarding Tasks. | Tip |
|---|
| When redirected to Events & Tasks page, it will show all tasks that have been assigned to you or that you created. |
|
|
|
| Column |
|---|
|
|
|
|
| UI Expand |
|---|
| title | Related Training Video |
|---|
| | Multimedia |
|---|
| name | HUBS - CRM Portal Home Page.mp4 |
|---|
| width | 100% |
|---|
| height | 100% |
|---|
|
|
|
| Aura - Tab |
|---|
|
| Panel |
|---|
| borderColor | #002D72 |
|---|
| bgColor | #F3F4F9 |
|---|
| titleColor | #ffffff |
|---|
| borderWidth | 1 |
|---|
| titleBGColor | #002D72 |
|---|
| borderStyle | none |
|---|
| title | Creating & Converting Leads |
|---|
|
|
| Info |
|---|
| The information below provides guidance on all aspects of lead creation and management. Hubs cannot delete Lead Records. Should this be necessary, please work with your NYSERDA Project Manager. |
| UI Expand |
|---|
|
| Section |
|---|
| Column |
|---|
|
| UI Steps |
|---|
|
| UI Step |
|---|
Hubs will receive the Web-to-Lead form HTML from the NYSERDA Program Team. The HTML will be unique to each Hub so that incoming leads are automatically assigned to the correct corresponding Hub Queue. | Warning |
|---|
| Hubs will need to provide the web domain names before NYSERDA can provide the HTML. |
|
| UI Step |
|---|
The HTML can be set to any URL which might be shared via a Hub for customer outreach and can be used however the Hub requires to capture new leads and customers. |
| UI Step |
|---|
The HTML can be updated to point to a specific redirect link after form completion and submittal. By default, the HTML will direct submitters to the NYSERDA website. To change the webpage redirect, within the HTML change Line 111 values by inserting the Webpage. |
| UI Step |
|---|
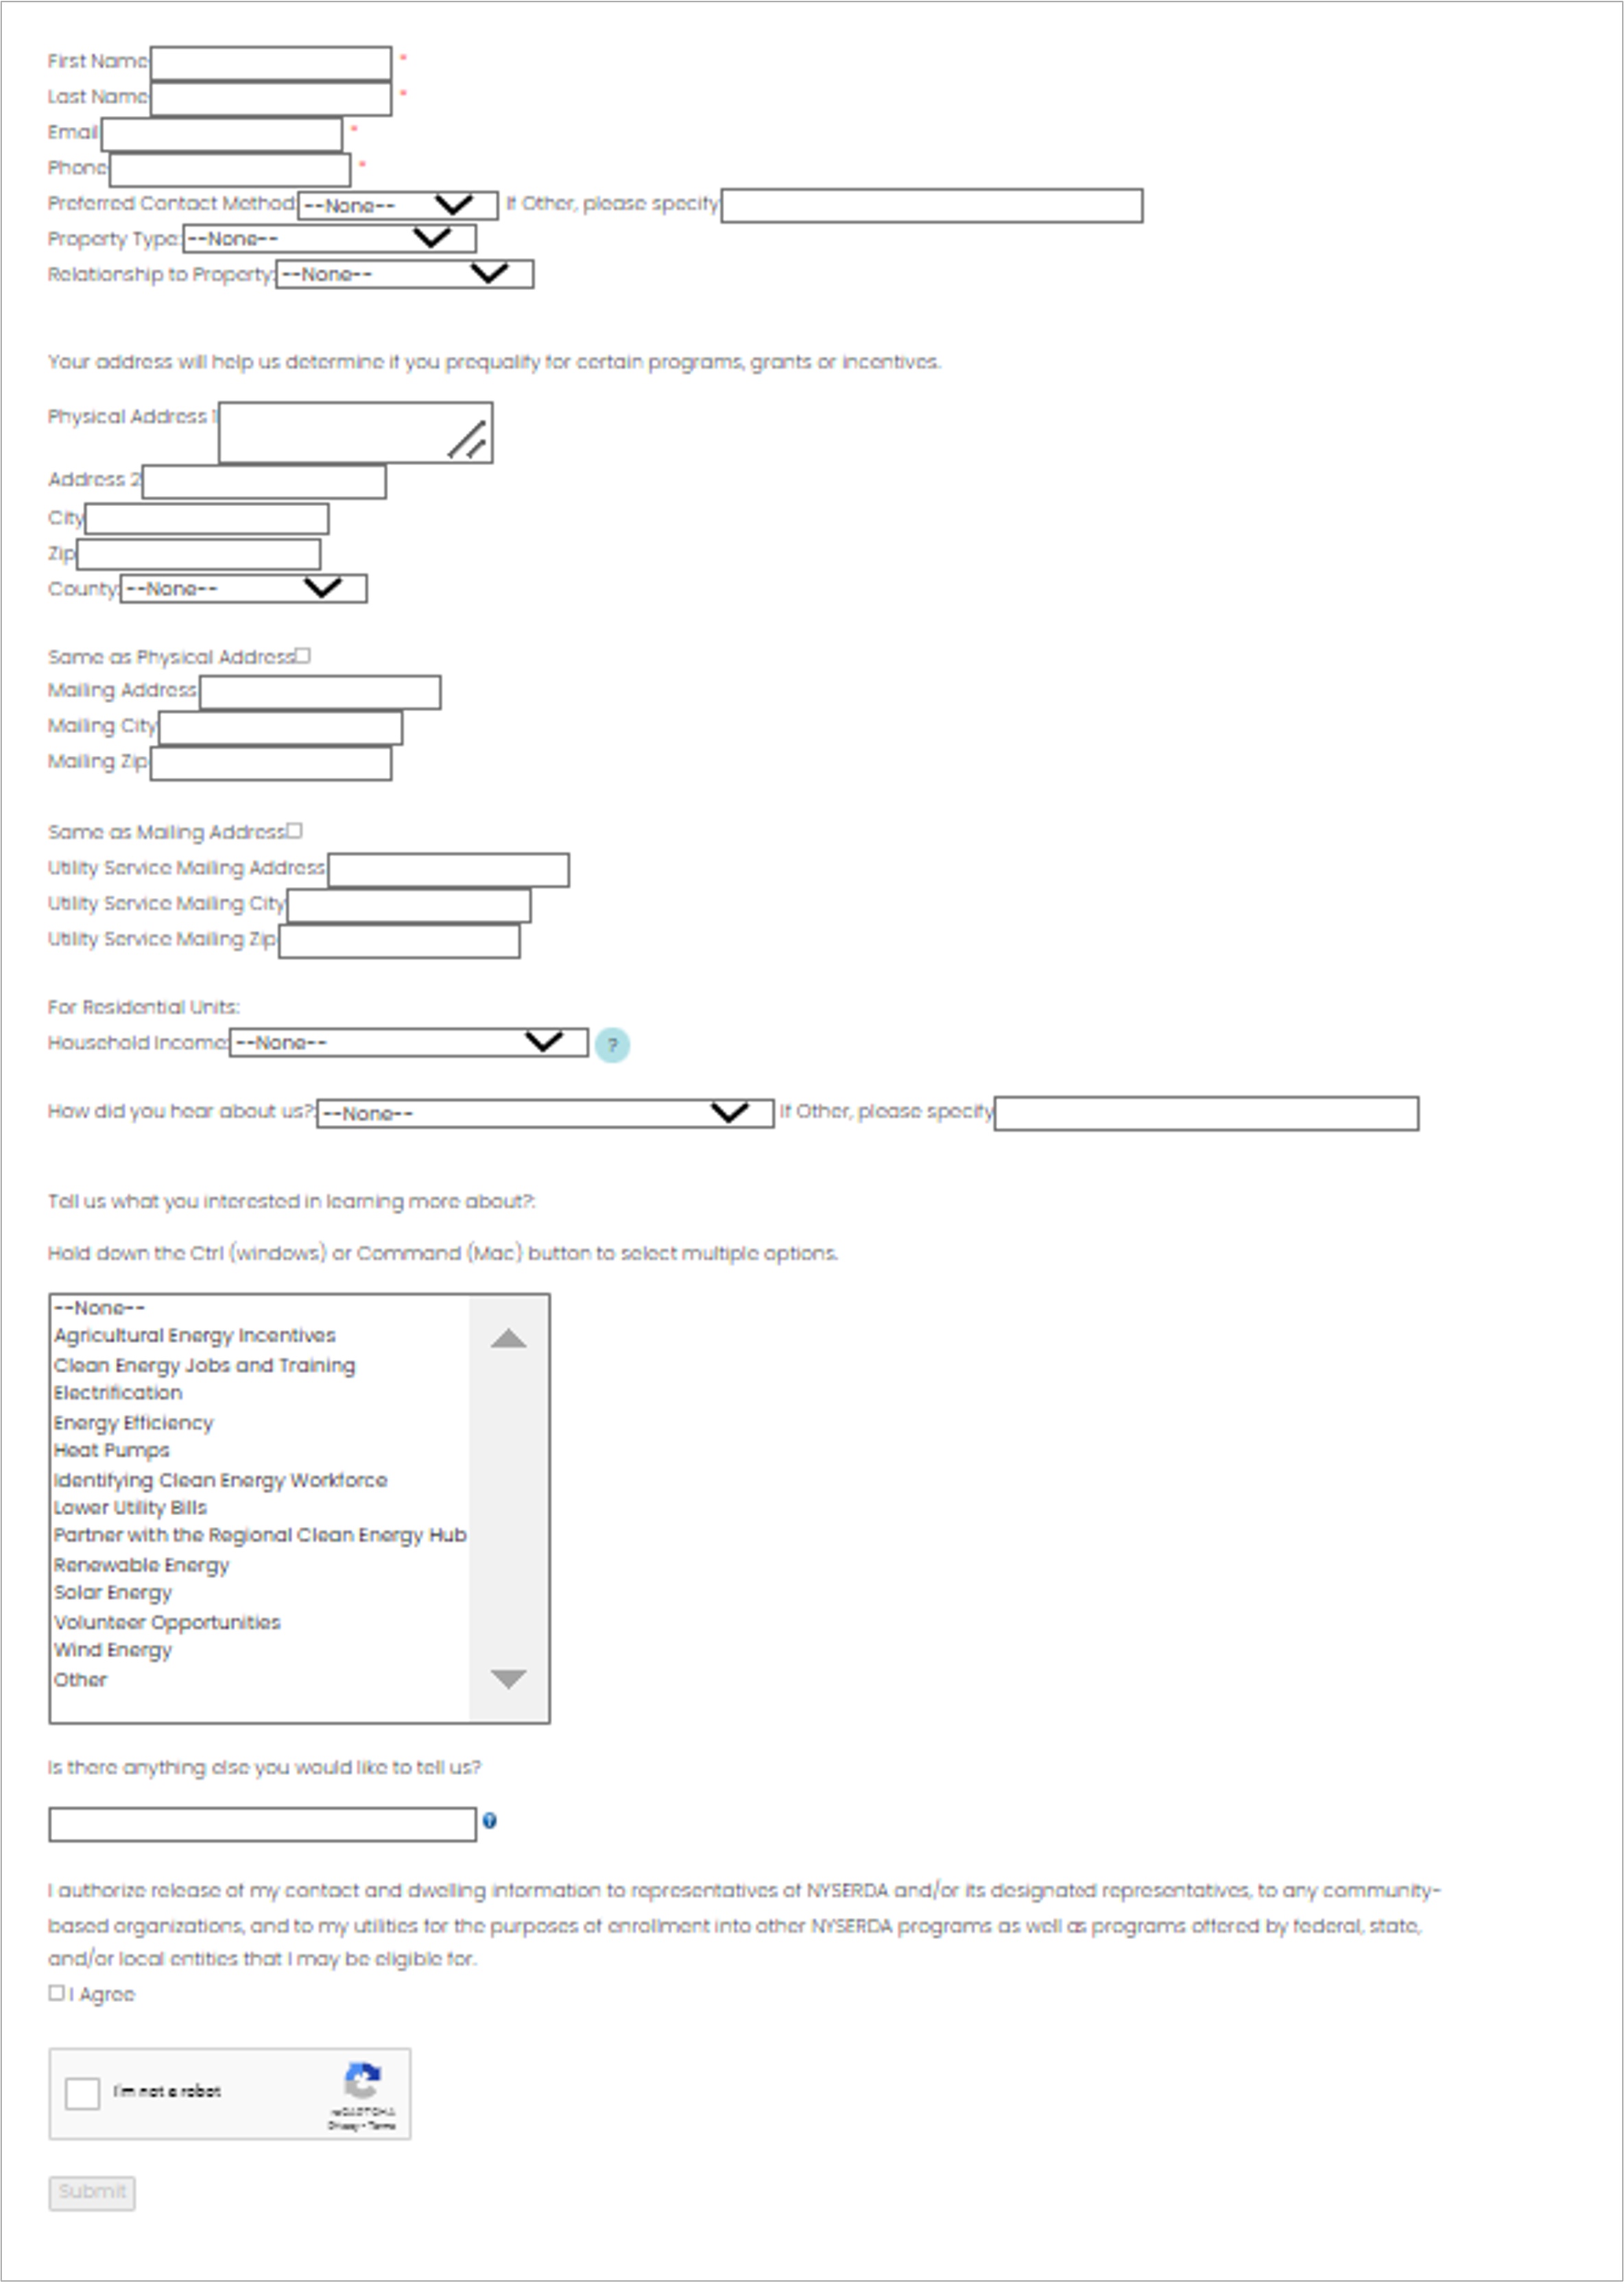
When possible, let customers know that completing the address fields will help NYSERDA determine which programs the customer is pre-qualified for. | Warning |
|---|
Red asterisk fields are required on the Web-to-Lead form. |
|
|
|
| Column |
|---|
|
|
|
|
| UI Expand |
|---|
| title | Leads CRM Portal Page |
|---|
| 
| Page Options | Description/Function |
|---|
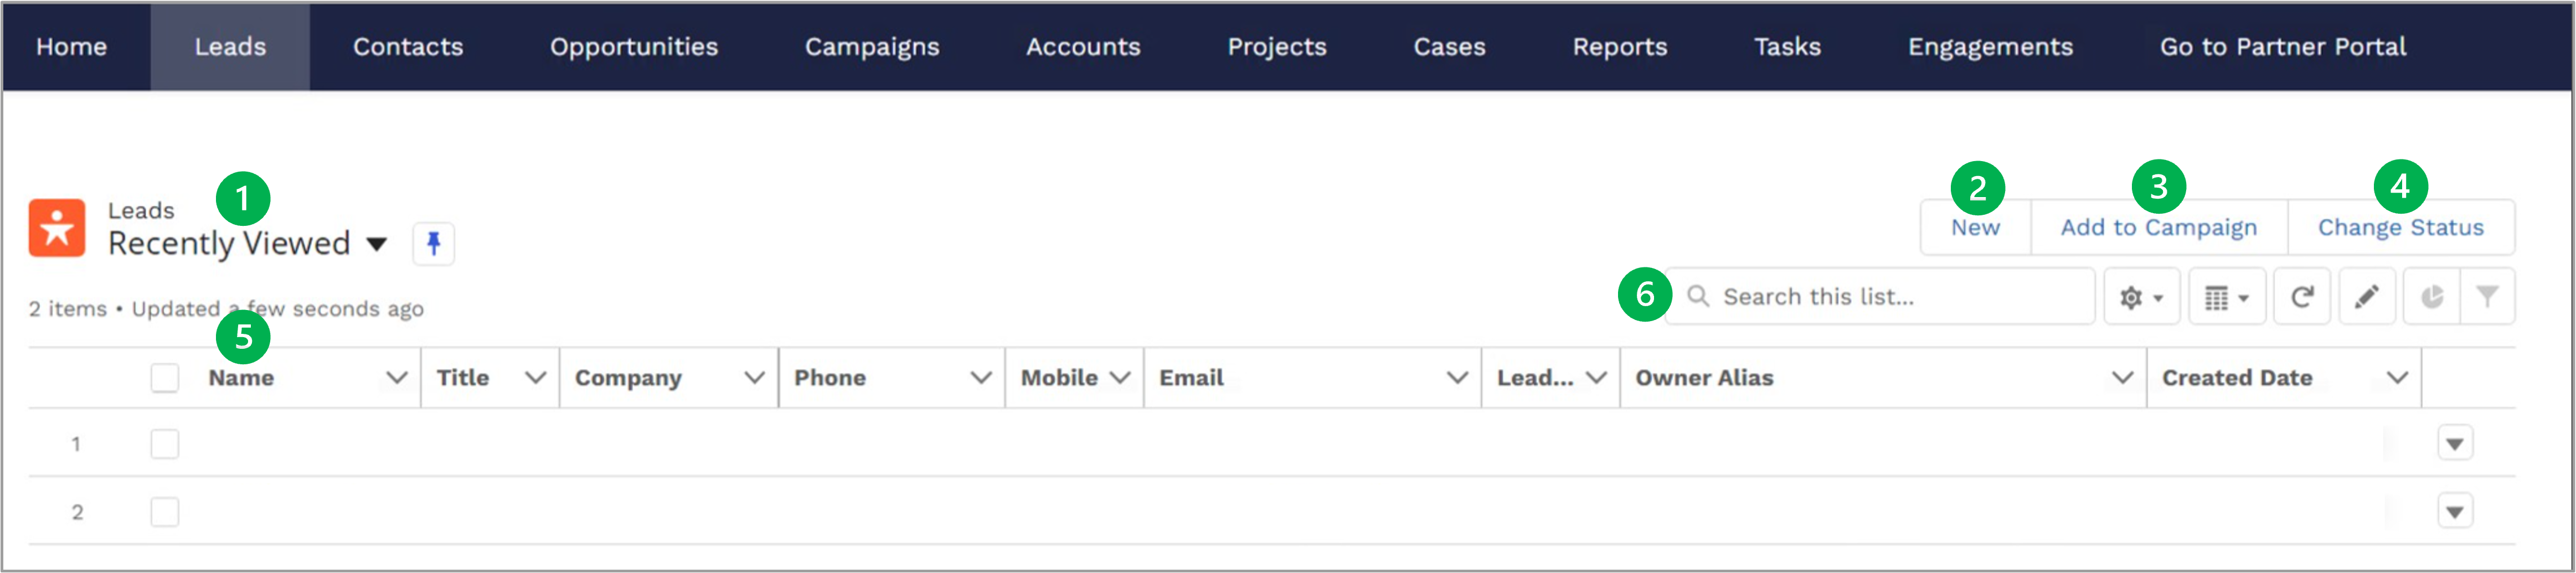
| 1 | Lead Queues | Groups leads into helpful queues for easy review and access. Click the current queue to open the drop-down to select other available queues. Use the Pin icon to set a different queue as the default view when accessing this page. | | 2 | New Lead Button | Opens a modal window to create a new lead. New leads are automatically added to the current users My Leads queue. Please review the Create New Lead section below for more information. | | 3 | Add to Campaign Button | Associates any number of leads on the current list to an active campaign. Individual leads on the lead list must be selected first using the checkbox to the left of any lead name. Review the Add to Campaign information in the Lead Record section below to learn how to assign leads to campaigns. | | 4 | Change Status Button | When clicked, lead statuses can be changed in bulk for any leads selected using the checkbox to the left of any lead name. It is not recommended to change lead statuses in bulk. Review the Lead Status and Convert Leads information in the Lead Record section below to learn more. | | 5 | Leads List | A list of all leads in the currently selected queue. Access a specific Lead Record by clicking the name link in the Name Column. | | 6 | Search List Field | Filter the visible lead list below based on the search parameters. |
|
| UI Expand |
|---|
|
| Section |
|---|
| Column |
|---|
|
| UI Steps |
|---|
|
| UI Step |
|---|
Complete as many fields as possible when creating a New Lead noting that fields marked with a red asterisk are required and must be completed before the lead can be created. The following are required fields: - First Name
- Last Name
- Company
| Warning |
|---|
The preferred method to enterleads is using your WTL form. If entering a Lead directly from Salesforce, Company is required. If the Lead is an individual, enterLast Name, First Name Individual in the Company field. If the Lead is representing a Company or Organization enter the Company or Organization name. |
- Lead Status
- Preferred Contact Method
|
| UI Step |
|---|
Some fields have a small grey circular Information Icon. Hovering the cursor over this icon will display a tooltip with helpful information for that field. |
| UI Step |
|---|
Use the Search Address box to locate and populate the rest of the mailing address fields. |
| UI Step |
|---|
Be sure to check the Mailing Address in DAC box or the Service Address in DAC box if the address(es) is/are within a Disadvantage Community. This helps NYSERDA determine if the lead is pre-approved for specific NYSERDA Programs. |
| UI Step |
|---|
If the Mailing Geo Match Address or Service Geo Match Address fields contain information it indicates that the lead may be pre-approved for specific NYSERDA Programs. |
| UI Step |
|---|
Click Save & New to save the Lead Record and generate a blank new lead form. |
| UI Step |
|---|
New leads are automatically assigned and only visible to the lead creator. |
|
|
| Column |
|---|
| 
|
|
|
| UI Expand |
|---|
| 
| Record Options | Description/Function |
|---|
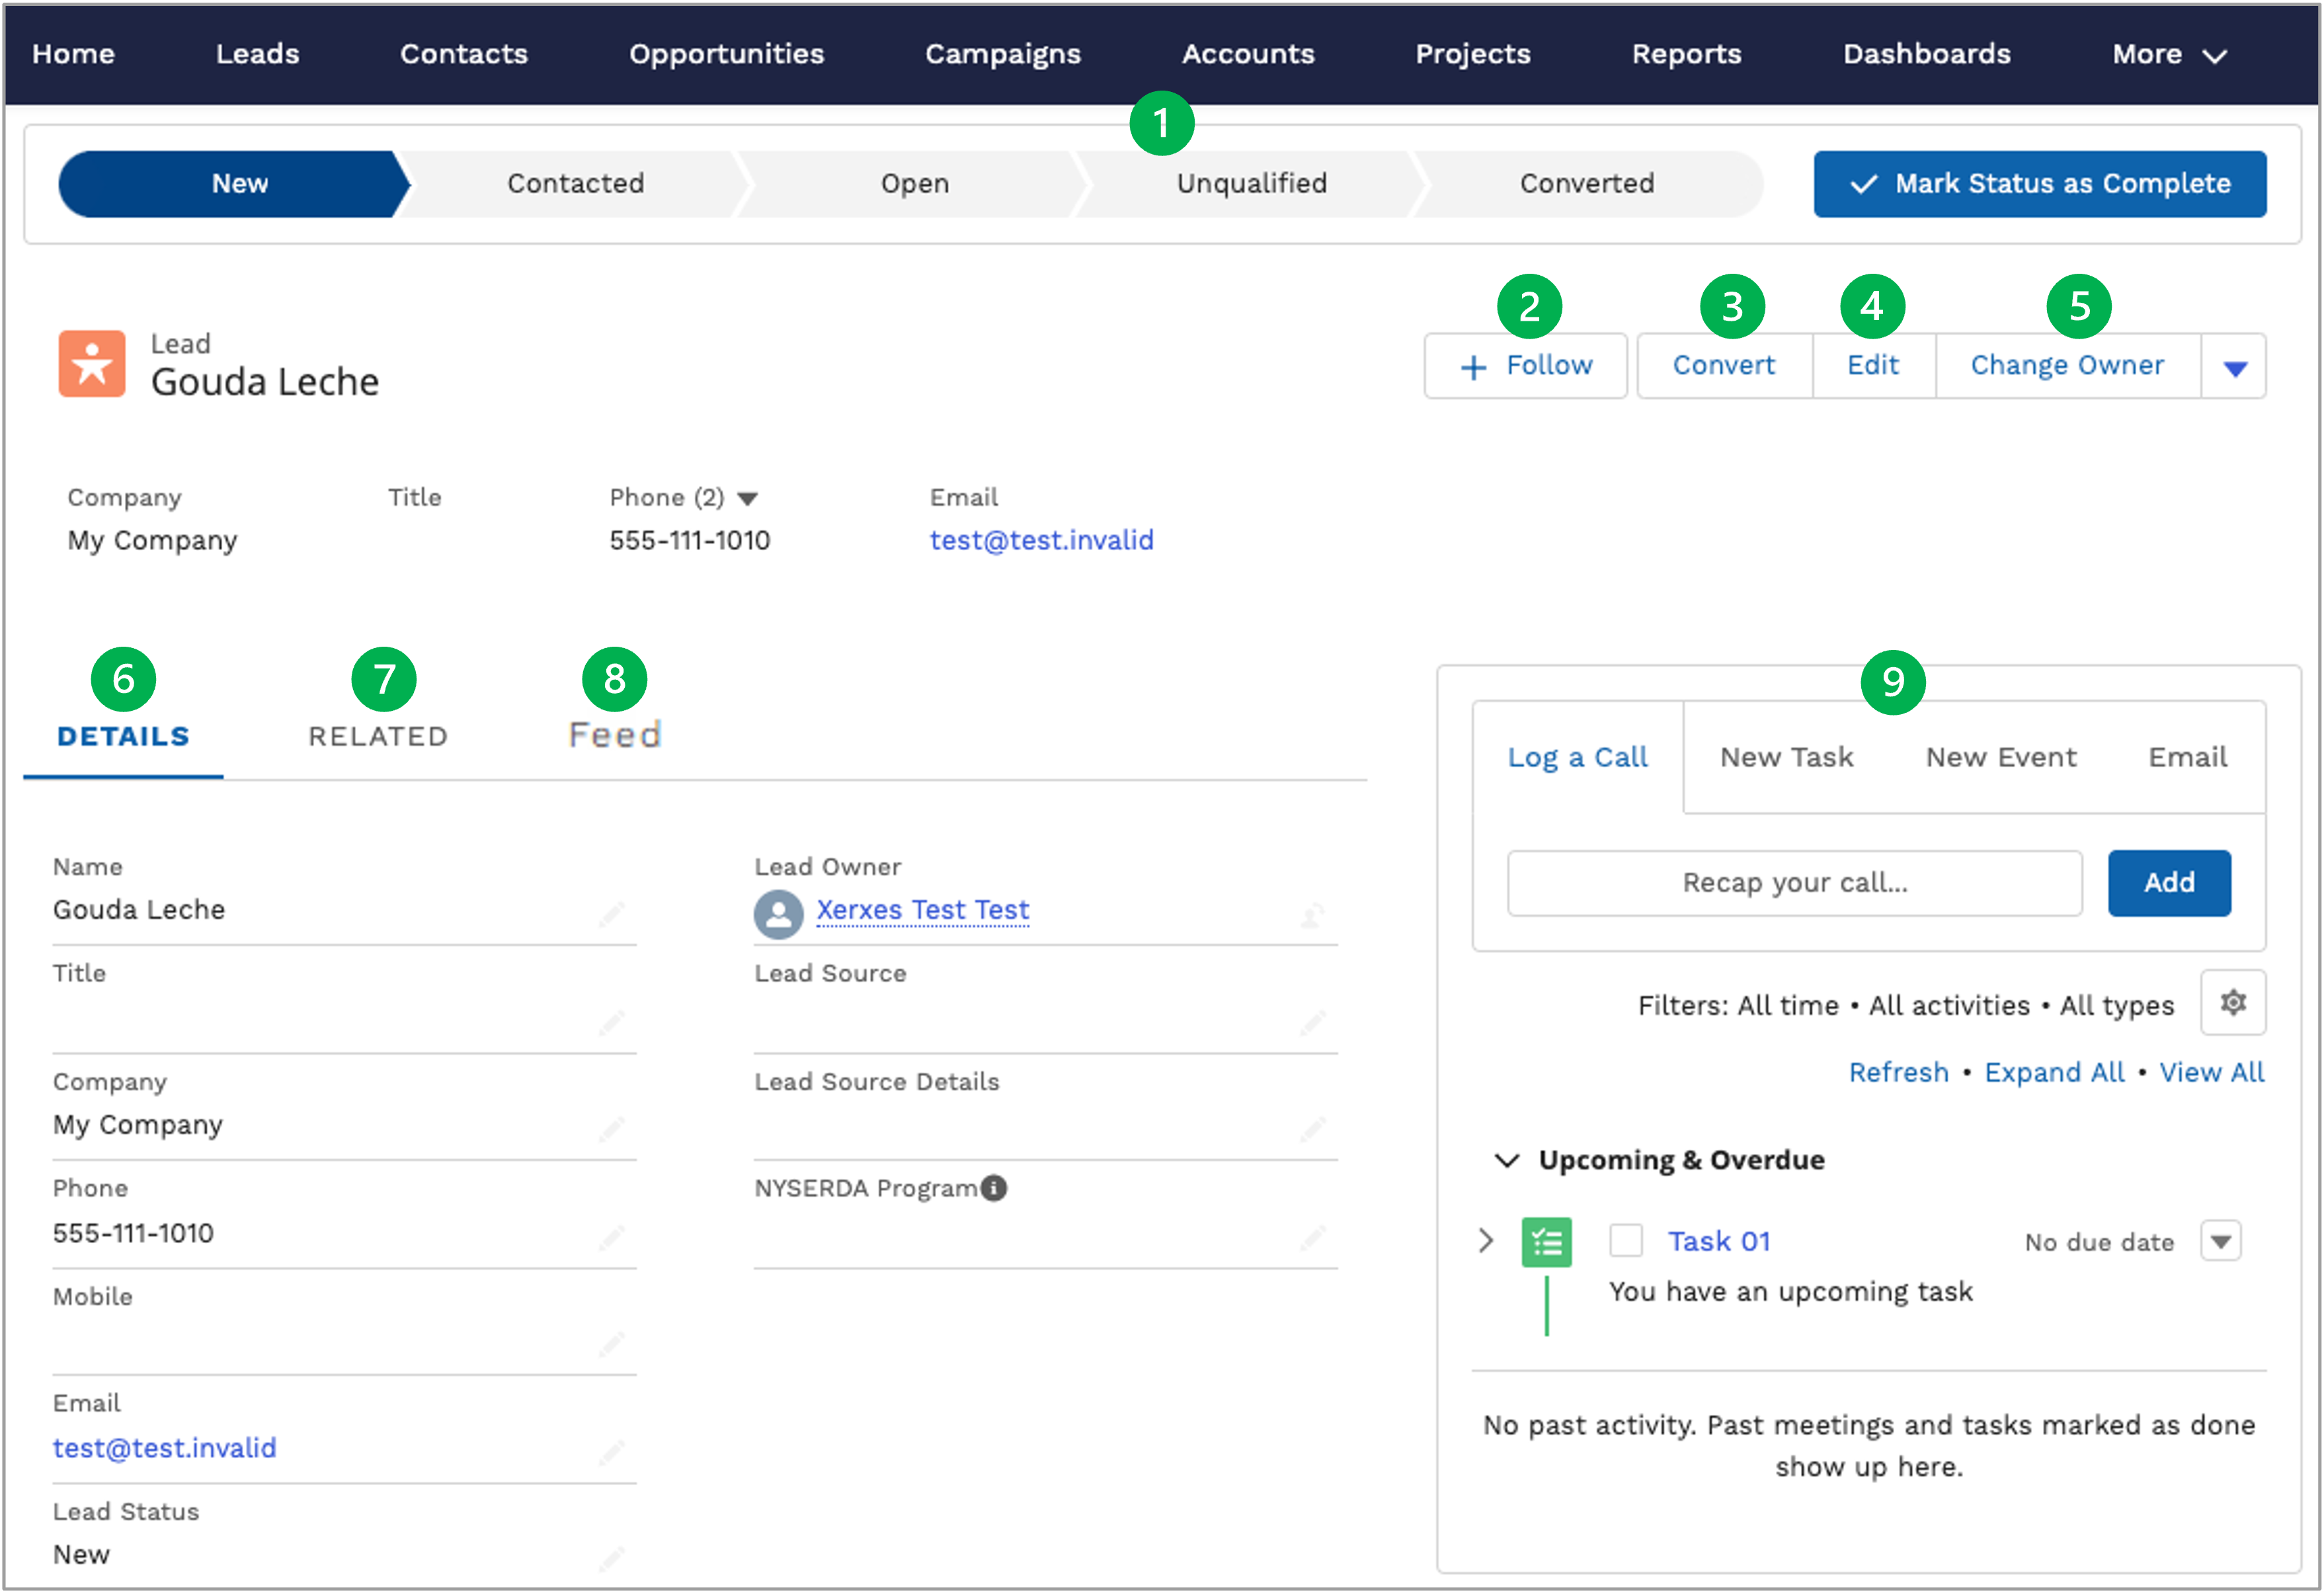
| 1 | Lead Status Conversion Tool
| A tool to move the lead through the conversion process. Either click the Mark Status as Complete to update the lead status to the next sequential status in the tool or click on a specific status and click on the same button to update the lead to the selected status. | Warning |
|---|
| Leads should not be converted using the Converted status button on this tool as it will not convert the Lead Record to a Contact Record. |
Lead Status Options and Definitions: - New: New lead created
- Contacted: Initial contact was made through email, text, phone call, etc.
- Open: Lead is interested in NYSERDA programs
- Unqualified: Lead will not move forward with applying to NYSERDA programs
- Converted: Lead converted to Contact, Opportunity, and Account.
|
|---|
| 2 | Follow Button | Reviewed on the Introduction Tab. |
|---|
| 3 | Convert Button | The correct method to convert a Lead Record to a Contact Record. Review the Converting Leads section below for more information. |
|---|
| 4 | Edit Button | Places the entire Lead Record into edit mode. Be sure to Save when all changes have been made. |
|---|
| 5 | Change Owner Button | The correct method of changing a Lead Record owner to an alternate Hub queue or Hub member. | Expand |
|---|
|
| Tip |
|---|
| The below video contains no sound. |
| Multimedia |
|---|
| name | ChangeLeadOwner.mp4 |
|---|
| width | 100% |
|---|
| height | 100% |
|---|
|
|
|
|---|
| 6 | Details Tab | Displays the Lead Record details that can be edits either through the pencil icon at the far right of any field in this tab or when using the Edit button in the controls at the top-right of this page. |
|---|
7
| Related Tab - Lead History | Displays the history of all changes to the Lead Record. |
|---|
| Related Tab - Activity History | Another mechanism to email the Lead by selecting the Send an Email button. | | Related Tab - Campaign History | Displays any campaign(s) the Lead Record has been associated with. Provides the ability to add the lead to existing campaigns and, if the lead is assigned to an individual Hub member and not a Hub queue, can create a new campaign at the same time. | Expand |
|---|
|
| Tip |
|---|
| The below video contains no sound. |
| Multimedia |
|---|
| name | Hubs Add to Campaign.mp4 |
|---|
| width | 100% |
|---|
| height | 100% |
|---|
|
|
| | Related Tab - Notes & Attachments | Displays any attachments uploaded to the Lead Record. Provides the ability to upload additional files. | Warning |
|---|
| Uploaded files must not contain any PPSI (Personal and Protected Sensitive Information) |
| | 8 | Feed Tab | Provides the ability to add an update to the Lead's Feed. Displays updated information to Users who Follow the Lead. |
|---|
| 9 | Quick Tools | Provides access to Log Calls, Create New Tasks, Create New Events, and Send Emails and links any of these record types to the Lead Record. These functions are reviewing in the Introduction Tab. Upcoming or overdue Tasks will appear in this section as well. |
|---|
|
| UI Expand |
|---|
|
| Info |
|---|
| | When a Lead Record is ready to be converted into a Contact Record it is important that Hubs use the Convert Button on any Lead Record. Any other mechanism used to convert a lead will not work. When converting a lead, the system will also either create a related Account Record and Opportunity Record or will ask to assign the converted lead (Contact Record) to an existing Account Record and Opportunity Record. |
| UI Steps |
|---|
|
| UI Step |
|---|
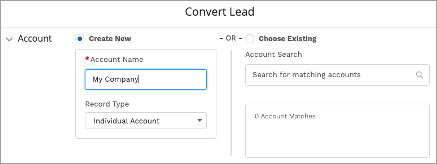
At the top of the Convert Lead screen, input an Account Name for the lead (this is the Person or Company Name), being sure to switch the record type to Individual Account (if a person) and Business Account (if a business). If the lead should be associated with an existing Account Record, click the Choose Existing radio button to search for and locate the existing Account Record. | Expand |
|---|
| 
|
|
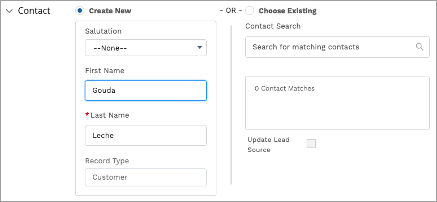
| UI Step |
|---|
Next, update any of the Contact fields as needed. If the lead should be associated with an existing Contact Record, click the Choose Existing radio button to search for and locate the existing Contact Record. In most cases a new Contact Record will be created. | Expand |
|---|
| 
|
|
| UI Step |
|---|
Then, input the Opportunity Name. It is best practice to input an opportunity name that easily identifies a specific NYSERDA Program the customer is interested in. Account Records and Contact Records can have multiple opportunities and the person's First and Last Name (ex. Bilbo Baggins - Empower +). If the lead should be associated with an existing Opportunity Record, click the Choose Existing radio button to search for and locate the existing Opportunity Record. | Tip |
|---|
If you prefer to not create an opportunity upon conversion, a check box is available under the Create New field. |
| Expand |
|---|
| 
|
|
| UI Step |
|---|
Finally, update the Record Owner to an alternate Hub member or Hub queue if required. Leave the Converted Status field to the default Qualified option and click Convert. | Expand |
|---|
| 
|
|
| UI Step |
|---|
Once converted, the Salesforce CFM Portal will create any required records and/or link created records to existing ones based on the options chosen in the previous steps. Confirm the record creation/linkages on the next window. | Expand |
|---|
| 
|
|
| UI Step |
|---|
The converted lead confirmation window can be closed. Additionally, use the buttons on the bottom right to Create New Tasks that will be automatically linked to the account, contact, and opportunity records, or click Go to Leads to return to the leads page. |
|
|
| UI Expand |
|---|
| title | Related Training Video |
|---|
| | Multimedia |
|---|
| name | HUBS Creating and Converting Leads.mp4 |
|---|
| width | 100% |
|---|
| height | 100% |
|---|
|
|
|
| Aura - Tab |
|---|
|
| Panel |
|---|
| borderColor | #002D72 |
|---|
| bgColor | #F3F4F9 |
|---|
| titleColor | #ffffff |
|---|
| borderWidth | 1 |
|---|
| titleBGColor | #002D72 |
|---|
| borderStyle | none |
|---|
| title | Creating & Managing Contacts |
|---|
|
|
| UI Expand |
|---|
| title | Contacts CRM Portal Page |
|---|
|
| Column |
|---|
| 
| Page Options | Description/Function |
|---|
| 1 | Contacts List Views | Groups Contacts into helpful queues for easy review and access. Click the current queue to open the drop-down to select other available queues. Use the Pin icon to set a different queue as the default when accessing this page. |
|---|
| 2 | Search List Field | Filter the visible Contact list below based on the search parameters. |
|---|
| 3 | New Contacts Button | Opens a modal window to create a new contact. New contacts are automatically added to the current users My Contacts queue. Please review the Create New Contact section below for more information. |
|---|
| 4 | Add to Campaign | Associates any number of contacts on the current list to an active campaign. Individual contacts on the contact list must be selected first using the checkbox to the left of any contact name. Review the Add to Campaign information in the Contact Record section below to learn how to assign contacts to campaigns. |
|---|
| 5 | Contacts List | A list of all Contacts in the currently selected queue. Access a specific Contact Record by clicking the name link in the Name Column. |
|---|
|
|
| UI Expand |
|---|
|
| Section |
|---|
| Column |
|---|
|
| UI Steps |
|---|
|
| UI Step |
|---|
Complete as many fields as possible when creating a New Contact noting that fields marked with a red asterisk are required and must be completed before the lead can be created. The following are required fields: - First Name
- Last Name
- Email Address
- Phone Number
|
| UI Step |
|---|
Some fields have a small grey circular Information Icon. Hovering the cursor over this icon will display a tooltip with helpful information for that field. |
| UI Step |
|---|
Use the Search Address box to locate and populate the rest of the mailing address fields. |
| UI Step |
|---|
Click Save & New to save the Contact Record and generate a blank new contact form. |
|
|
| Column |
|---|
| 
|
|
|
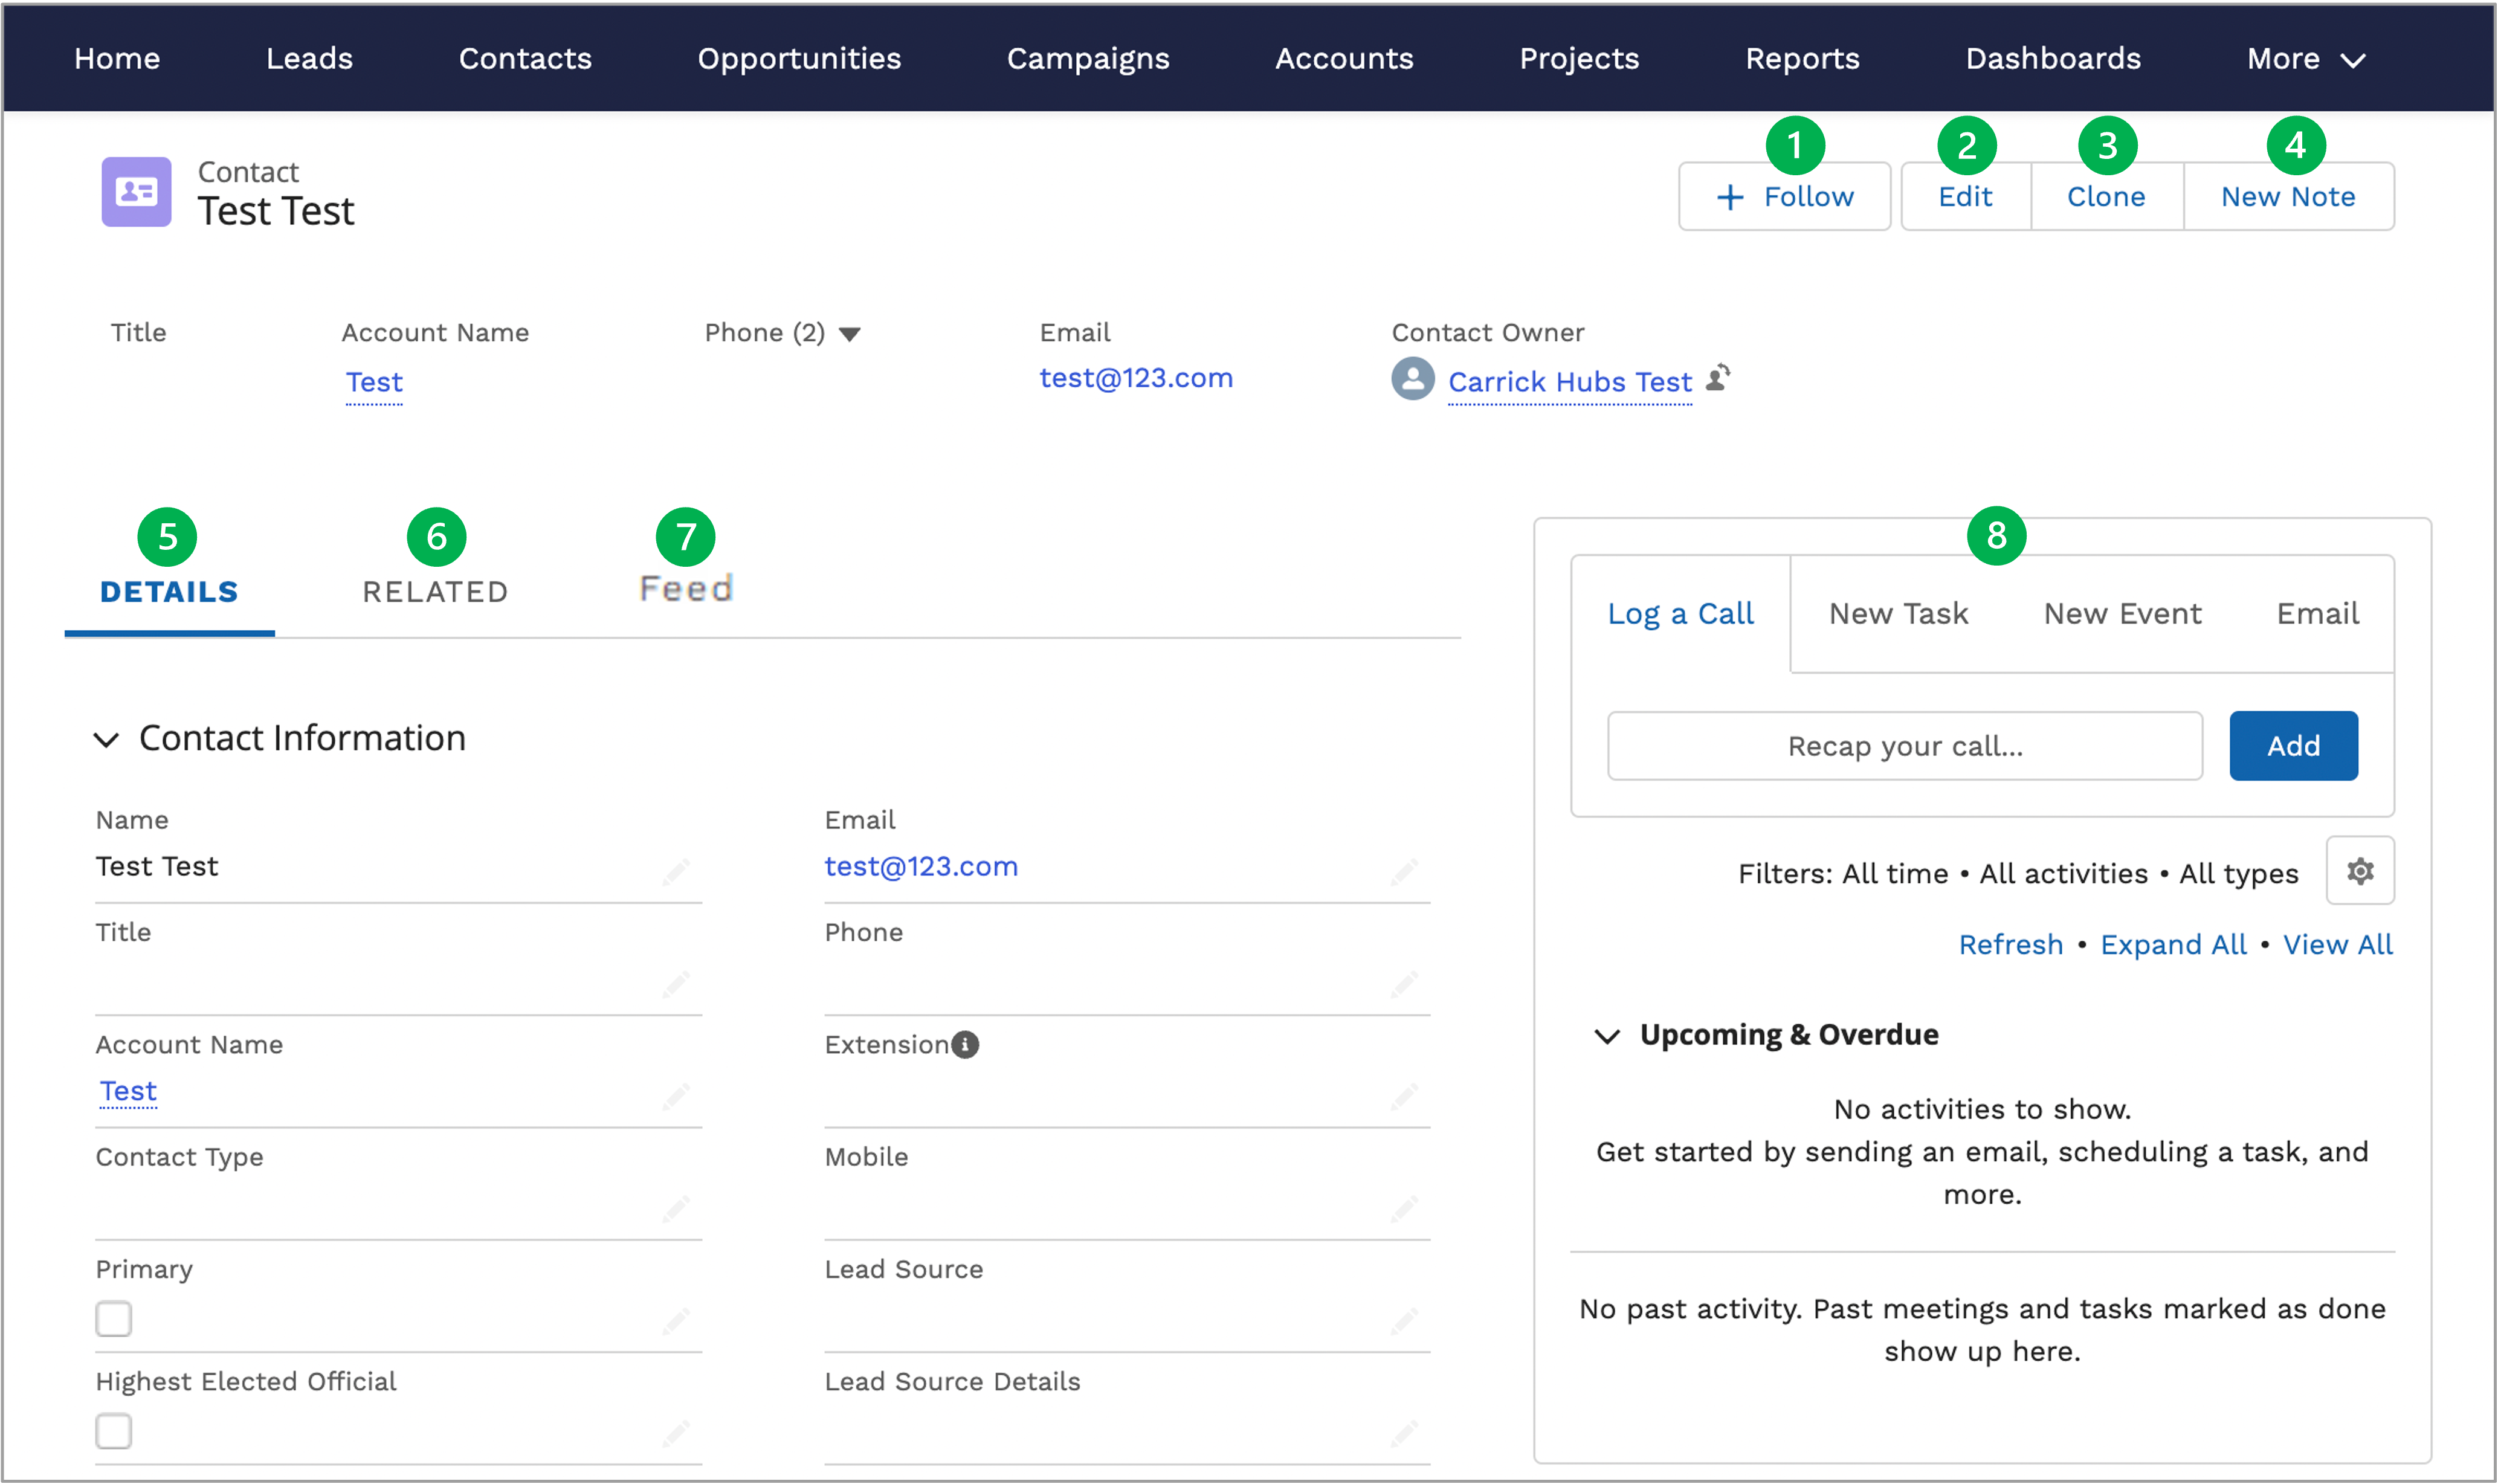
| UI Expand |
|---|
| 
| Record Options | Description/Function |
|---|
| 1 | | Reviewed on the Introduction Tab. |
|---|
| 2 | Edit Button | Places the entire Contact Record into edit mode. Be sure to Save when all changes have been made. |
|---|
| 3 | Clone Button | Can be used to create an exact duplicate of this record. This may be a useful tool when creating an additional contact with similar information, such as a shared address. |
|---|
| 4 | New Note | Notes are a useful way to add any additional context to a Contact record that may be helpful for you or other Hub members. Notes, once created, can be found in the Related tab on each Contact record. |
|---|
| 5 | Details Tab | Displays the Contact Record details that can be edited either through the pencil icon at the far right of any field in this tab or when using the Edit button in the controls at the top-right of this page. |
|---|
6
| Related Tab - Opportunities | Allows new opportunities to be created and automatically assigned to the current Contact Record. The process to create a new opportunity is outlined in the Create New Opportunity section in the Opportunities Tab to the left. Follow the instructions there to learn how to create an opportunity for a specific Contact Record. |
|---|
| Related Tab - Campaign History | Displays any campaign(s) the Contact Record has been associated with. Provides the ability to add the lead to existing campaigns and, if the lead is assigned to an individual Hub member and not a Hub queue, can create a new campaign at the same time. | Expand |
|---|
|
| Tip |
|---|
| The below video contains no sound. |
| Warning |
|---|
Though the the below video was taken from the Add to Campaign option in the Lead Record, the process is the same as would be conducted in the Contact Record. |
| Multimedia |
|---|
| name | Hubs Add to Campaign.mp4 |
|---|
| width | 100% |
|---|
| height | 100% |
|---|
|
|
| | Related Tab - Contact History | Displays the contact history for every logged call. | | Related Tab - Notes & Attachments | Displays any attachments uploaded to the Lead Record. Provides the ability to upload additional files. | Warning |
|---|
| Uploaded files must not contain any PPSI (Personal and Protected Sensitive Information) |
| | Related Tab - Notes | Displays Notes created from the Notes button on the Details tab. | | 7 | Feed Tab | Provides the ability to add an update to the Contact Feed. Displays updated information to Users who Follow the Contact. |
|---|
| 8 | Quick Tools | Provides access to Log Calls, Create New Tasks, Create New Events, and Send Emails and links any of these record types to the Contact Record. These functions are reviewing in the Introduction Tab. Upcoming or overdue Tasks will appear in this section as well. |
|---|
|
| UI Expand |
|---|
| title | Related Training Video |
|---|
| | Multimedia |
|---|
| name | HUBS Creating and Managing Contacts.mp4 |
|---|
| width | 100% |
|---|
| height | 100% |
|---|
|
|
|
| Aura - Tab |
|---|
|
| Panel |
|---|
| borderColor | #002D72 |
|---|
| bgColor | #F3F4F9 |
|---|
| titleColor | #ffffff |
|---|
| borderWidth | 1 |
|---|
| titleBGColor | #002D72 |
|---|
| borderStyle | none |
|---|
| title | Creating Opportunities |
|---|
|
|
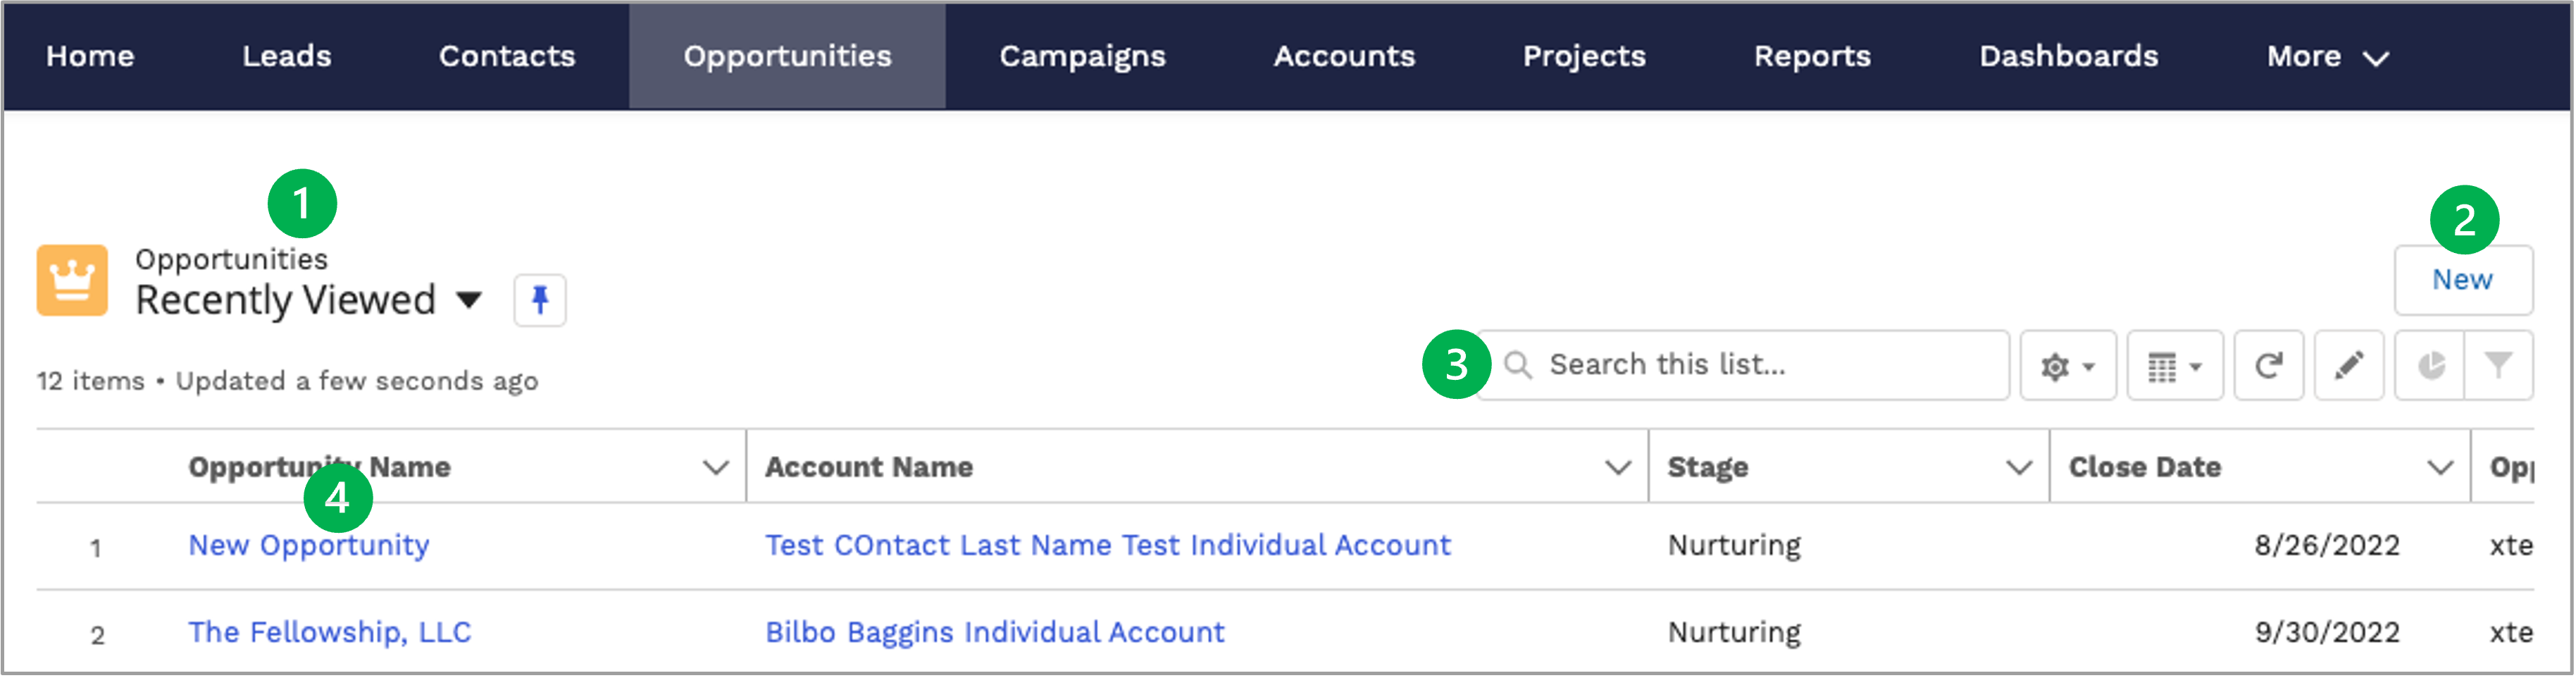
| UI Expand |
|---|
| title | Opportunities CRM Portal Page |
|---|
|
| Column |
|---|
| 
| Page Options | Description/Function |
|---|
| 1 | Opportunities List Views | Groups Opportunities into helpful queues for easy review and access. Click the current queue to open the drop-down to select other available queues. Use the Pin icon to set a different queue as the default when accessing this page. | | 2 | New Opportunities Button | Opens a modal window to create a new Opportunity. New Opportunities are automatically added to the current users My Opportunity queue. Please review the Create New Opportunity section below for more information. | | 3 | Search List Field | Filter the visible Opportunities list below based on the search parameters. | | 4 | Opportunities List | A list of all Opportunities in the currently selected queue. Access a specific Opportunities Record by clicking the name link in the Name Column. | | 5 | Printable View Button | Generates a document of the current lead queue that can be printed. |
|
|
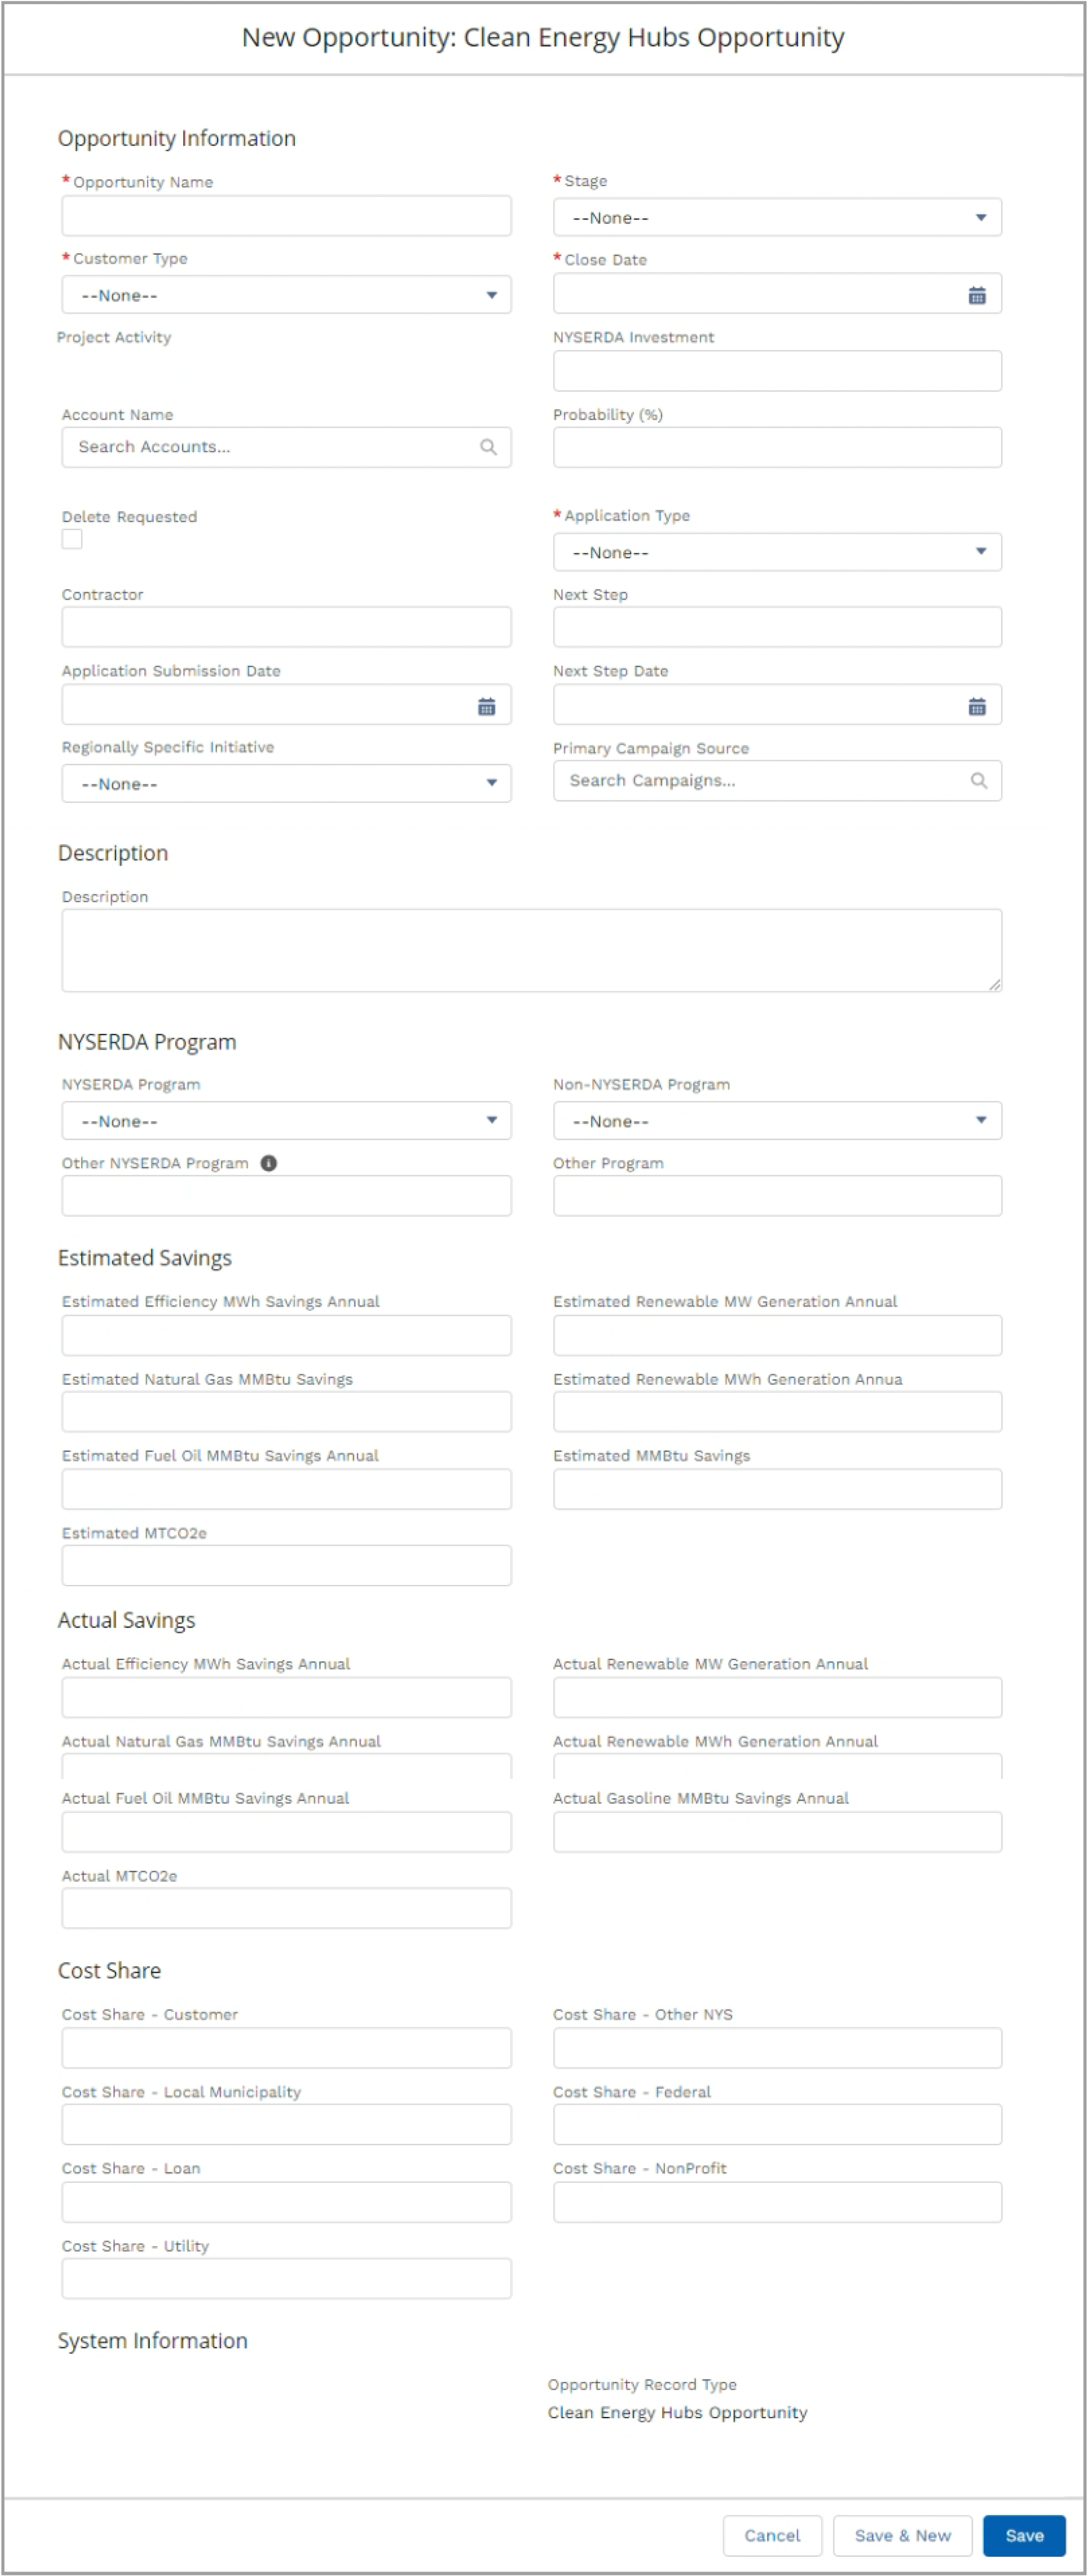
| UI Expand |
|---|
| title | Create New Opportunity |
|---|
|
| Info |
|---|
When creating an Opportunity without using the conversion process, the Account should be the Contact's Account. This will keep it consistent with the Opportunities that get created from the conversion process and allow the Account to connect the Contact and Opportunity. |
| Section |
|---|
| Column |
|---|
|
| UI Steps |
|---|
|
| UI Step |
|---|
Complete as many fields as possible when creating a New Opportunity noting that fields marked with a red asterisk are required and must be completed before the opportunity can be created. | Expand |
|---|
| title | tips on required fields |
|---|
|
| Required Fields | Tip |
|---|
Application Type | Select: - Audit: Ex. Energy Audit and Assessment
- Grant: Ex. Empower +
- Loan: Ex. Financing Program
- Not Applicable
- NYSERDA Solicitation
|
|---|
Opportunity Name | Opportunities should be named by identifying the Customer's First and Last Name and the Program or Opportunity they are interested in (ex. Bilbo Baggins - Empower +). |
|---|
Stage |
|
|---|
Customer Type | Select one of the following: - Market rate
- Multifamily
- Not-for-profit
- Residential
- Small Commercial
- Partner
- Contractor/Installer
- Builder
- Trainer
- Referral.
|
|---|
Close Date | Estimate closing date for opportunity. Can be adjusted, if needed. | Warning |
|---|
For NYC Hubs are required to use the NYC Hub Selection field to differentiate which NYC Hub entered the Opportunity. |
|
|---|
|
|
| UI Step |
|---|
Some fields have a small grey circular Information Icon. Hovering the cursor over this icon will display a tooltip with helpful information for that field. |
| UI Step |
|---|
Use the Account Name field to locate and relate the opportunity to a specific account. | Warning |
|---|
Ensure the correct Contact Account account is identified to connect the Contact and Opportunity. |
|
| UI Step |
|---|
Set the Stage drop-down to Nurturing if this is a brand new opportunity or to any other Stage as appropriate for the specific opportunity. | Expand |
|---|
| title | tips on stage options |
|---|
|
| Stage Option | Descriptions |
|---|
| Nurturing | Growing relationship with Contact. |
|---|
| Application in Development: | Assisting with application development. |
|---|
| Application Submitted | Contact has submitted application. |
|---|
| Application Approved | Contact application has been approved |
|---|
| Project Contracted | Contact has been connected with a Contractor. |
|---|
Project Completed | Project is complete. |
|---|
| Application Withdrawn | Application was withdrawn. |
|---|
| Closed - Customer Ineligible | Contact was not eligible for program or resource the opportunity was closed. | Warning |
|---|
Do not delete the Opportunity. A Contact might return at a later date to the Hub for assistance regarding this Opportunity, at which point the Stage would change. |
|
|---|
| Closed - Customer Not Responsive | Contact was not responsive the opportunity was closed. | Warning |
|---|
Do not delete the Opportunity. A Contact might return at a later date to the Hub for assistance regarding this Opportunity, at which point the Stage would change. |
|
|---|
| Deferred | Contact deferred the Opportunity for another time. |
|---|
|
|
| UI Step |
|---|
Document the opportunity type in either the NYSERDA Program or Non-NYSERDA Program orOther Program drop-down fields. If the opportunity does not appear on either of those drop-down fields, use the Other NYSERDA Program field to type in the opportunity. | Warning |
|---|
Although selecting a NYSERDA Program or Non-NYSERDA Program is not required you must identify which program or resource you are connecting a Contact to. Each Opportunity must contain ONLY one program or resource identified for a Customer. If braiding or stacking programs for a Customer you must separately enter those programs or resources as opportunities. |
|
| UI Step |
|---|
Click Save & New to save the Opportunity Record and generate a blank new opportunity form. |
| UI Step |
|---|
New Opportunities are automatically assigned and only visible to the opportunity creator. |
|
|
| Column |
|---|
| 
|
|
|
| UI Expand |
|---|
| 
| Record Options | Description/Function |
|---|
| 1 | Opportunity Status Conversion Tool
| A tool to move the Opportunity through the conversion process. Either click the Mark Status as Complete to update the opportunity status to the next sequential status in the tool or click on a specific status and click on the same button to update the lead to the selected status. Review the Converting Opportunities section below to learn more.
| Tip |
|---|
Stages can also be changed within the Details tab in the Stages field. These are the same Stages found in the Create New Opportunity tab. If updating Stages in the Details tab there are additional stage selections than provided with the Opportunity Status Conversion Tools. Those additional stage selections are identified and defined in the Create New Opportunity tab. |
Opportunity Status Options and Definitions: - Nurturing - Growing relationship with Contact.
- Application in Development - Assisting with application development.
- Application Submitted - Contact has submitted application.
- Application Approved - Contact application has been approved.
- Project Contracted - Contact has been connected with a Contractor.
- Application Withdrawn - Application was withdrawn.
- Closed - Opportunity was closed.
| Warning |
|---|
Do not delete the Opportunity. A Contact might return at a later date to the Hub for assistance regarding this Opportunity, at which point the Stage would change. |
|
|---|
| 2 | Follow Button | Reviewed on the Introduction Tab. |
|---|
| 3 | Edit Button | Places the entire Opportunity Record into edit mode. Be sure to Save when all changes have been made. |
|---|
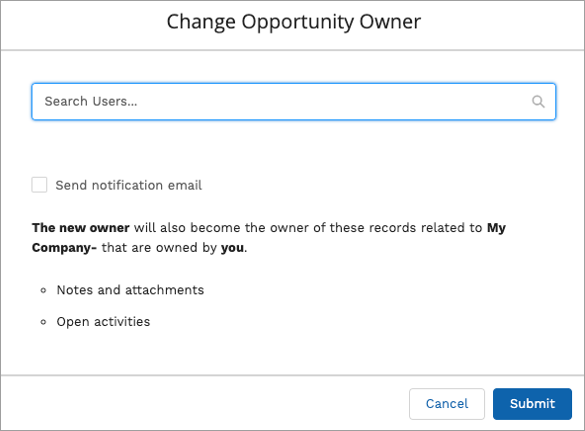
| 4 | Change Owner Button | The correct method of changing an Opportunity Record owner to an alternate Hub member. Use the Search Users field to search for and locate an alternate Hub member that should become the owner of the Opportunity Record. Check the Send Notification Email box to send the new owner an email notification of the change. | Expand |
|---|
| 
|
|
|---|
| 5 | Change Record Type | Record Type identifies which NYSERDA Program the Opportunity belongs to. When a new Opportunity is created the record type is selected by the User. There are two record type options Clean Energy Hubs Opportunity and CEEP Legacy. All record typed created by the Hubs should be Clean Energy Hubs Opportunity. CEEP Legacy record types refer to CEEP contacts that have been migrated over to the CRM system. |
|---|
| 6 | Details Tab | Displays the Opportunity Record details that can be edits either through the pencil icon at the far right of any field in this tab or when using the Edit button in the controls at the top-right of this page. |
|---|
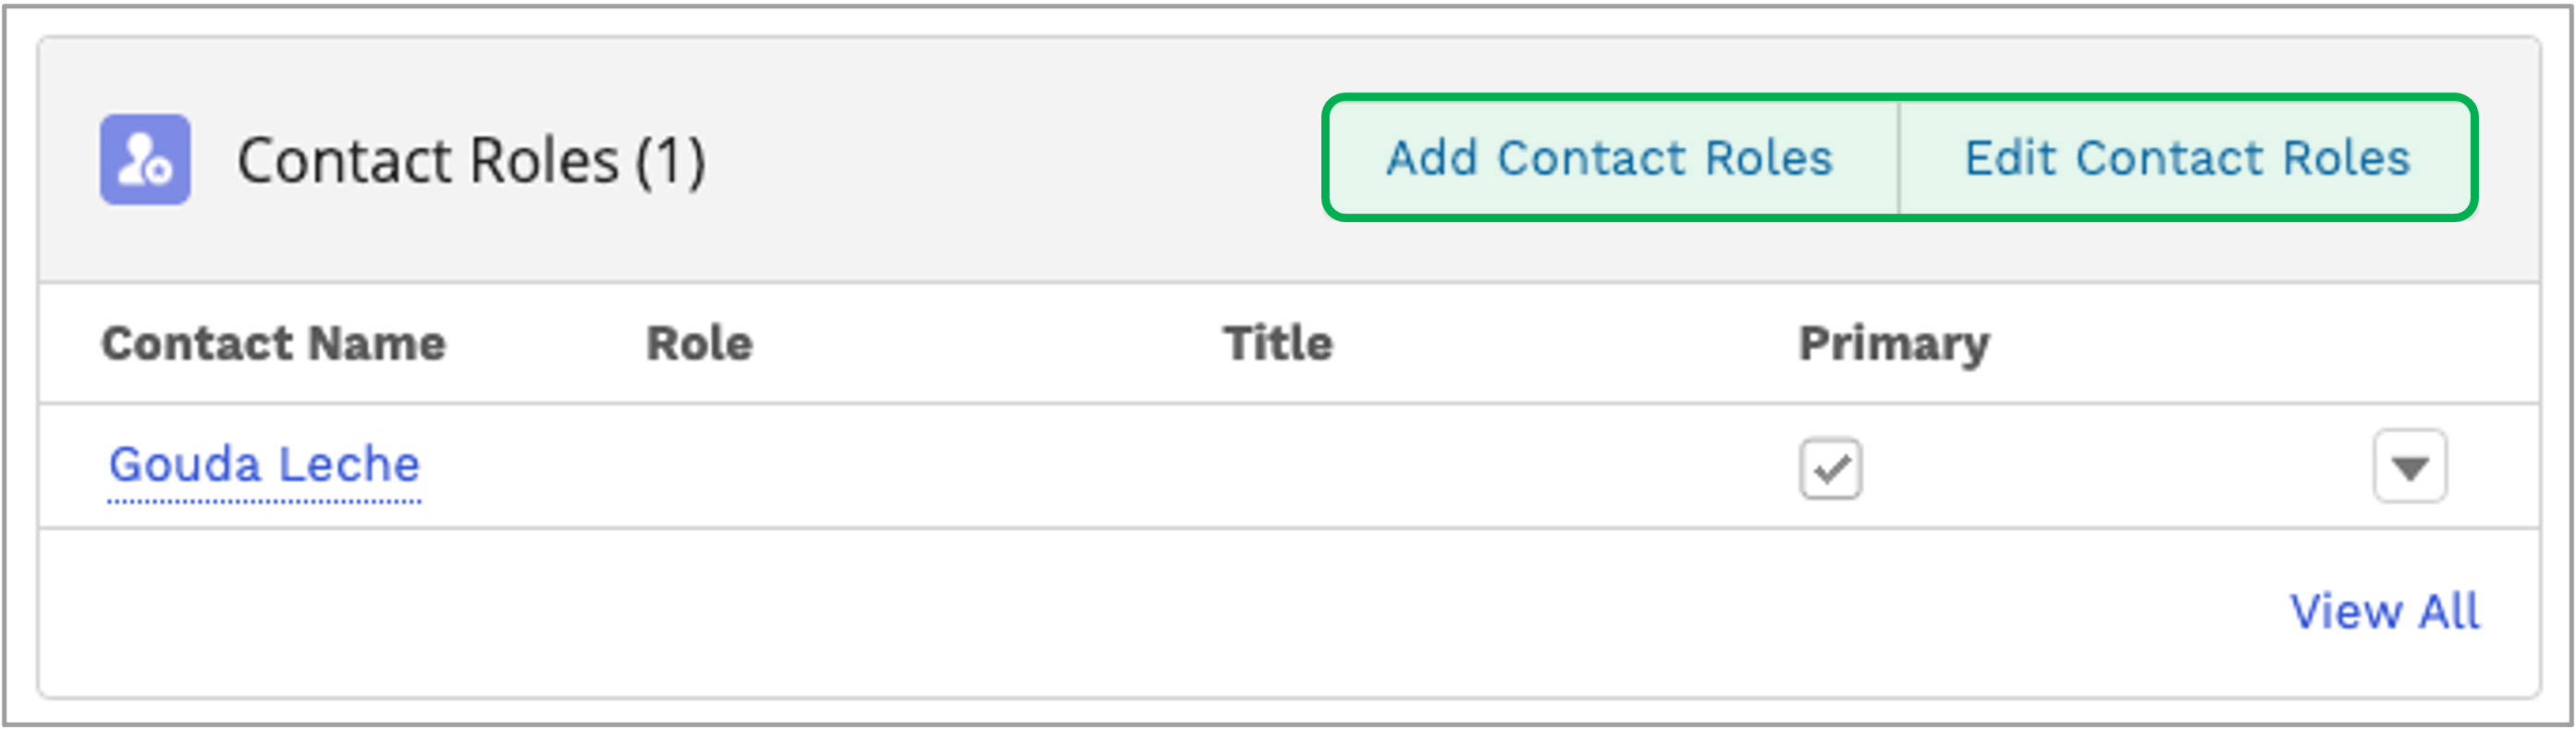
| 7 | Related Tab - Contact Role | Use the Add Contact Roles button to assign existing Contact Records to the current Opportunity Record. Additionally, use the Edit Contact Roles button to update the role an assigned Contact plays with respect to the opportunity (i.e., if the contact is the decision-maker, select that role option from the list when Editing Contact Roles. | Expand |
|---|
| 
|
|
|---|
| 8 | Feed Tab | Provides the ability to add an update to the Opportunity Feed. Displays updated information to Users who Follow the Opportunity. |
|---|
| 9 | Quick Tools | Provides access to Log Calls, Create New Tasks, Create New Events, and Send Emails and links any of these record types to the Opportunity Record. These functions are reviewing in the Introduction Tab. Upcoming or overdue Tasks will appear in this section as well. |
|---|
|
| UI Expand |
|---|
| title | Related Training Video |
|---|
| | Multimedia |
|---|
| name | HUBS Creating Opportunities.mp4 |
|---|
| width | 100% |
|---|
| height | 100% |
|---|
|
|
|
| Aura - Tab |
|---|
|
| Panel |
|---|
| borderColor | #002D72 |
|---|
| bgColor | #F3F4F9 |
|---|
| titleColor | #ffffff |
|---|
| borderWidth | 1 |
|---|
| titleBGColor | #002D72 |
|---|
| borderStyle | none |
|---|
| title | Managing Campaigns |
|---|
|
|
| Info |
|---|
Campaigns are a helpful tool to group Contact, Leads, Opportunities, and Accounts into categories determined by the Hubs. Sample categories include Multifamily, Single Family, Commercial, Small Business, Events, etc. |
| UI Expand |
|---|
| title | Campaigns CRM Portal Page |
|---|
| 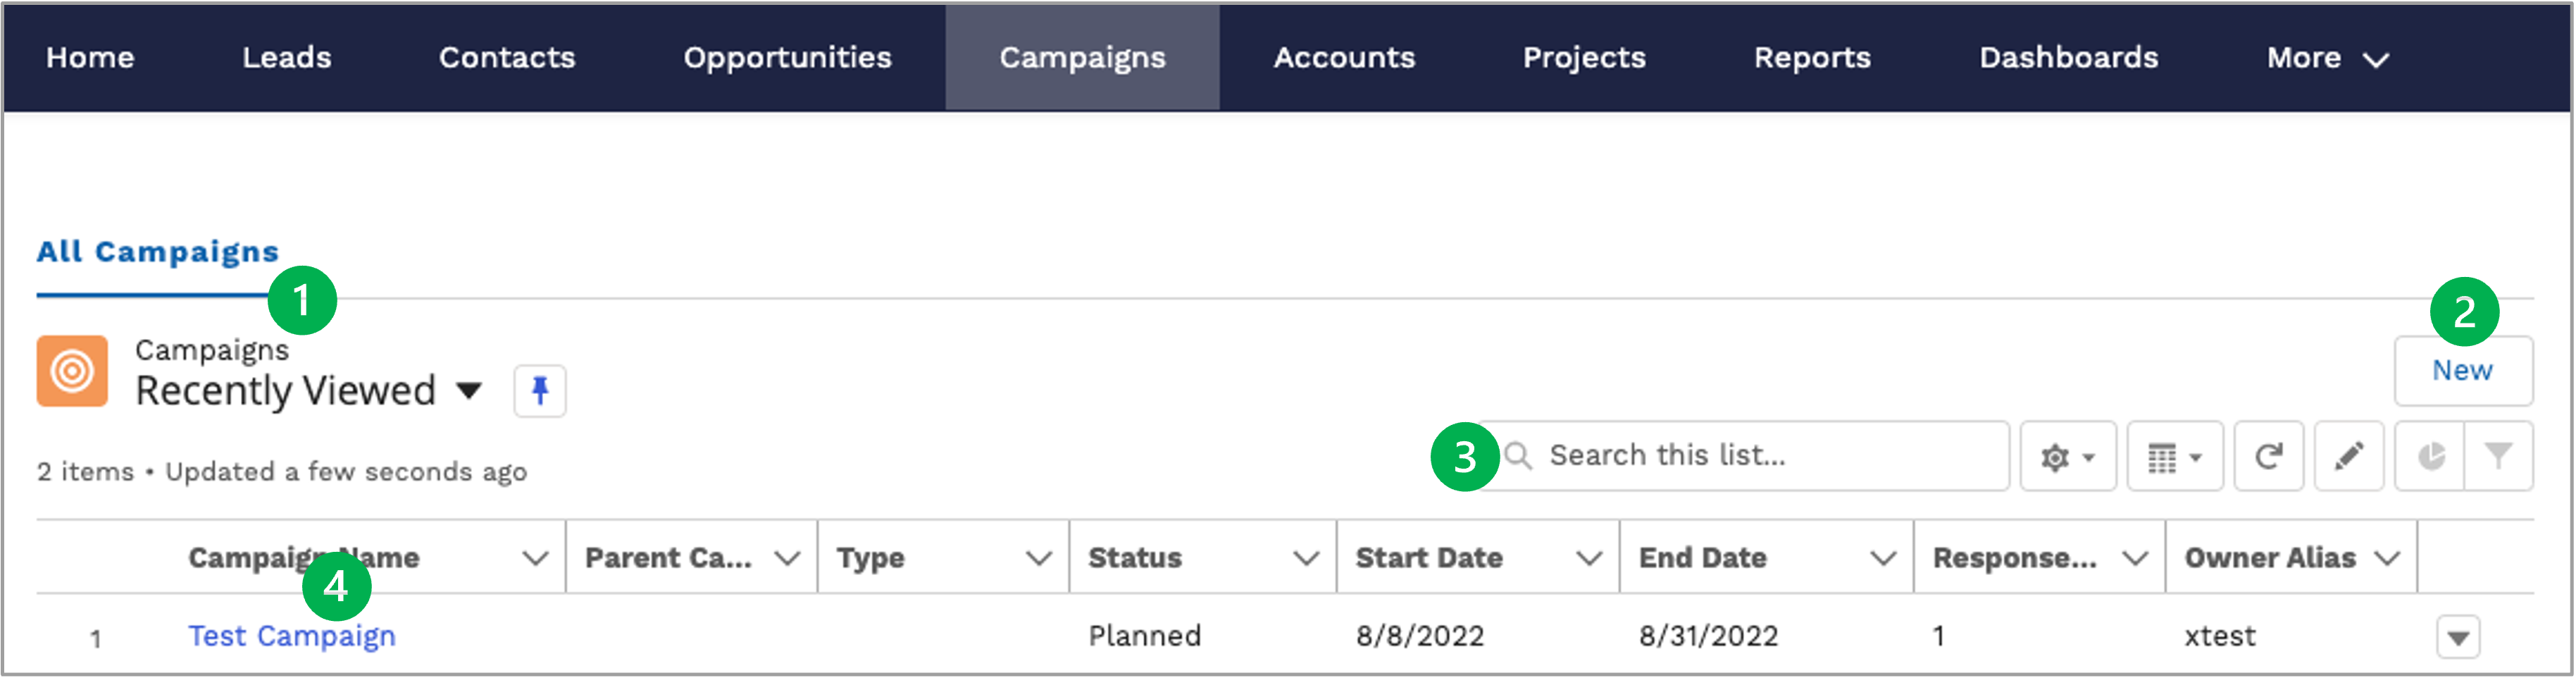
| Page Options | Description/Function |
|---|
| 1 | Campaigns List Views | Groups Campaigns into helpful queues for easy review and access. Click the current queue to open the drop-down to select other available queues. Use the Pin icon to set a different queue as the default when accessing this page. |
|---|
| 2 | New Campaign Button | Opens a modal window to create a new Campaign. New Campaigns are automatically added to the current users My Campaigns queue. Please review the Create New Campaign section below for more information. |
|---|
| 3 | Search List Field | Filter the visible lead list below based on the search parameters. |
|---|
| 4 | Campaigns List | A list of all Campaigns in the currently selected queue. Access a specific Campaign Record by clicking the name link in the Name Column. |
|---|
|
| UI Expand |
|---|
|
| Section |
|---|
| Column |
|---|
|
| UI Steps |
|---|
|
| UI Step |
|---|
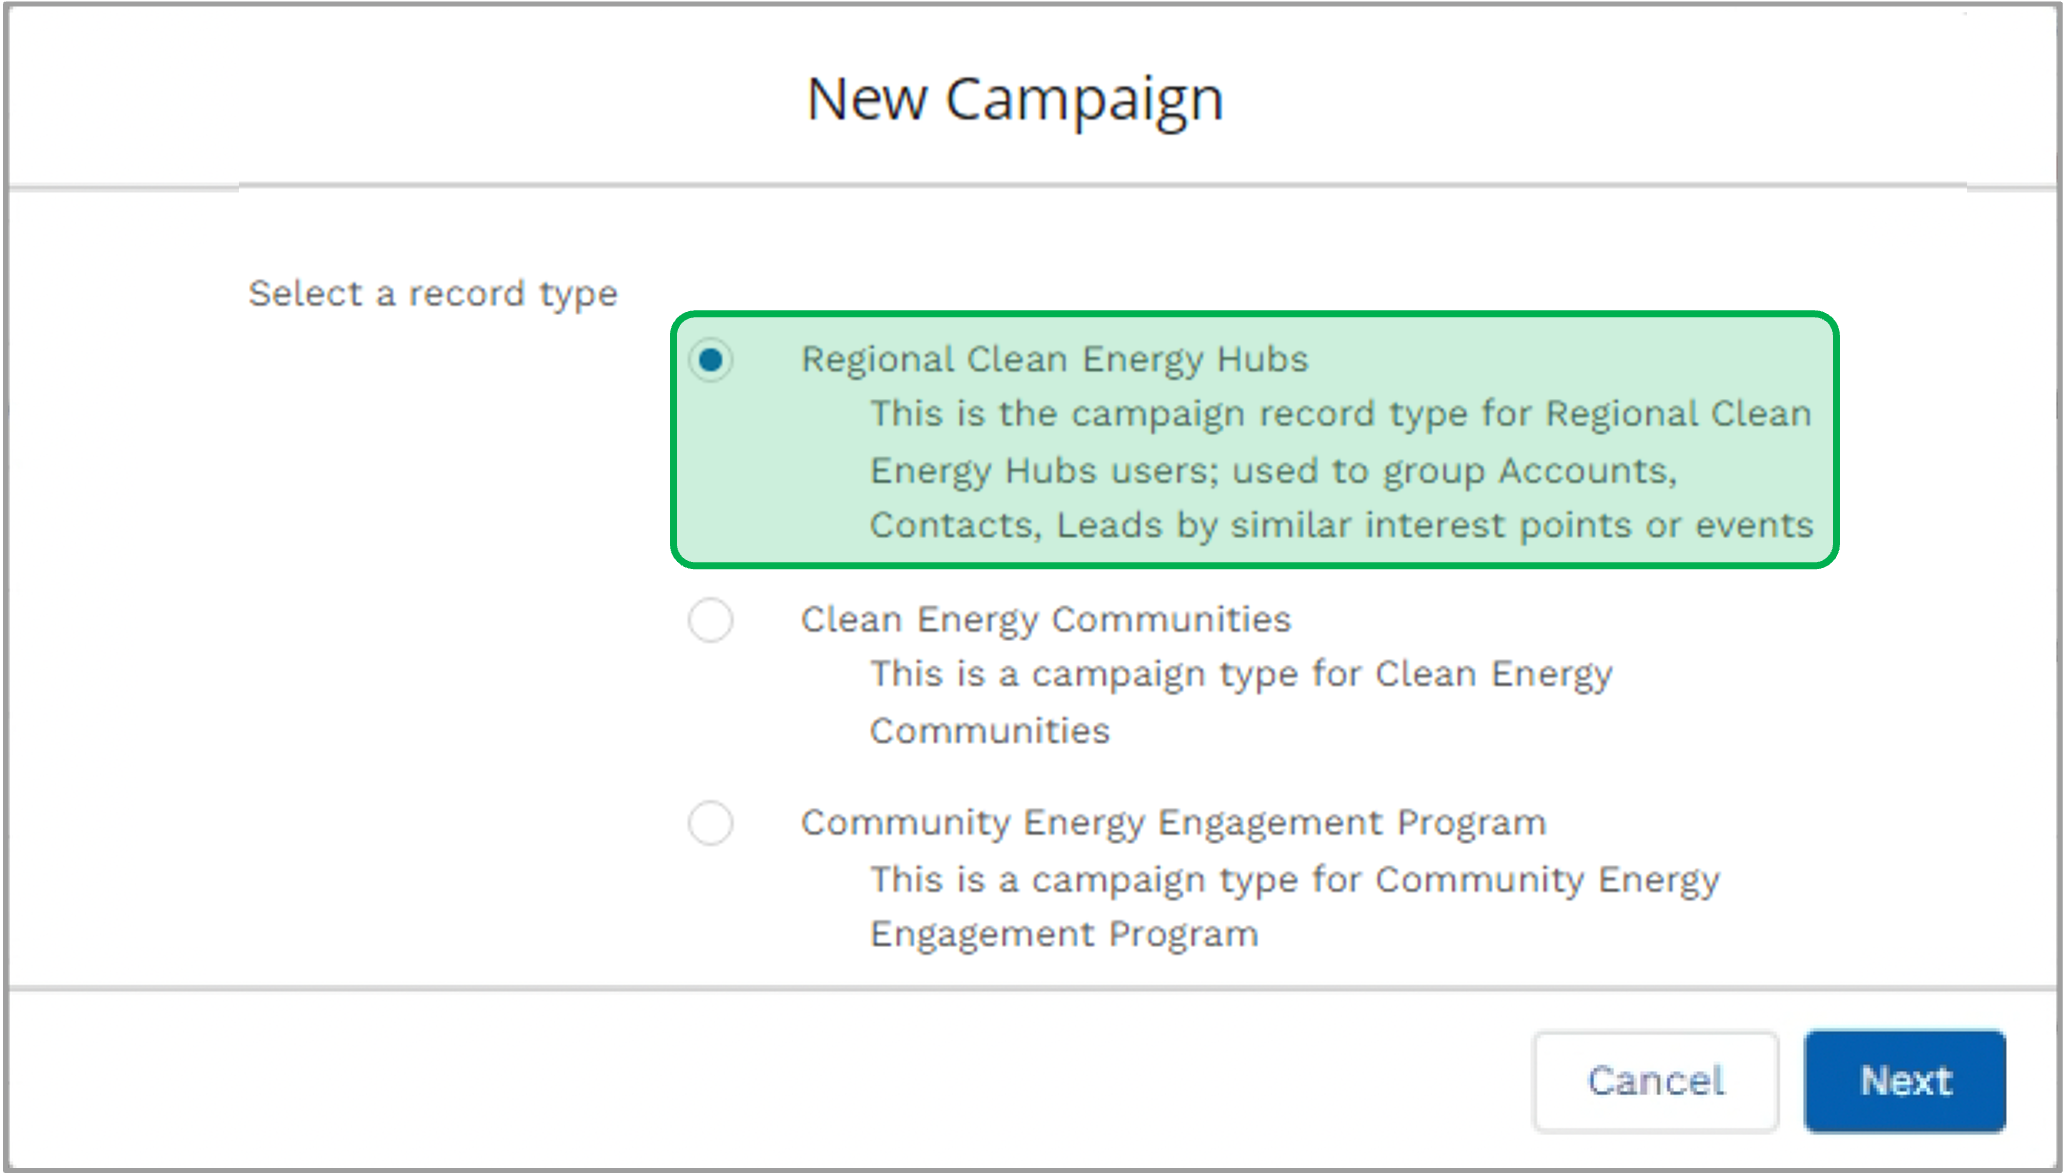
When creating a new Campaign, the Select a Record Type window will pop-up. Only select the Regional Clean Energy Hubs as the option and click Next. | Expand |
|---|
| 
|
|
| UI Step |
|---|
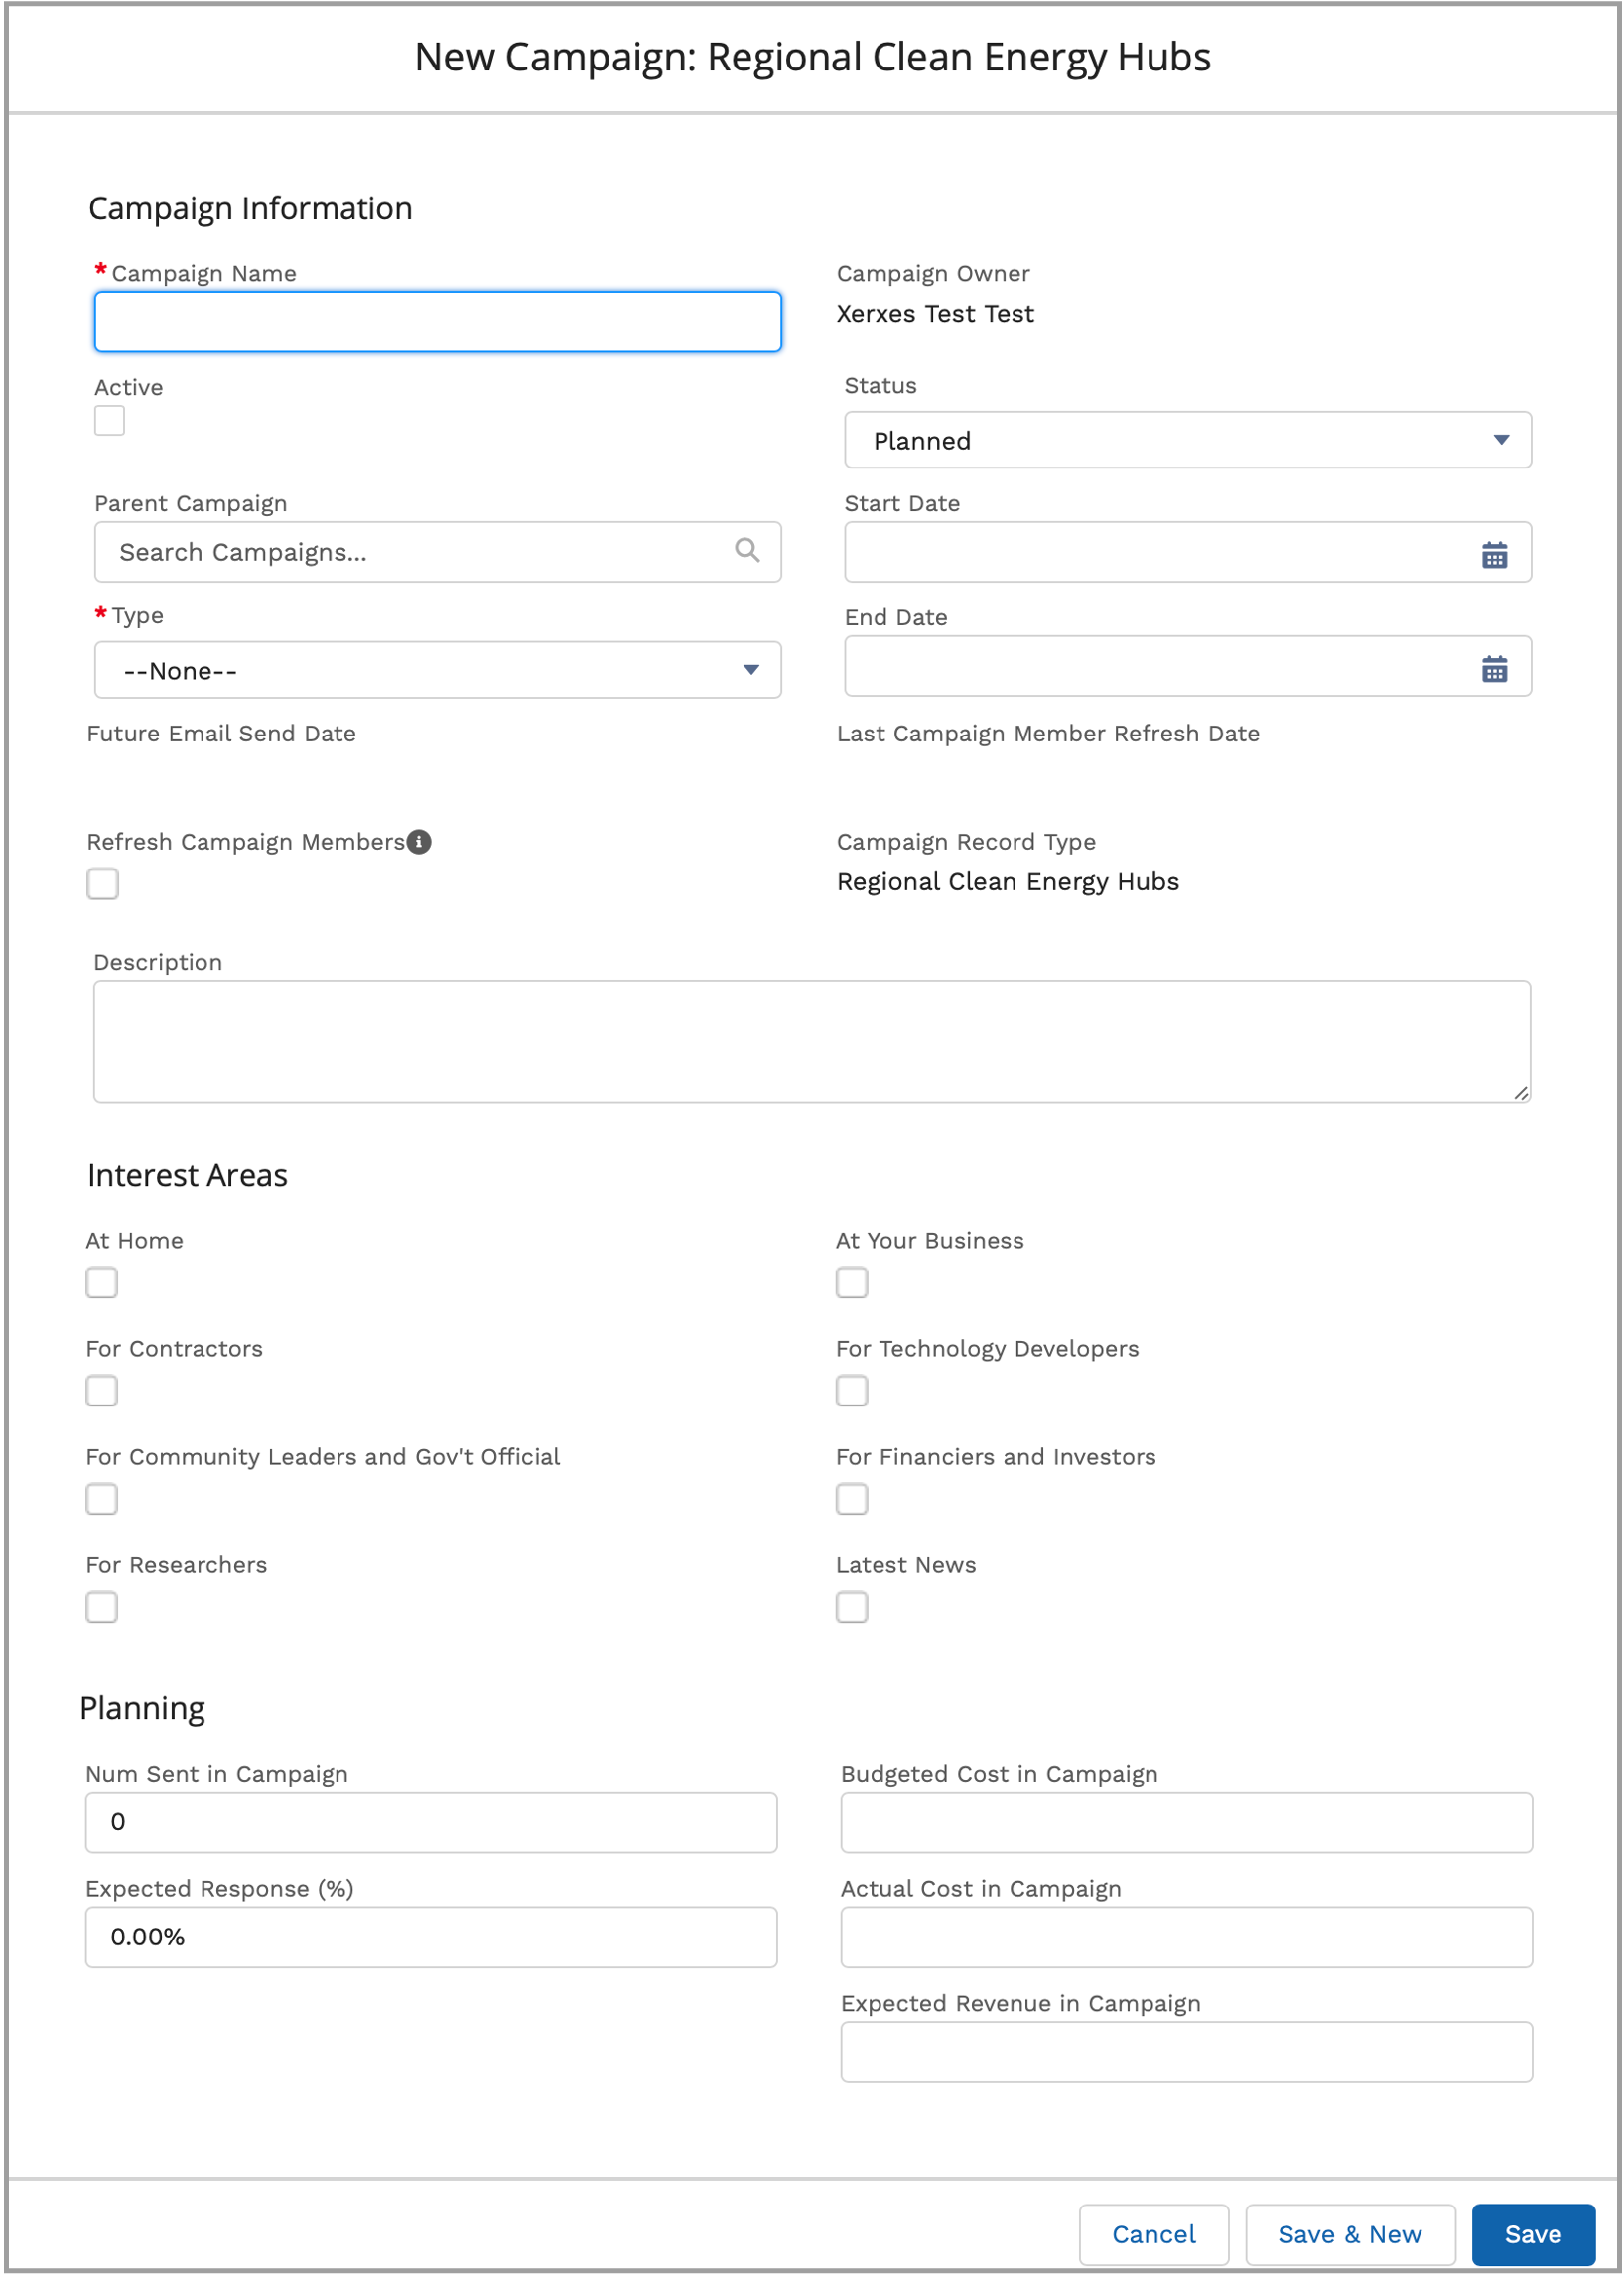
Complete as many fields as possible when creating a New Campaign noting that fields marked with a red asterisk are required and must be completed before the lead can be created. The following are required fields:
| Warning |
|---|
Although not required, check the Active box to signify that the Campaign is active. |
|
| UI Step |
|---|
Some fields have a small grey circular Information Icon. Hovering the cursor over this icon will display a tooltip with helpful information for that field. |
| UI Step |
|---|
Click Save & New to save the Campaign Record and generate a blank new Campaign form. |
| UI Step |
|---|
New Campaigns are automatically assigned and only visible to the campaign creator. |
|
|
| Column |
|---|
| 
|
|
|
| UI Expand |
|---|
| 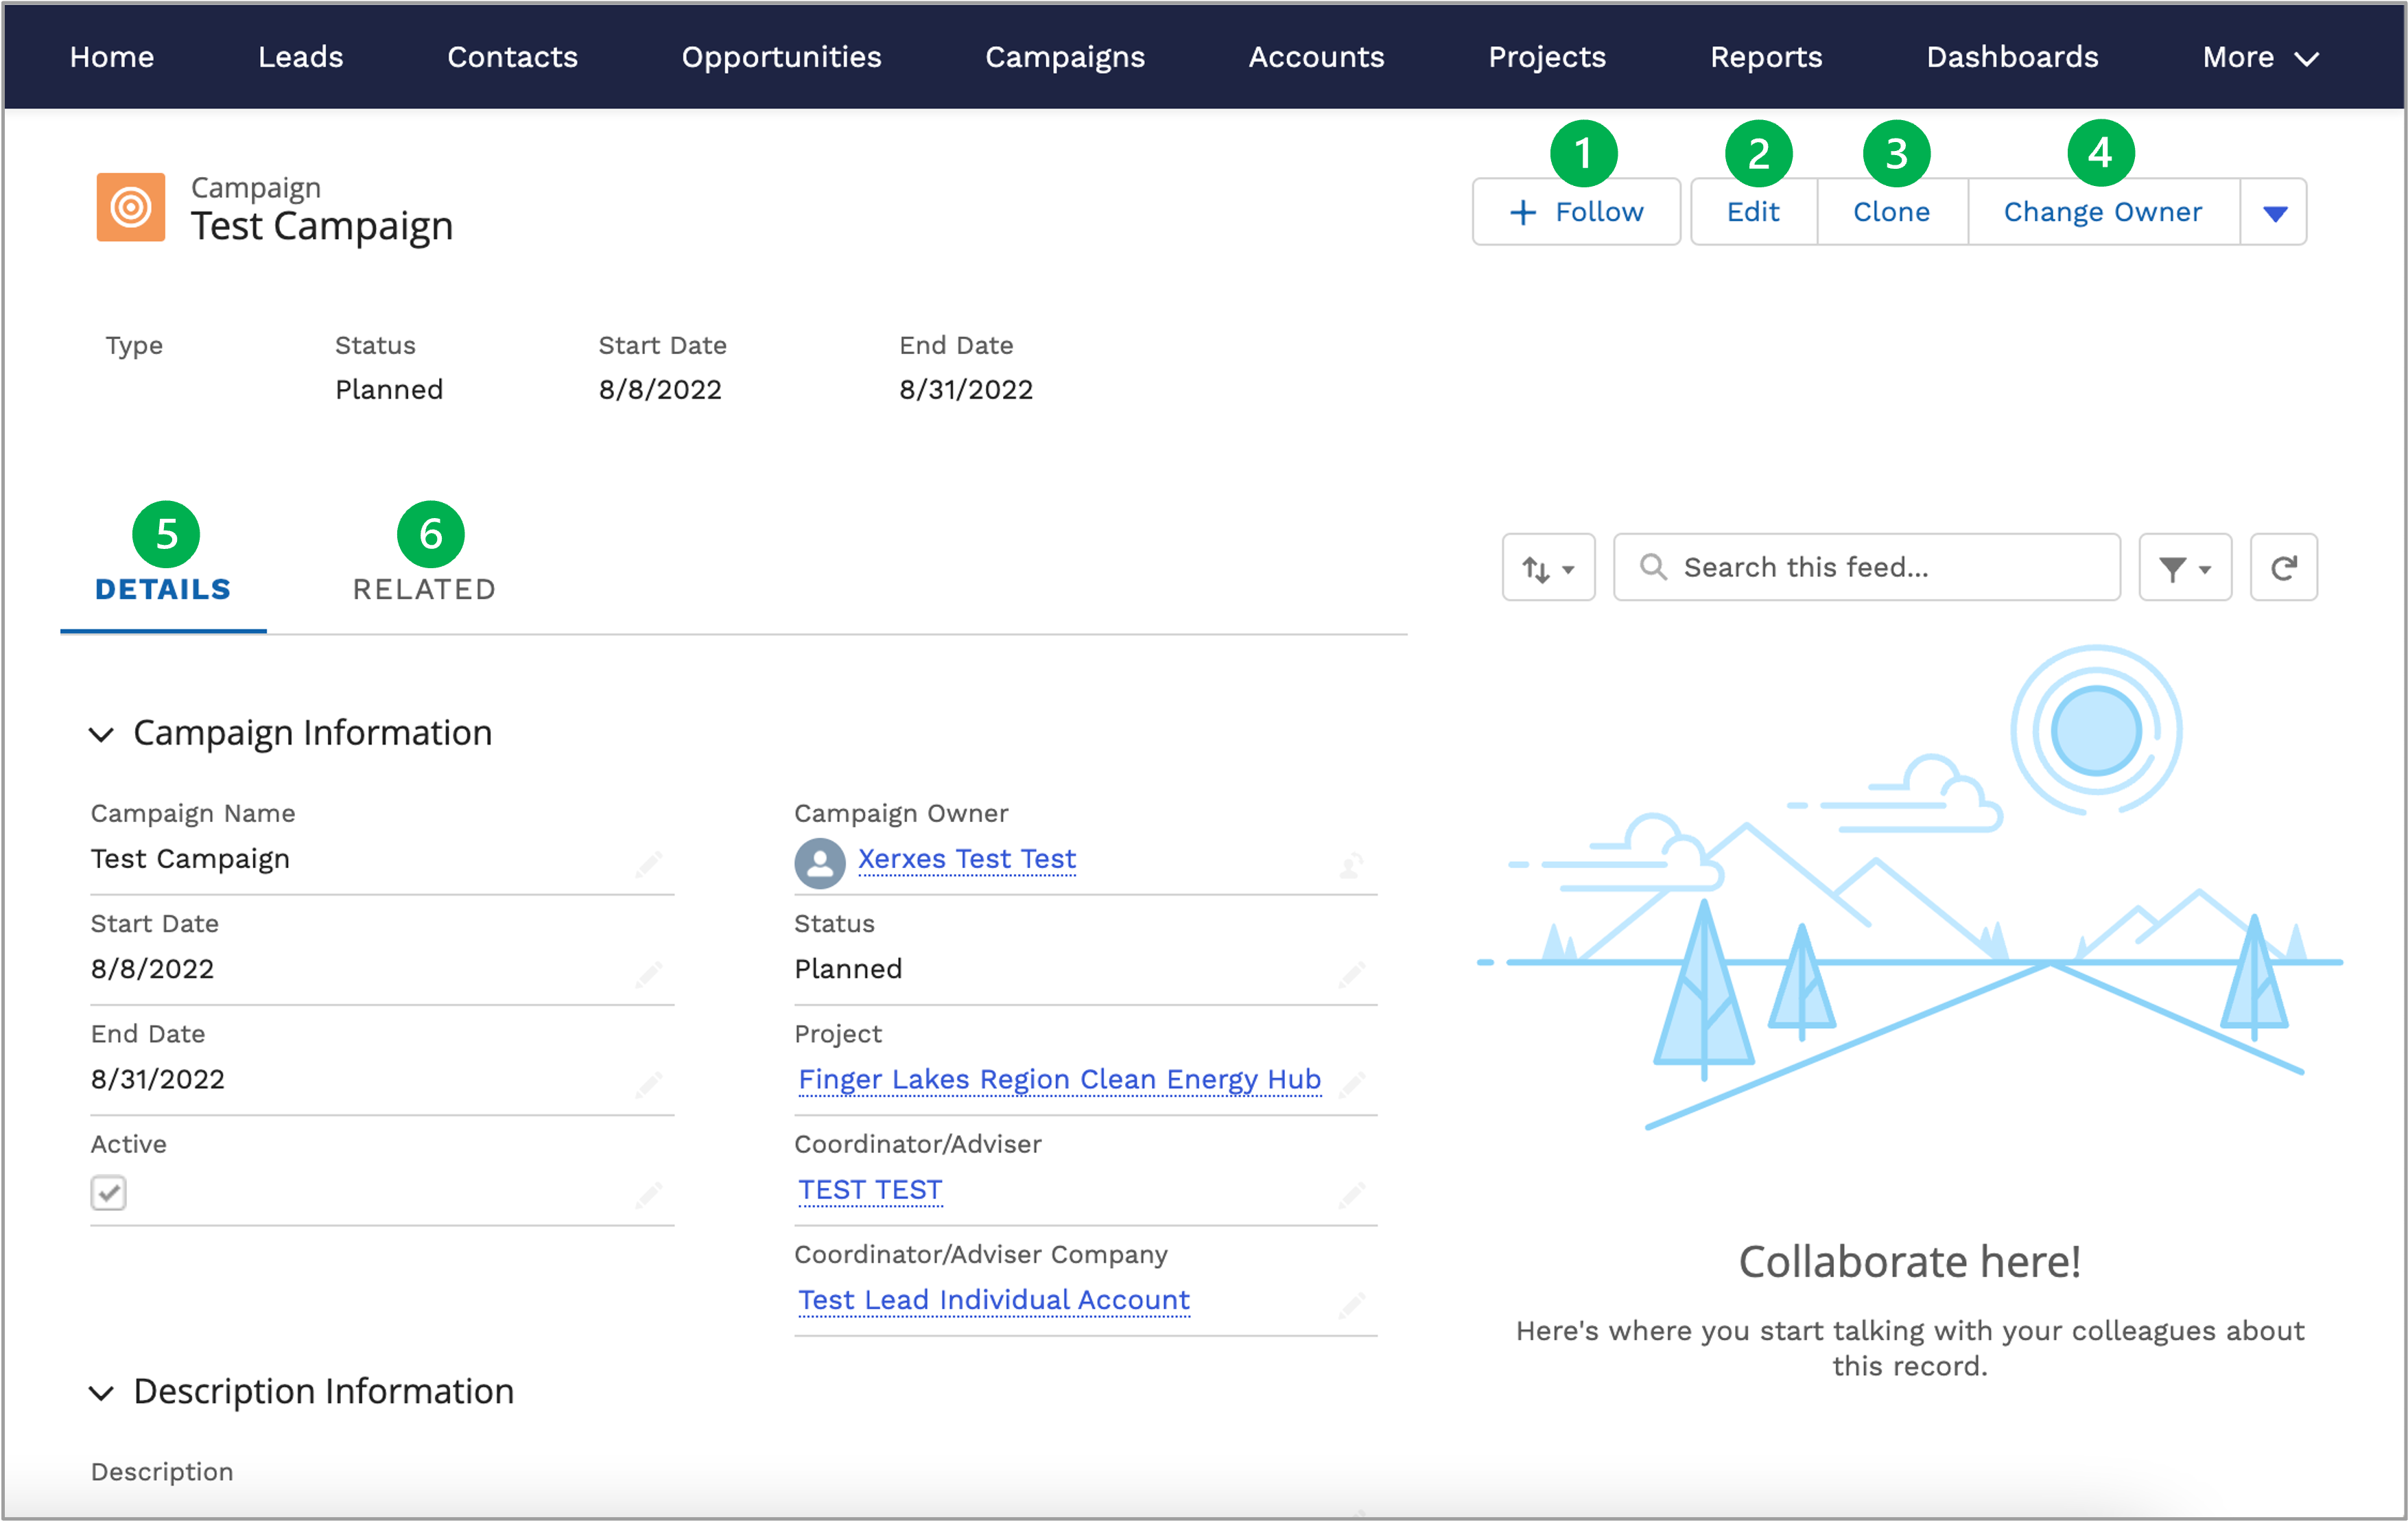
| Record Options | Description/Function |
|---|
| 1 | Follow Button | Reviewed on the Introduction Tab. |
|---|
| 2 | Edit Button | Places the entire Campaign Record into edit mode. Be sure to Save when all changes have been made. |
|---|
| 3 | Clone Button | Can be used to create an exact duplicate of this record. This may be a useful tool when creating an additional contact with similar information, such as a shared address. |
|---|
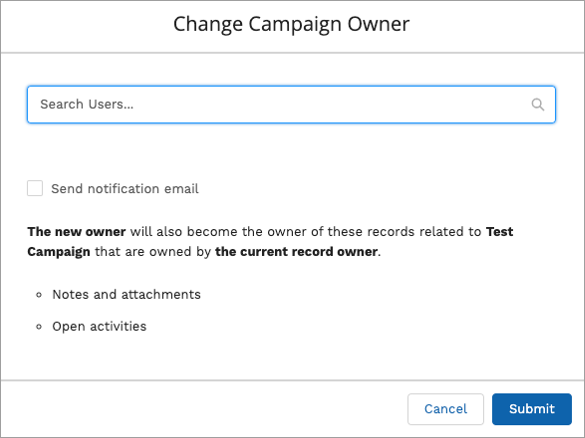
| 4 | Change Owner Button | The correct method of changing a Campaign Record owner to an alternate Hub queue or Hub member. | Expand |
|---|
| 
|
|
|---|
| 5 | Details Tab | Displays the Campaign Record details that can be edits either through the pencil icon at the far right of any field in this tab or when using the Edit button in the controls at the top-right of this page. |
|---|
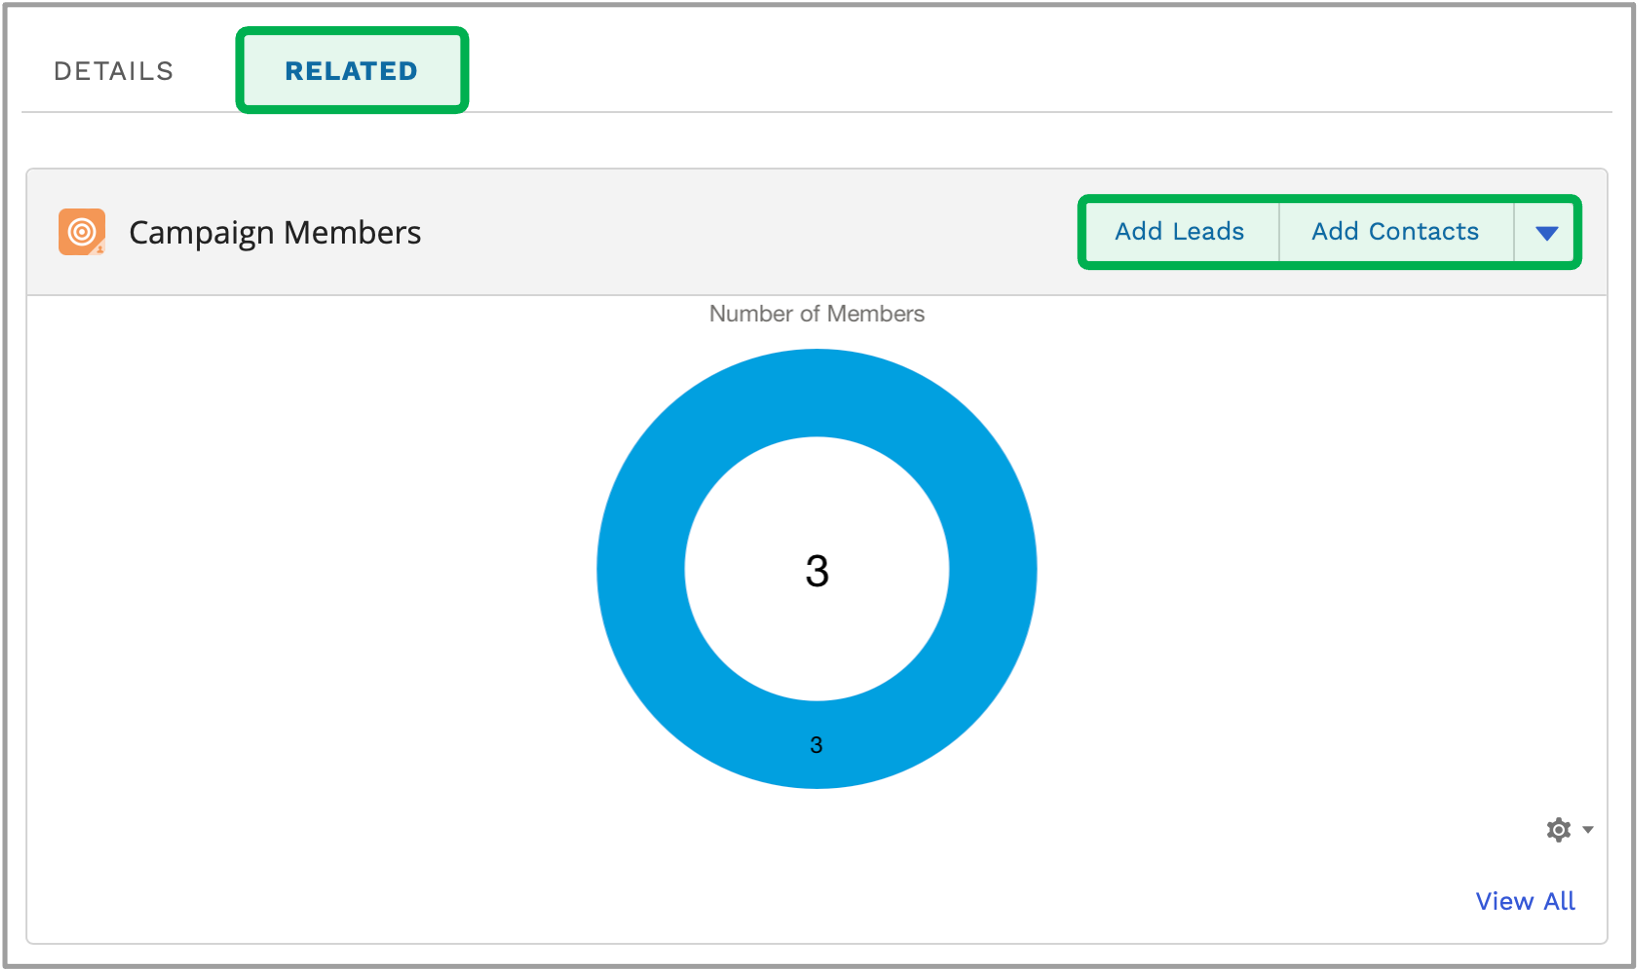
| 6 | Related Tab - Campaign Members | Add existing Leads or Contacts to the Campaign Record. |
|---|
| Related Tab - Activity History | Displays any email records sent as part of the select campaign. Use the Send an Email button to send an email to all associated Campaign Members. | | Related Tab - Attachments | Upload any related campaign Attachments using the Upload Files button. Otherwise, view and related campaign attachments previously uploaded. | Warning |
|---|
Attachments must not contain PPSI (Personal or Protected Sensitive Information) |
|
|
| UI Expand |
|---|
| title | Add Campaign Members |
|---|
|
| UI Steps |
|---|
|
| UI Step |
|---|
From a Campaign Record, access the Related tab to add Leads, Contacts, or Accounts to that Campaign. Note that the Accounts option can be found by clicking the small blue arrow to the right of the Add Leads and Add Contacts buttons. | Expand |
|---|
| 
|
|
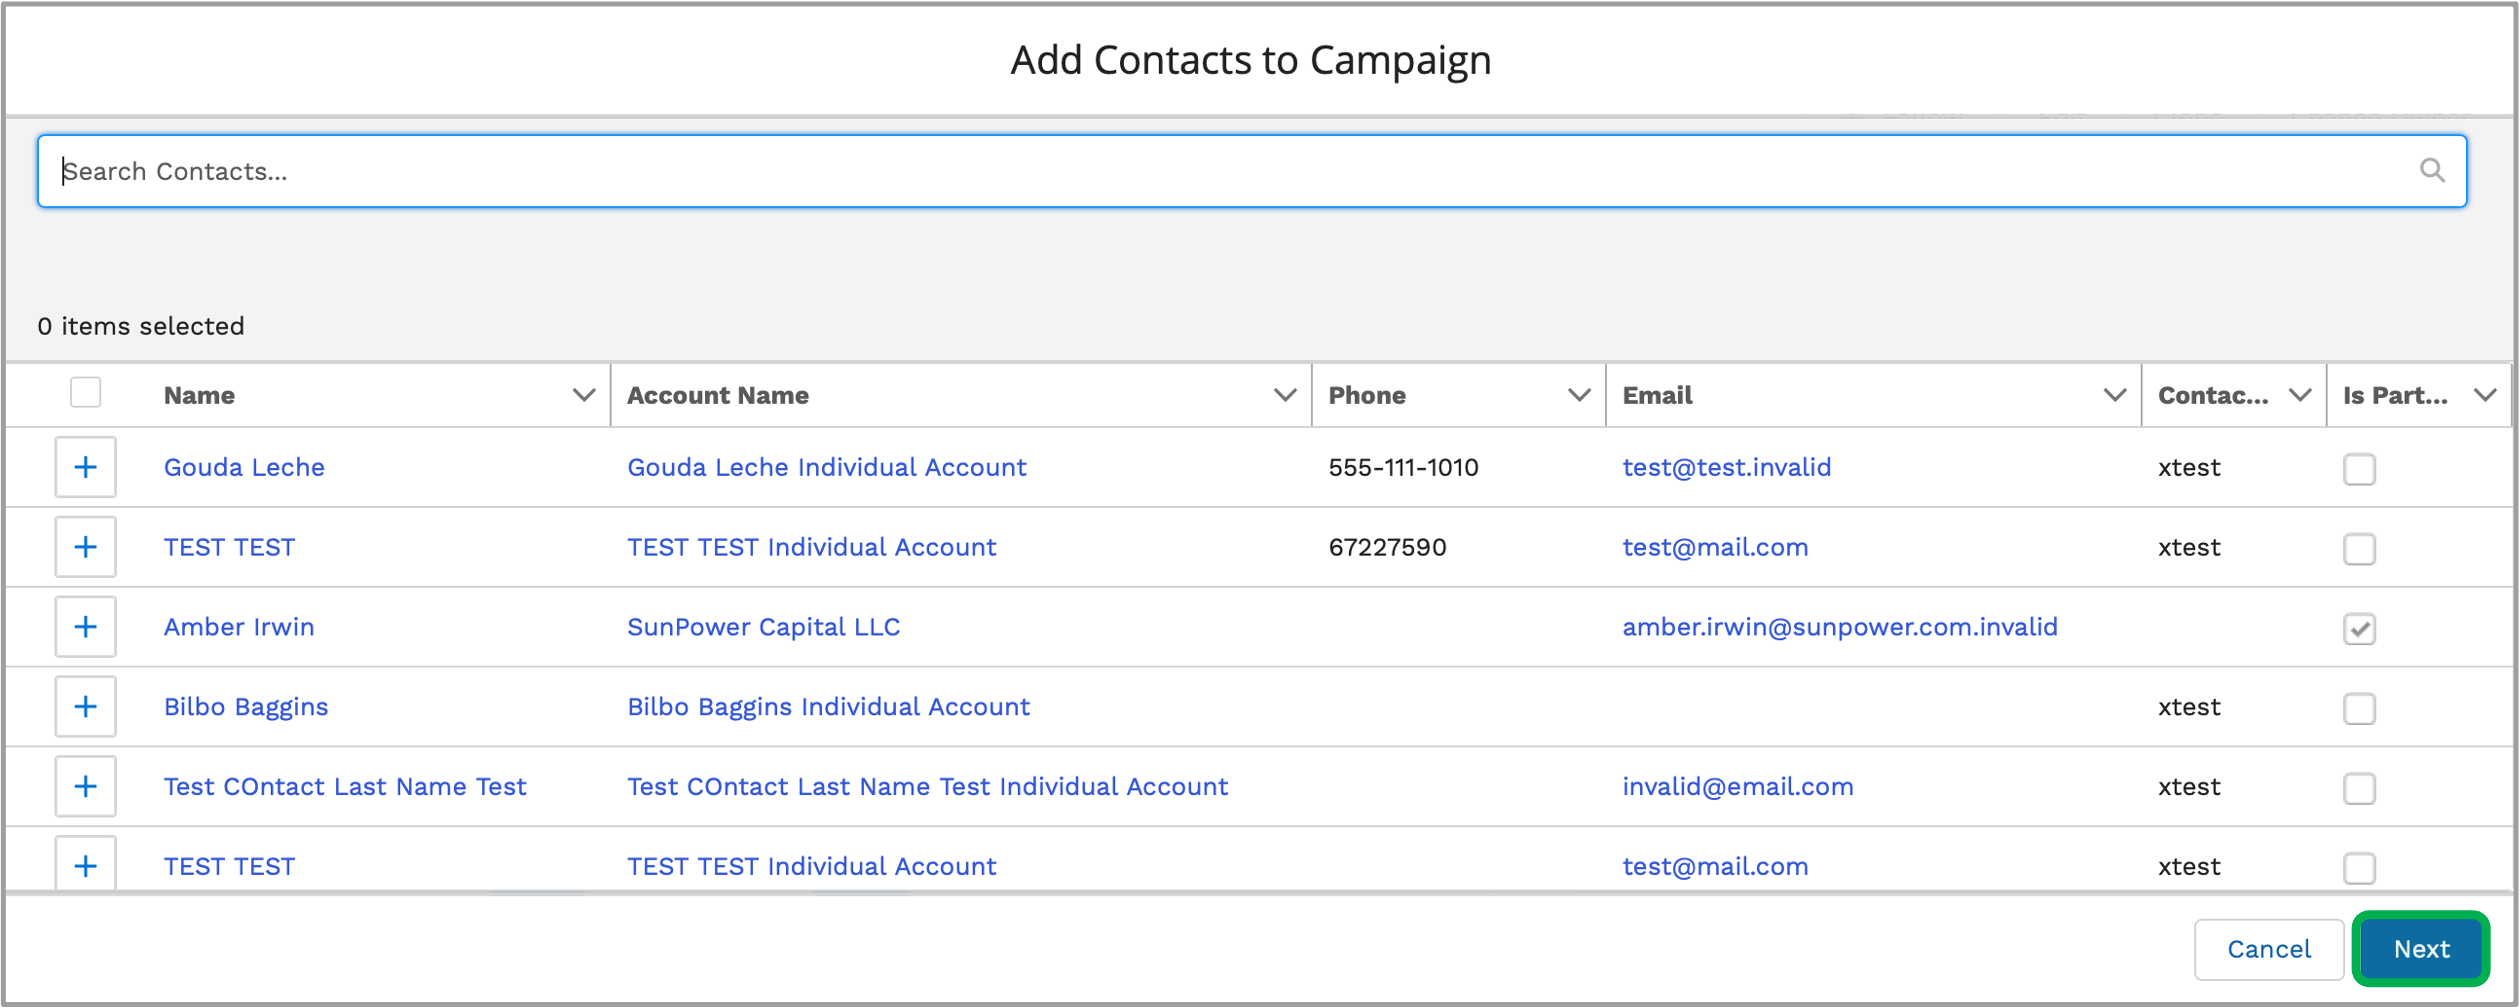
| UI Step |
|---|
Once an Add Leads, Add Contacts, or Add Accounts button is clicked, you will be taken to a search window. Use the Search field to locate the correct Lead, Contact, or Account record or select from one of the Recent options visible by clicking the Plus Icon. Click Next when the correct record is selected. | Expand |
|---|
|  |
|
| UI Step |
|---|
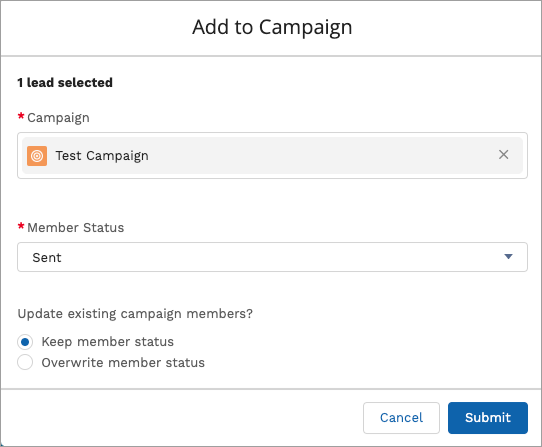
On the next screen, click Submit. Note that if you choose the Overwrite member status option, all existing campaign members will be overwritten with the new member and will no longer be associated with the campaign. | Expand |
|---|
| 
|
|
|
|
| UI Expand |
|---|
| title | Related Training Video |
|---|
| | Multimedia |
|---|
| name | HUBS Creating and Leveraging Campaigns.mp4 |
|---|
| width | 100% |
|---|
| height | 100% |
|---|
|
|
|
| Aura - Tab |
|---|
|
| Panel |
|---|
| borderColor | #002D72 |
|---|
| bgColor | #F3F4F9 |
|---|
| titleColor | #ffffff |
|---|
| borderWidth | 1 |
|---|
| titleBGColor | #002D72 |
|---|
| borderStyle | none |
|---|
| title | Creating & Managing Account |
|---|
|
|
| UI Expand |
|---|
| title | Accounts CRM Portal Page |
|---|
|
| Column |
|---|
| 
| Page Options | Description/Function |
|---|
| 1 | Accounts List Views | Groups Accounts into helpful queues for easy review and access. Click the current queue to open the drop-down to select other available queues. Use the Pin icon to set a different queue as the default when accessing this page. |
|---|
| 2 | New Accounts Button | Opens a modal window to create a new Account. New Accounts are automatically added to the current users My Accounts queue. Please review the Create New Account section below for more information. |
|---|
| 3 | Search Accounts Field | Filter the visible Account list below based on the search parameters. |
|---|
| 4 | Accounts List | A list of all Accounts in the currently selected queue. Access a specific Account Record by clicking the Account name hyperlink in the Account Name Column. |
|---|
|
|
| UI Expand |
|---|
|
| Info |
|---|
Best Practice is to not create new accounts unless you are entering a Business or Organization with Multiple Contacts. |
| Section |
|---|
| Column |
|---|
|
| UI Steps |
|---|
|
| UI Step |
|---|
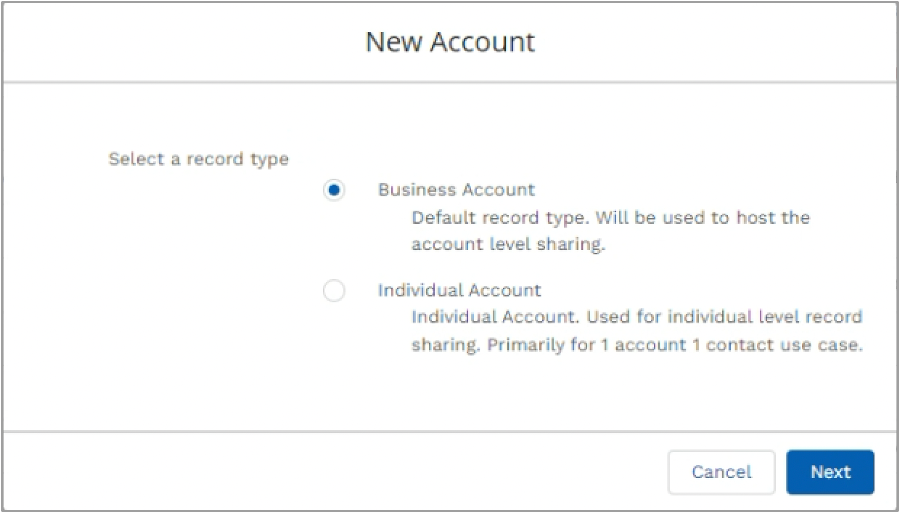
When creating a new Account, the Select a Record Type window will pop-up. Choose your account type and click Next. | Expand |
|---|
| 
|
|
| UI Step |
|---|
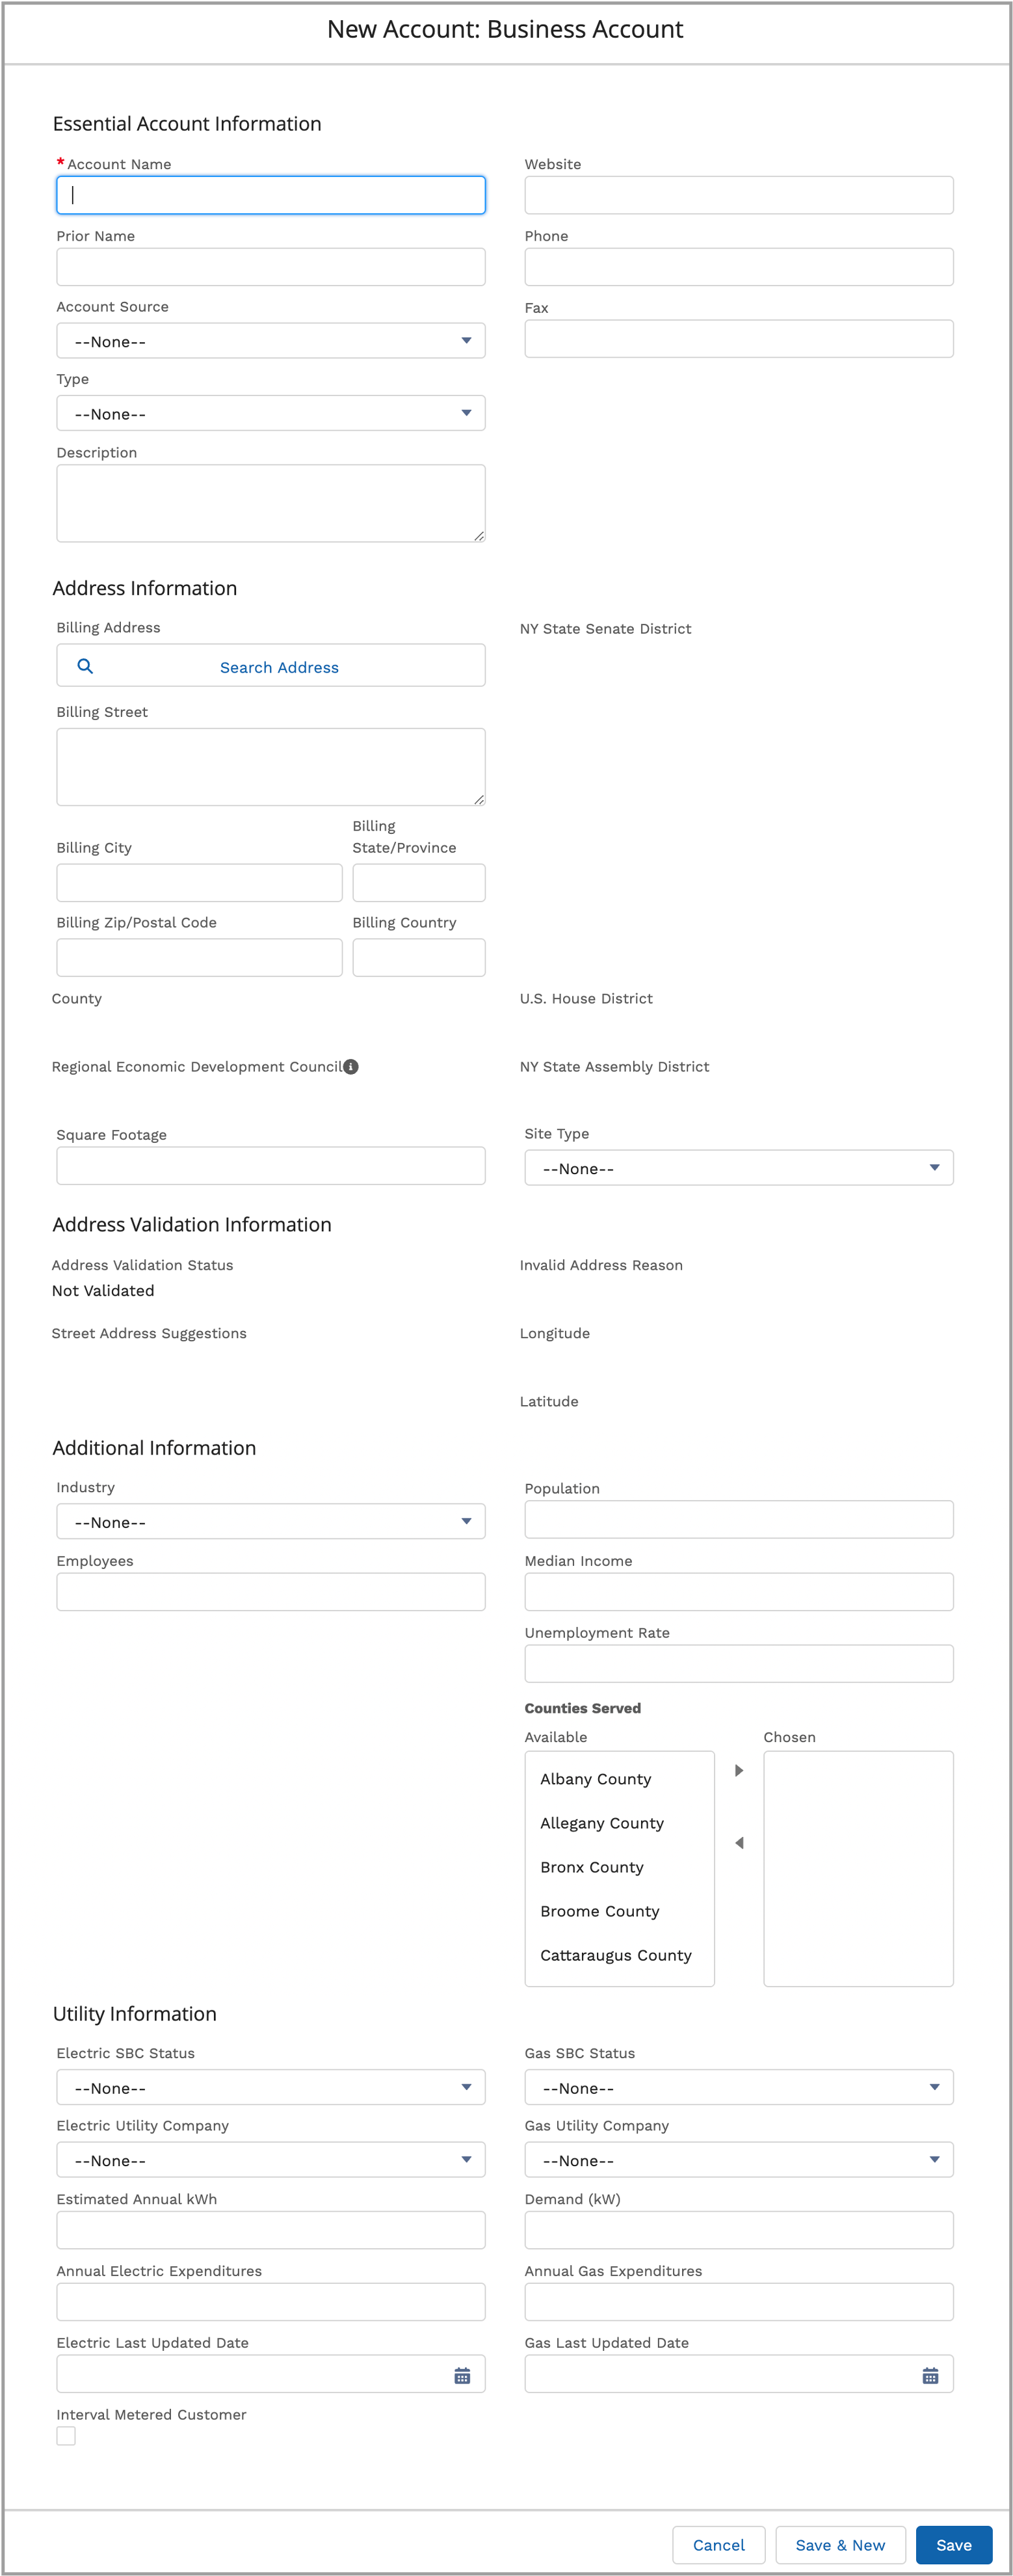
Complete as many fields as possible when creating a New Account noting that fields marked with a red asterisk are required and must be completed before the lead can be created. The following are required fields: | Tip |
|---|
Account Name shall be the individual’s name ex: Mary Dawn |
|
| UI Step |
|---|
Some fields have a small grey circular Information Icon. Hovering the cursor over this icon will display a tooltip with helpful information for that field. |
| UI Step |
|---|
Use the Search Address box to locate and populate the rest of the mailing address fields. |
| UI Step |
|---|
Click Save & New to save the Account Record and generate a blank new Account form. |
| UI Step |
|---|
New Accounts are automatically assigned and only visible to the Account creator. |
|
|
| Column |
|---|
| 
|
|
|
| UI Expand |
|---|
| 
| Record Options | Description/Function |
|---|
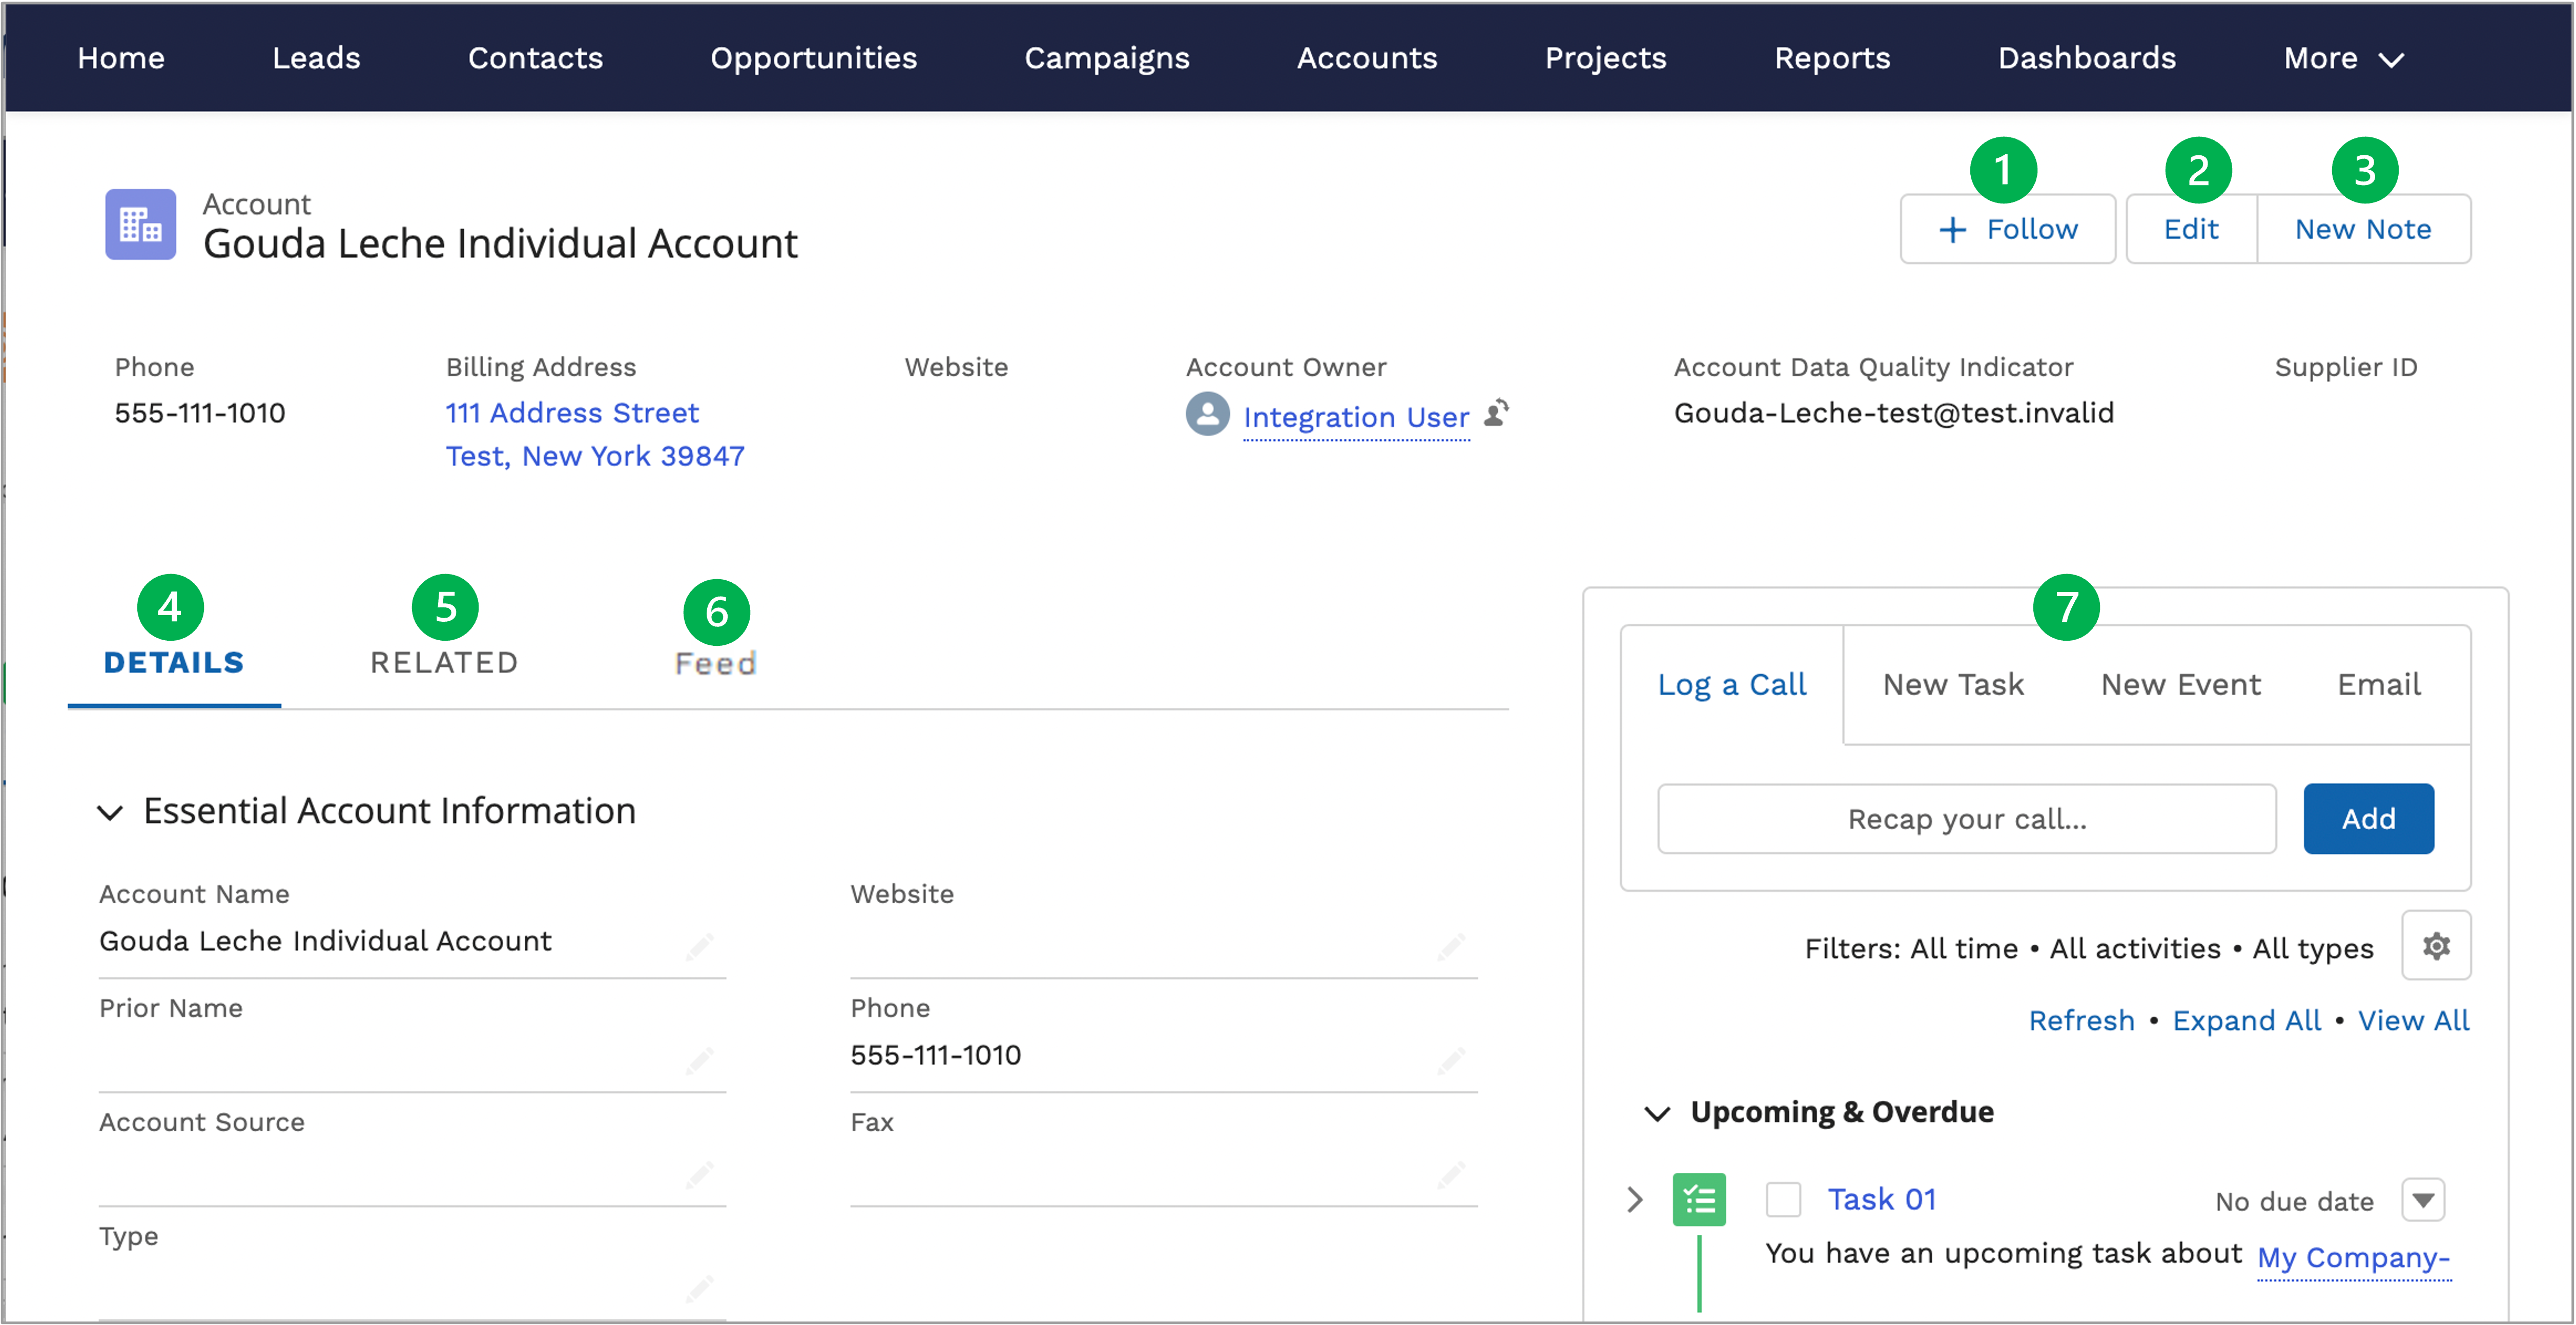
| 1 | Follow Button | Reviewed on the Introduction Tab. |
|---|
| 2 | Edit Button | Places the entire Account Record into edit mode. Be sure to Save when all changes have been made. |
|---|
| 3 | New Note | Notes are a useful way to add any additional context to an account record that may be helpful for you or other Hub members. Notes, once created, can be found in the Related tab on each account record. |
|---|
| 4 | Details Tab | Displays the Account Record details that can be edited either through the pencil icon at the far right of any field in this tab or when using the Edit button in the controls at the top-right of this page. |
|---|
| 5 | Related Tab - Contacts | Displays Contact Records associated with the account. Use the New button to create a new Contact Record. Refer to the Create New Contact section in the Contacts tab to the left to learn more. Used for Business Accounts. However, you may add the household names as contacts. |
|---|
| Related Tab - Program Partnerships Used for Business Accounts | Displays any Program Partnerships related to the account. | | Related Tab - Opportunities | Displays any associated opportunities created and aligned to the account. Use the new button to create a new opportunity. Please refer to the Create New Opportunity section of the Opportunities tab to the left to learn more. | | Related Tab - Open Activities | Displays existing Task and Event Records associated with the Account Record. Use the New Task or New Event button to create new tasks or events associated with the account. | | Related Tab - Activity History | Displays any email notifications sent through the Account Record to the associated Contacts. | | Related Tab - Notes & Attachments | Displays both notes and uploaded attachments. Use the Upload Files button to upload new documents. | Warning |
|---|
Do not upload files with PPSI (Personal or Protected Sensitive Information) |
| | Related Tab - Account History | Displays a list of all changes or updates made with respect to the Account Record. | | 6 | Feed Tab | Provides the ability to add an update to the Account Feed. Displays updated information to Users who Follow the Account. |
|---|
| 7 | Quick Tools | Provides access to Log Calls, Create New Tasks, Create New Events, and Send Emails and links any of these record types to the Account Record. These functions are reviewing in the Introduction Tab. Upcoming or overdue Tasks will appear in this section as well. |
|---|
|
|
| Aura - Tab |
|---|
|
| Panel |
|---|
| borderColor | #002D72 |
|---|
| bgColor | #F3F4F9 |
|---|
| titleColor | #ffffff |
|---|
| borderWidth | 1 |
|---|
| titleBGColor | #002D72 |
|---|
| borderStyle | none |
|---|
| title | Accessing Project Records |
|---|
|
|
| UI Expand |
|---|
| title | Projects CRM Portal Page |
|---|
|
| Column |
|---|
| 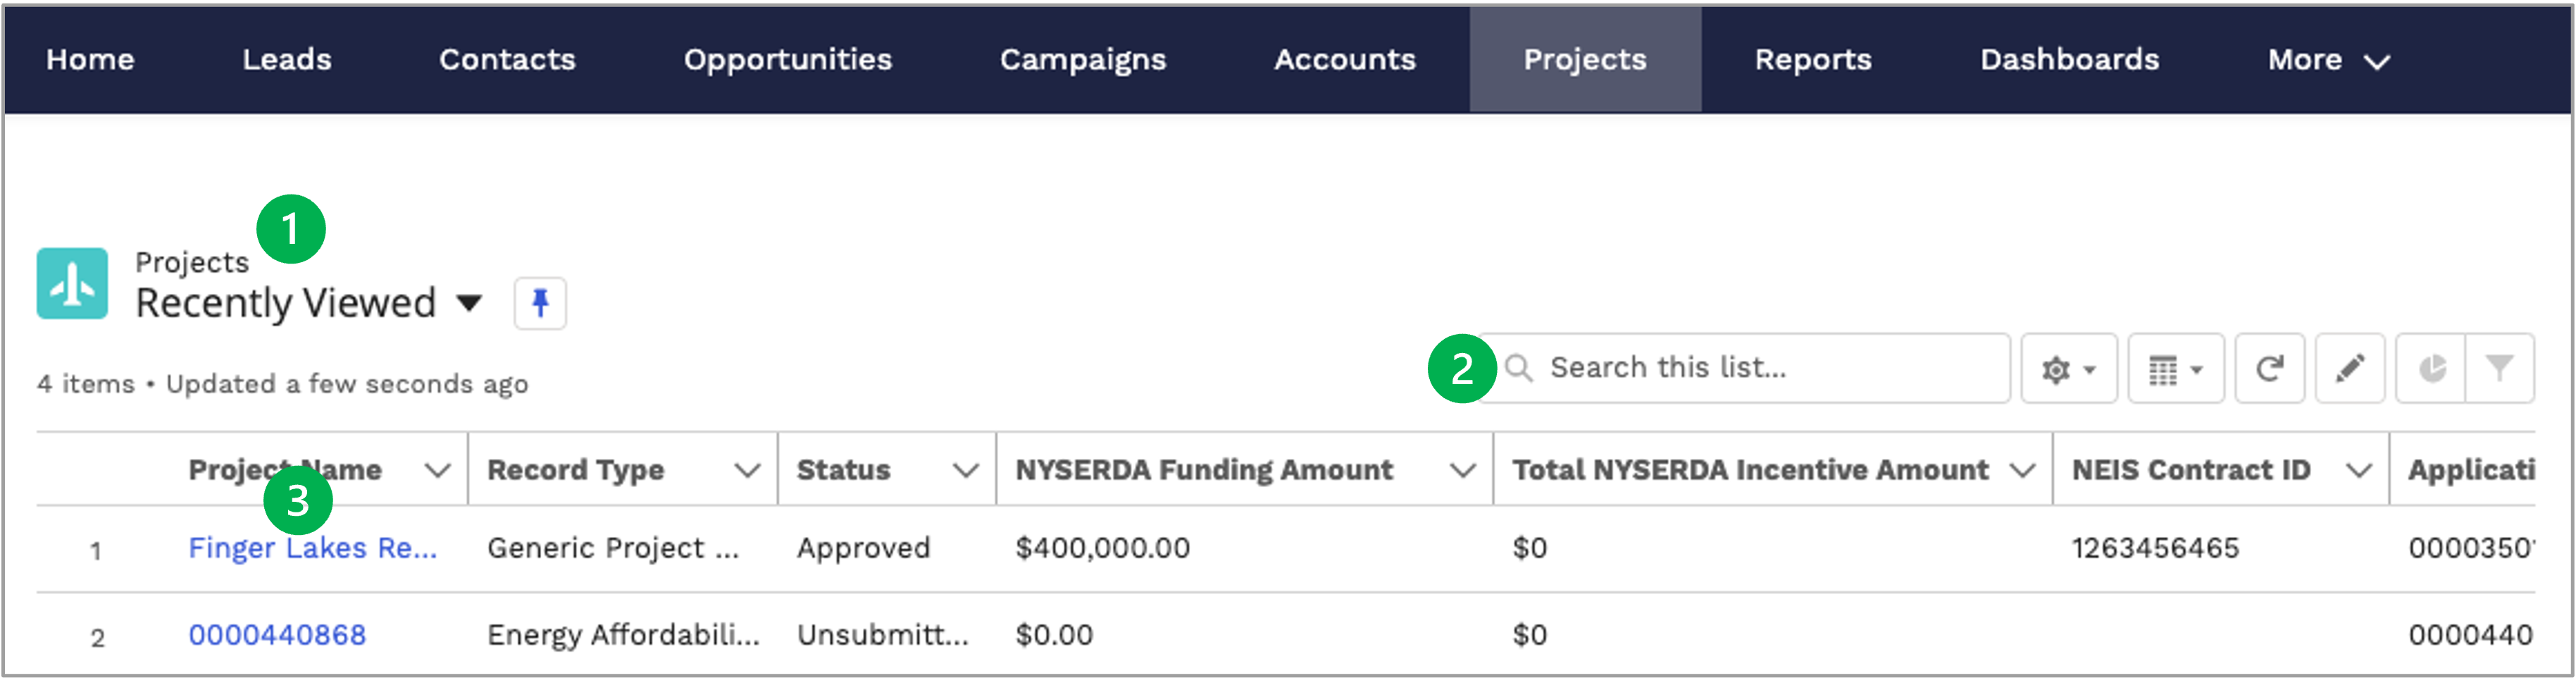
| Page Options | Description/Function |
|---|
| 1 | Projects List Views | Groups Projects into helpful queues for easy review and access. Click the current queue to open the drop-down to select other available queues. Use the Pin icon to set a different queue as the default when accessing this page. |
|---|
| 2 | Search Projects Field | Filter the visible Project list below based on the search parameters. |
|---|
| 3 | Projects List | A list of all Projects in the currently selected queue. Access a specific Project Record by clicking the name link in the Name Column. |
|---|
|
|
| UI Expand |
|---|
| 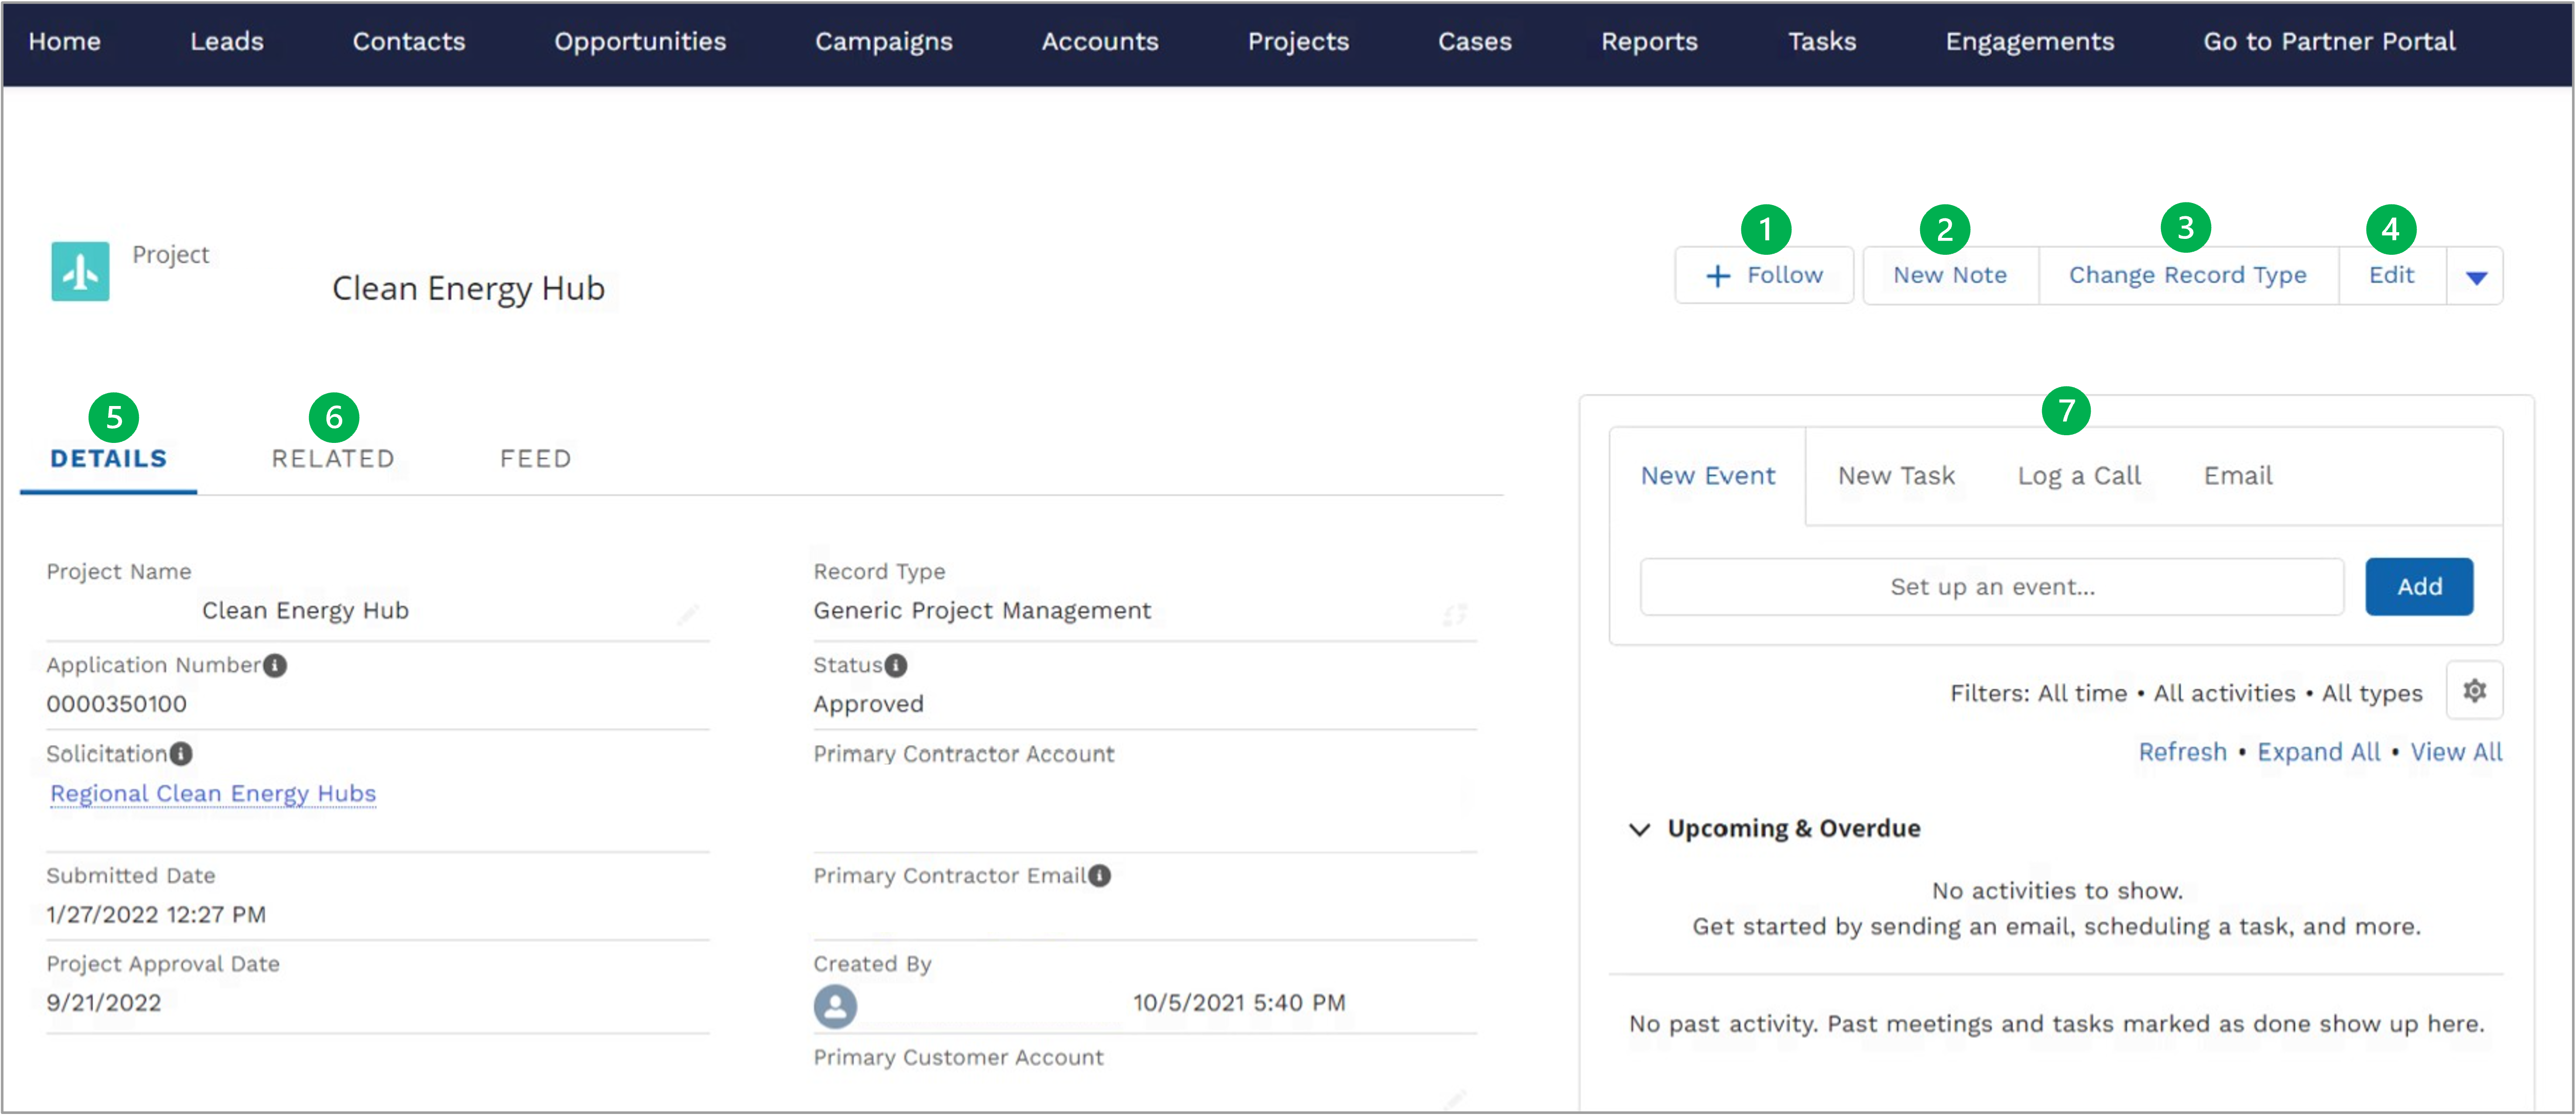
| Record Options | Description/Function |
|---|
| 1 | Follow Button | Reviewed on the Introduction Tab. |
|---|
| 2 | New Note | Notes are a useful way to add any additional context to a project record that may be helpful for you or other Hub members. Notes, once created, can be found in the Related tab on each project record. |
|---|
| 3 | Edit Button | Places the entire Project Record into edit mode. Be sure to Save when all changes have been made. |
|---|
| 4 | Details Tab | Displays the Project Record details that can be edits either through the pencil icon at the far right of any field in this tab or when using the Edit button in the controls at the top-right of this page. |
|---|
| 5 | Related Tab - Engagements | Lists all Engagement Objects created to document the work done for the project. Please refer to the Project Engagement Objects section below to learn more. | Tip |
|---|
For the Hub Regional Project record, Monthly Engagements may be entered. For Applications submitted, Hubs will not be entering an Engagement to a Project Record. |
|
|---|
| 6 | Related Tab - Project Invoices | Displays all Invoices that have been submitted for the project. Clicking the Invoice Number link will bring you to the Invoice Record in Salesforce. | Tip |
|---|
For the Hub Regional Project record, Monthly Invoices Submitted will appear. It is recommended that the entry of a New Invoice be submitted through the Partner Portal. |
|
|---|
| 7 | Quick Tools | Provides access to Log Calls, Create New Tasks, Create New Events, and Send Emails and links any of these record types to the Project Record. These functions are reviewed in the Introduction Tab. Upcoming or overdue Tasks will appear in this section as well. |
|---|
|
| UI Expand |
|---|
| title | Project Engagement Objects |
|---|
|
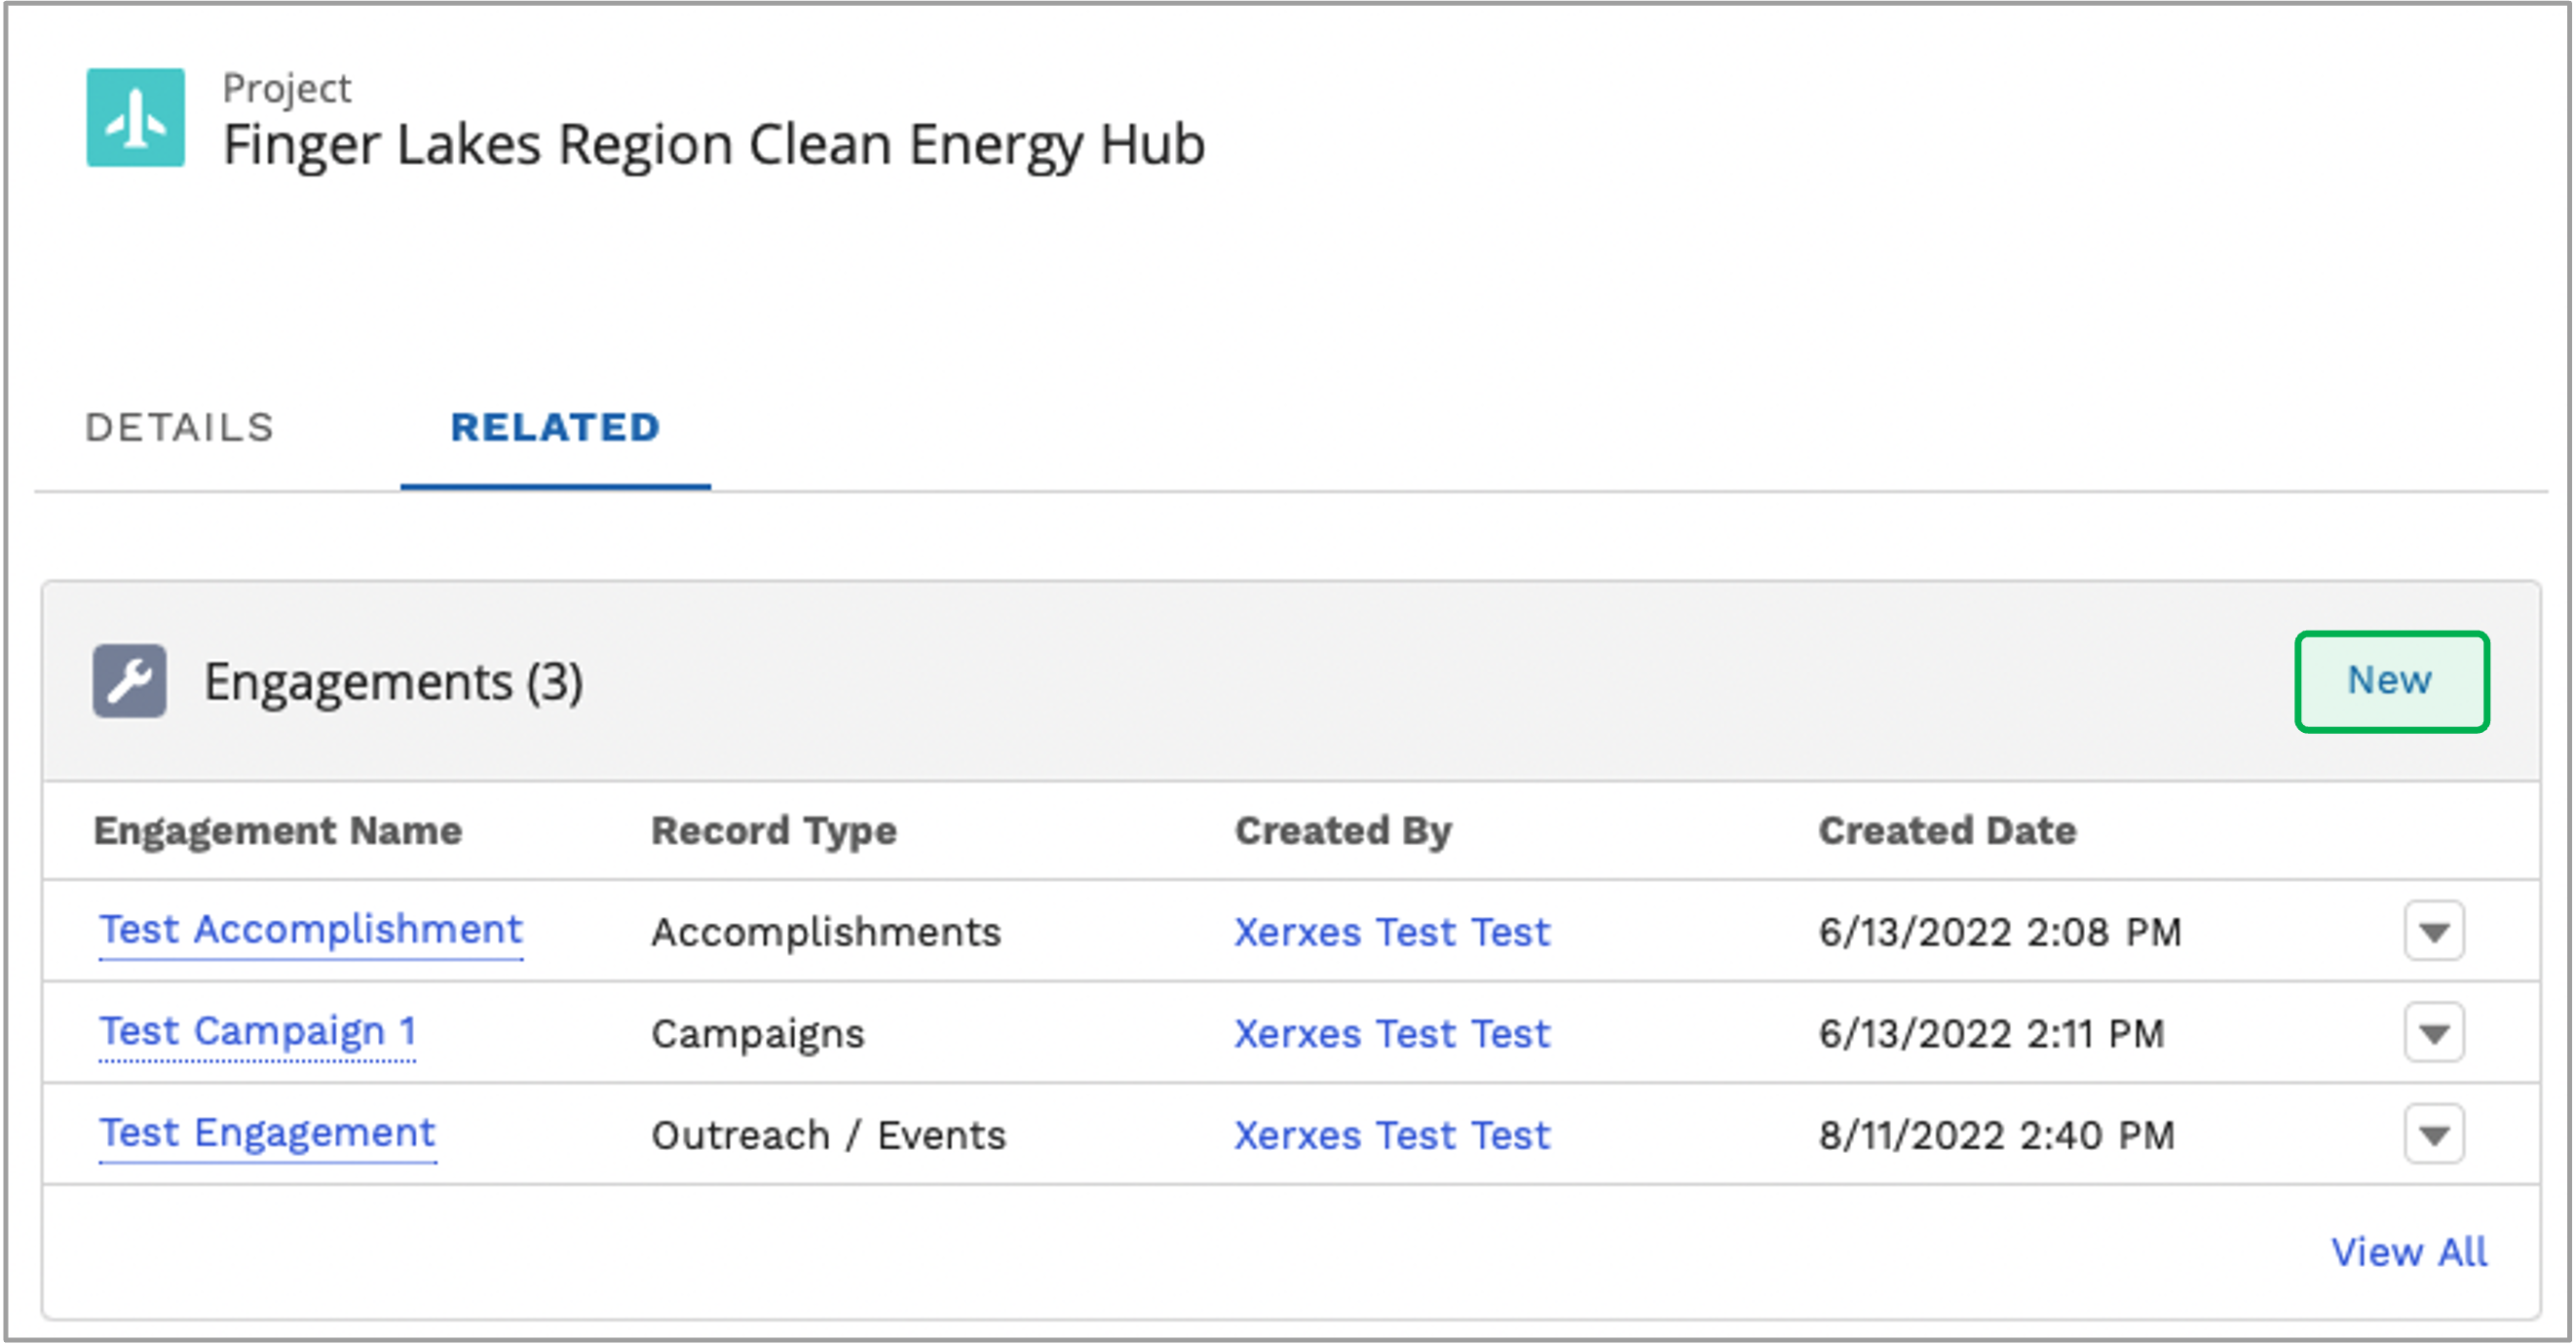
| Info |
|---|
Information entered for each engagement object is automatically added to the monthly report. Monthly reports are a requirement for Hubs to ensure that NYSERDA has a firm accounting of all the work done for the project and is used when reviewing and approving invoices. |
| UI Steps |
|---|
|
| UI Step |
|---|
Click the New button in the Engagements section of the Related Tab. | Expand |
|---|
| 
|
|
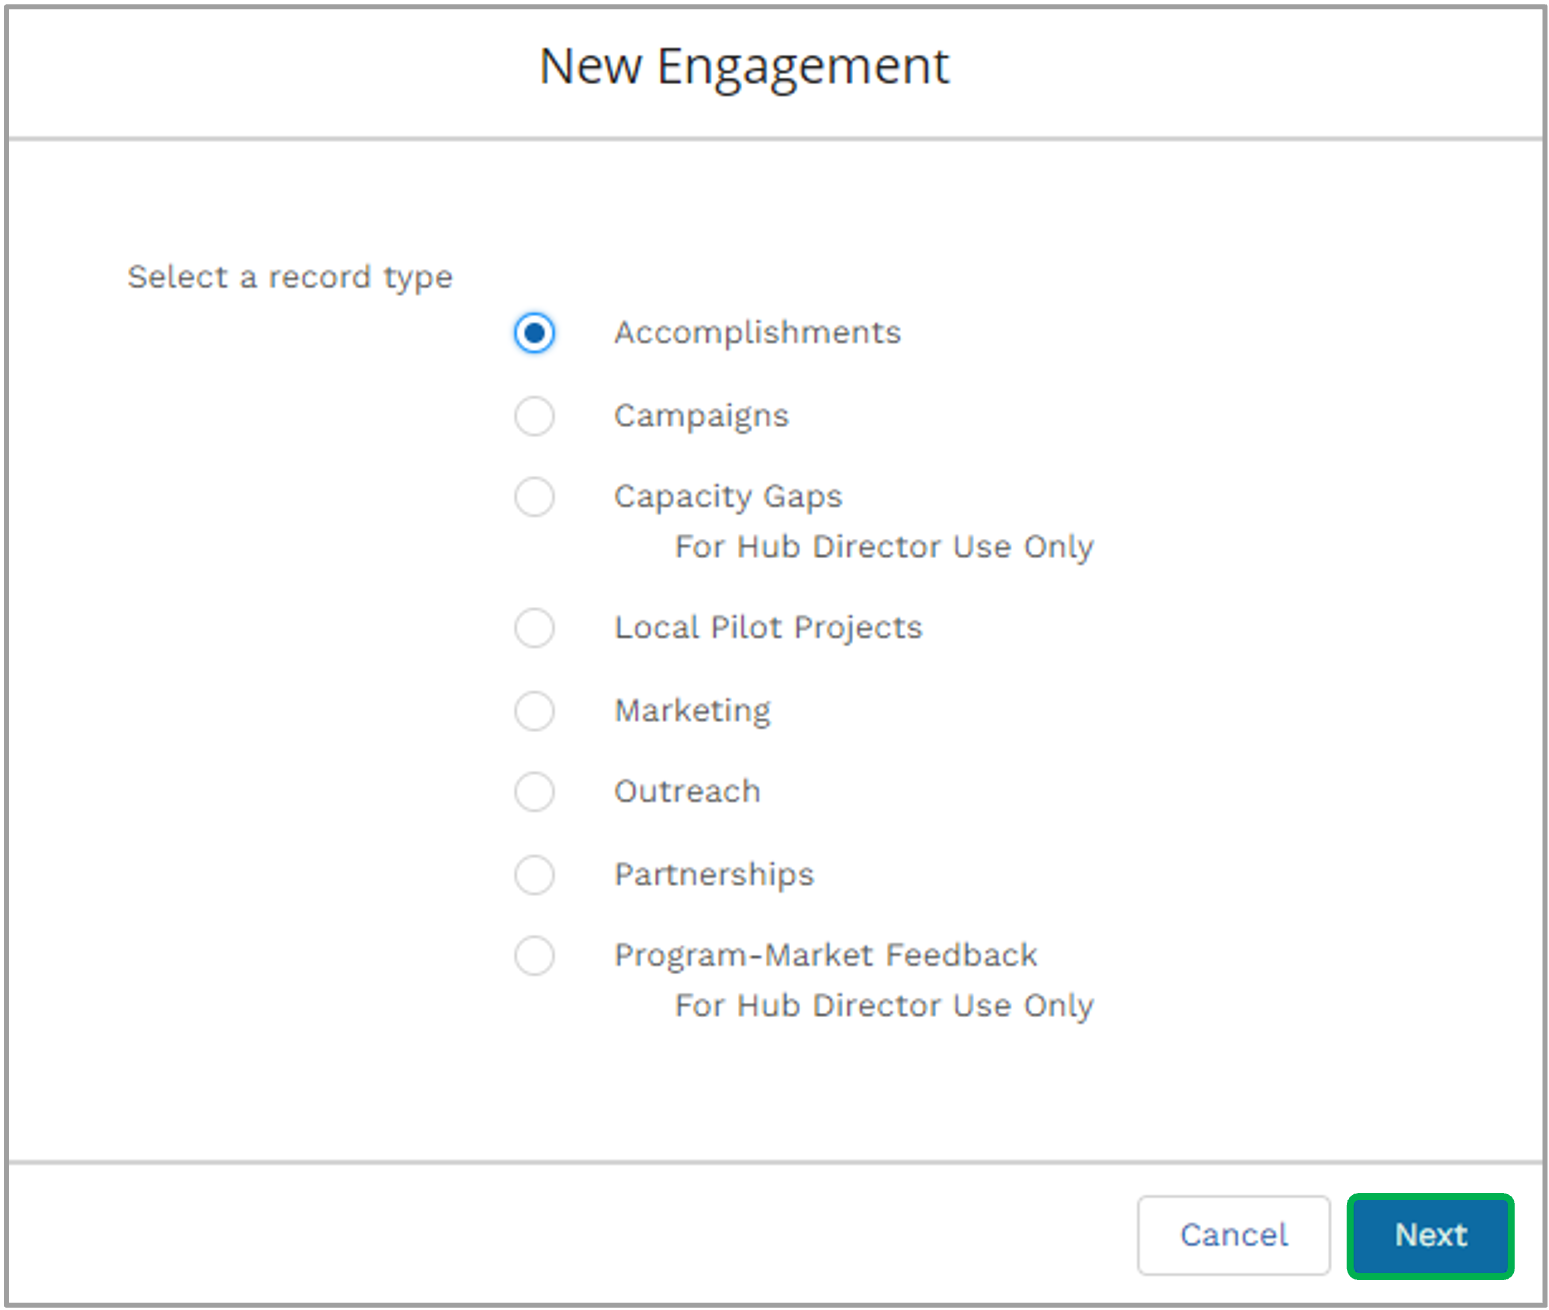
| UI Step |
|---|
In the New Engagement window, select the category that best matches the related work done for the project, then click the Next button. | Tip |
|---|
Each engagement type provides a different set of fields when documenting the work. |
| Warning |
|---|
Please note that Hub Directors shall ONLY enter Capacity Gaps and Program Market Feedback Engagements. There should be at a minimum one (1) entry for each Hub member requesting reimbursement on the monthly invoice. Each Engagement shall be tied to the Statement of Work (SOW) Task. (Required field for each Engagement). |
| Expand |
|---|
|
| Record Type | Description |
|---|
| Accomplishments | Identify significant events, Administrative (meetings) and Project Management tasks; and a roll up of the number of opportunities e.g., 14 new opportunities, in conversation with 12 existing opportunities, and 3 withdrew their application. |
|---|
| Campaigns | New community campaigns launched, or activities related to existing community campaigns that the Hub has taken over. |
|---|
| Capacity Gaps | Identify the Hub capacity issues/gaps (e.g., administrative, management and staff knowledge, skills, geographic each, partnerships/network management, etc.) or issues impacting the effective delivery of Hub services in the Region, identify necessary resources to address the capacity issues/gaps, and what measures the Hub leadership team has taken. |
|---|
| Local Pilot Projects | Activities pertaining to approved Local Project Support funding. |
|---|
| Marketing | Articles, Social Media, Email, News (PSA, Cable, TV), Press Release, Print, and Radio. All marketing materials shall be approved by NYSERDA prior to placement, unless key messaging is used. |
|---|
| Outreach | Presentations, Exhibitor opportunities, Stakeholder Forums, Energy Literacy Workshops, and Trainings provided. Attendance sheets are required for Stakeholder Forums and Energy Literacy Workshops; however, sign in sheets for other outreach engagements are encouraged. To upload attachments, the Engagement record must be created. Then use the drop down and select the Hub Name, Open the Engagement, click Related tab and upload the attendance/sign in sheets. |
|---|
| Partnerships | New partnerships established. A Partnership Support Letter is required to be uploaded. Support letters shall be on the Partner’s letterhead and outline how the Partner will work with the Hub to meet the Hub goals. To upload the Support Letter, enter the Engagement, located the record, lick the Related Tab, and upload the document. |
|---|
| Program - Market Feedback | Identify any significant events, deviations from the budget opportunities and challenges, feedback or problems encountered during the month that could be shared with NYSERDA program teams. Do NOT include contractual issues. |
|---|
|
| Expand |
|---|
| 
|
|
| UI Step |
|---|
In the next window, fill in the required fields then click the Save & New button. | Expand |
|---|
|
| Tip |
|---|
The screenshot below references the Accomplishments engagement object fields and does not convey the fields required for other engagement object types. |

|
|
| UI Step |
|---|
To Edit, Delete, or Clone an Engagement Object click the name of the engagement object from the Engagements list in the Related Tab. Make any edits as needed, being sure to save before exiting. |
|
|
| UI Expand |
|---|
| title | Related Training Video |
|---|
| | Multimedia |
|---|
| name | HUBS Accessing Project Records.mp4 |
|---|
| width | 100% |
|---|
| height | 100% |
|---|
|
|
|
| Aura - Tab |
|---|
|
| Panel |
|---|
| borderColor | #002D72 |
|---|
| bgColor | #F3F4F9 |
|---|
| titleColor | #ffffff |
|---|
| borderWidth | 1 |
|---|
| titleBGColor | #002D72 |
|---|
| borderStyle | none |
|---|
| title | Working With Reports |
|---|
|
|
| UI Expand |
|---|
|
| Info |
|---|
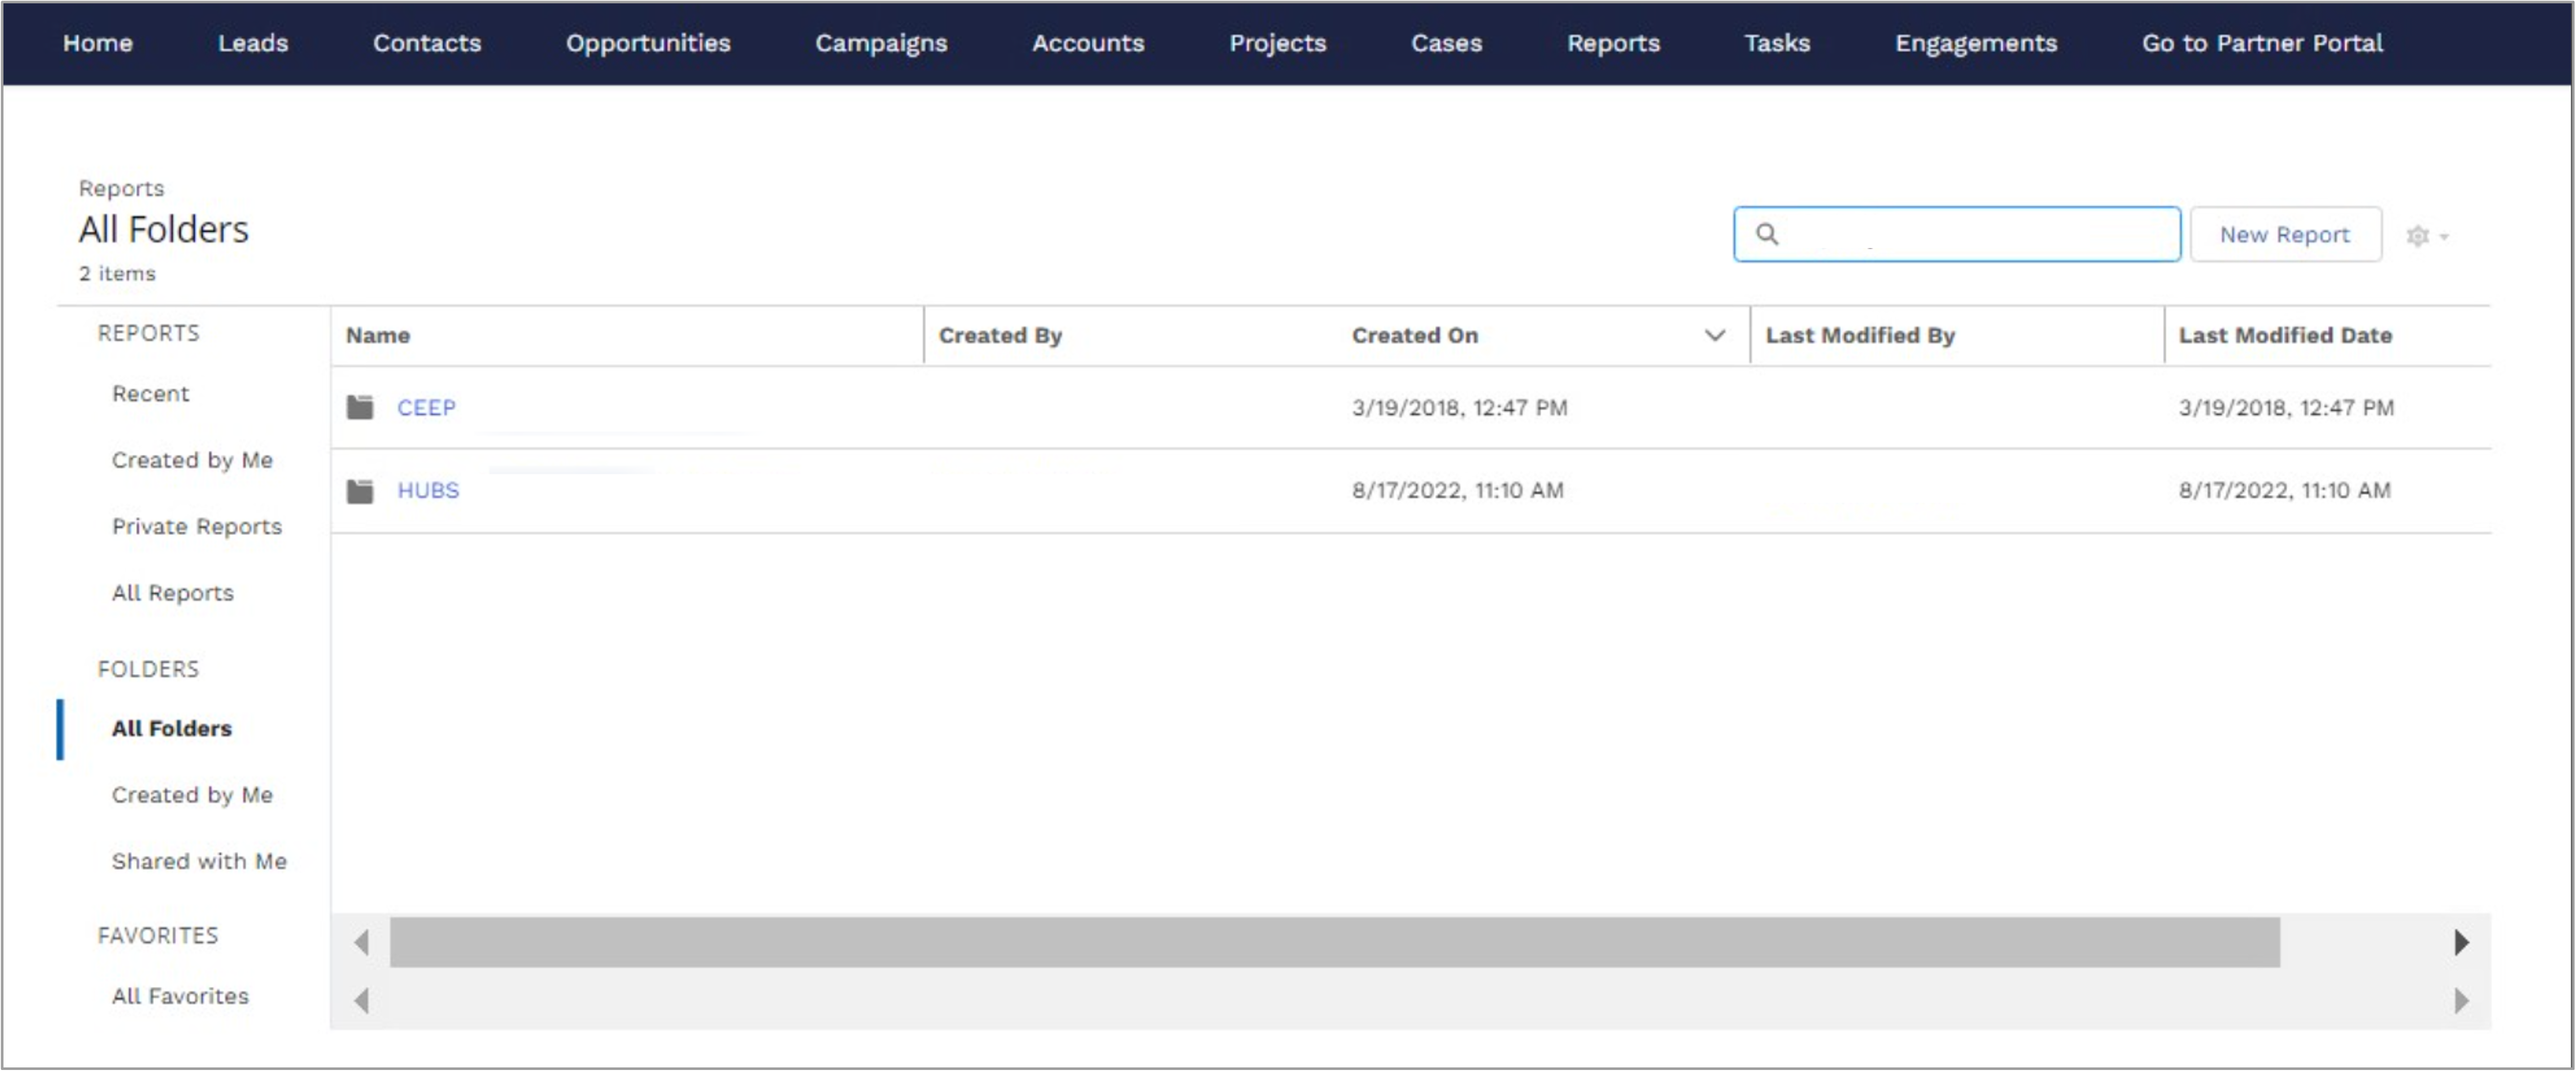
Each Hub has a folder that contains their reports which is located under All Folders in the Reports tab. | Expand |
|---|
| title | Hub Pre-defined Reports |
|---|
| Hub – Opportunities Hub – Converted Leads Hub – Prime Hub Contacts w/Activities Hub – Prime Hub Leads w/Activities Hub – Monthly Report Roll Up (Required for Monthly Invoice) Hub Monthly Report – Part 1 and Part 2 (separate report rolled into Monthly Report Roll Up) |
| Expand |
|---|
| 
|
|
| UI Steps |
|---|
|
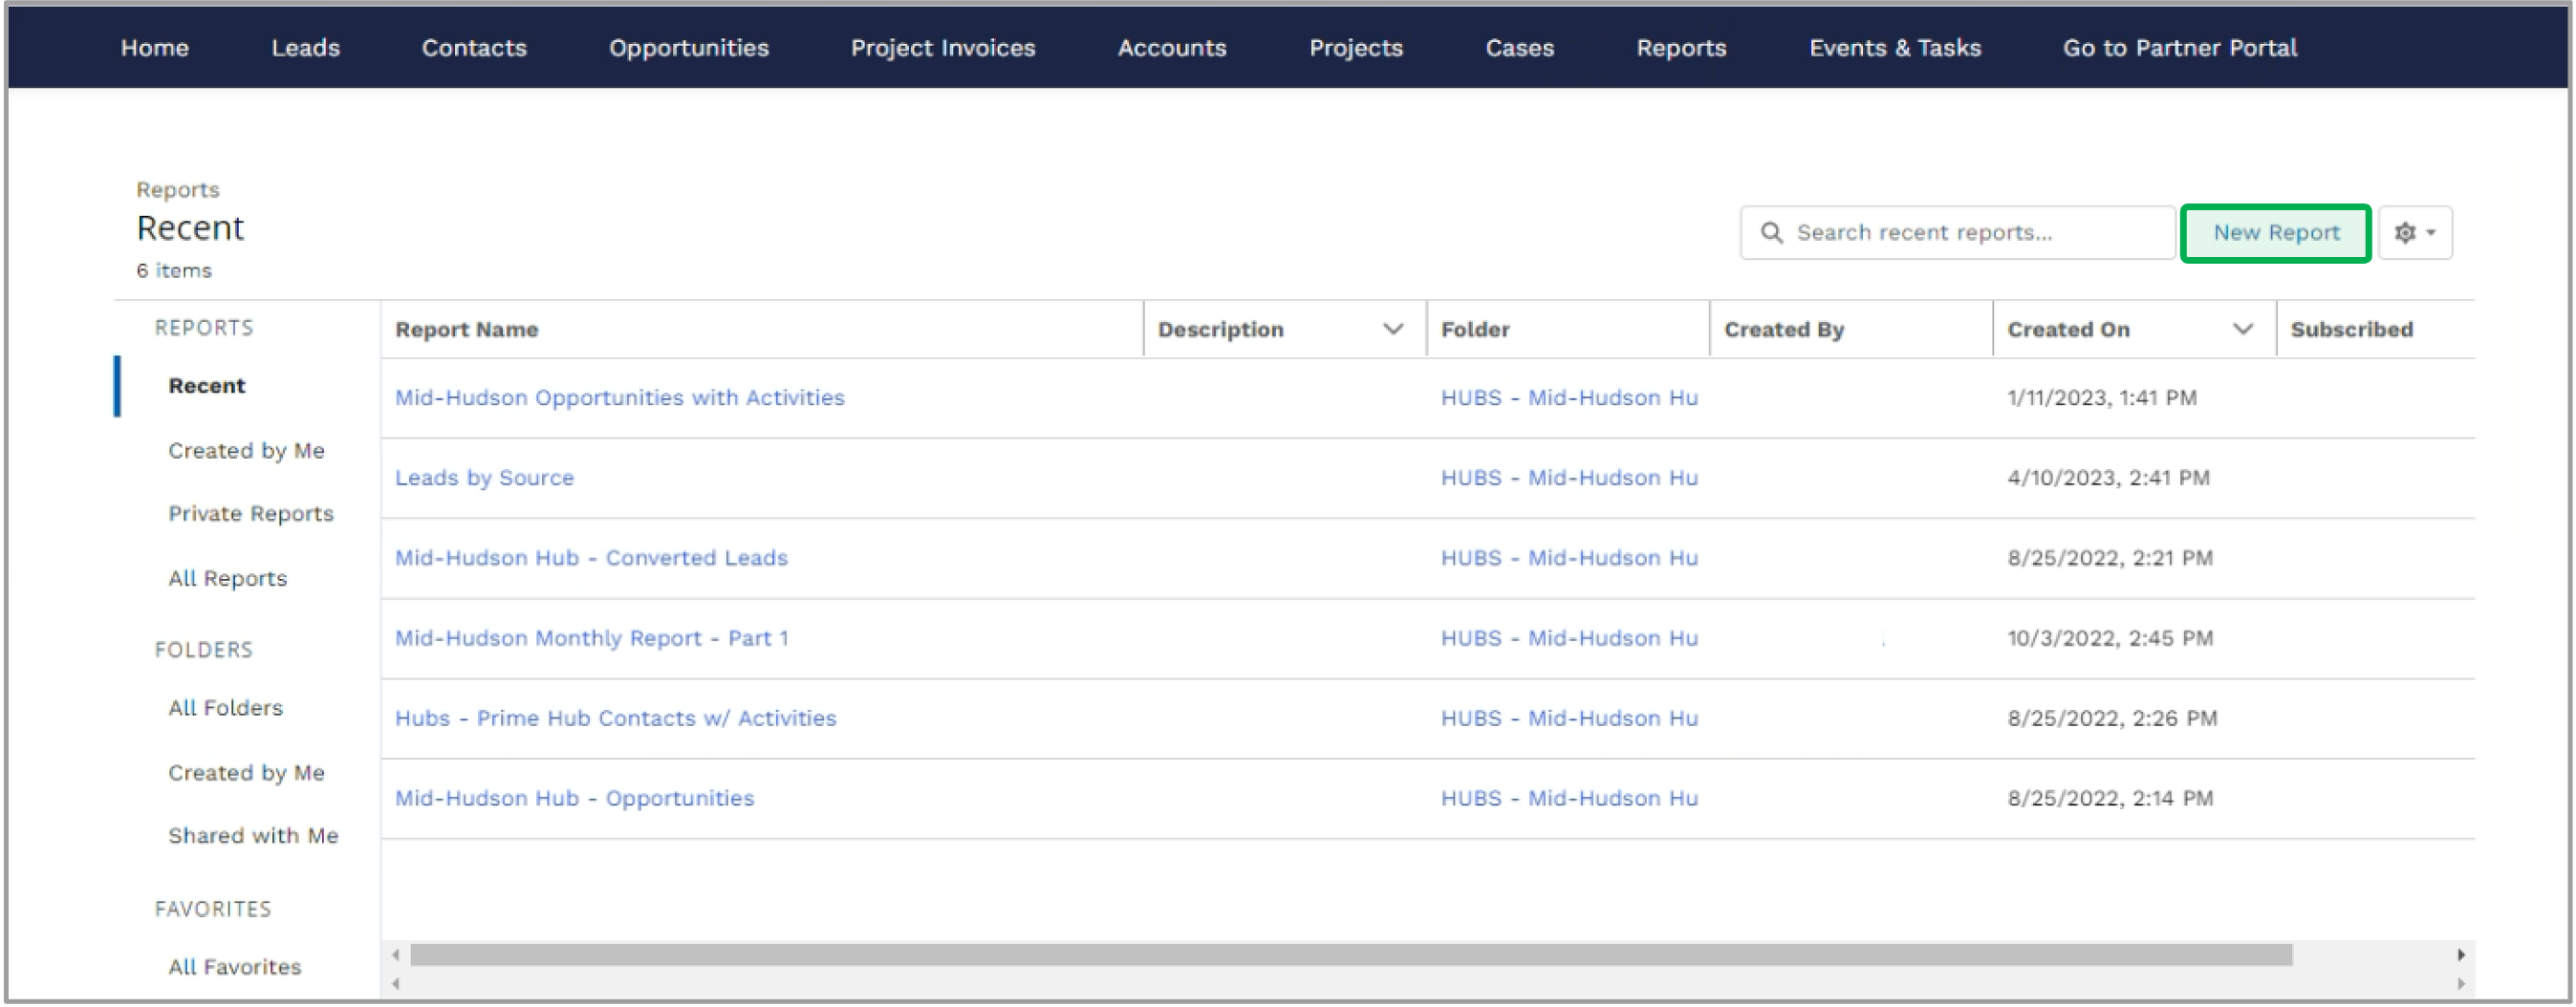
| UI Step |
|---|
On the Reports tab, click the New Report button to start the process. | Expand |
|---|
| 
|
|
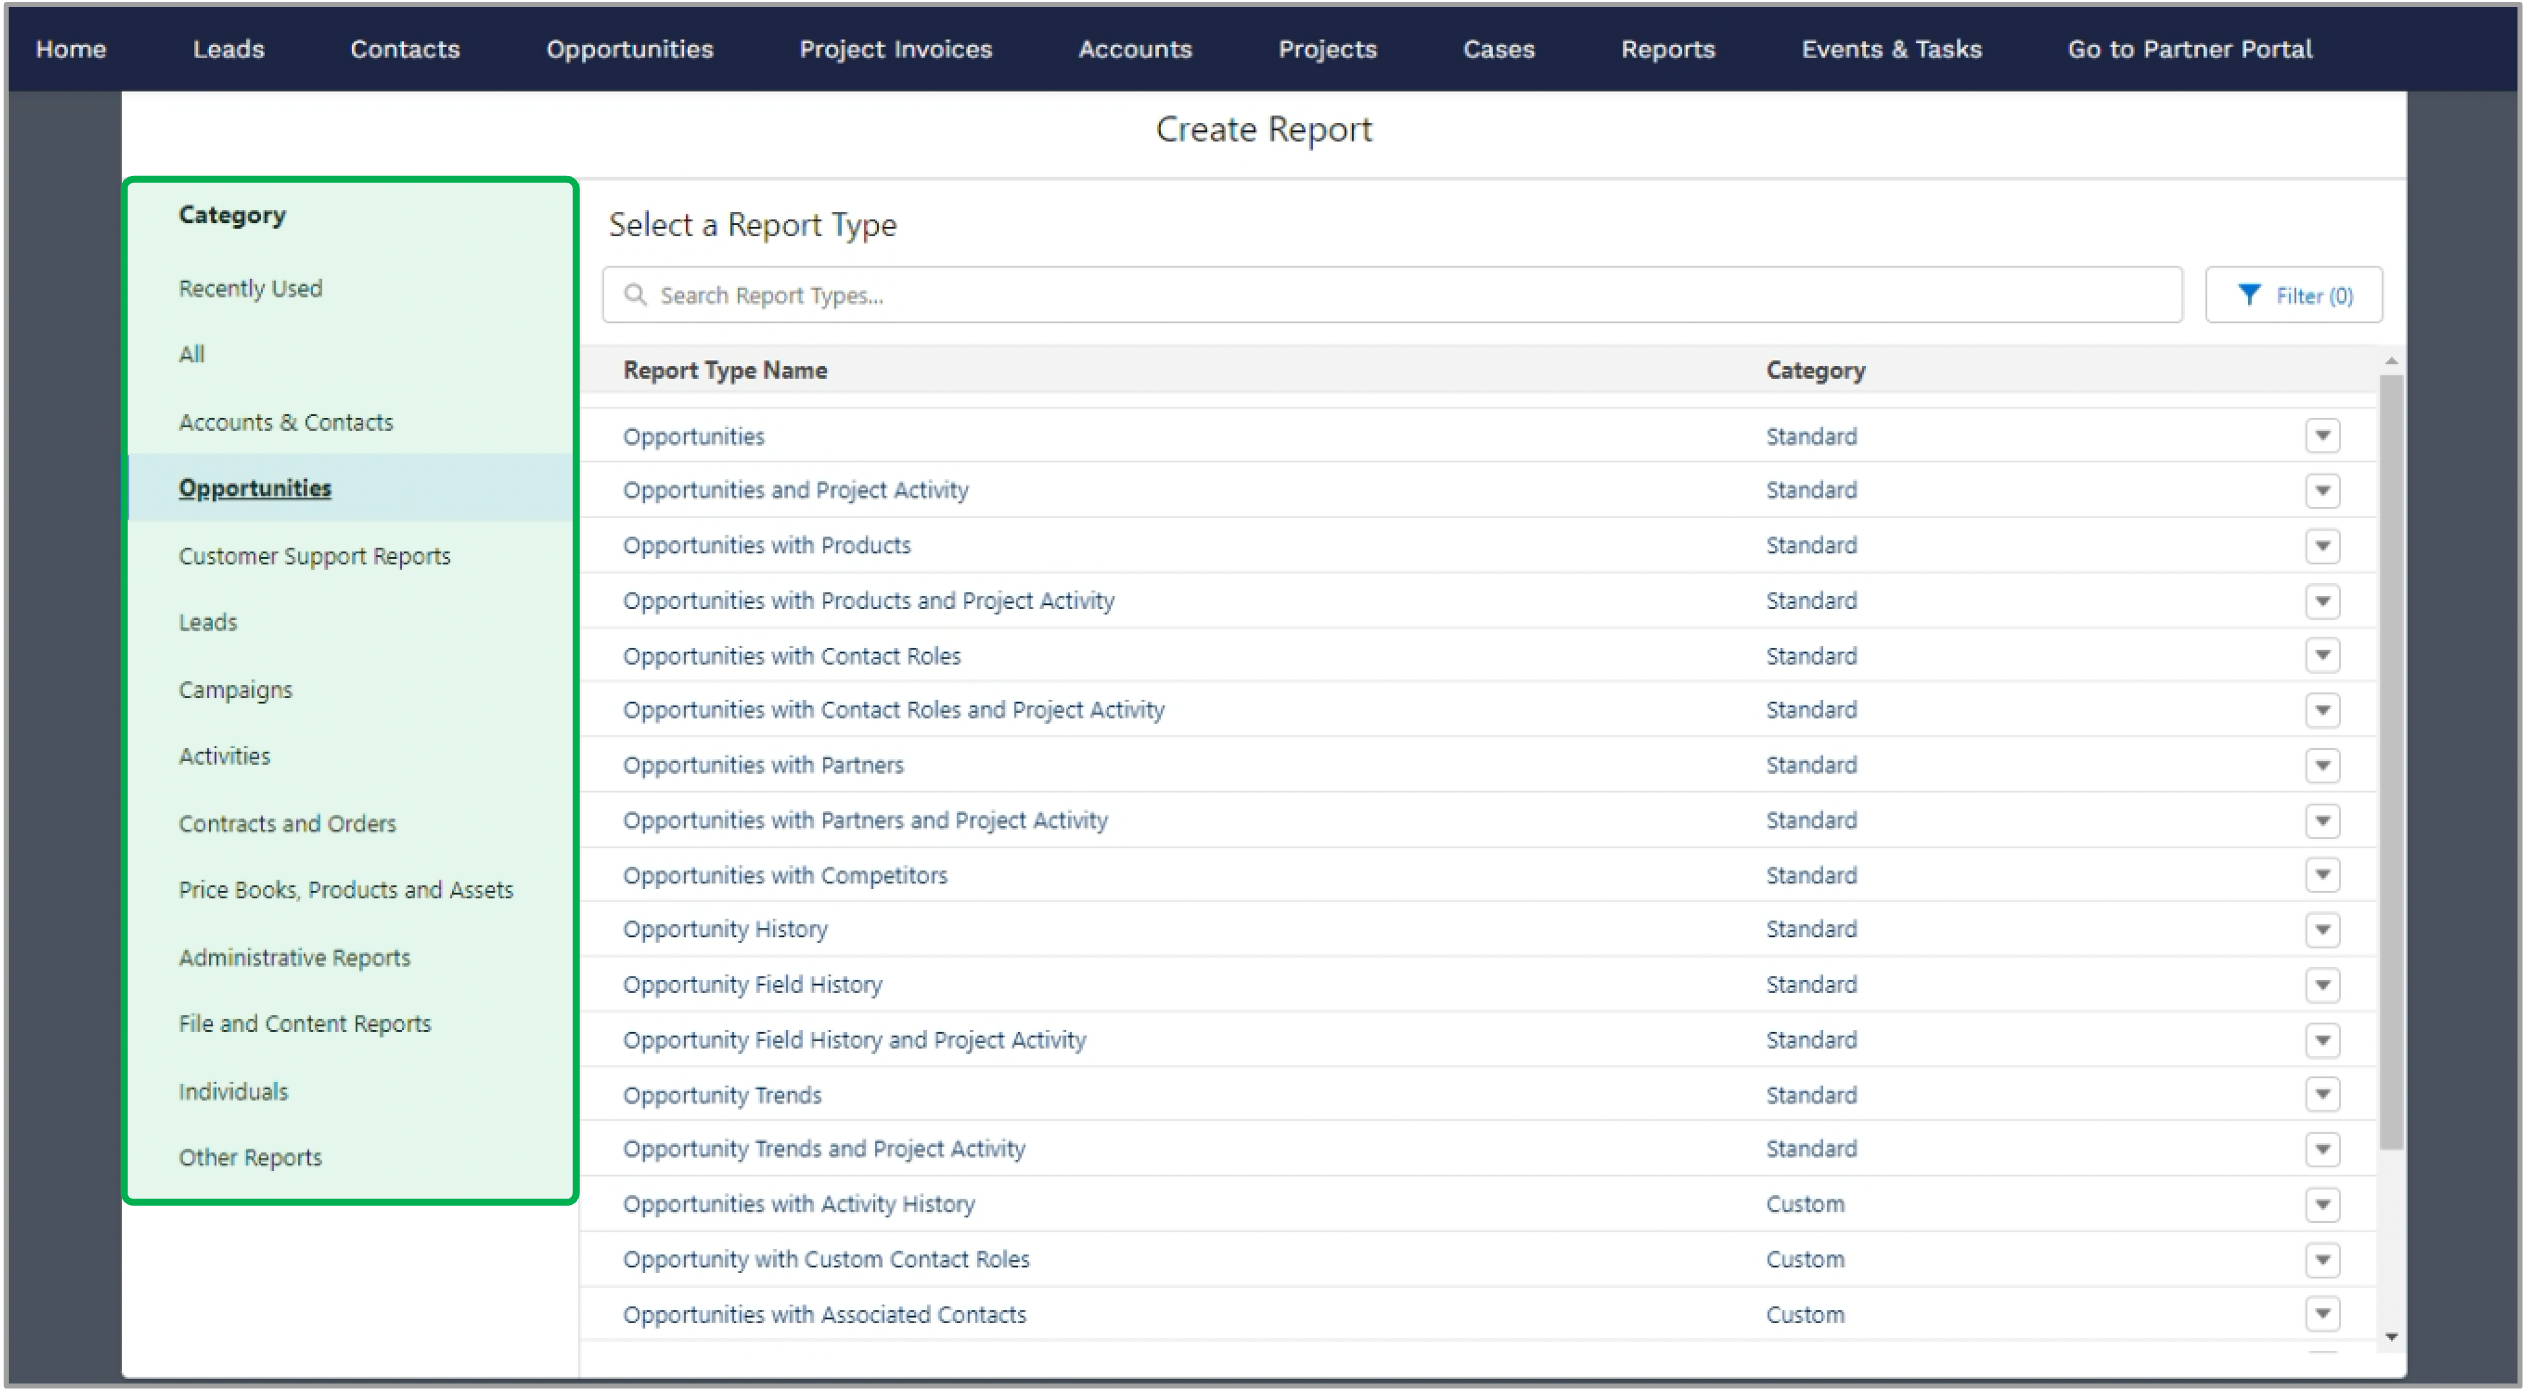
| UI Step |
|---|
In the Create Report window, choose a Report Type which defines the tables and fields you can have in the report. Use the Category on the left to filter the report types by the main objects you want to report on. | Expand |
|---|
| 
|
|
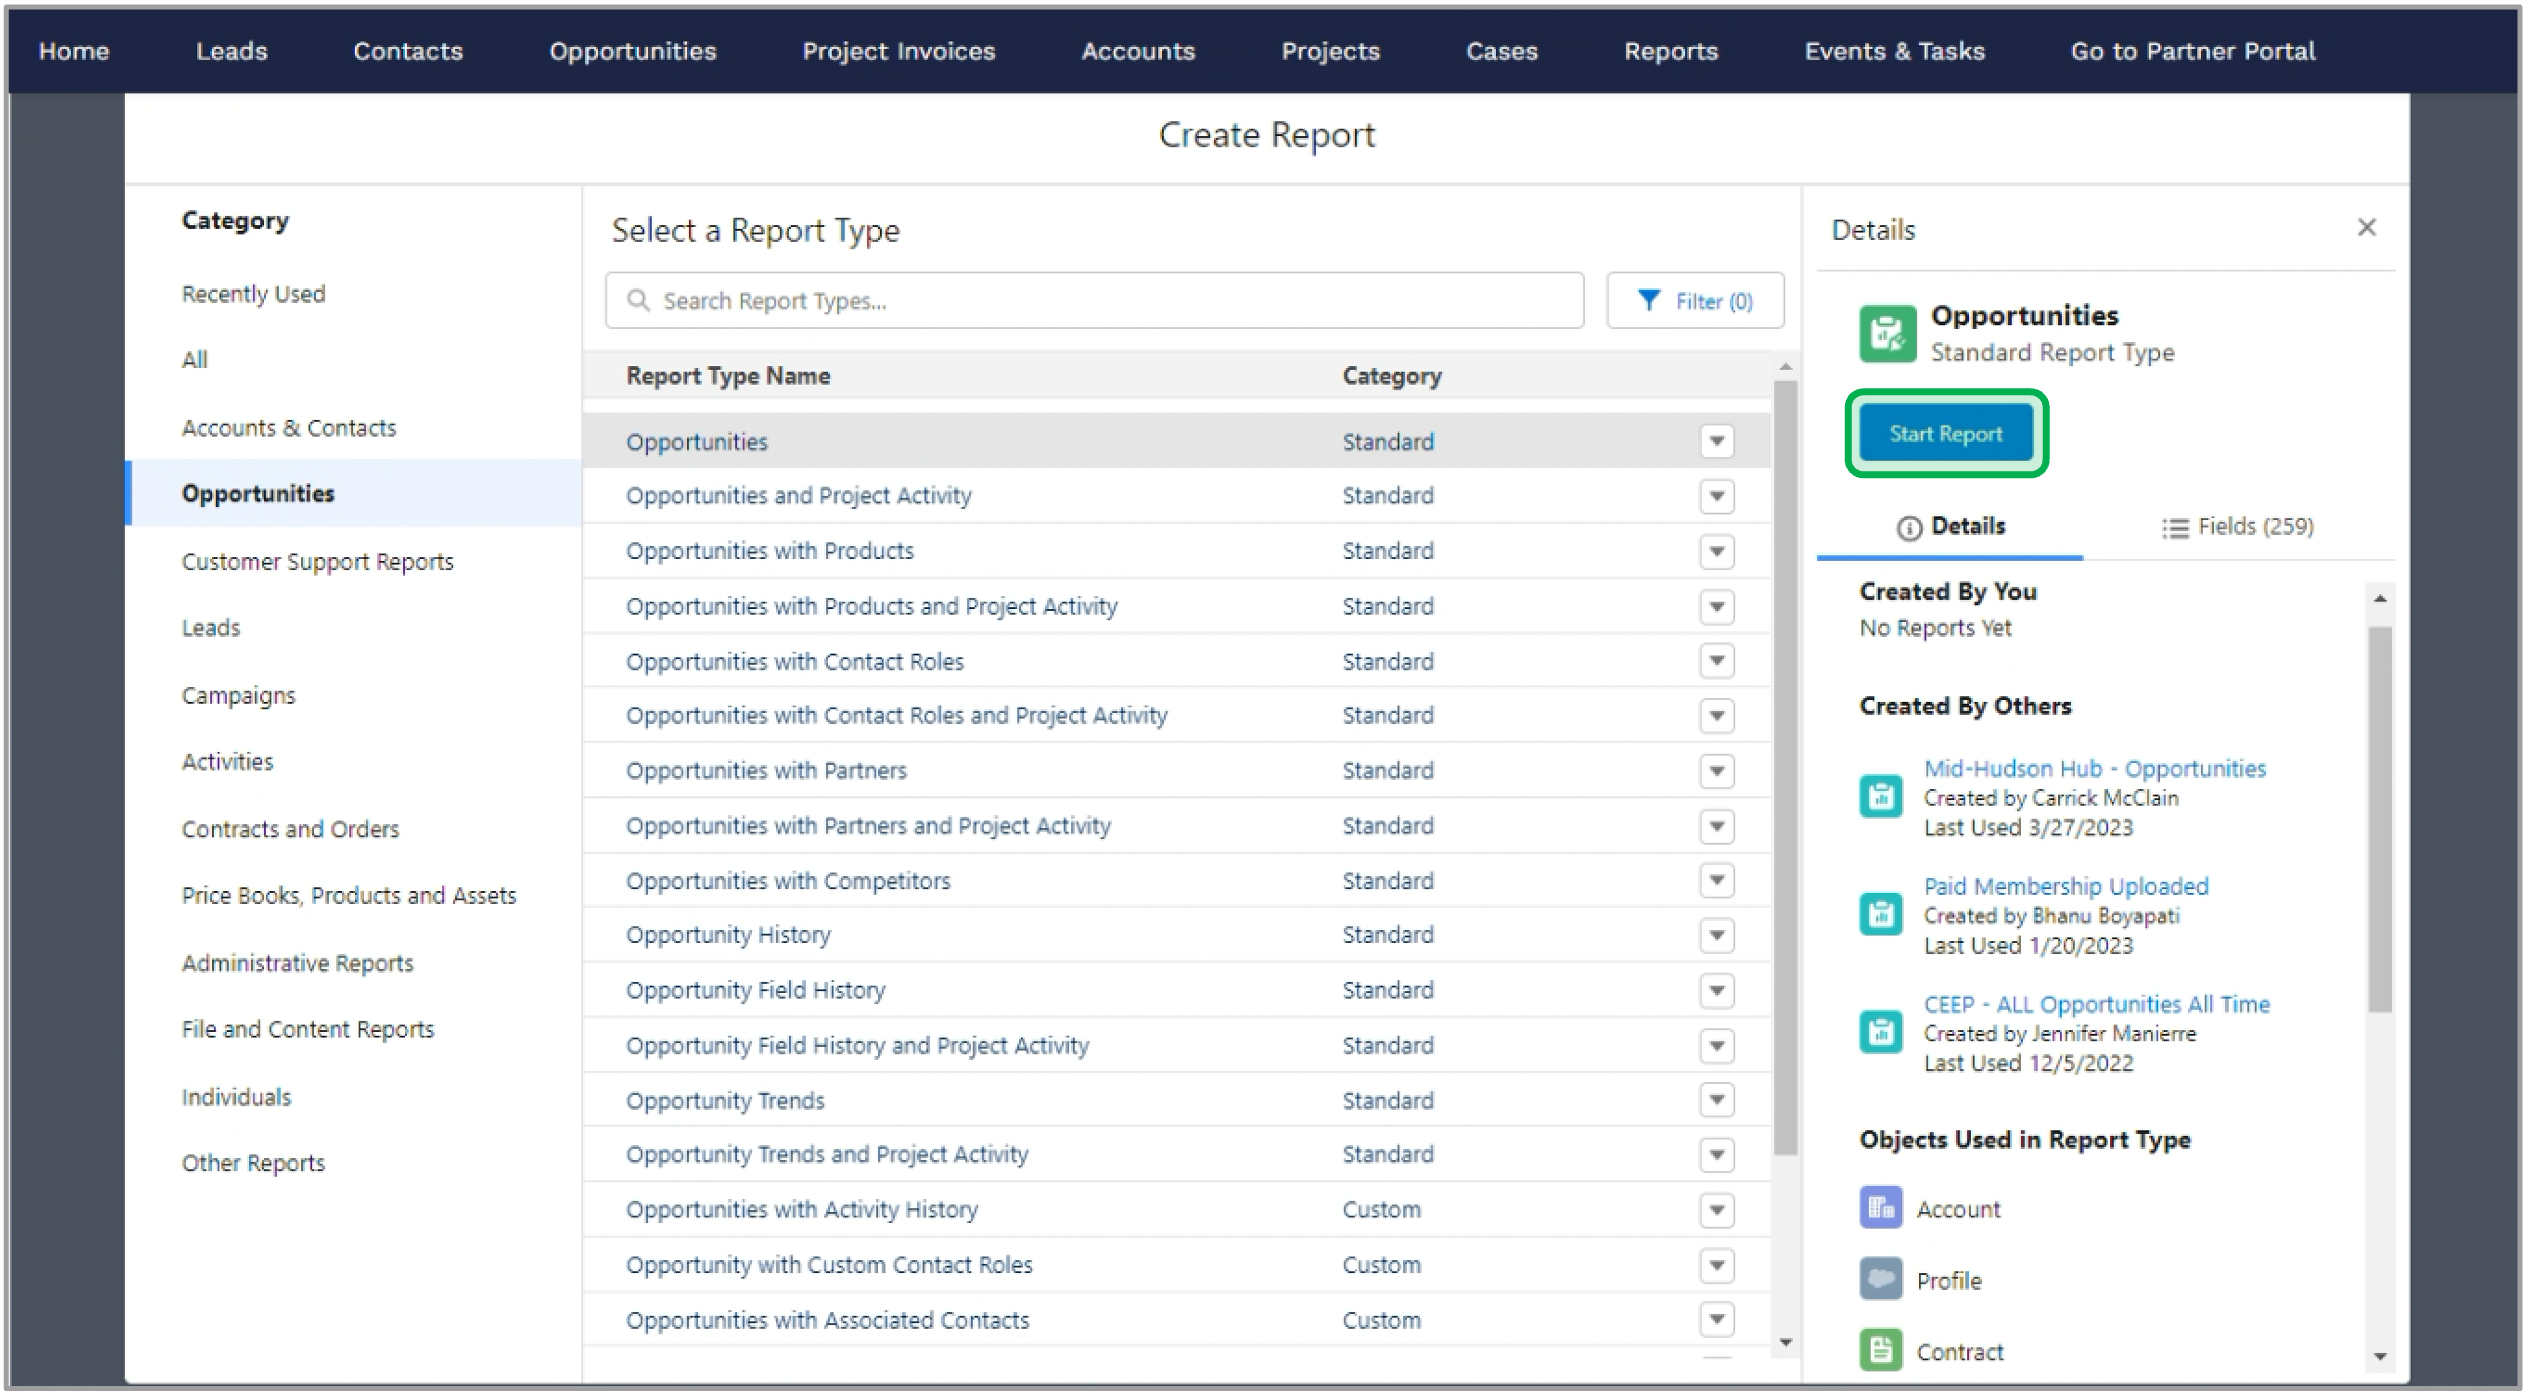
| UI Step |
|---|
Once the Report Type is selected, click the Start Report button. | Expand |
|---|
| 
|
|
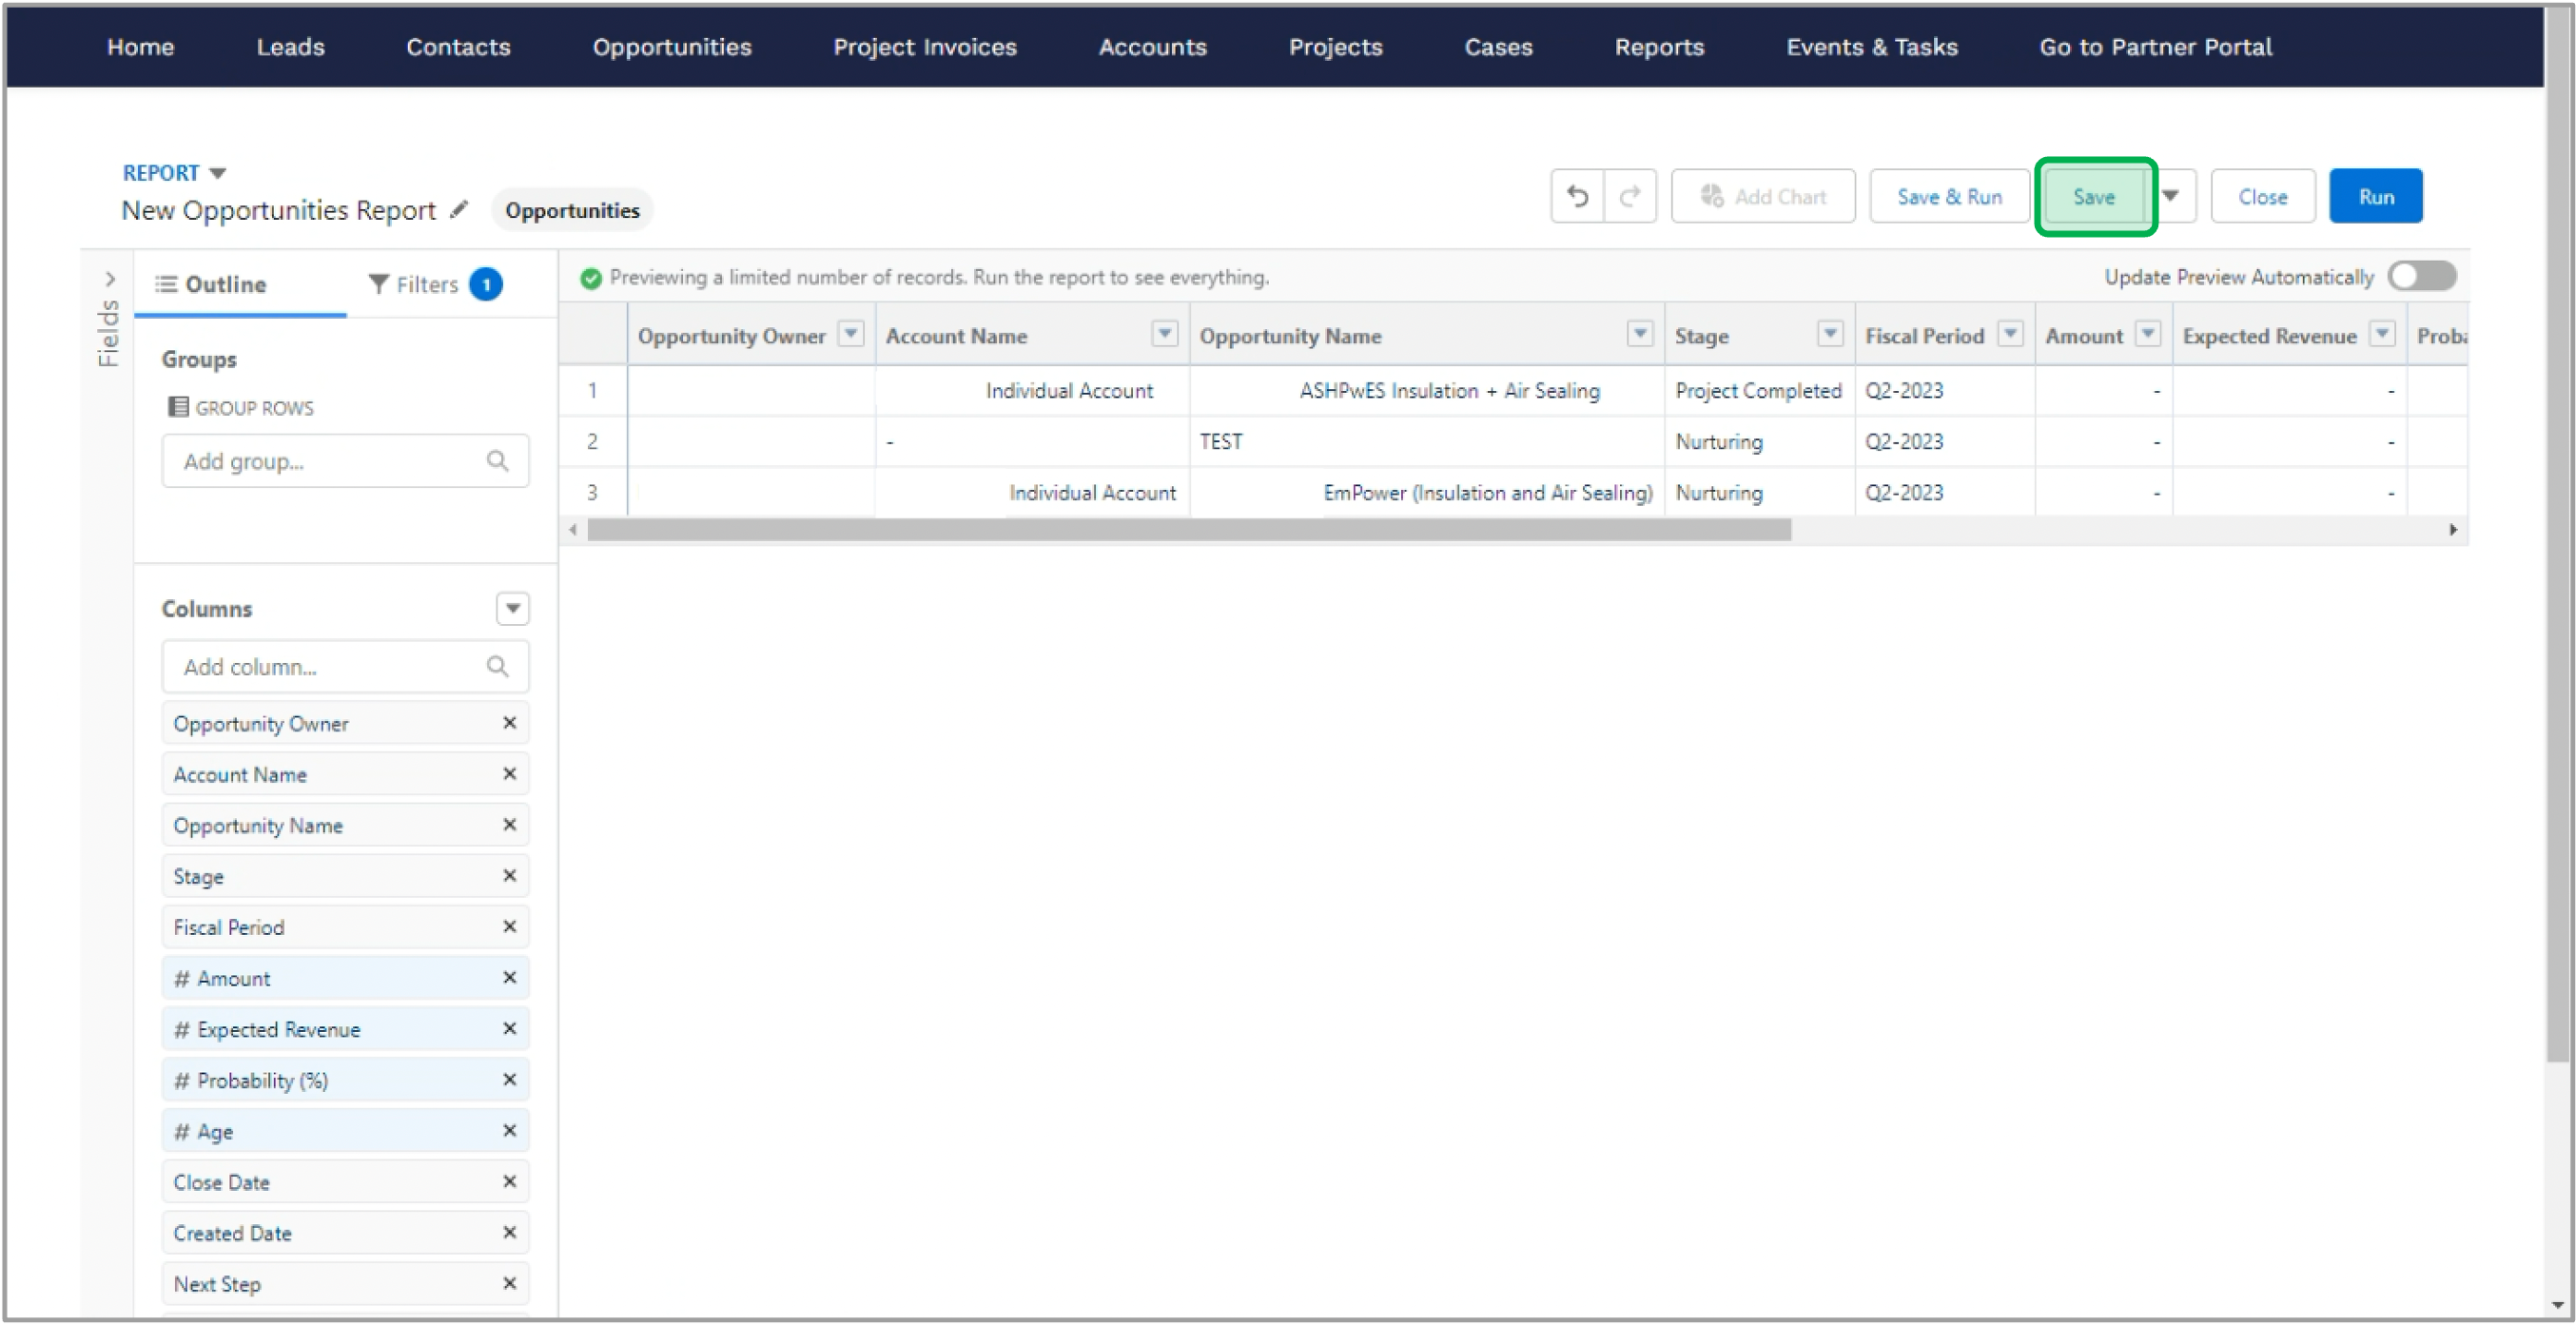
| UI Step |
|---|
On the New Report page, you can drag and drop the categories under the Column section to the table on right. If any changes to the table were made, click the Run button to see how the Report would look like. | Expand |
|---|
| 
|
|
| UI Step |
|---|
Once you are ready to save the report, click the Save button. | Warning |
|---|
For Hub member visibility, save New Reports to the Hub Folder. |
| Expand |
|---|
| 
|
|
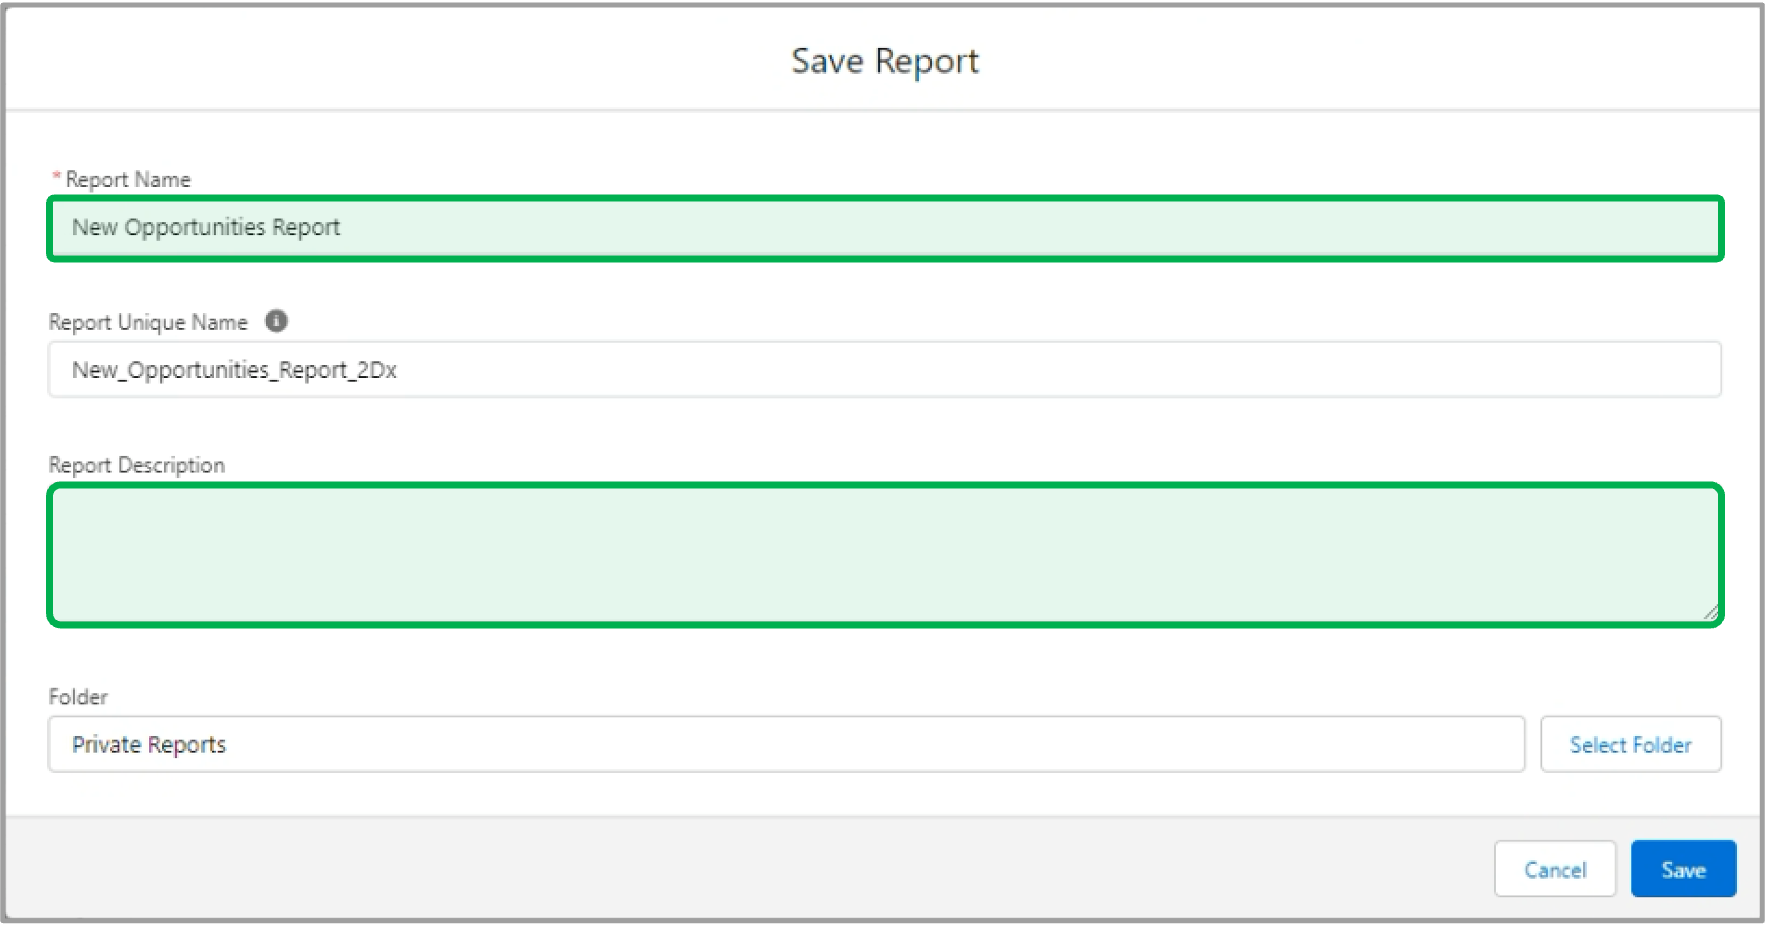
| UI Step |
|---|
On the Save Report pop-up window, update the report name and add a discription. | Expand |
|---|
| 
|
|
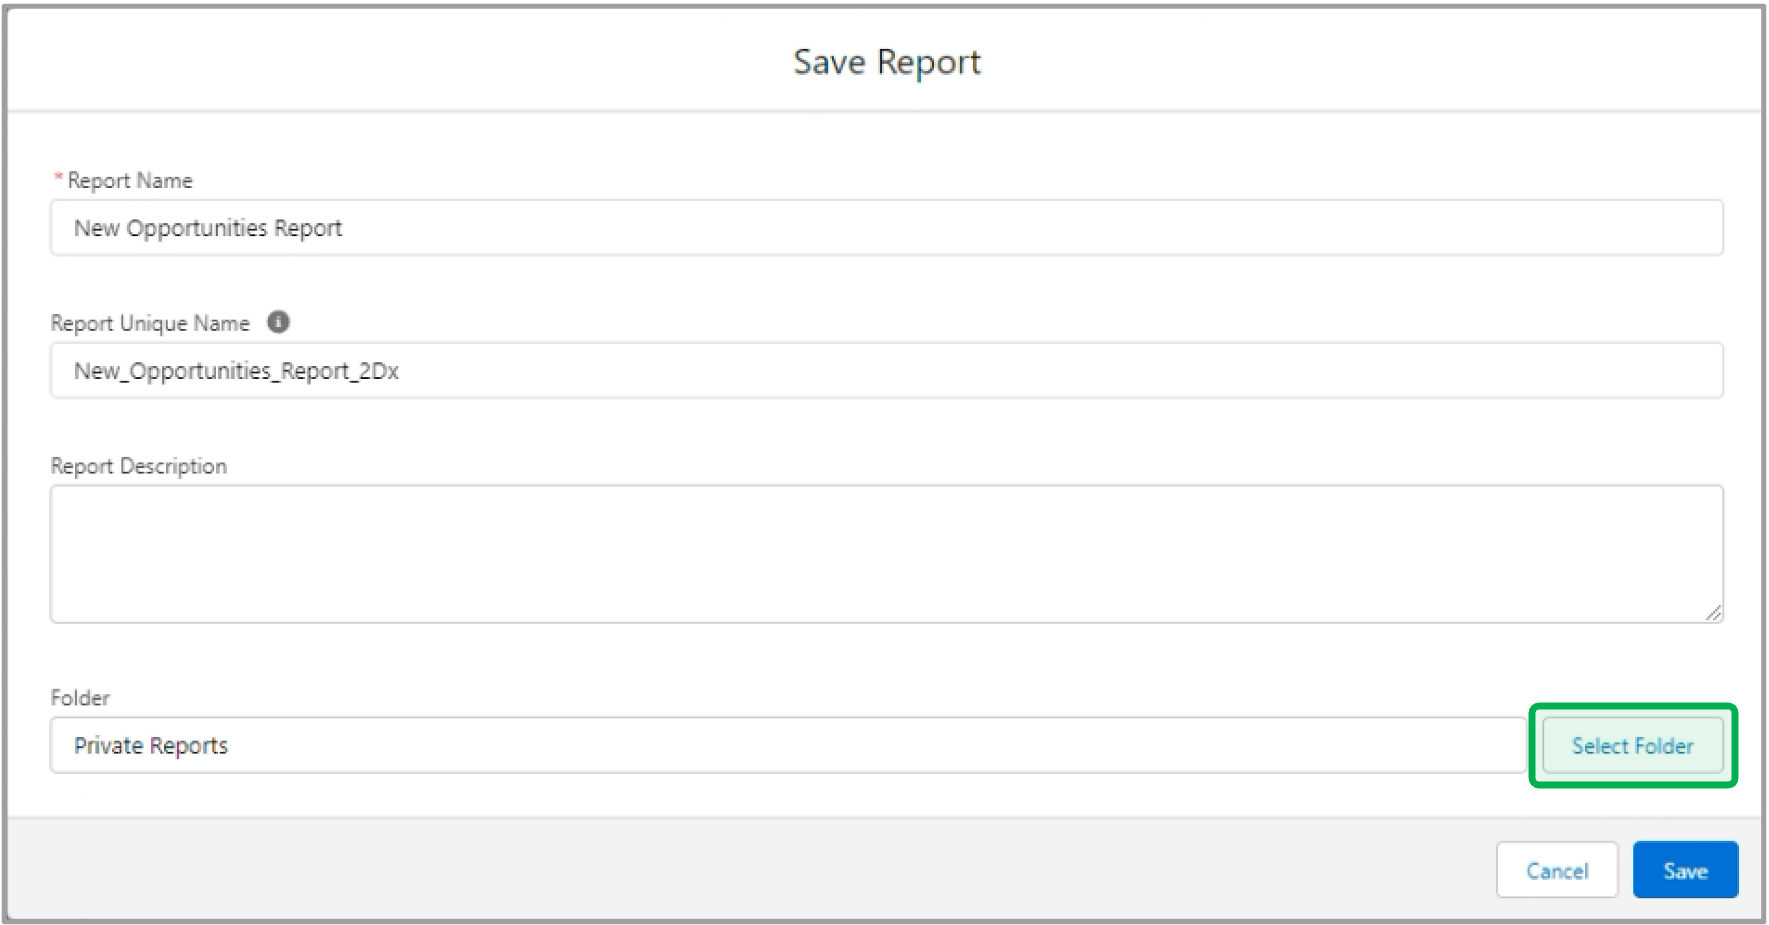
| UI Step |
|---|
When saving a report, if you want to share the report with other users in the Hub, the report should be saved in your Hubs folder (Private Reports Folder is set as the default). Click the Select Folder button and choose your Hubs Folder. | Expand |
|---|
| 
|
|
| UI Step |
|---|
In the Select window pop-up, click the folder name starting with HUBS, then click the Select Folder button to continue. | Expand |
|---|
| 
|
|
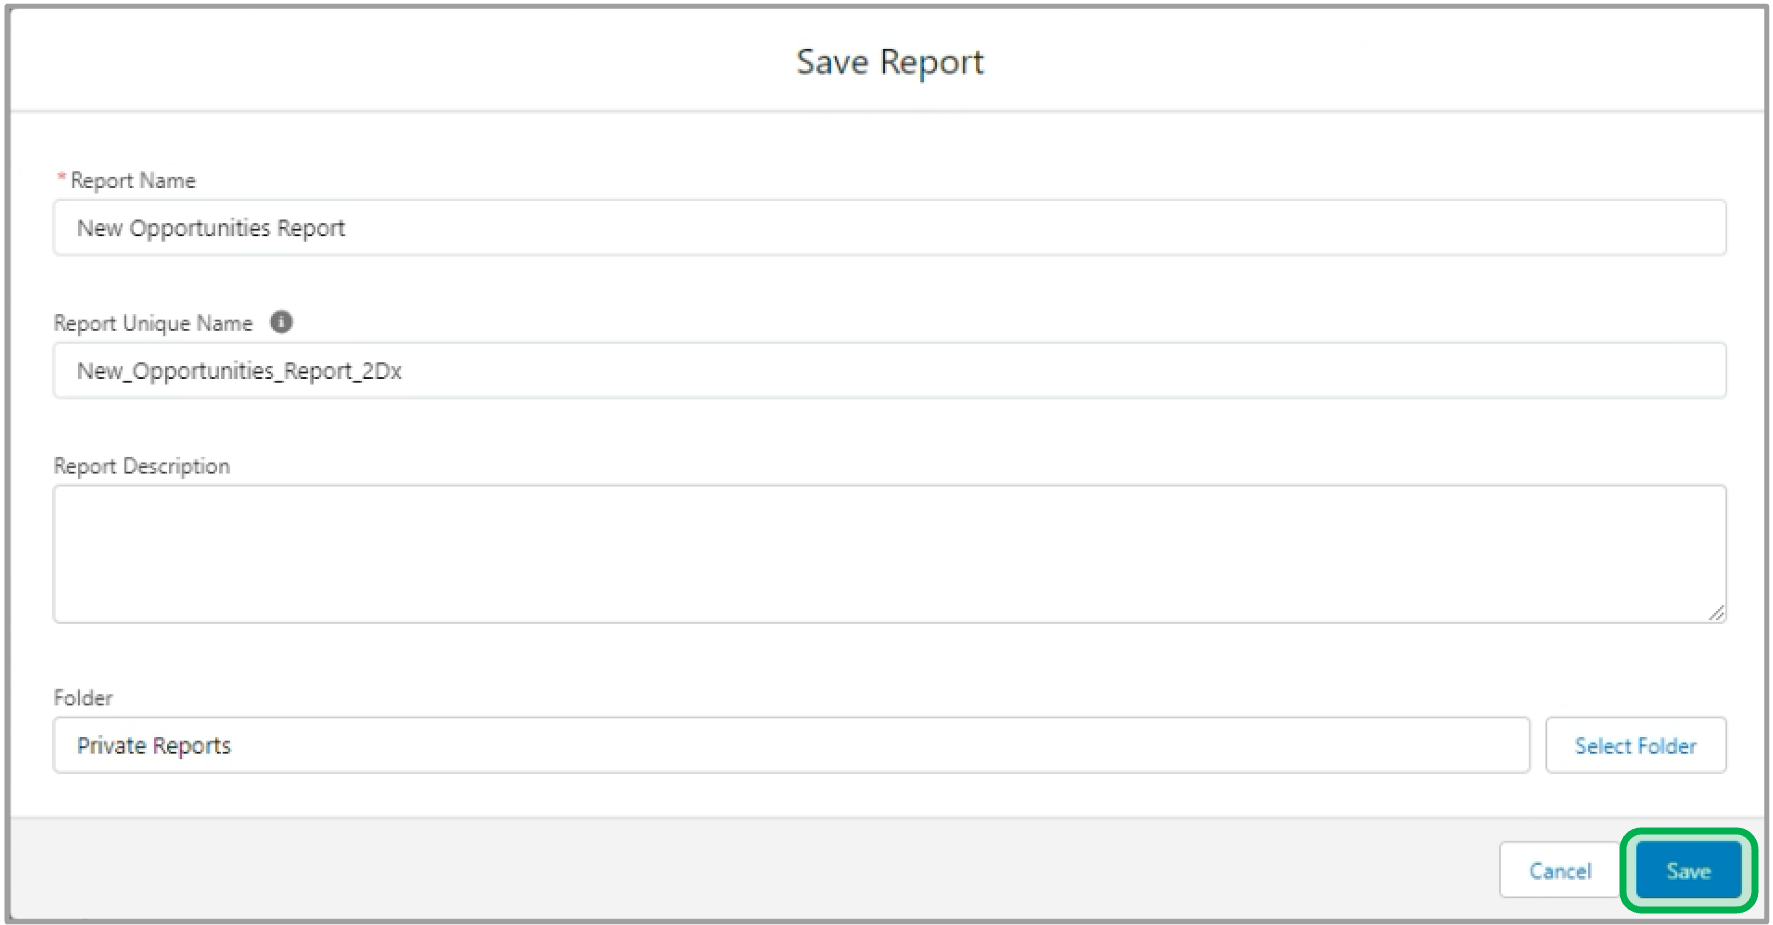
| UI Step |
|---|
Once you are ready to save the report, click the Save button. | Expand |
|---|
| 
|
|
|
|
| UI Expand |
|---|
| title | Reports CRM Portal Page |
|---|
| 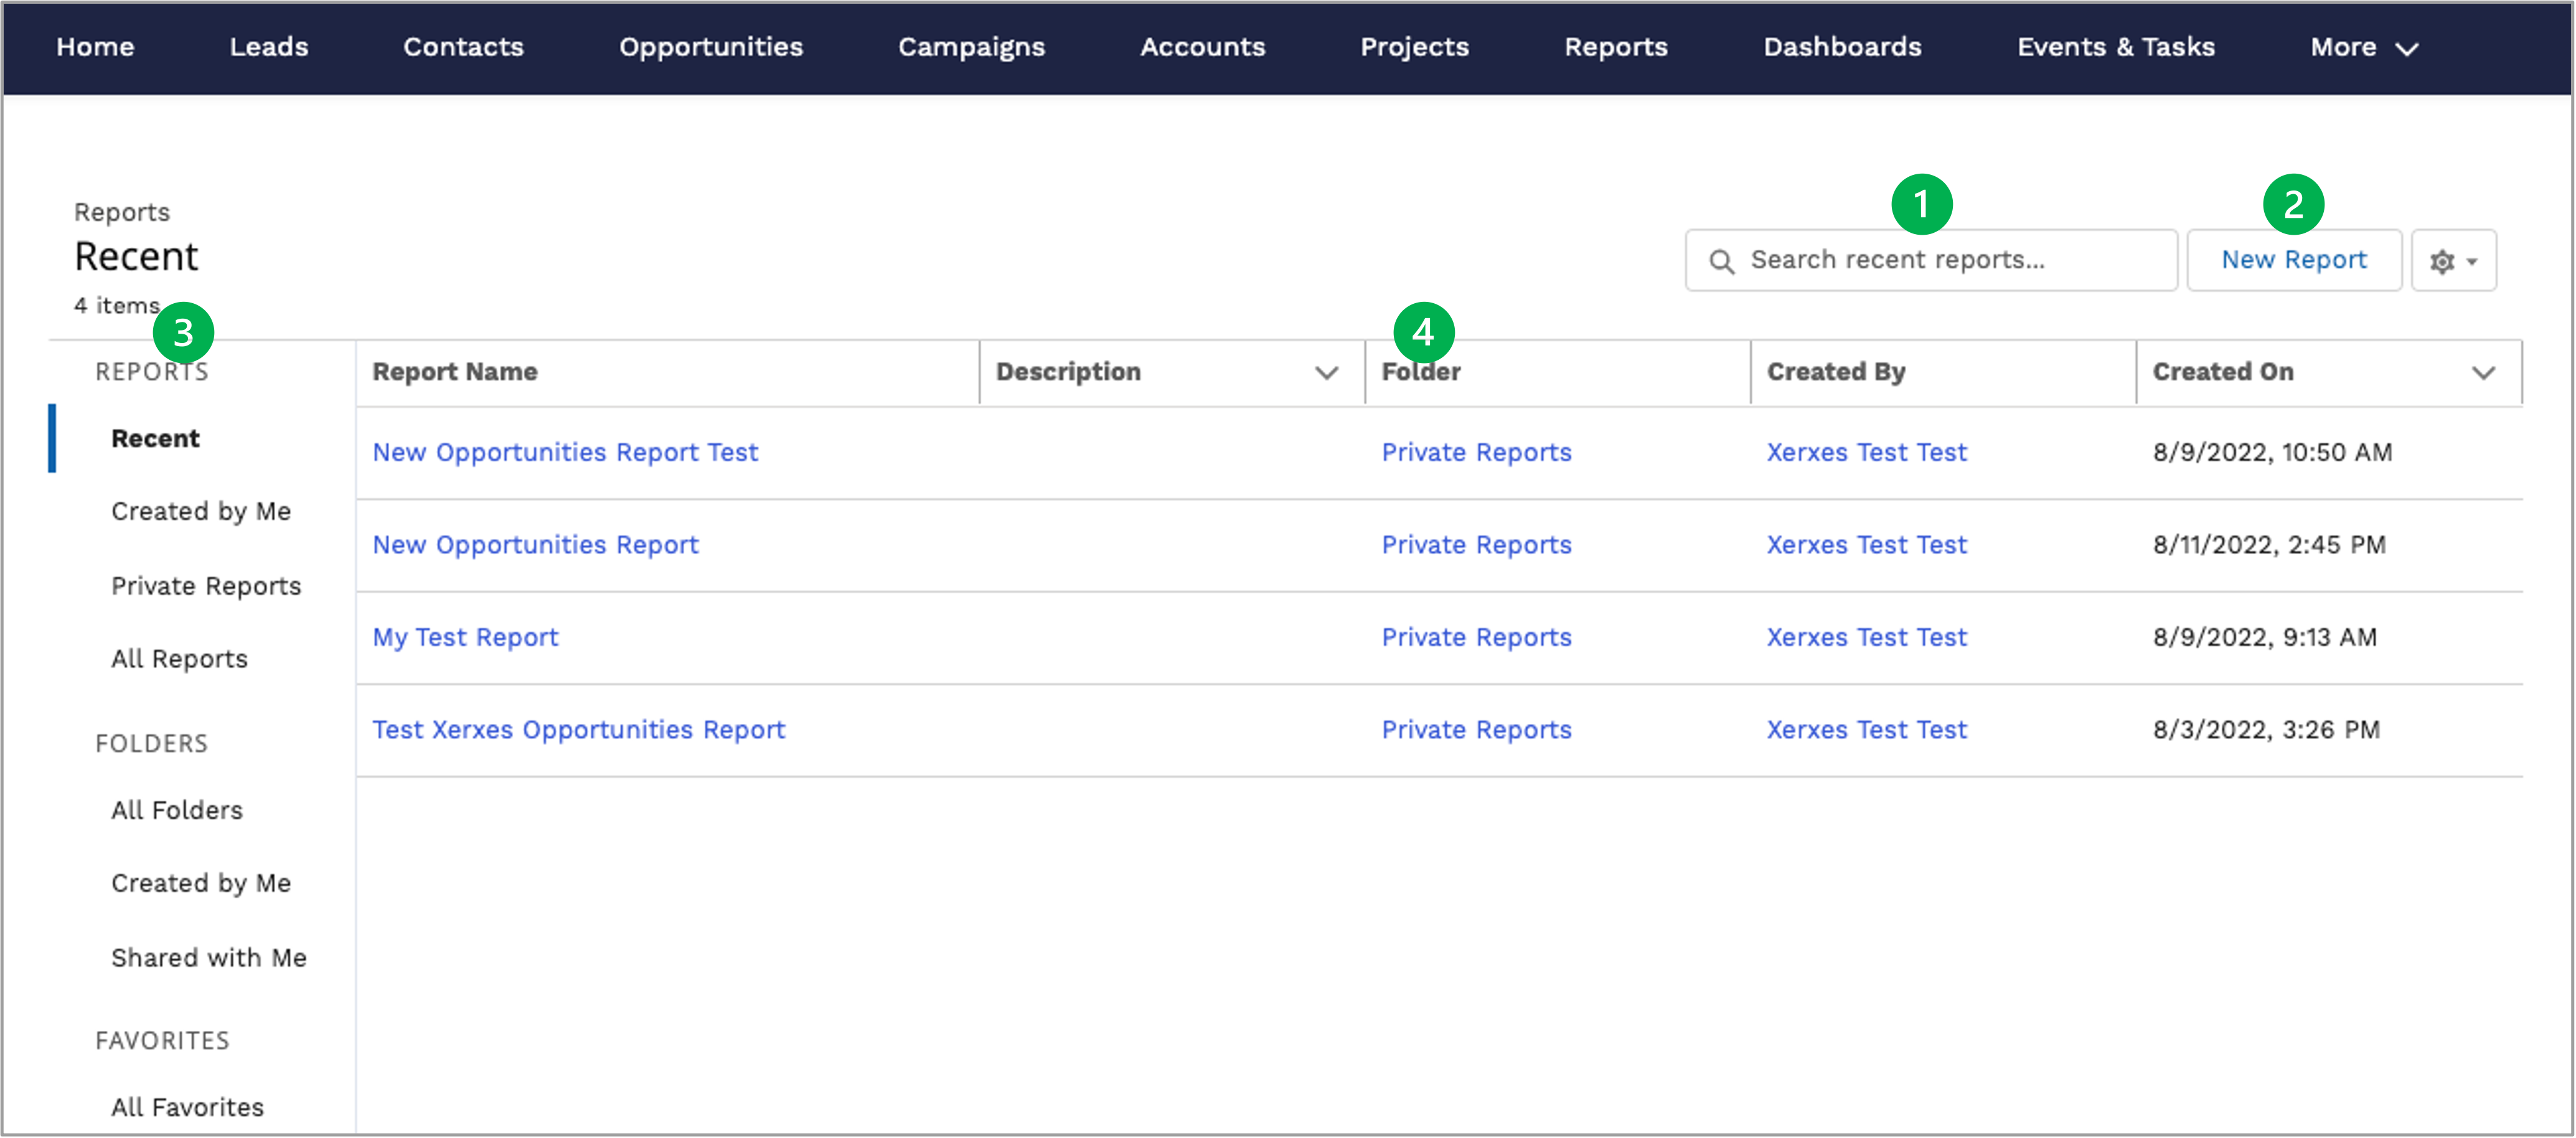
| Page Options | Description/Function |
|---|
| 1 | Search Reports | Filter the visible Reports list below based on the search parameters. |
|---|
| 2 | New Report | Allows users to run pre-configured reports. There is some flexibility in what each report will show. Please review the recording in the Reports Training Video section below to learn more. |
|---|
| 3 | Report Folders | Groups reports together based on the report folder commonality. |
|---|
| 4 | Available Reports | Displays all reports for the select folder. |
|---|
|
| UI Expand |
|---|
| title | Reports Training Video |
|---|
| | Multimedia |
|---|
| name | HUBS Working With Reports.mp4 |
|---|
| width | 100% |
|---|
| height | 100% |
|---|
|
|
|
| Aura - Tab |
|---|
|
| Panel |
|---|
| borderColor | #002D72 |
|---|
| bgColor | #F3F4F9 |
|---|
| titleColor | #ffffff |
|---|
| borderWidth | 1 |
|---|
| titleBGColor | #002D72 |
|---|
| borderStyle | none |
|---|
| title | Managing Tasks |
|---|
|
|
| UI Expand |
|---|
| title | Tasks CRM Portal Page |
|---|
|
| Column |
|---|
| 
| Page Options | Description/Function |
|---|
| 1 | Tasks List Views | Groups Tasks into helpful queues for easy review and access. Click the current queue to open the drop-down to select other available queues. Use the Pin icon to set a different queue as the default when accessing this page. |
|---|
| 2 | Search Tasks Field | Filter the visible Task list below based on the search parameters. |
|---|
| 3 | New Tasks Button | Opens a modal window to create a new lead. New Tasks are automatically added to the current users queue. Please review the Create New Task section below for more information. |
|---|
| 4 | Tasks List | list of all Tasks in the currently selected queue. Access a specific Task Record by clicking the name link in the Name Column. |
|---|
|
|
| UI Expand |
|---|
|
| Section |
|---|
| Column |
|---|
|
| UI Steps |
|---|
|
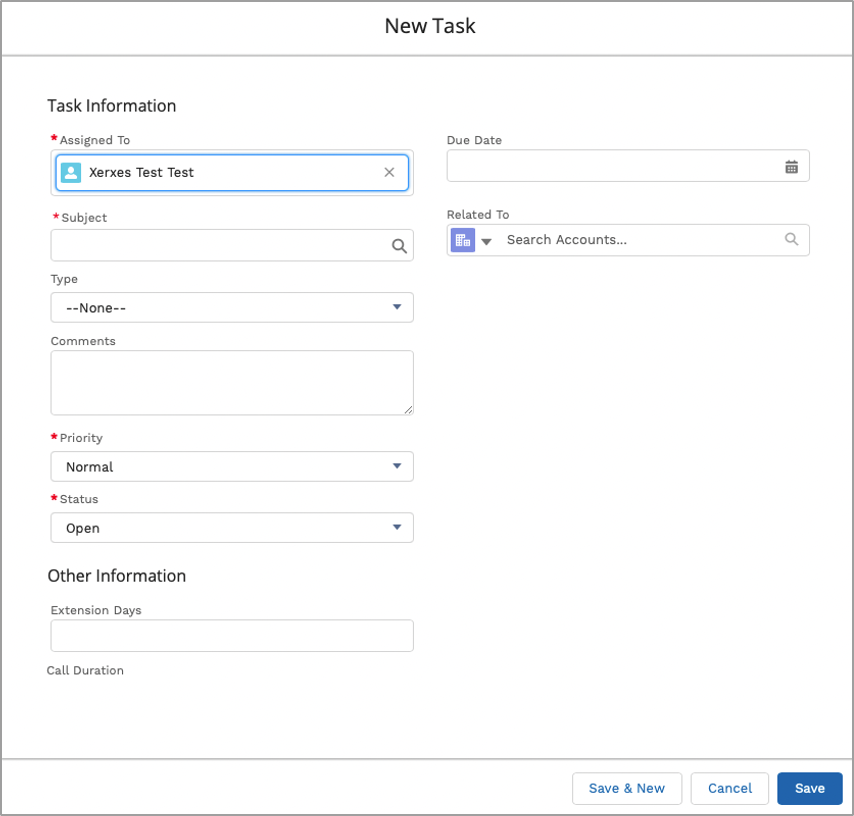
| UI Step |
|---|
Complete as many fields as possible when creating a New Task noting that fields marked with a red asterisk are required and must be completed before the lead can be created. The following are required fields: - Assigned to
- Subject
- Priority - should always be set to Normal. High priority assignments should be done via email or telephone
- Status
Open - Assigned to Hub Member Approved - Assignee approves email, accepts the meeting Rejected - Assignee rejects the task, comments should be included in the comments as to why the Task was rejected Completed - Task finished
| Tip |
|---|
The Type drop-down is action to be taken by the Assigned Hub Member. |
|
| UI Step |
|---|
Click Save & New to save the Task and generate a blank new form. |
| UI Step |
|---|
New Tasks are automatically assigned and only visible to the creator. |
|
|
| Column |
|---|
| 
|
|
|
| UI Expand |
|---|
| 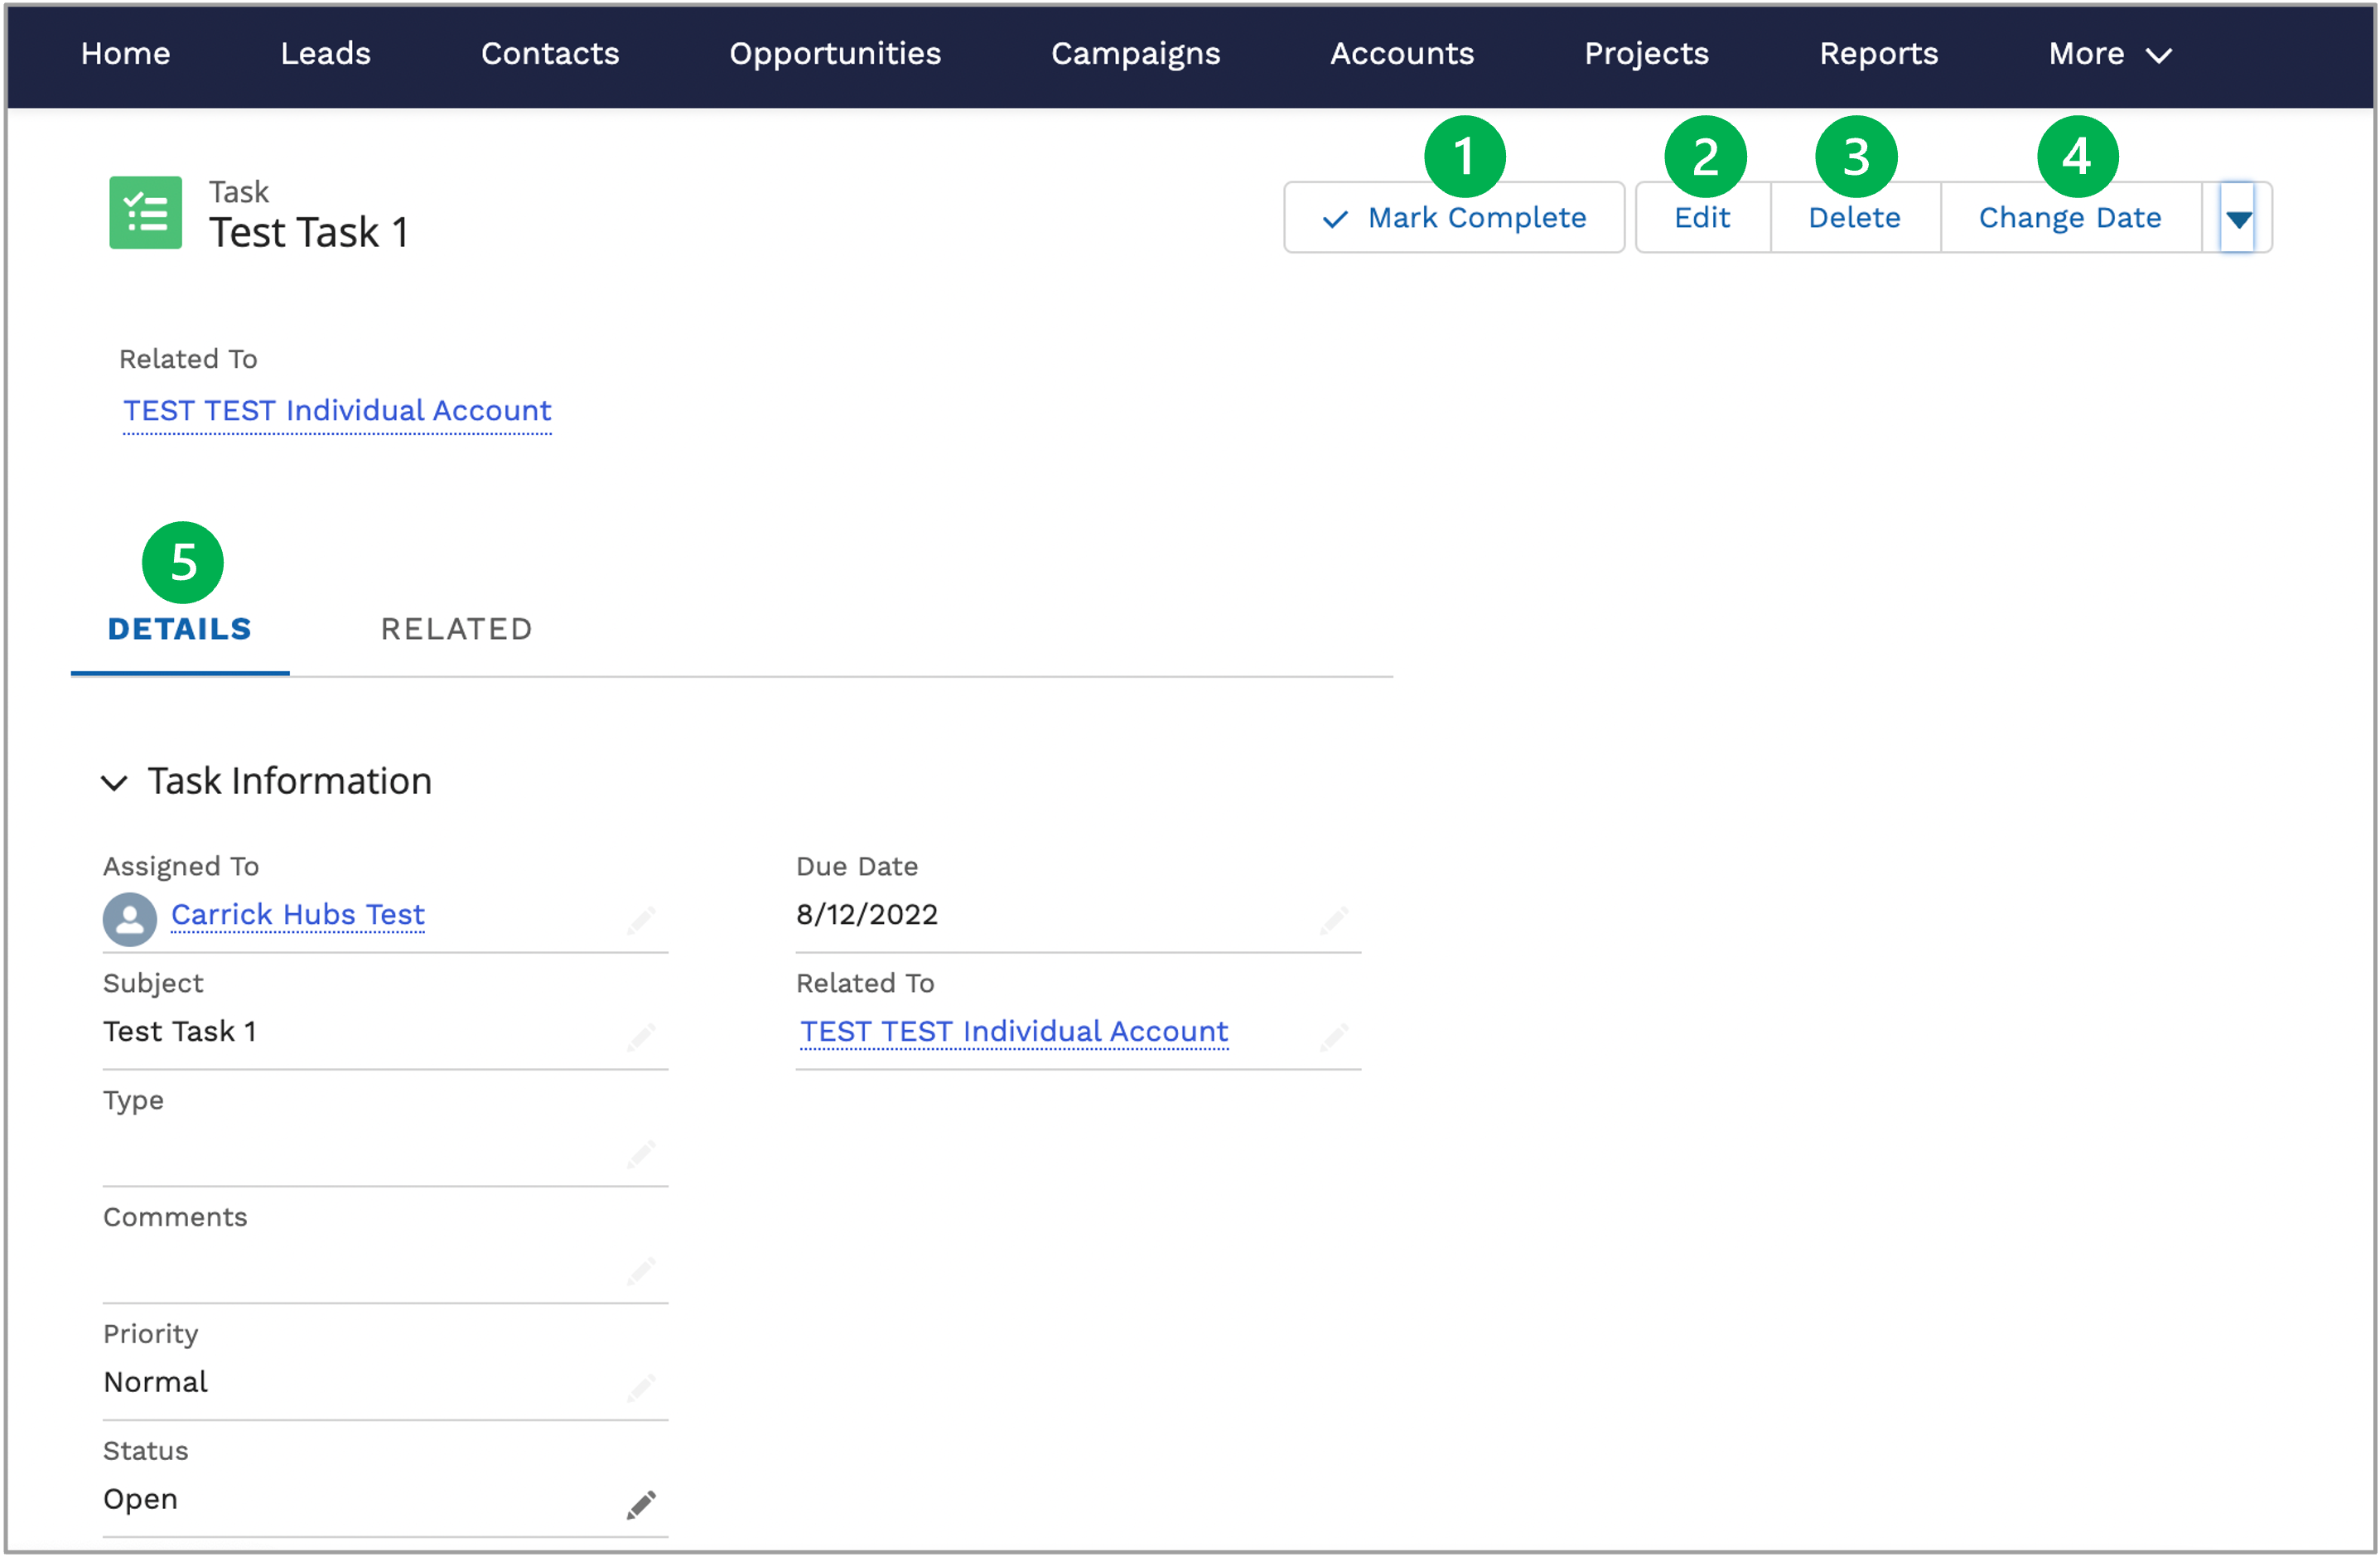
| Record Options | Description/Function |
|---|
| 1 | Mark Complete | Allows user to update Task status to Approved, Reject, or Completed. |
|---|
| 2 | Edit Button | Places the entire Task Record into edit mode. Be sure to Save when all changes have been made. |
|---|
| 3 | Delete Button | |
|---|
| 4 | Change Date | Allows user to change the Due Date of the Task. |
|---|
| 5 | Details Tab | Displays the Task Record details that can be edited either through the pencil icon at the far right of any field in this tab or when using the Edit button in the controls at the top-right of this page. |
|---|
| 6 | Related Tab - Notes & Attachments | Displays both notes and uploaded attachments. Use the Upload Files button to upload new documents. | Warning |
|---|
Do not upload files with PPSI (Personal or Protected Sensitive Information) |
|
|---|
|
|
| Aura - Tab |
|---|
|
| Panel |
|---|
| borderColor | #002D72 |
|---|
| bgColor | #F3F4F9 |
|---|
| titleColor | #ffffff |
|---|
| borderWidth | 1 |
|---|
| titleBGColor | #002D72 |
|---|
| borderStyle | none |
|---|
| title | Invoicing |
|---|
|
|
| UI Expand |
|---|
|
| UI Steps |
|---|
|
| UI Step |
|---|
In the CRM Salesforce Portal, click on the Go to Partner Portal tab to access the NYSERDA Portal. | Expand |
|---|
| 
|
|
| UI Step |
|---|
Within the Portal, click on the Projects tab. | Expand |
|---|
| 
|
|
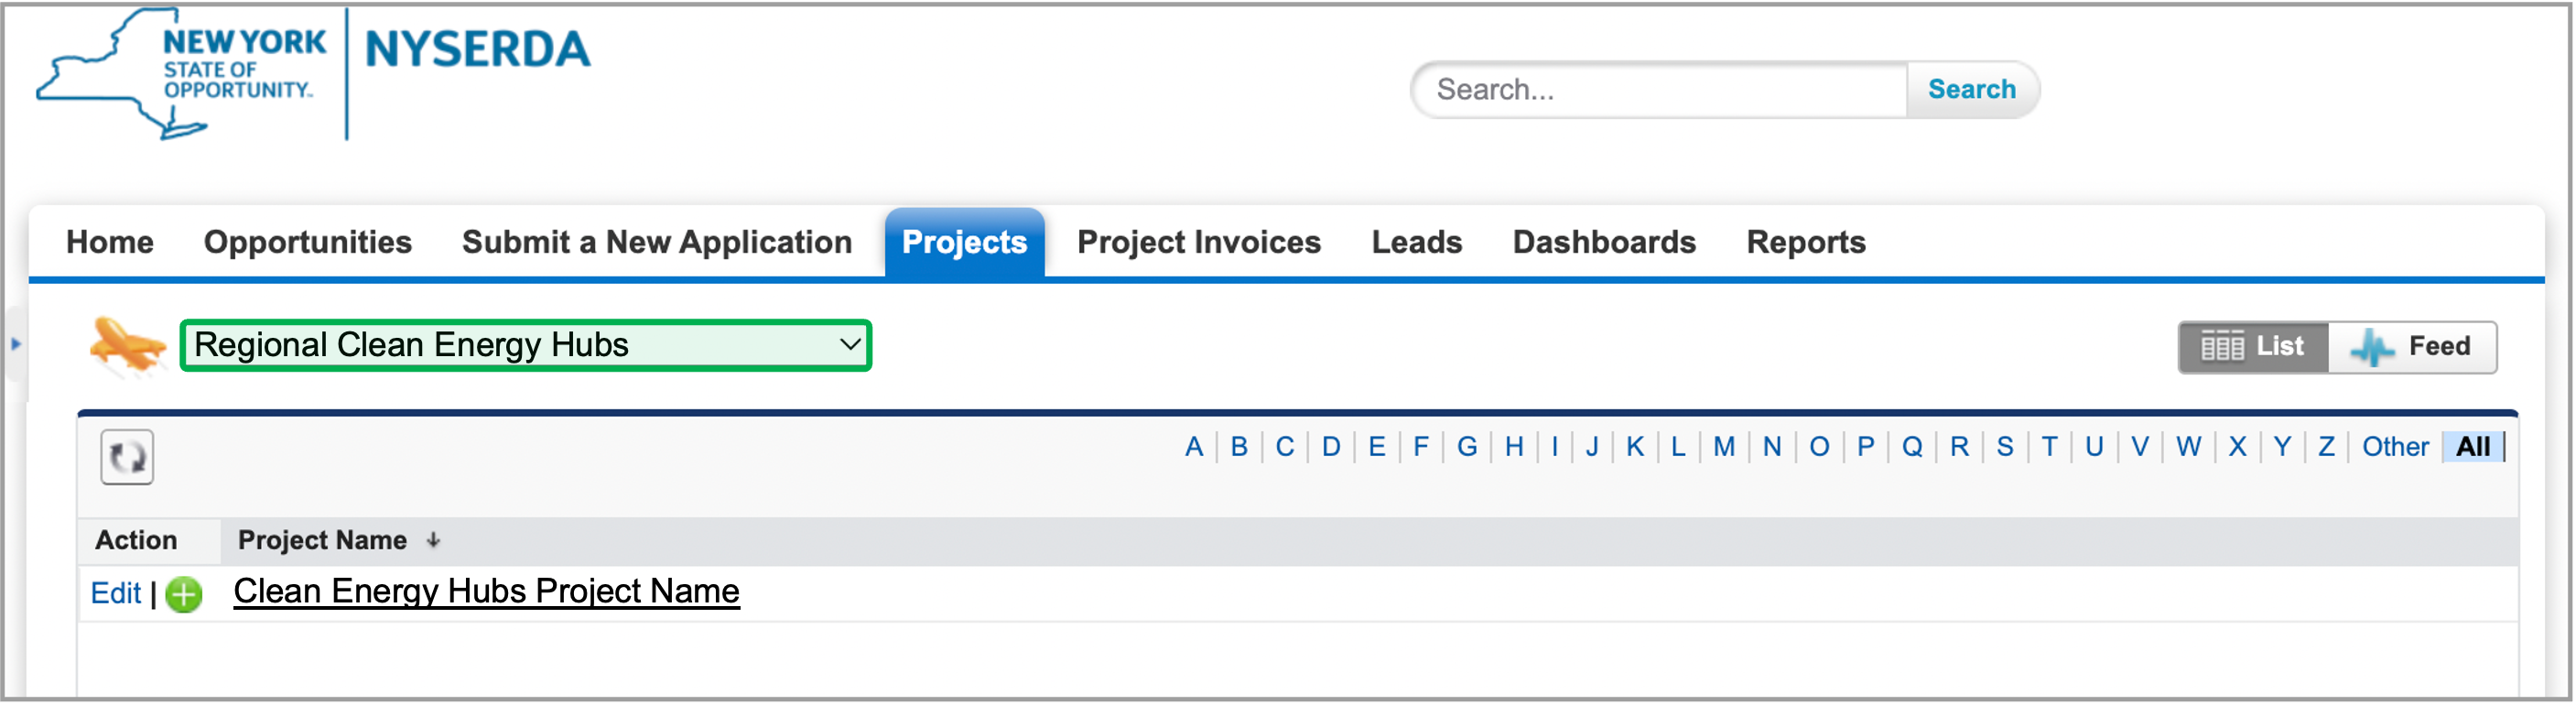
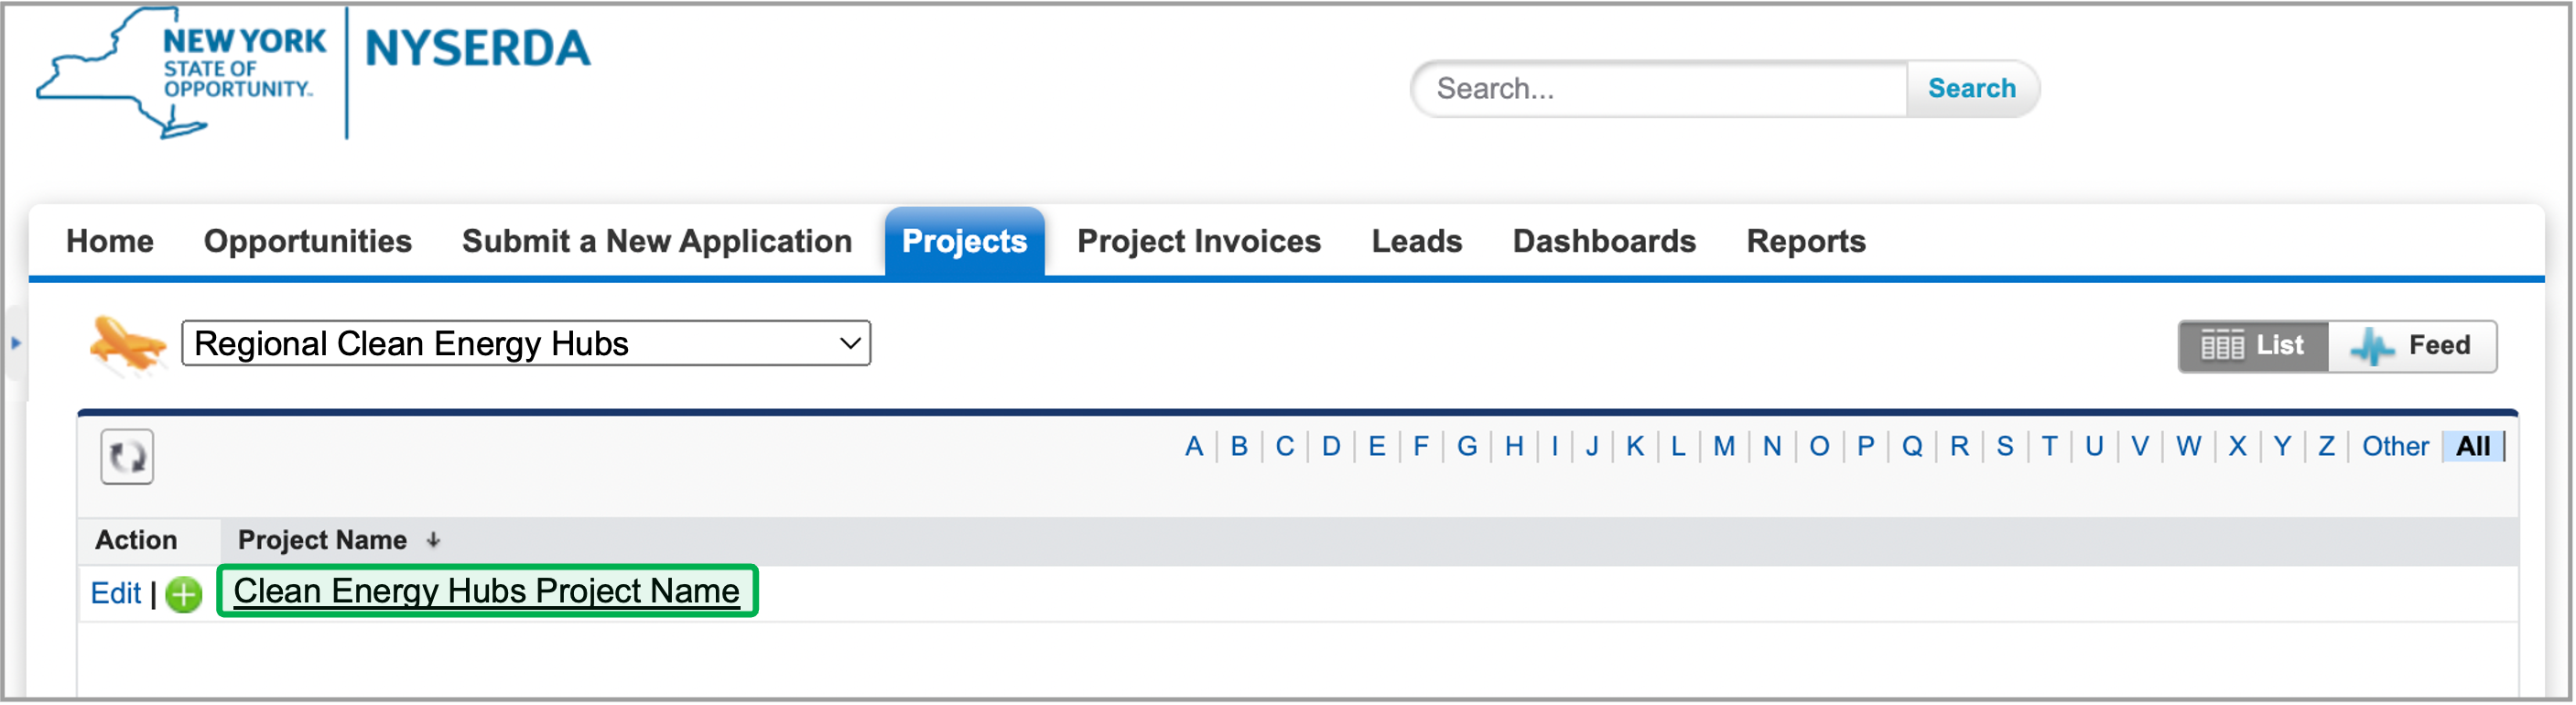
| UI Step |
|---|
Under the drop down menu, select the queue Regional Clean Energy Hubs. Once the queue is selected, the filter will show all related projects for that Hub member. | Expand |
|---|
| 
|
|
| UI Step |
|---|
Click on the Project Name hyperlink to access the Project Details page. | Expand |
|---|
| 
|
|
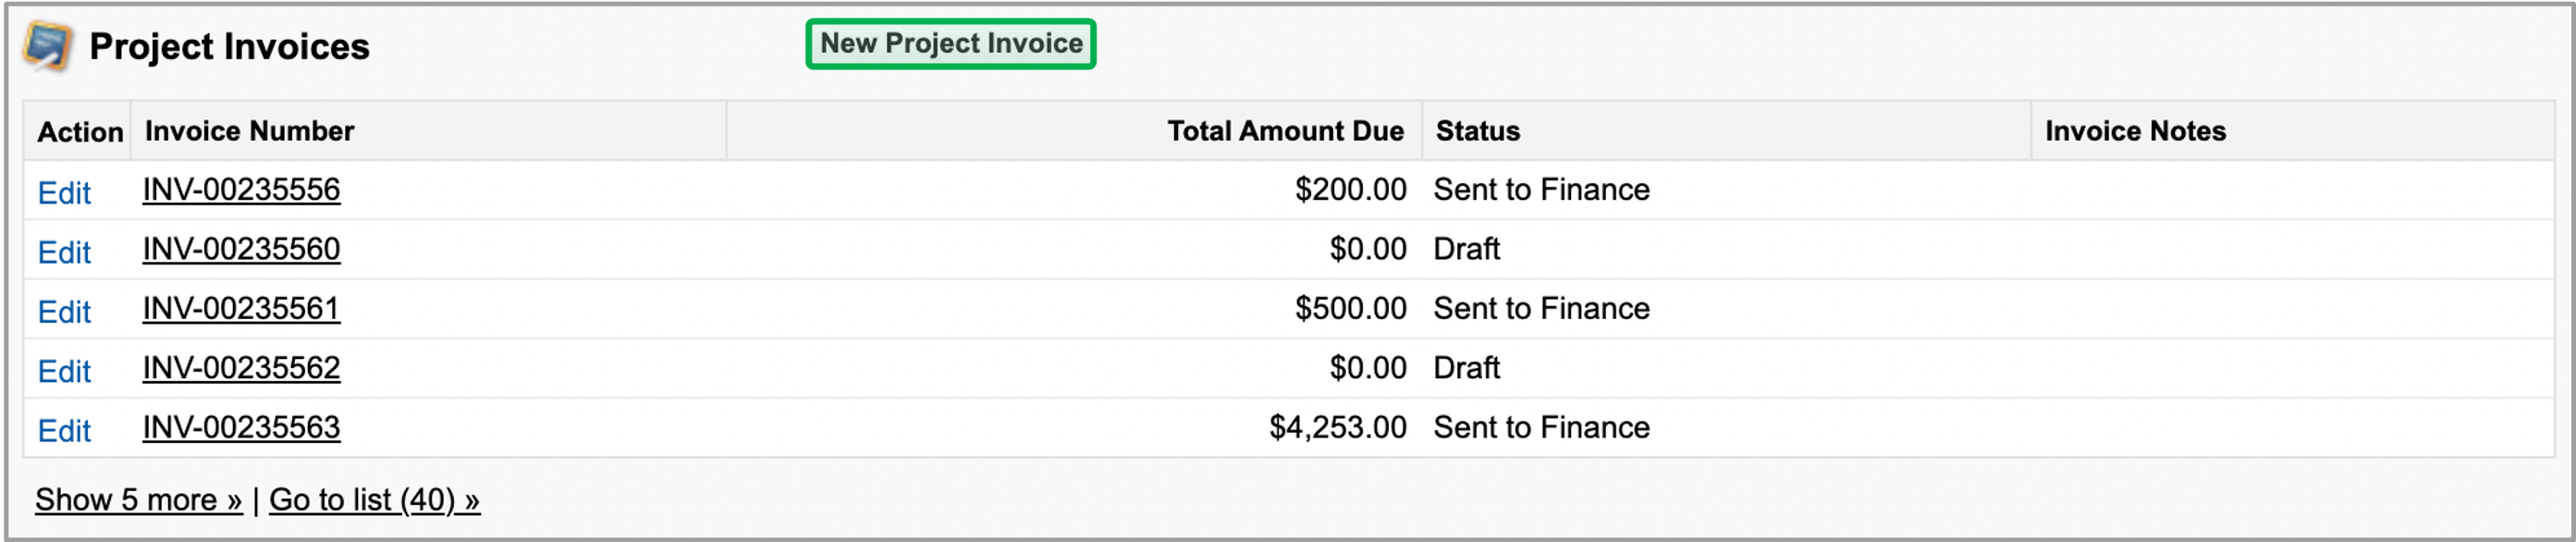
| UI Step |
|---|
In the Project Record, scroll down to the Project Invoices section and click on the New Project Invoice button. | Expand |
|---|
| 
|
|
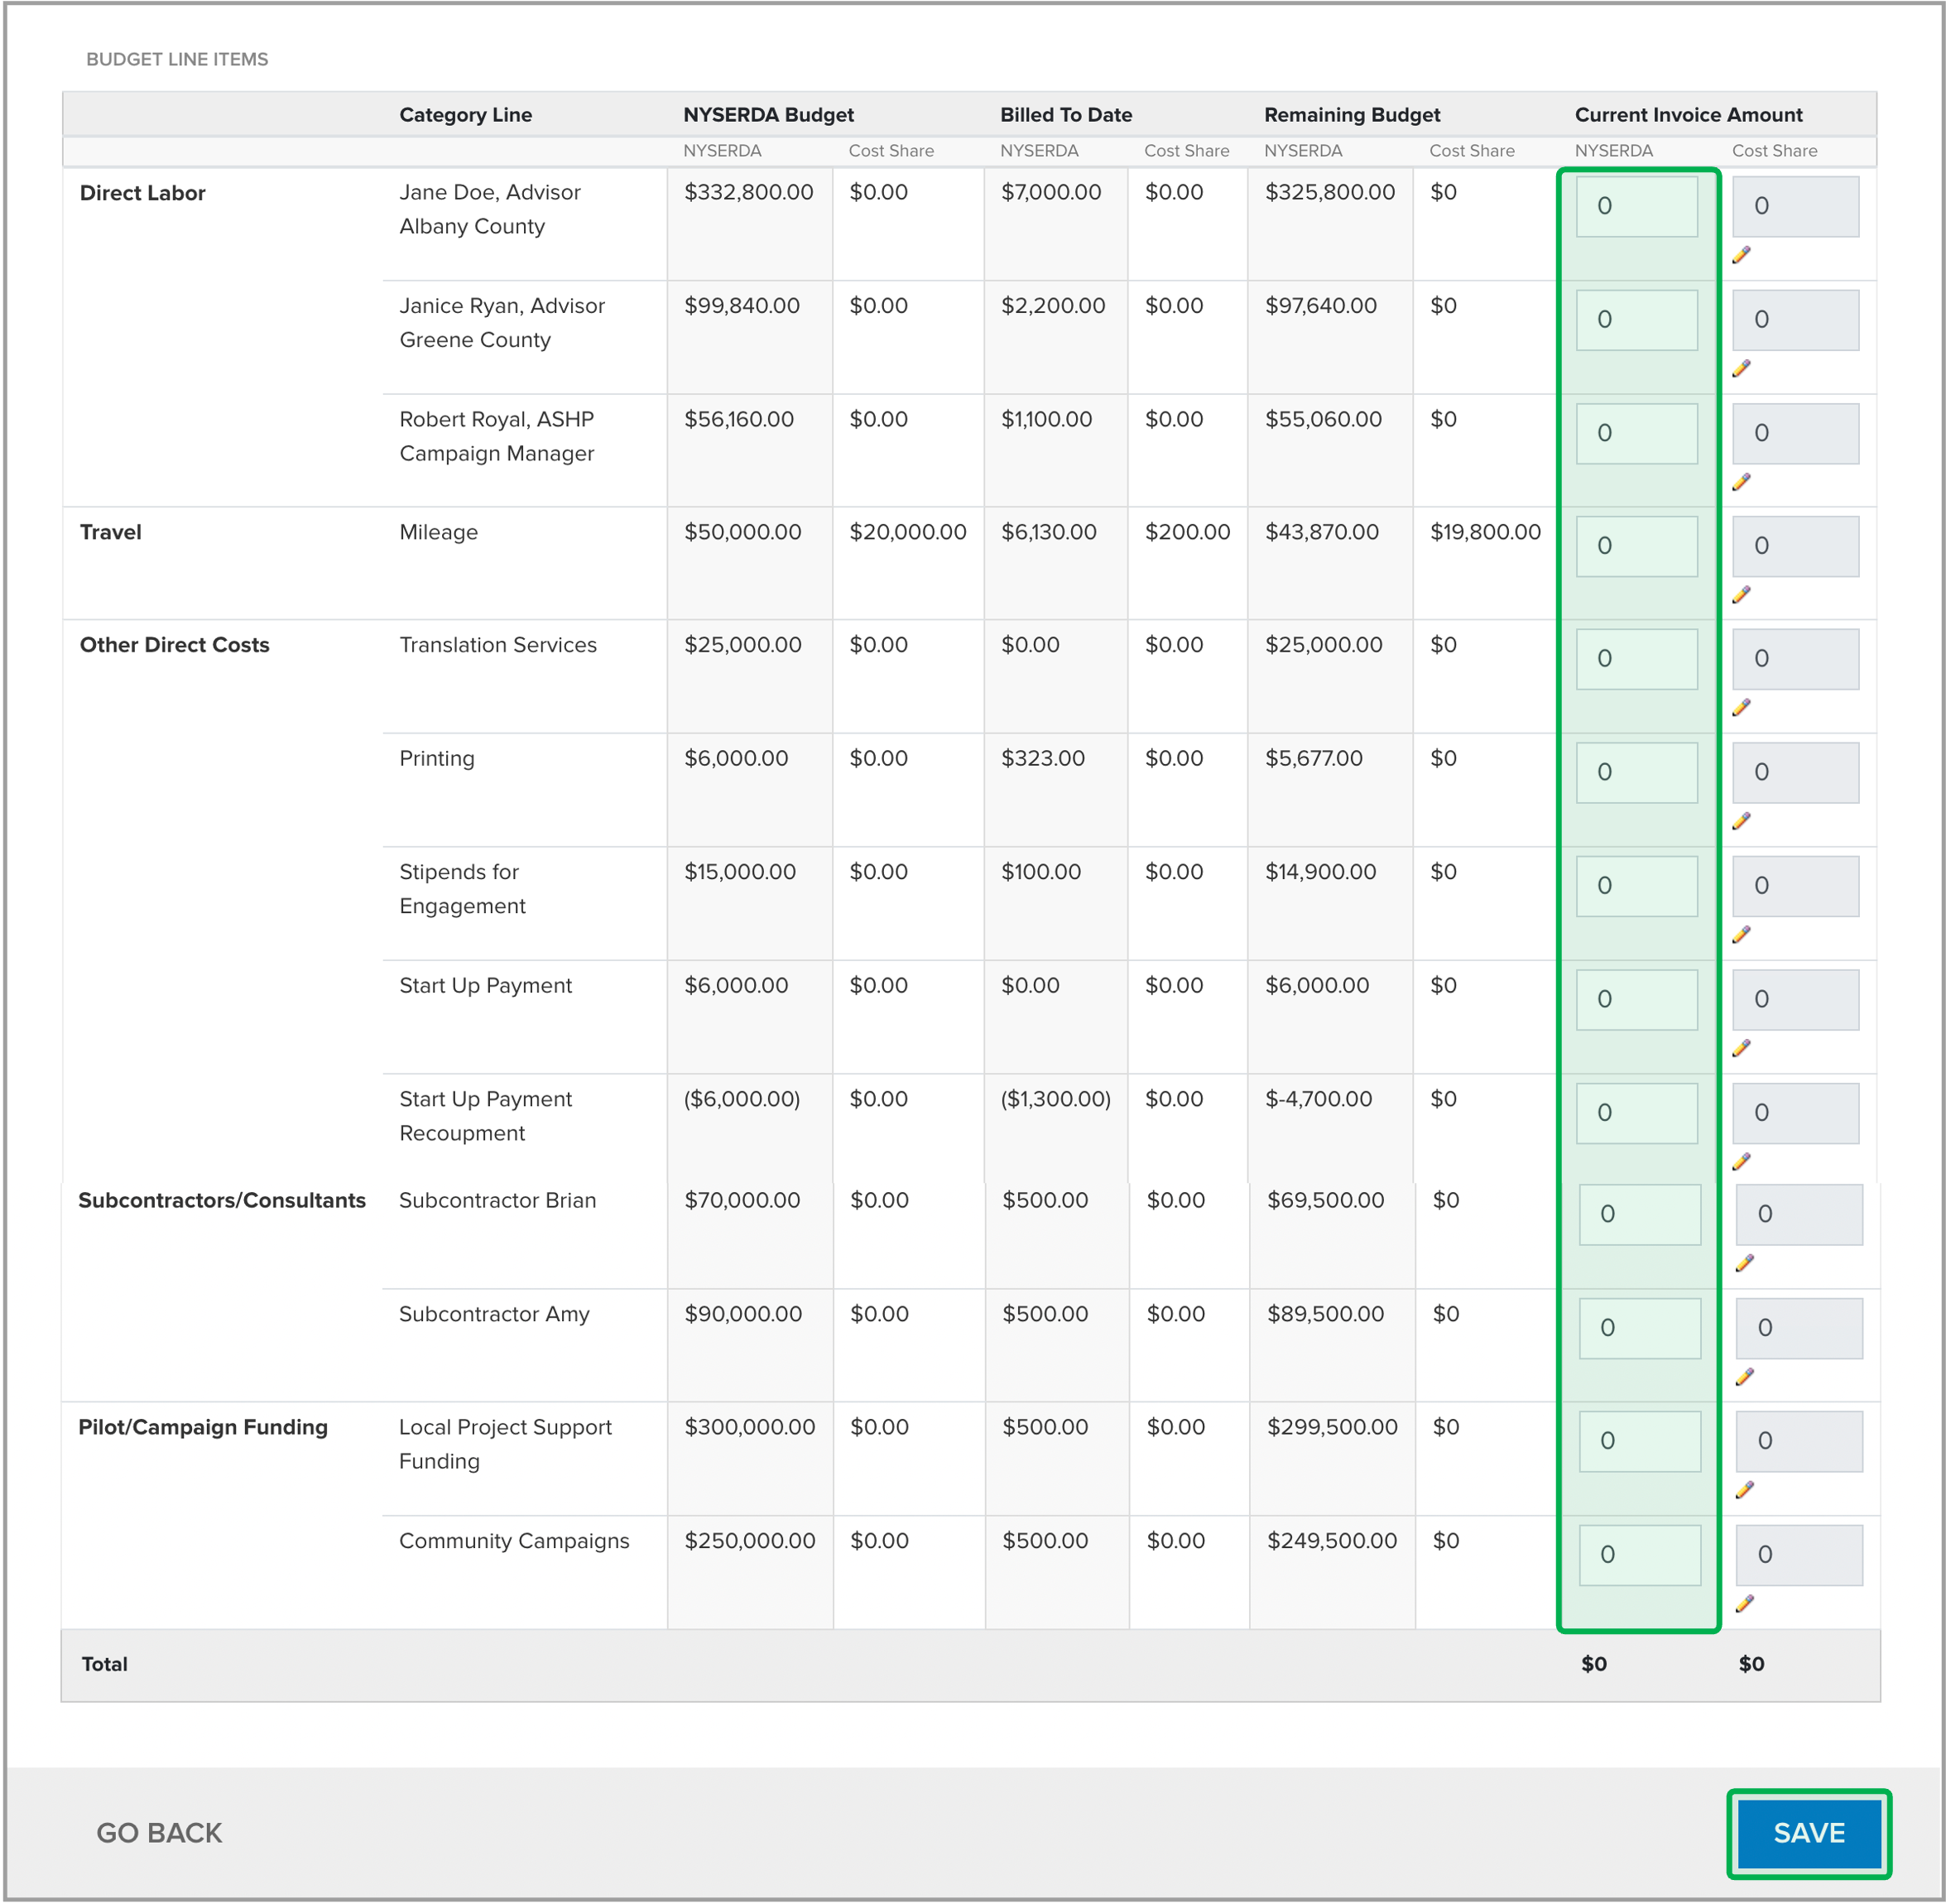
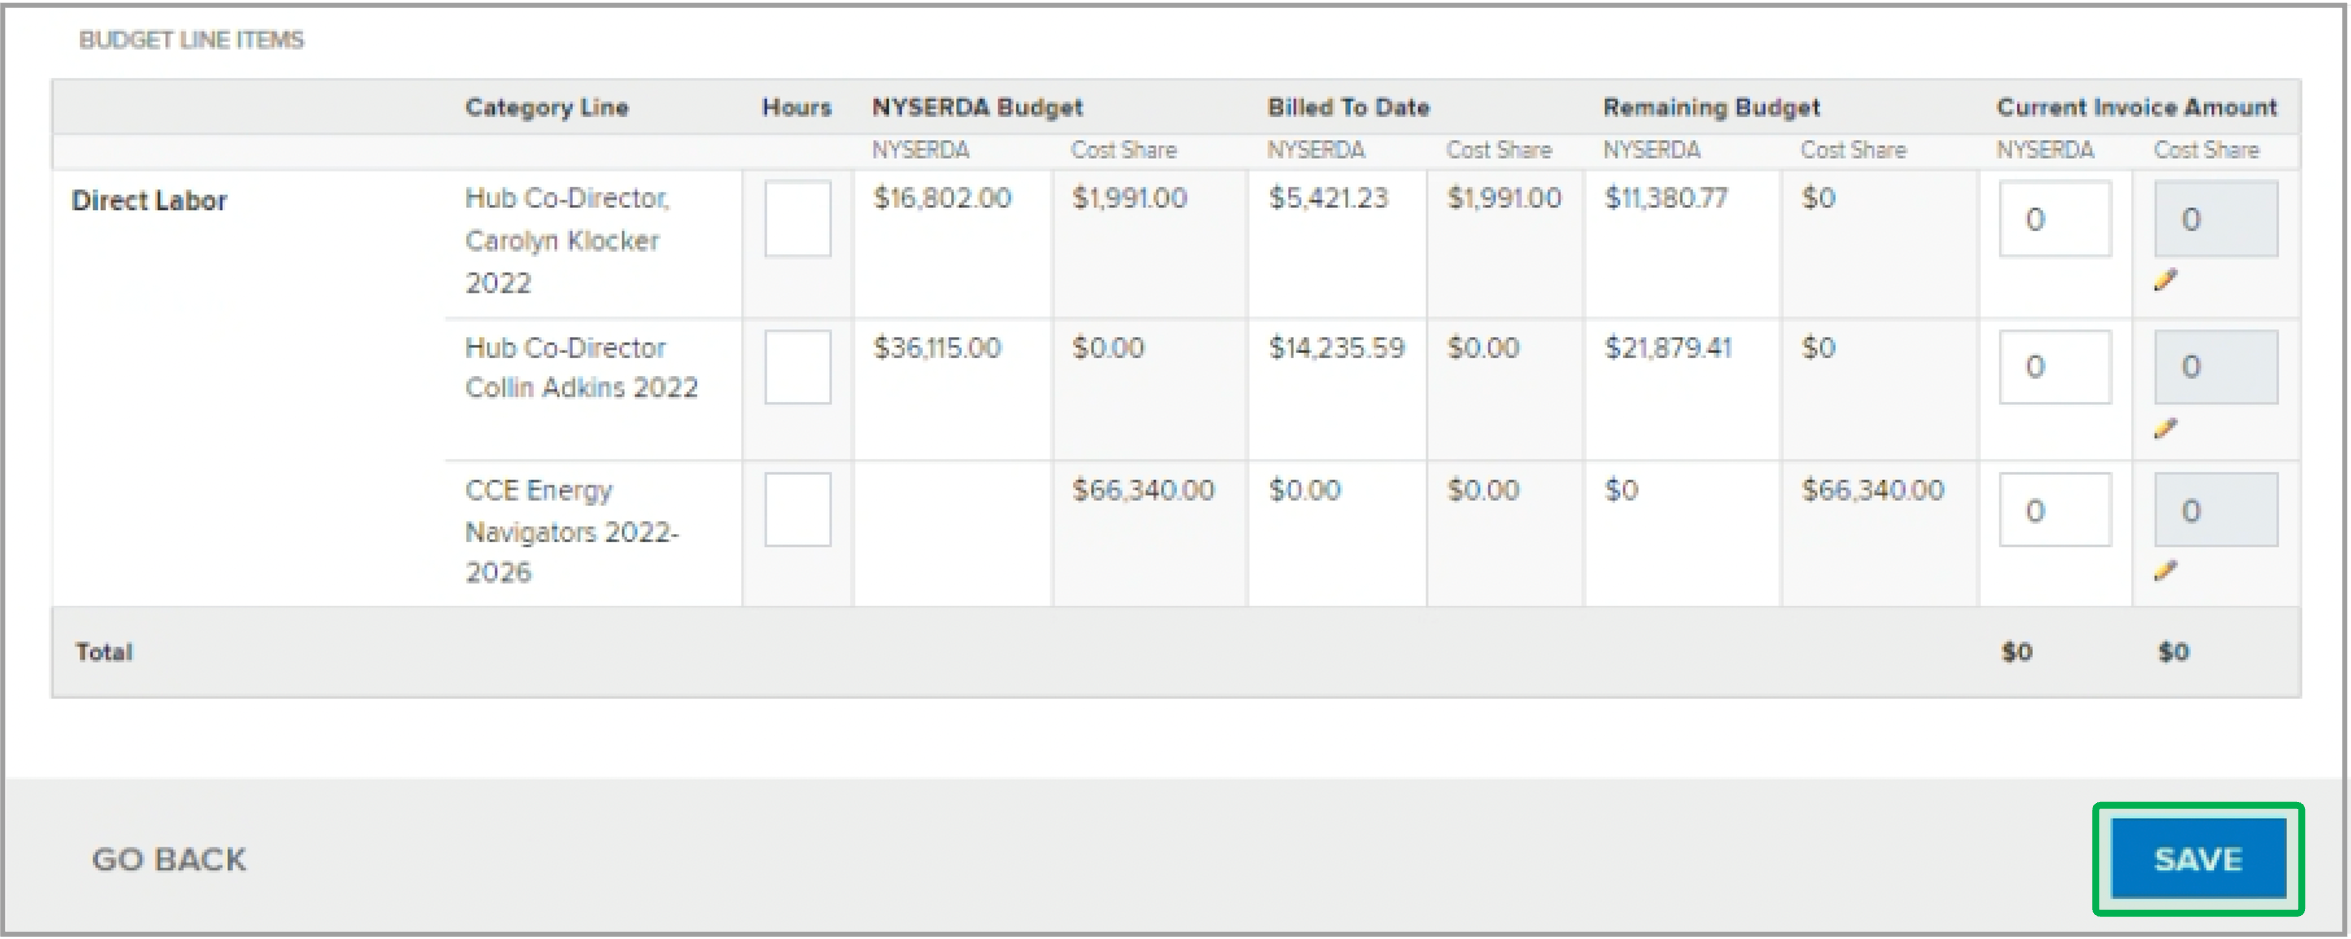
| UI Step |
|---|
In the Budget Line Items page, the Hubs member will document how much money should be invoiced against each of the Budget Line Items by typing in the amount in the boxes under the Current Invoice Amount column. | Expand |
|---|
| 
|
|
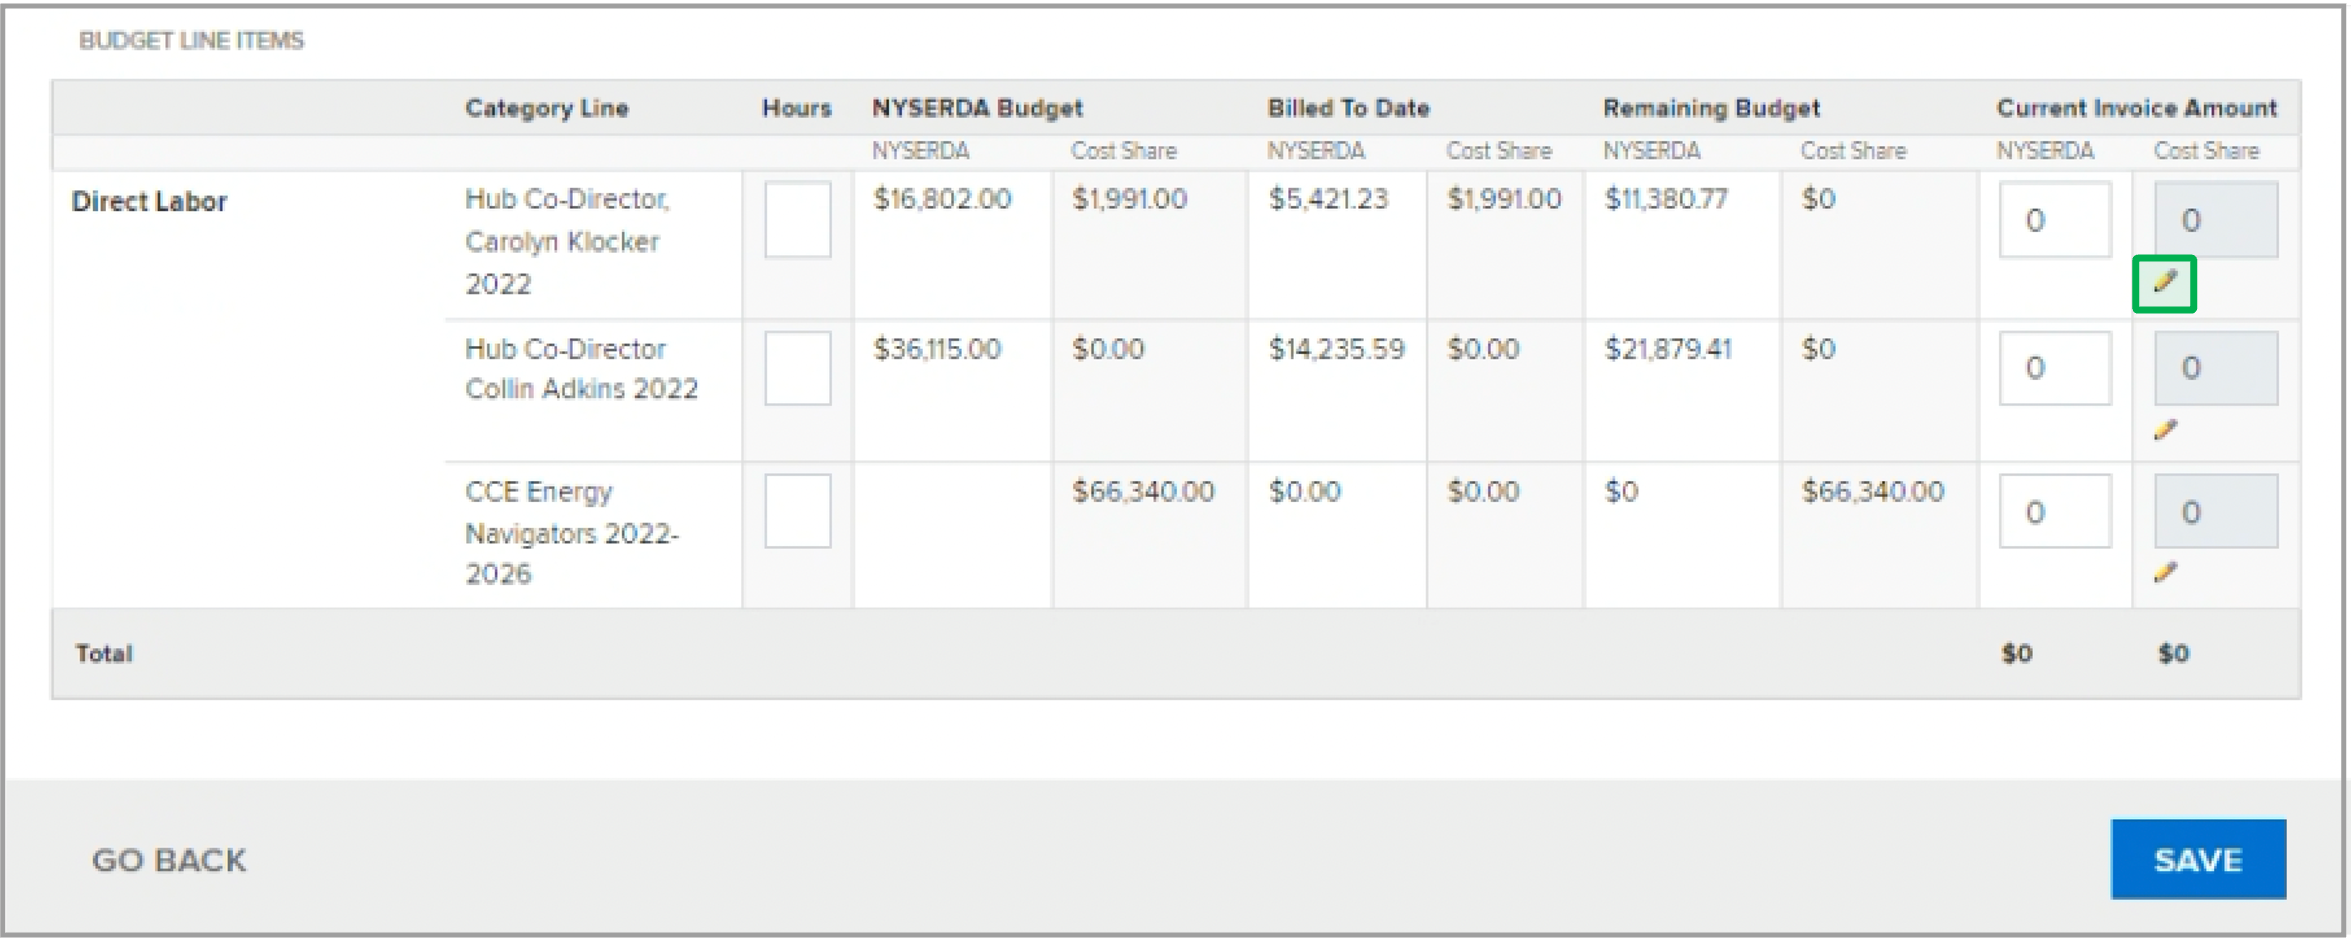
| UI Step |
|---|
To enter the Cost-Share amount, click the Pencil icon to open the cost-share column, enter the cost-share associated with the Budget lines and click the Green Arrow icon to save. | Expand |
|---|
| 
|
|
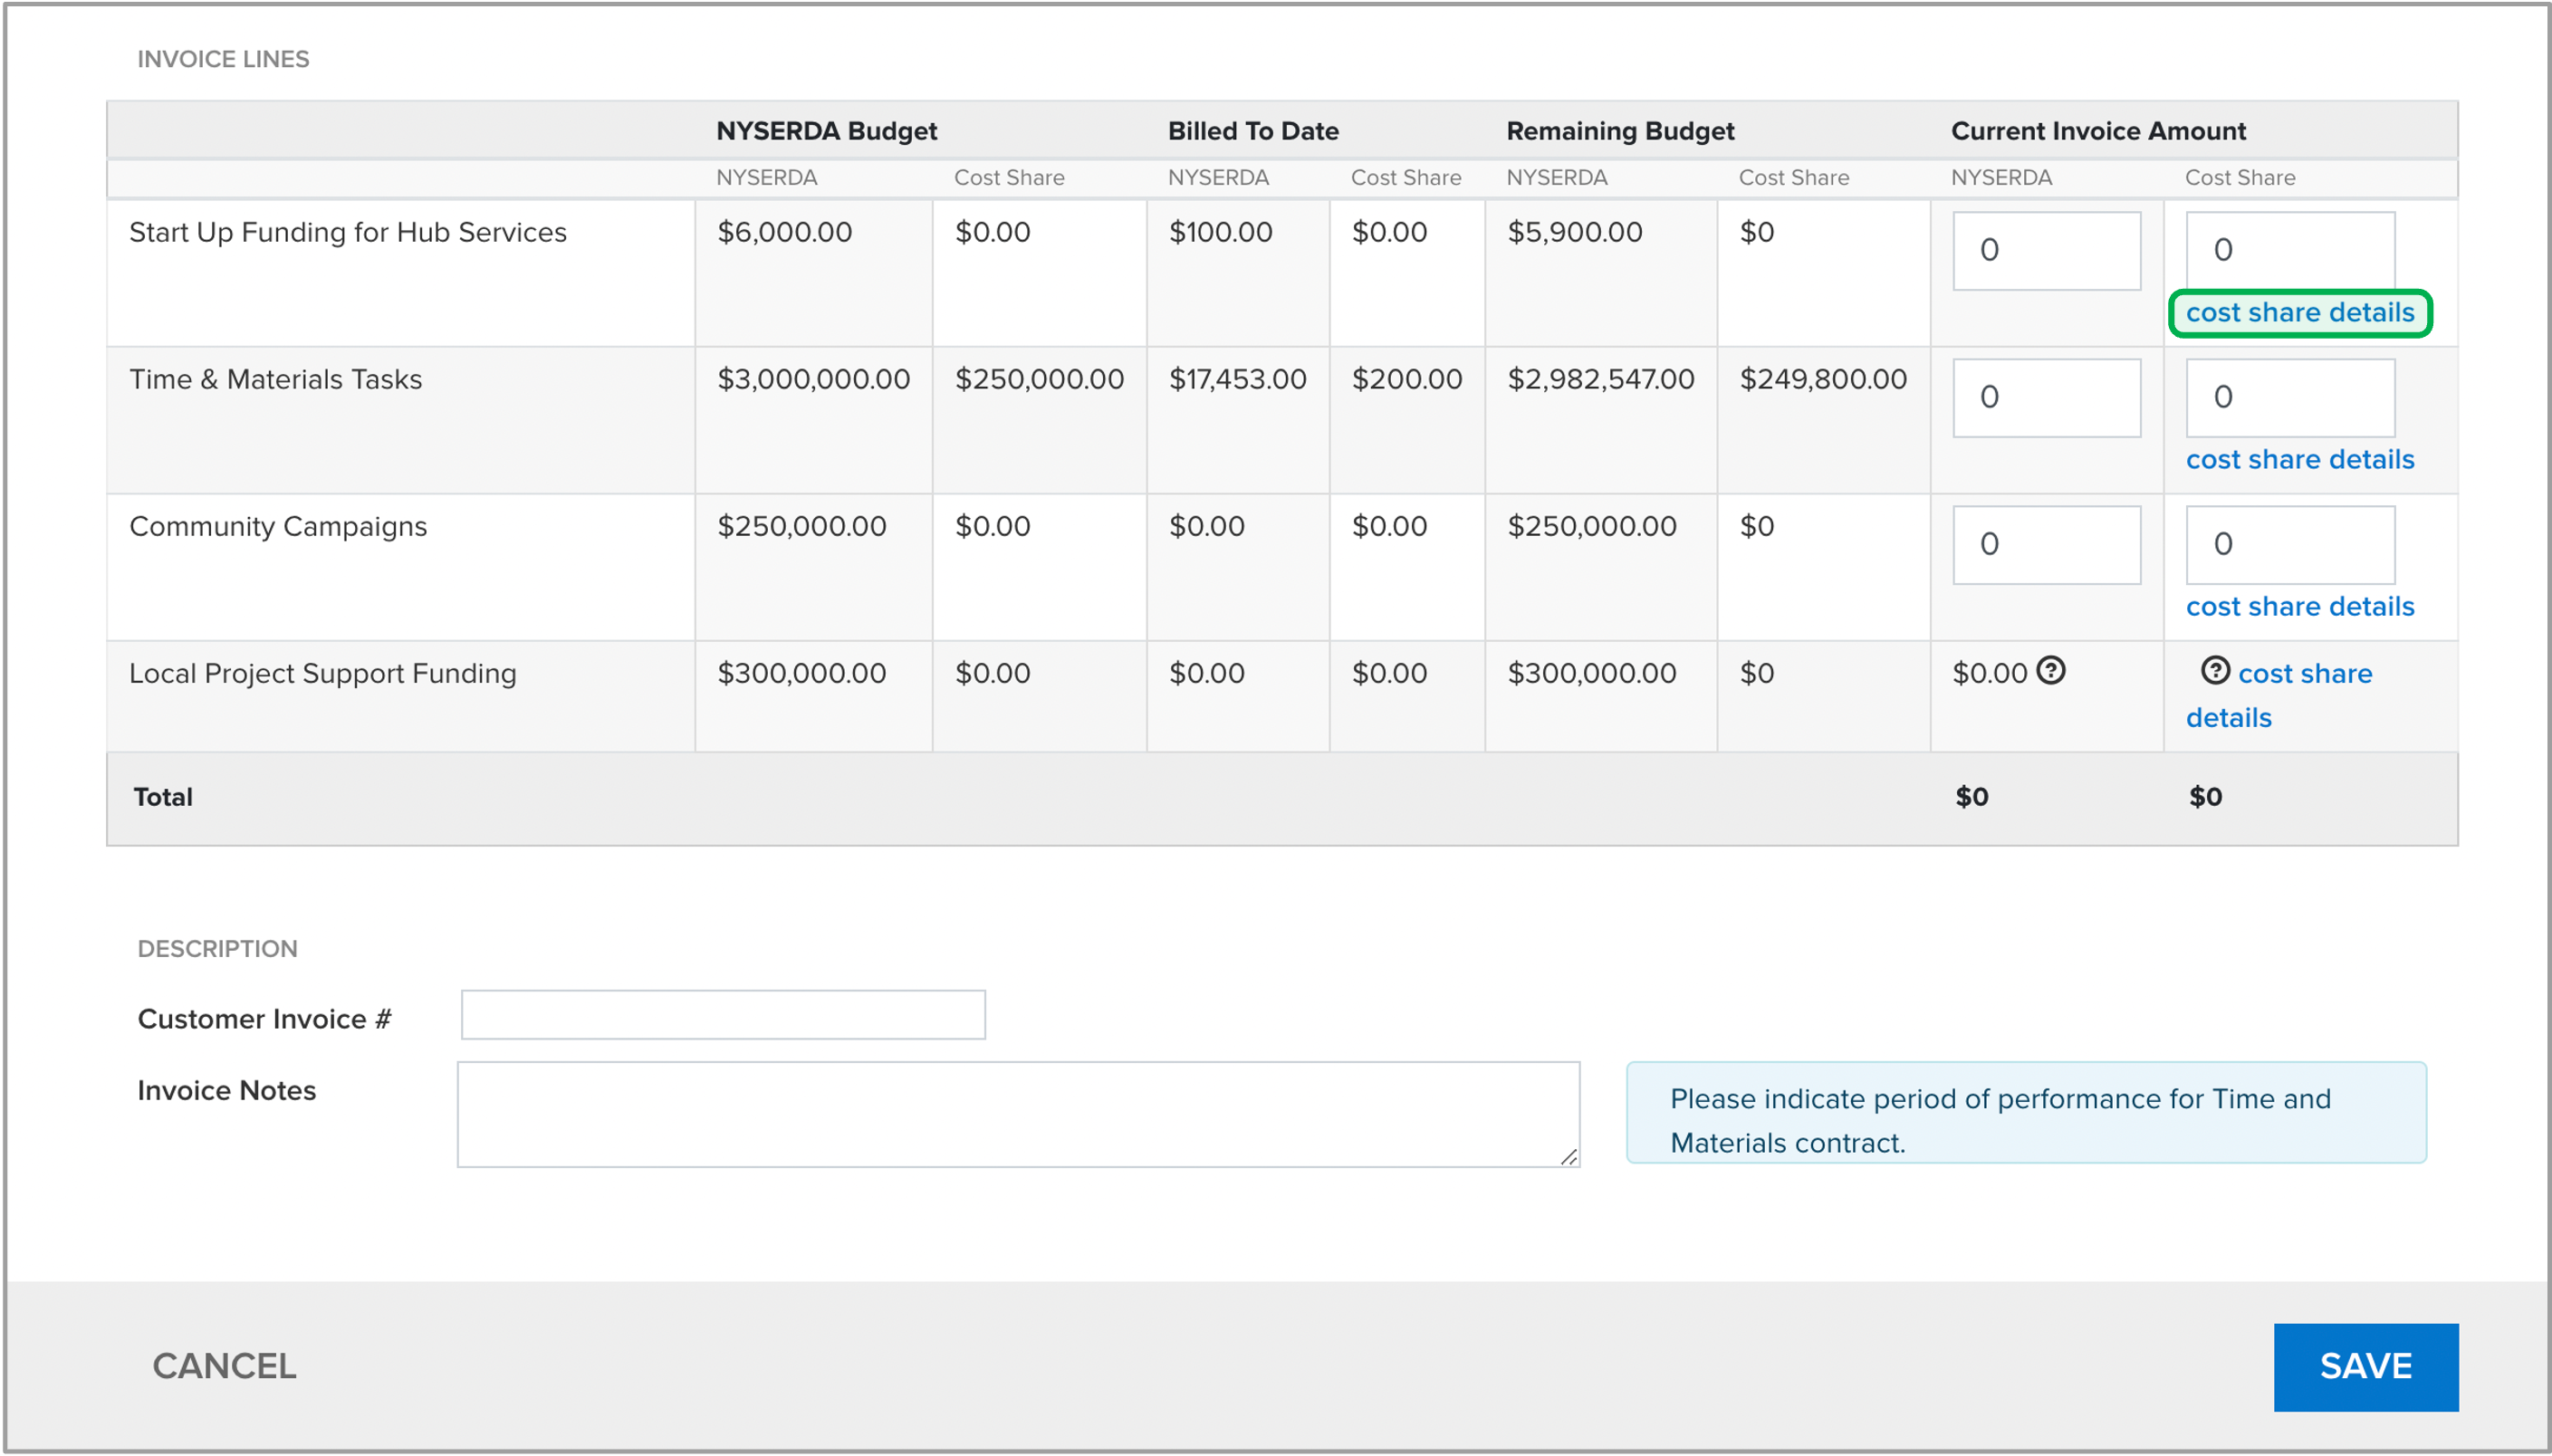
| UI Step |
|---|
Click the Save button, the Monthly Invoice will appear. Then, enter the Invoice Amount into the NYSERDA column of the Current Invoice amount. | Tip |
|---|
Hubs may click Continue or Edit, if revisions are needed. |
| Expand |
|---|
| 
|
|
| UI Step |
|---|
Enter the Cost Share Total from the first page in the Cost Share column. The total is shown at the top of the invoice. Then, click the Cost Share Details hyperlink to include the Cost Share amount. | Expand |
|---|
| 
|
|
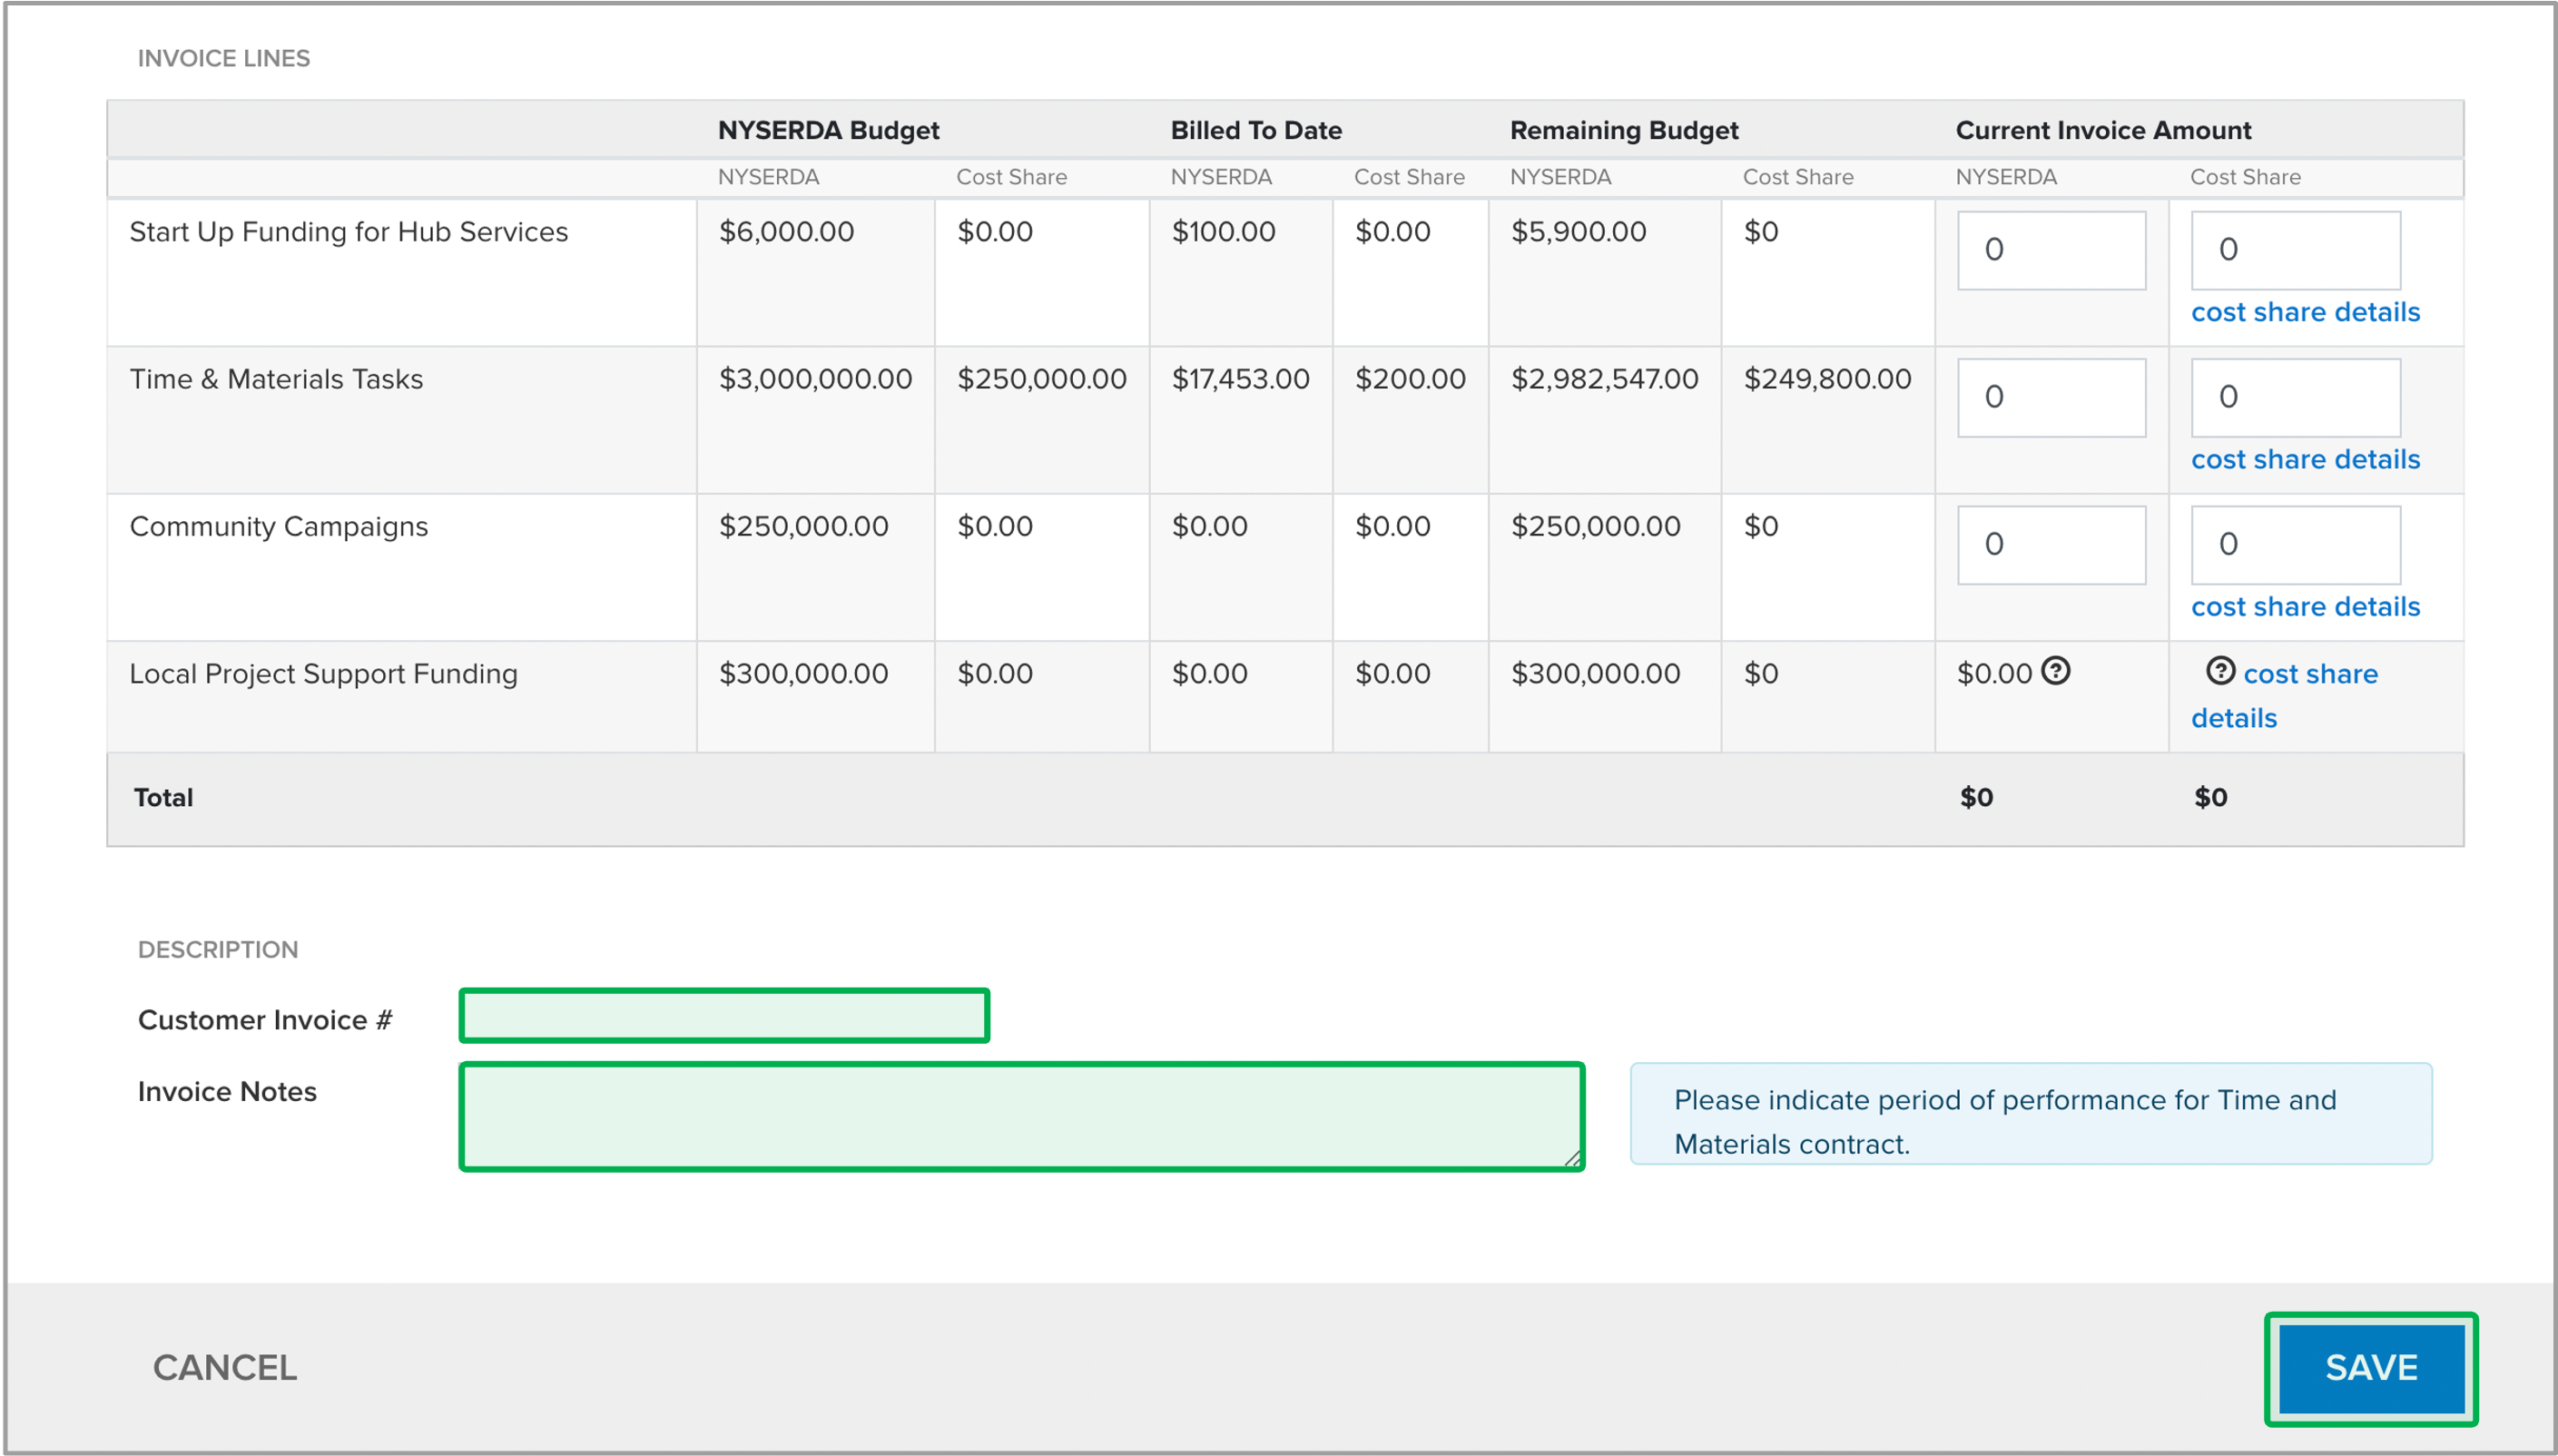
| UI Step |
|---|
Enter the amount and click the Add New Entry hyperlink if additional Entities are needed. Then, click the Save button. | Expand |
|---|
| 
|
|
| UI Step |
|---|
Use the Customer Invoice # box if the Hubs member or team has a different invoicing numbering mechanism, to create a parity for reference between the invoicing process. Use Invoice Notes to enter the Hubs Name, Month, and Year Invoice. Also include any special instructions for finance ex: split between funding sources, how cost share was derived. Then click the Save button to continue. | Expand |
|---|
| 
|
|
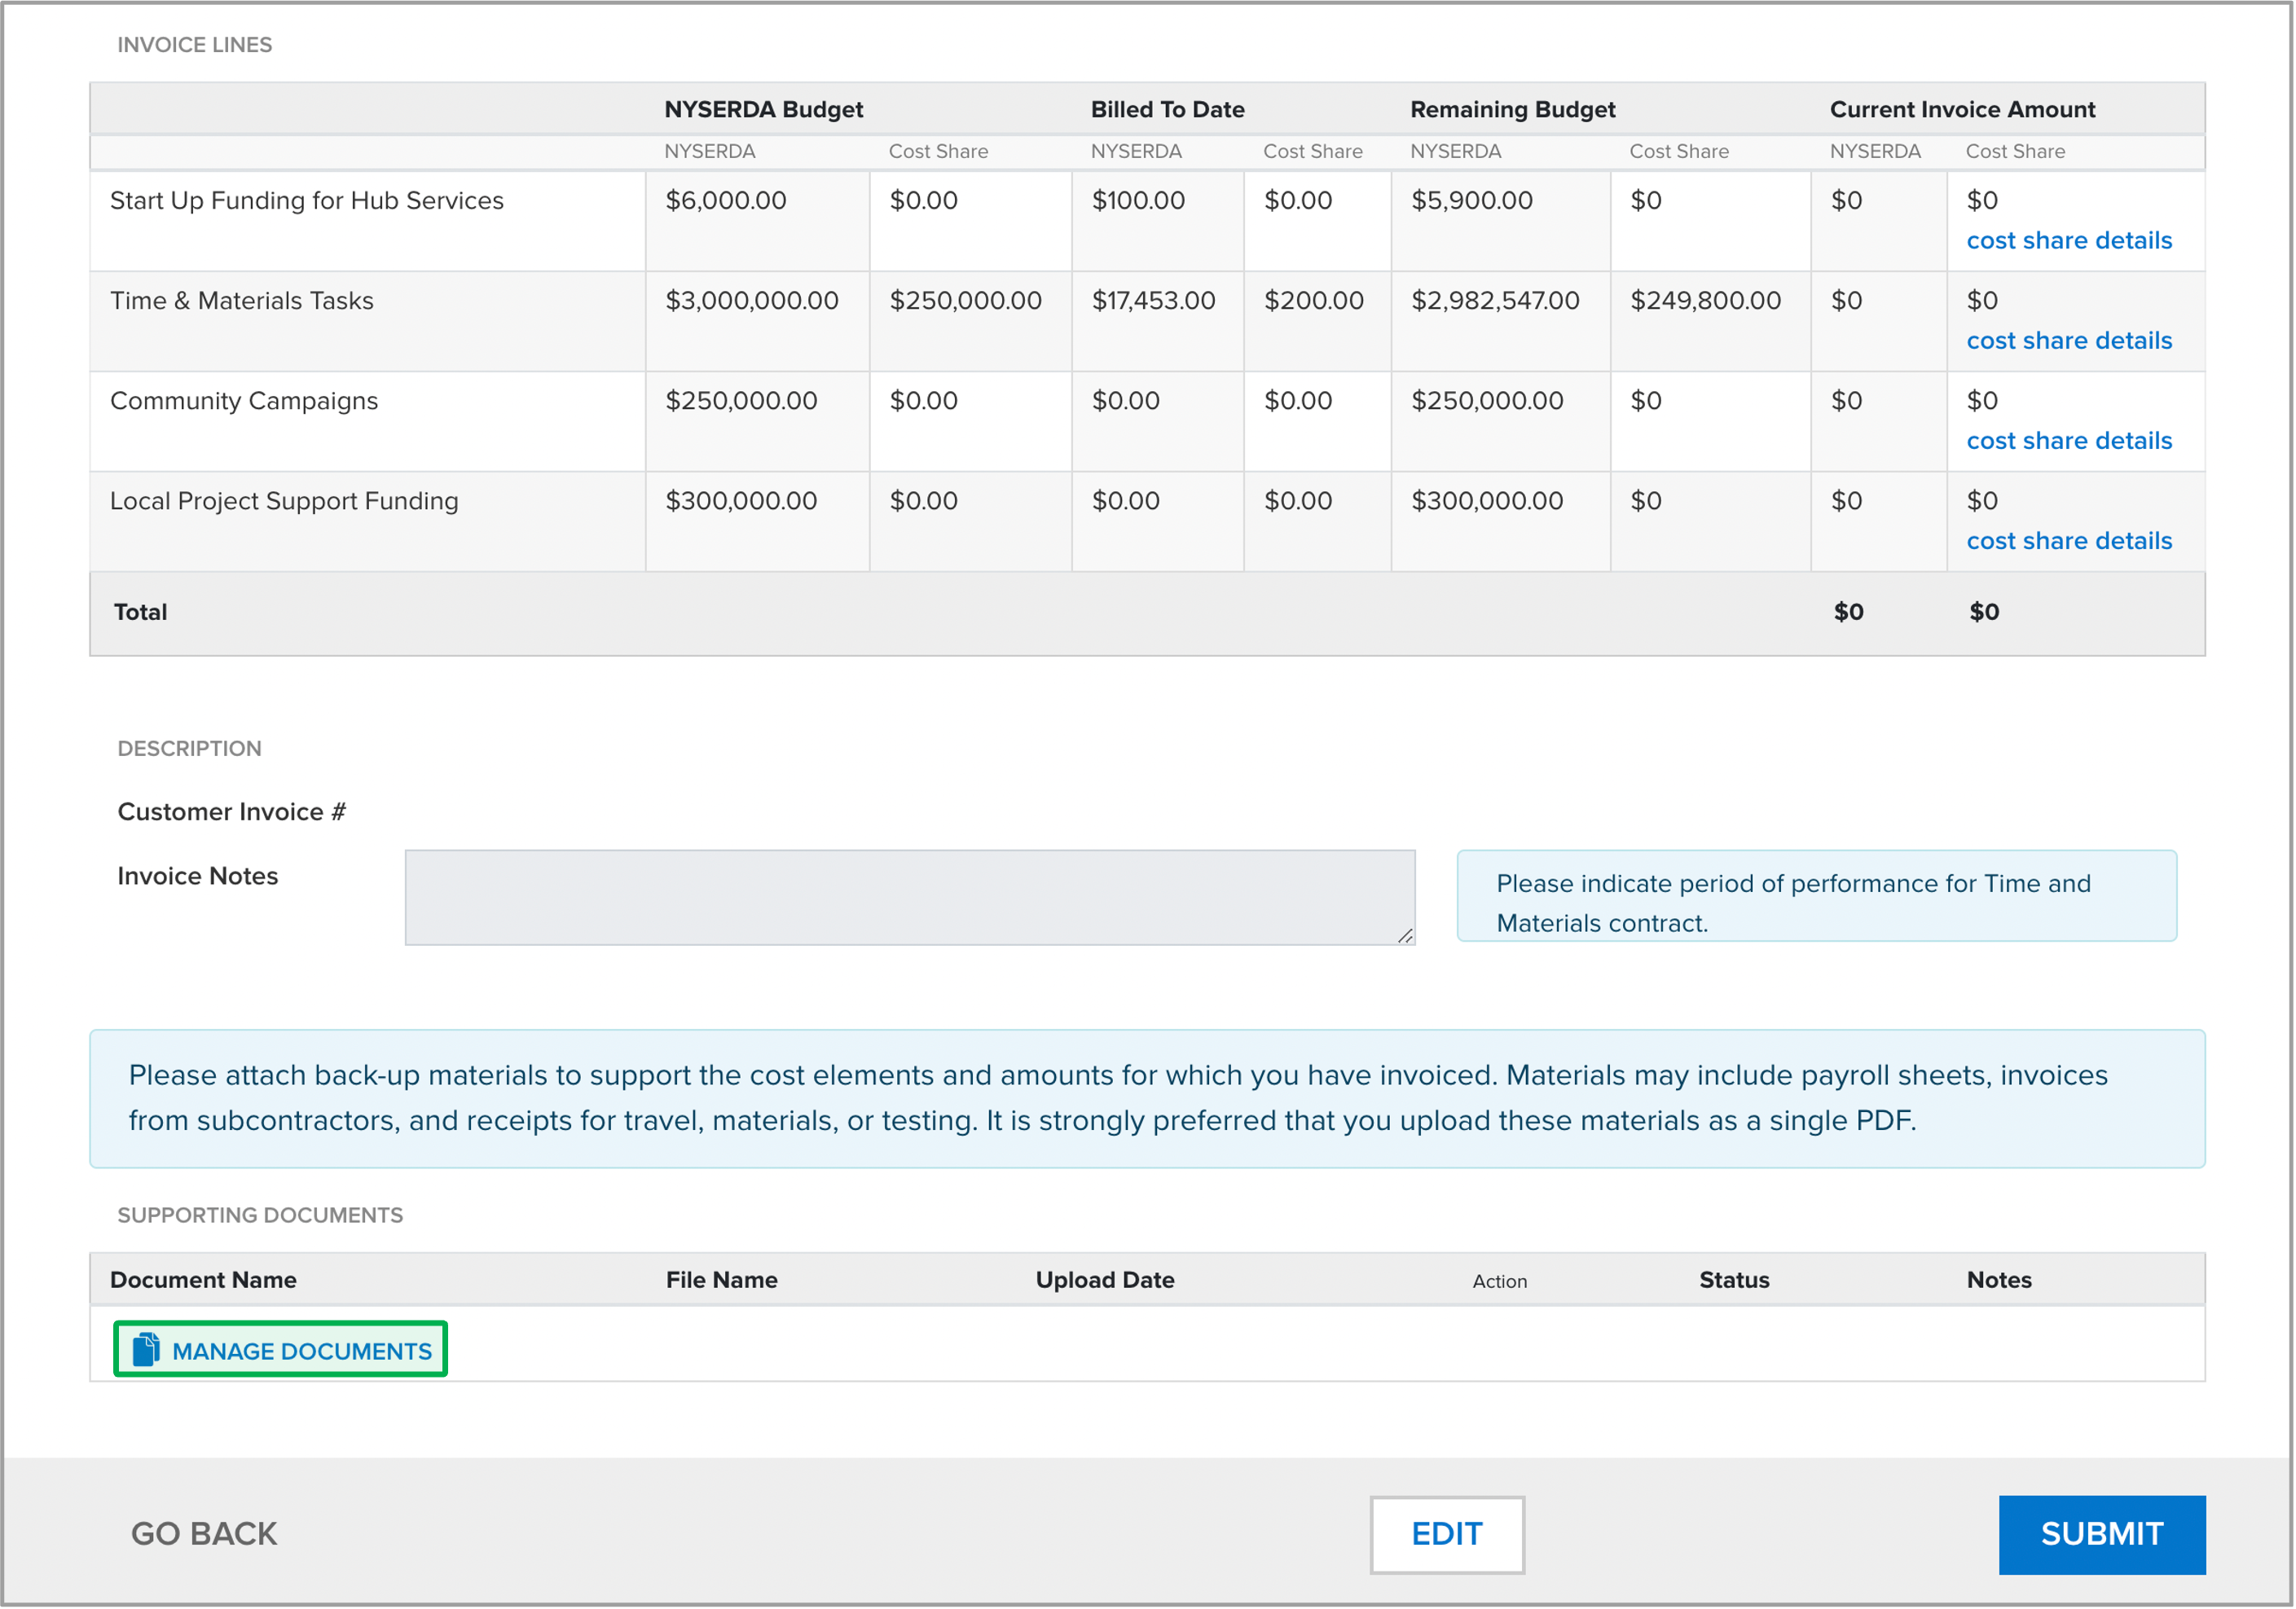
| UI Step |
|---|
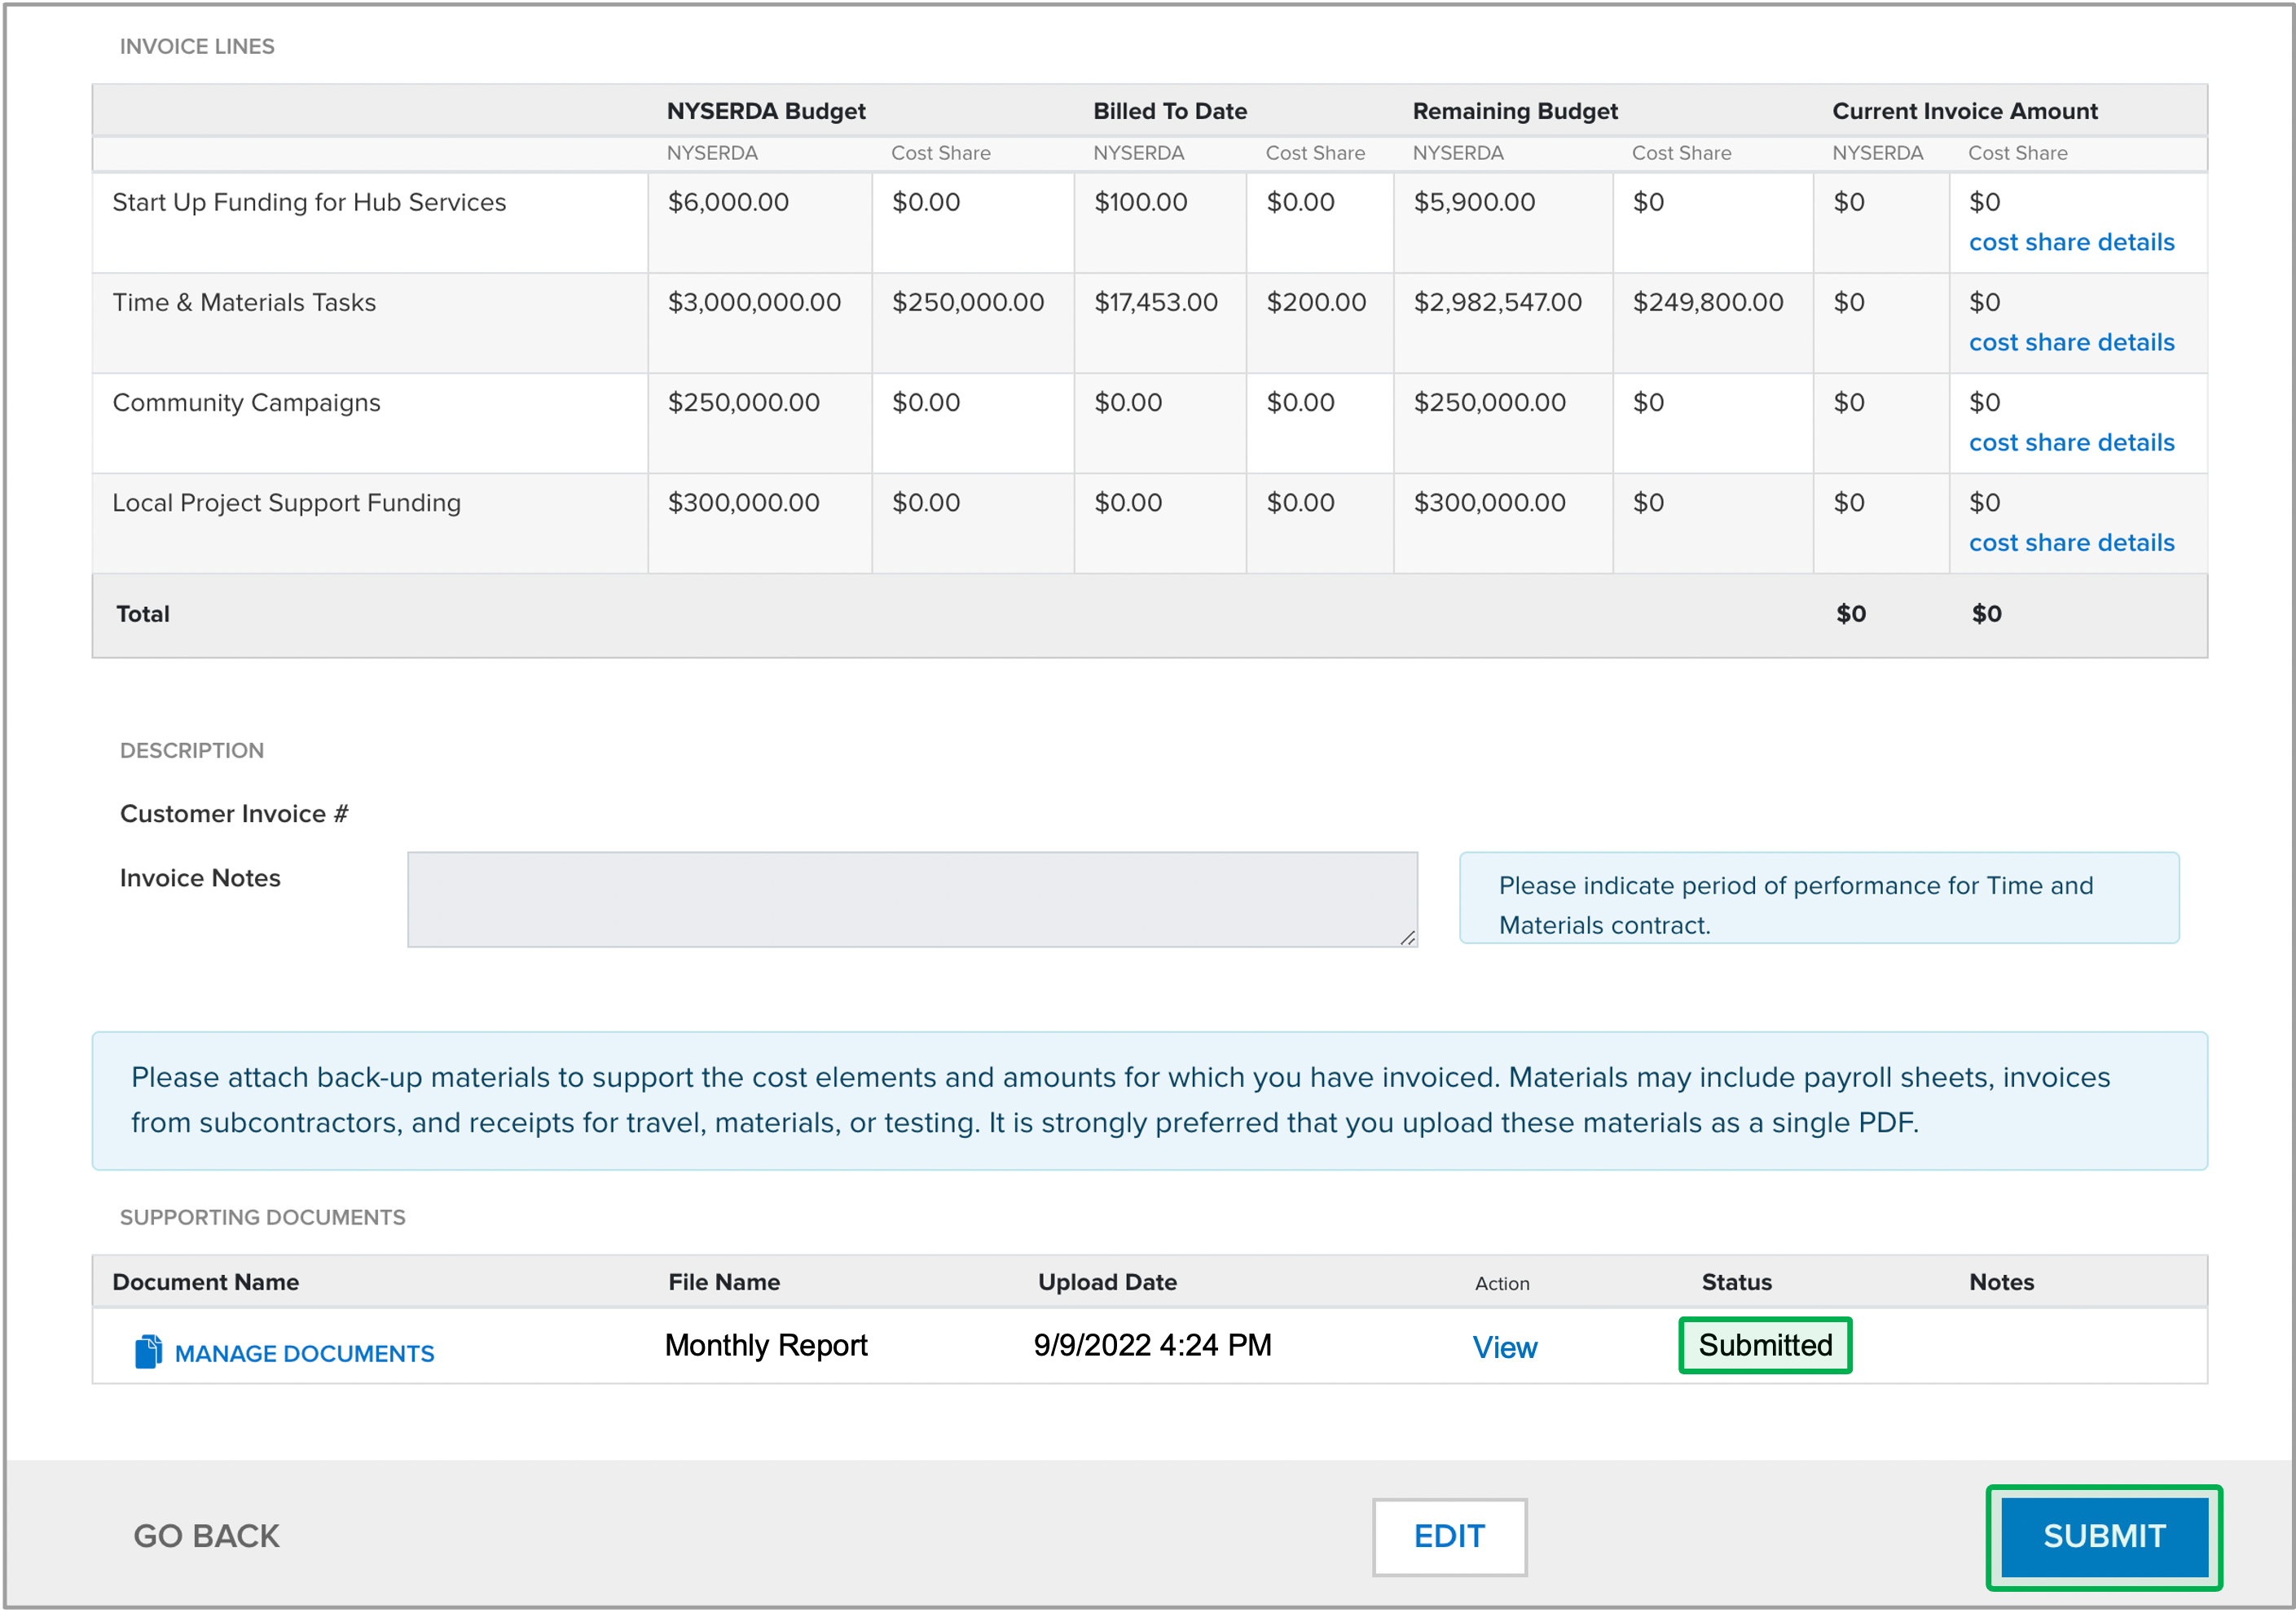
In the Review page, validate the invoice summary. Then, click on the Manage Documents link. | Expand |
|---|
| 
|
|
| UI Step |
|---|
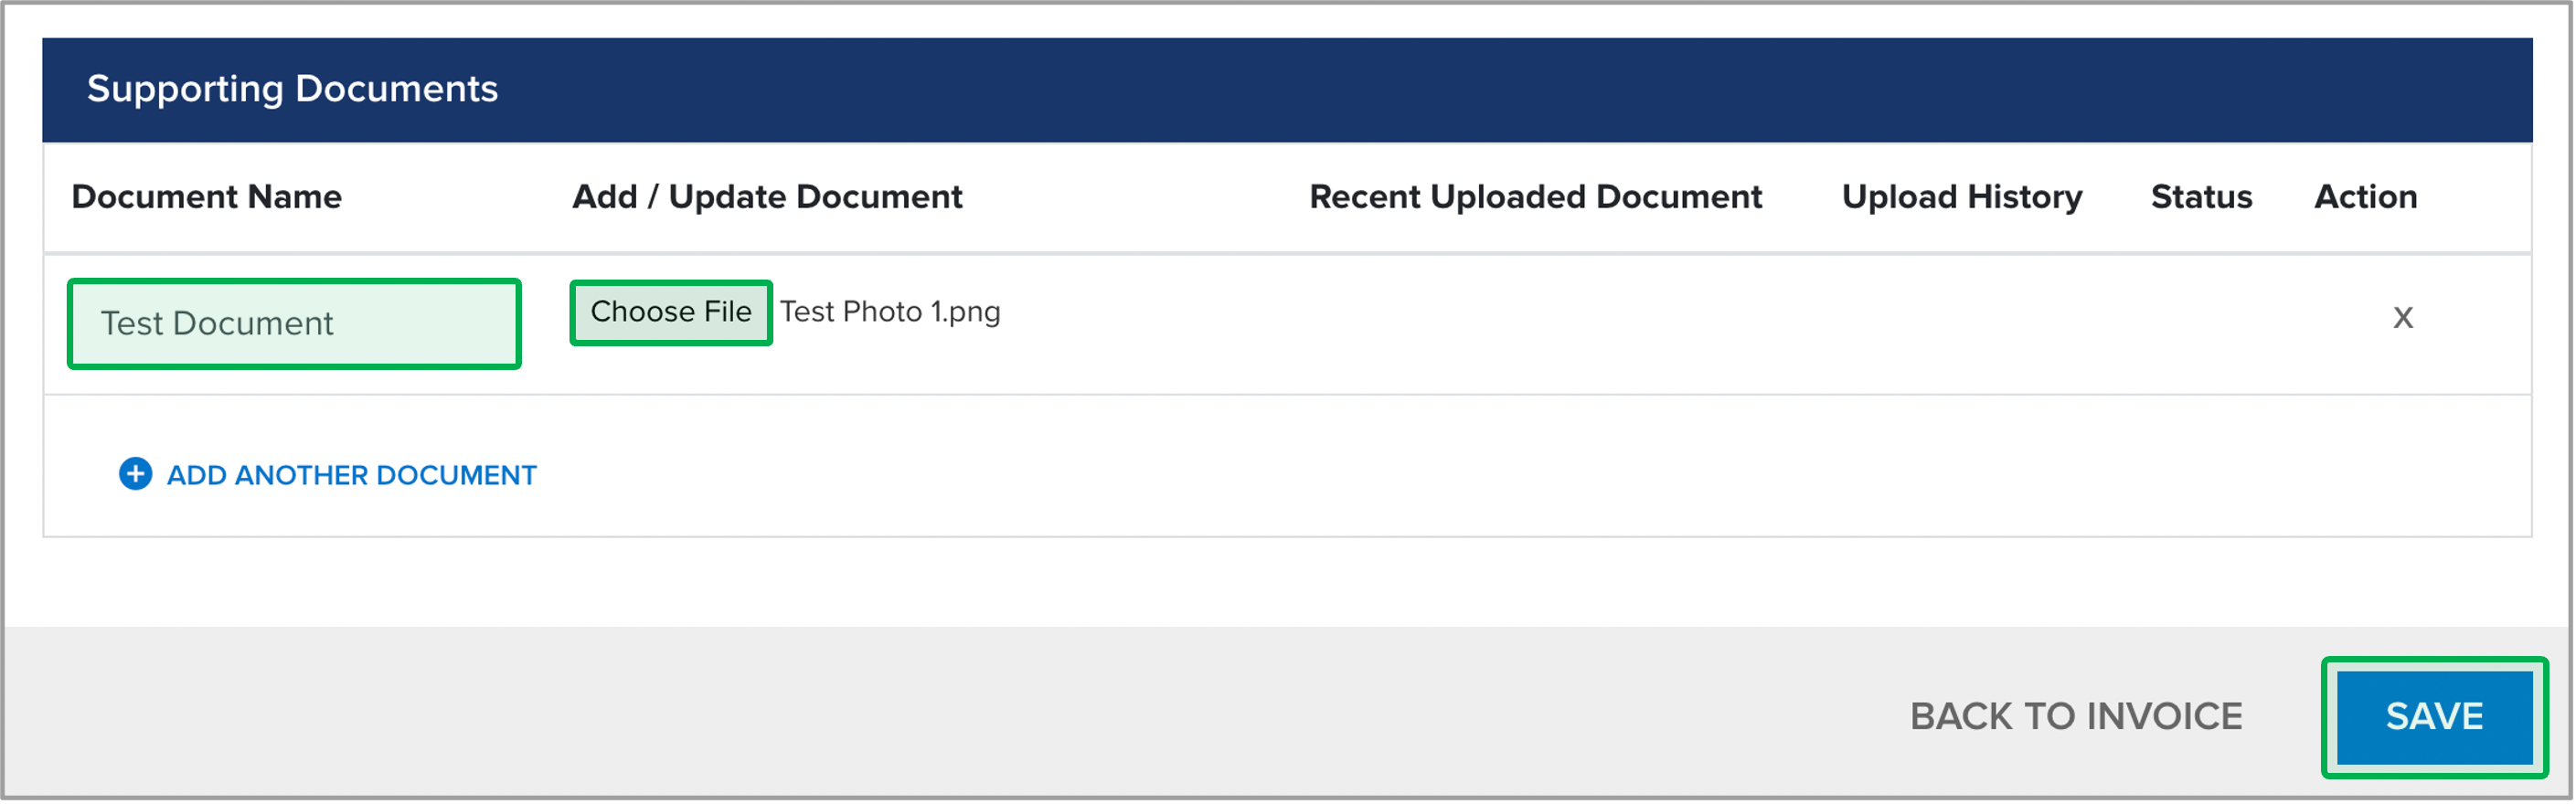
In the Supporting Documents page, click the Choose File button to upload the required Monthly Report (Opportunities Report and Monthly Roll Up Report) and Invoicing Documentation for yourself and your subcontractors. Use the box under Document Name to give the supporting documents a title. The Invoicing Documentation shall be one PDF file. The Opportunities and Monthly Roll Up Reports shall be Excel files. | Tip |
|---|
| There are times when receipts will need to be submitted for justification and proof of purchased materials. |
| Expand |
|---|
| 
|
|
| UI Step |
|---|
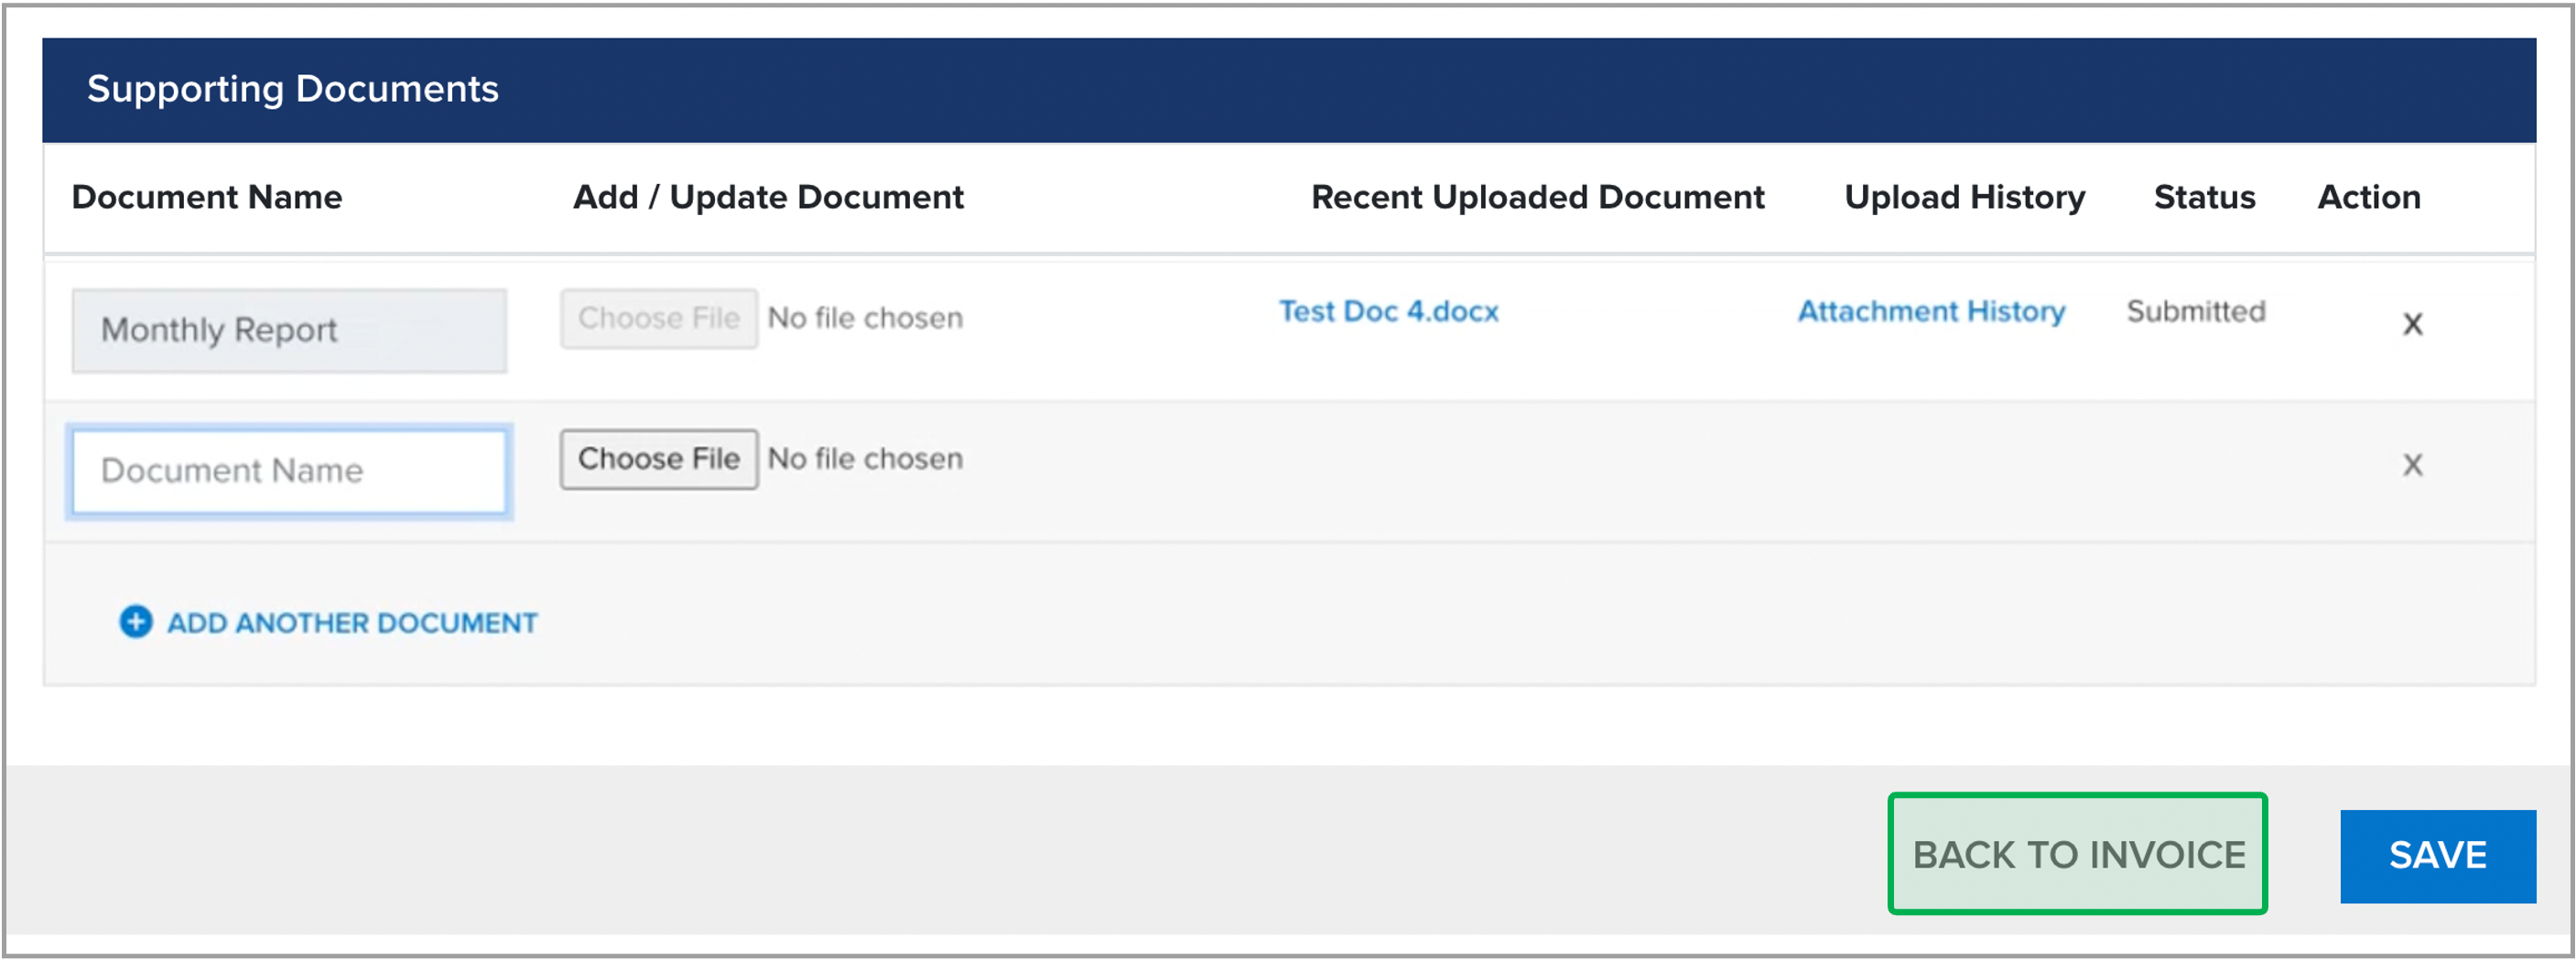
Once all supporting documents are uploaded, click the Save button to save the documents. Then click the Back to Invoice link to go back. | Expand |
|---|
| 
|
|
| UI Step |
|---|
Please leave the Invoice in Draft status. DO NOT click Submit. Email your NYSERDA Project Manager that your Month/Year invoice is in Salesforce for review. This will allow revisions to be resolved prior to submitting to NYSERDA Finance. | Tip |
|---|
The NYSERDA Project Manager will email their approval or request revisions/clarifications within 3-4 days of receipt of the email. |
|
| UI Step |
|---|
After validation by the NYSERDA Project Manager, click Submit. | Expand |
|---|
| 
|
|
|
|
| UI Expand |
|---|
|
| Info |
|---|
If your invoice is rejected, your NYSERDA Project Manager will change the invoice status to Draft so that you are able to make the required changes to ensure the invoice can be approved by NYSERDA's Finance team. The instructions below will guide you on how to re-access the Invoice from the Project Record in the NYSERDA Partner Portal. |
| UI Steps |
|---|
|
| UI Step |
|---|
Follow steps 1 - 4 in Creating an Invoice section above. |
| UI Step |
|---|
In the Project Record, scroll down to the Project Invoices section to locate the invoice set back to Draft status. | Expand |
|---|
| 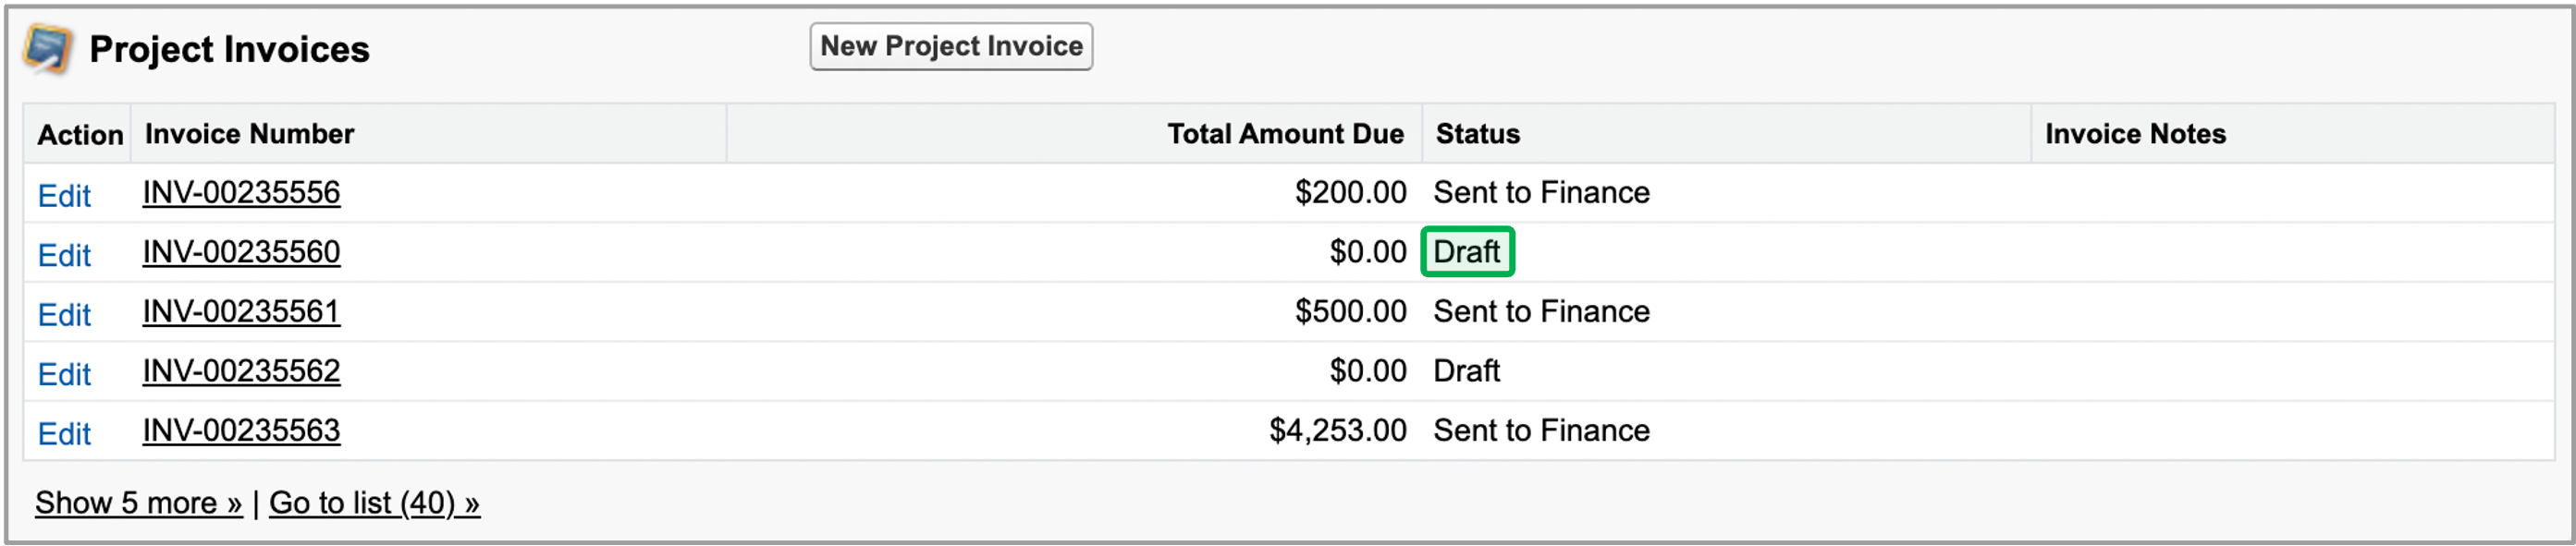
|
|
| UI Step |
|---|
Open the Draft Invoice, click Edit and revise the invoice according to your PM's instructions. |
|
|
| UI Expand |
|---|
| | Multimedia |
|---|
| name | Hubs Salesforce Invoicing Training.mp4 |
|---|
| width | 100% |
|---|
| height | 100% |
|---|
|
|
|
| Aura - Tab |
|---|
|
| Panel |
|---|
| borderColor | #002D72 |
|---|
| bgColor | #F3F4F9 |
|---|
| titleColor | #ffffff |
|---|
| borderWidth | 1 |
|---|
| titleBGColor | #002D72 |
|---|
| borderStyle | none |
|---|
| title | Case Management |
|---|
|
|
Case Creation| Expand |
|---|
| | Multimedia |
|---|
| name | EmPower and HUBS Case Creation.mp4 |
|---|
| width | 100% |
|---|
| page | External Guide Video Library |
|---|
| height | 100% |
|---|
|
|
Case Escalation Process| Expand |
|---|
| | Multimedia |
|---|
| name | EmPower and HUBS Case Escalation Process Video.mp4 |
|---|
| width | 100% |
|---|
| page | External Guide Video Library |
|---|
| height | 100% |
|---|
|
|
Monitoring & Checking on Case Status| Expand |
|---|
| | Multimedia |
|---|
| name | EmPower and HUBS Monitoring and Checking on Cases Video.mp4 |
|---|
| width | 100% |
|---|
| page | External Guide Video Library |
|---|
| height | 100% |
|---|
|
|
|
|