| Excerpt |
|---|
| Aura - Panel |
|---|
| tab | 1 |
|---|
| styles | {"body":{"text":{"color":"#465671","textAlign":"left","fontWeight":"normal","fontSize":14}},"header":{"backgroundColor":{"color":"#ffffff"}},"headline":{"text":{"text":"General Information","color":"#233e90","textAlign":" |
|---|
|
|
| tab | 1 |
|---|
styles | {"body":{"text":{"color":"#465671","textAlign":"| left","fontWeight":"normal","fontSize": |
|
| 14 | header | backgroundColor | color | #ffffff | }},"headline":{"text":{"text":"STEP 1: Applicant Information","color":"#233e90","textAlign":"left","fontWeight":"normal","fontSize":26}},"base":{"boxShadow":{"shadows":[{"color":"| :"rgba(0, 0, 0, 0.08)","x":0,"y":1,"blur":1,"spread":0},{"color":"rgba(0, 0, 0, 0.16)","x":0,"y":1,"blur":3,"spread":1}]},"backgroundColor":{"color":"#ffffff"},"border":{"color":"#233e90","style":"solid","width":4,"bottom":false,"top":false,"left":true,"right":false},"borderRadius":{"radius":4}}} | | body | <p><br /></p> |
|---|
|
| Expand |
|---|
| aura
| pretty-title | color | #0077c8 | | textAlign | left |
|---|
| fontSize | 24 |
|---|
| lineHeight | 24 |
|---|
| cloudText | Demo Title |
|---|
| tag | h6 |
|---|
| fontWeight | normal |
|---|
Complete the Application Information section: | | Section |
|---|
| Column |
|---|
| | UI Steps |
|---|
| | UI Step |
|---|
Your First Name and Last Name will pre-populate. |
| UI Step |
|---|
Select your Preferred Applicant Language from the drop-down. |
| UI Step |
|---|
Provide your Primary Phone Number. |
| UI Step |
|---|
All other fields are optional and can be completed at need. |
| Column |
|---|
| 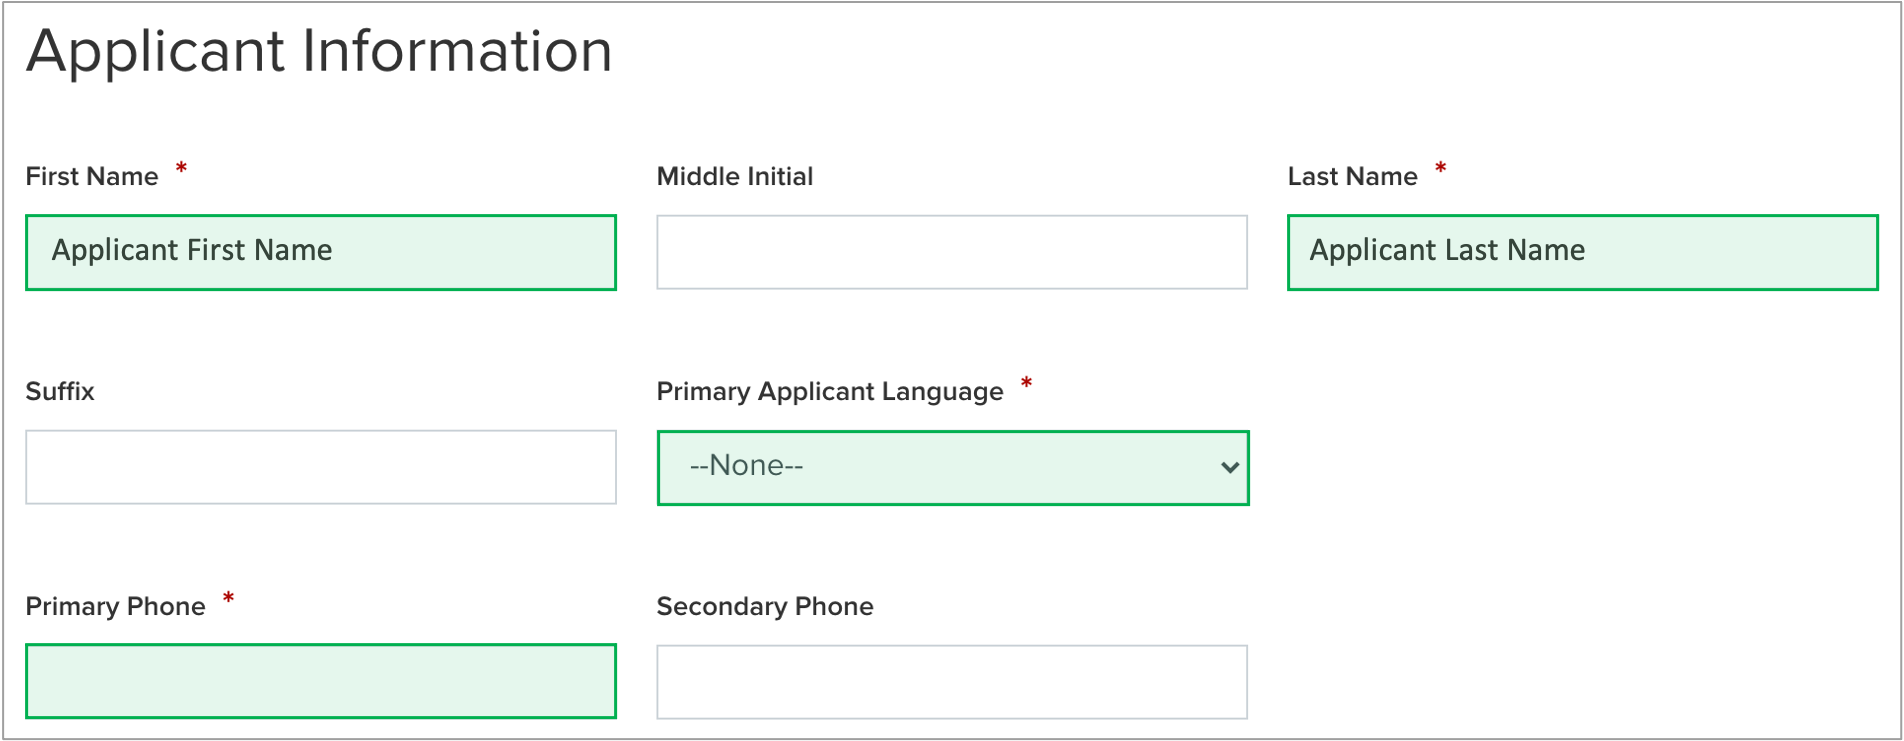 Image Removed Image Removed
|
| UI Step |
|---|
Applicants can access the online application by clicking the link below and logging into your Salesforce Portal account, then by selecting the EmPower+ Application option. | UI Button |
|---|
| color | blue |
|---|
| newWindow | true |
|---|
| size | small |
|---|
| icon | link |
|---|
| title | Salesforce Customer Login |
|---|
| url | https://nyserda-portal.force.com/customer/login |
|---|
|
| Expand |
|---|
| 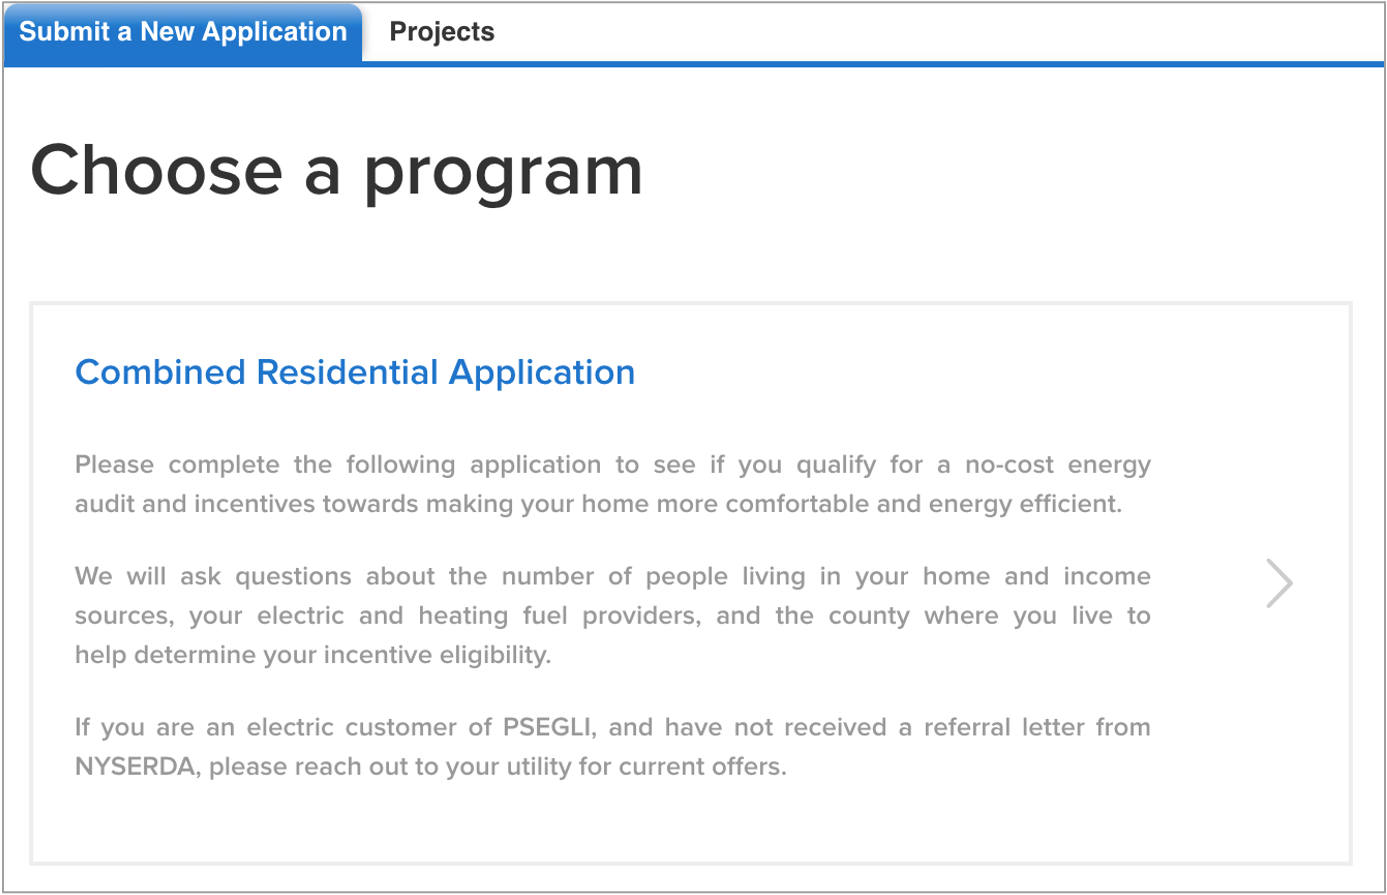 Image Added Image Added
|
|
| UI Step |
|---|
The application is comprised of seven (7) distinct steps, or pages, that you will navigate as you complete the application. Each page contains required fields and information denoted by a red asterisk. | Expand |
|---|
| 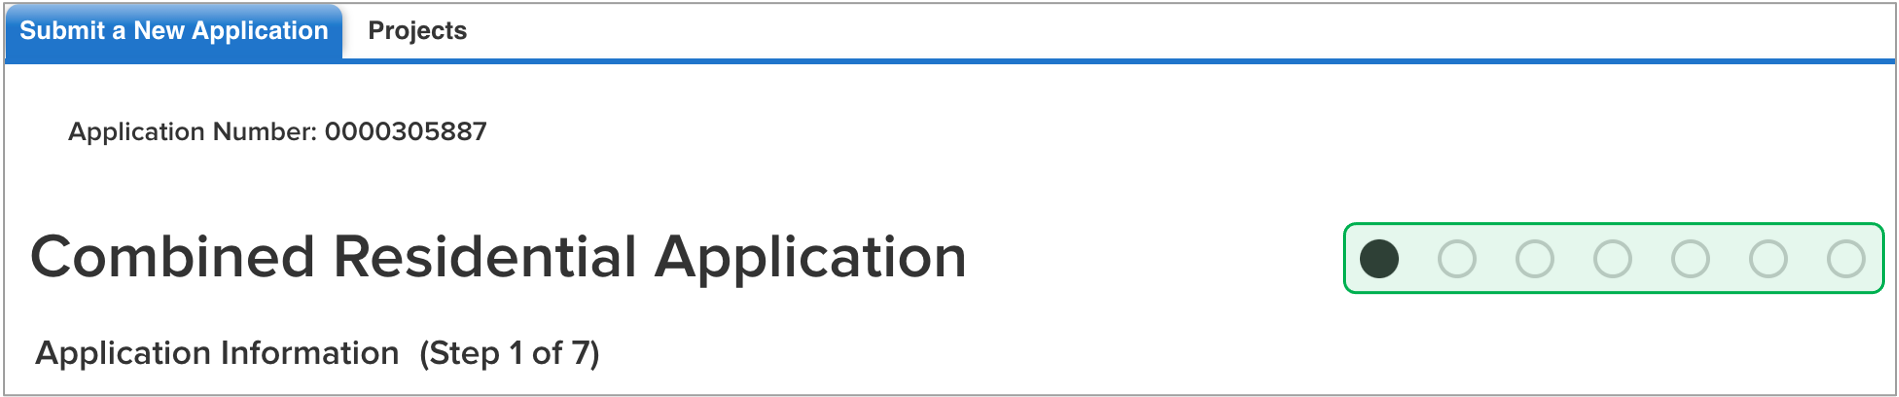 Image Added Image Added
|
|
| UI Step |
|---|
Each step, or page, throughout the application contains instructional text at the top of the page. It is highly recommended that you review these instructional texts as they provide clarity regarding the information requested. |
| UI Step |
|---|
Every step, or page, throughout the application contains a Save button at the bottom of the page. Click Save before exiting the application if you do not have time to complete it in one sitting. | Expand |
|---|
|  Image Added Image Added
|
|
| UI Step |
|---|
To access a Saved and incomplete application: - Log back into the Salesforce Portal
Select the Enrollment tab | Expand |
|---|
|  Image Added Image Added
|
Locate the correct application and click the link in the Enrollment Name column | Expand |
|---|
|
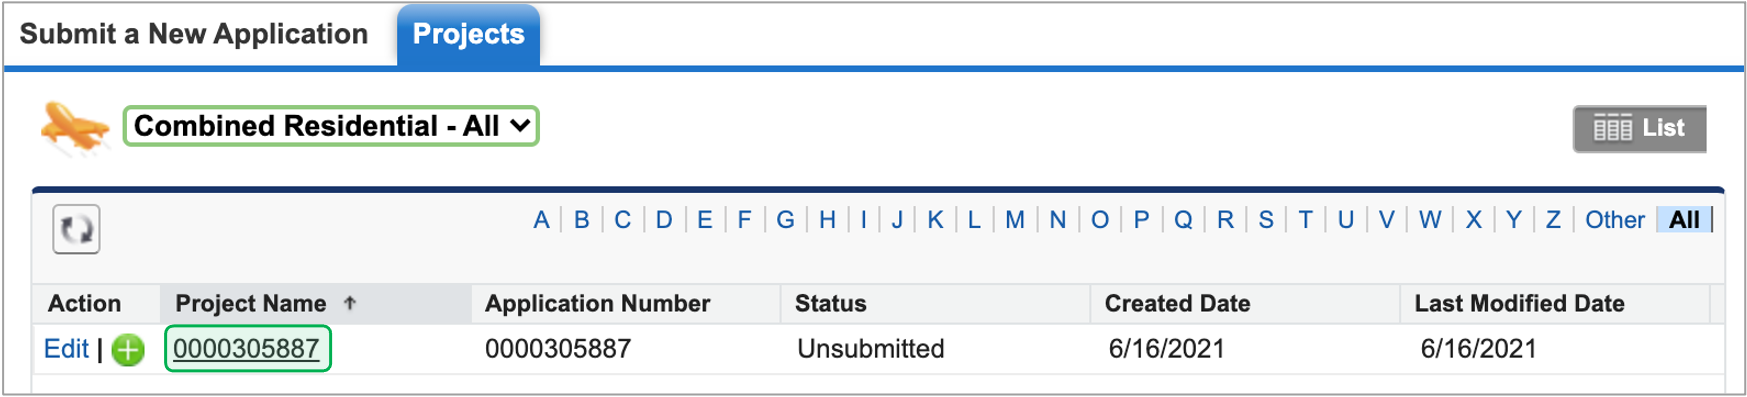 Image Added Image Added |
Finally, click the Application Wizard button to return to your incomplete application. | Expand |
|---|
| 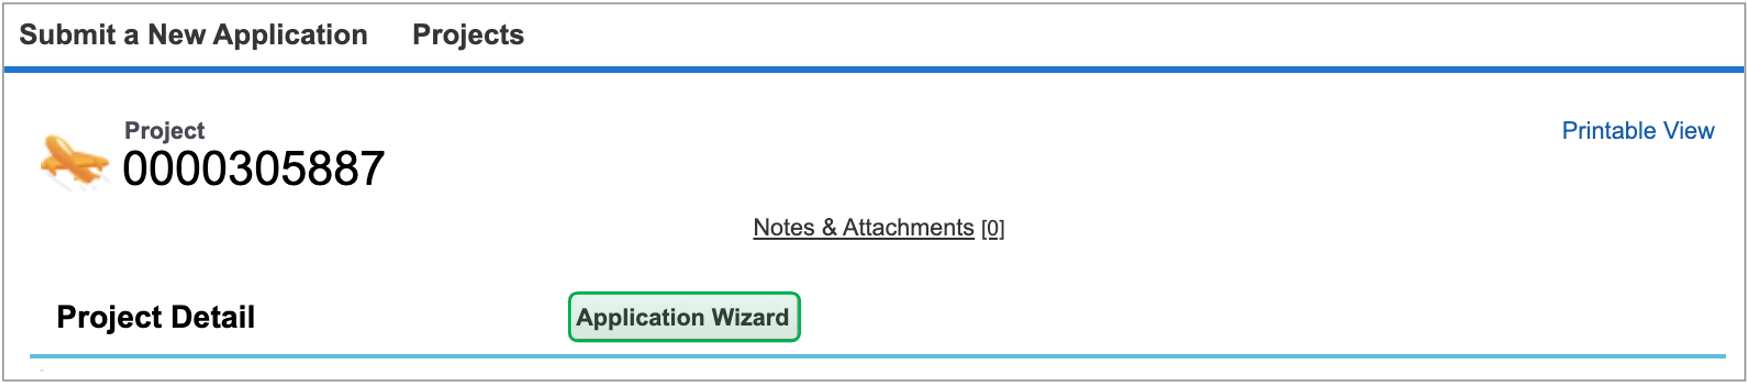 Image Added Image Added
|
|
|
|
|
| Aura - Panel |
|---|
| tab | 1 |
|---|
| styles | {"body":{"text":{"color":"#465671","textAlign":"left","fontWeight":"normal","fontSize":14}},"header":{"backgroundColor":{"color":"#ffffff"}},"headline":{"text":{"text":"STEP 1: Applicant Information","color":"#233e90","textAlign":"left","fontWeight":"normal","fontSize":26}},"base":{"boxShadow":{"shadows":[{"color":"rgba(0, 0, 0, 0.08)","x":0,"y":1,"blur":1,"spread":0},{"color":"rgba(0, 0, 0, 0.16)","x":0,"y":1,"blur":3,"spread":1}]},"backgroundColor":{"color":"#ffffff"},"border":{"color":"#233e90","style":"solid","width":4,"bottom":false,"top":false,"left":true,"right":false},"borderRadius":{"radius":4}}} |
|---|
| body | <p><br /></p> |
|---|
|
| Expand |
|---|
|
| Aura - Title |
|---|
| color | #0077c8 |
|---|
| textAlign | left |
|---|
| fontSize | 24 |
|---|
| lineHeight | 24 |
|---|
| cloudText | Demo Title |
|---|
| tag | h6 |
|---|
| fontWeight | normal |
|---|
| Complete the Application Information section: |
| Section |
|---|
| Column |
|---|
|
| UI Steps |
|---|
|
| UI Step |
|---|
Your First Name and Last Name will pre-populate. |
| UI Step |
|---|
Select your Preferred Applicant Language from the drop-down. |
| UI Step |
|---|
Provide your Primary Phone Number. |
| UI Step |
|---|
All other fields are optional and can be completed as needed. |
|
|
| Column |
|---|
| Image Added |
|
| Aura - Title |
|---|
| color | #0077c8 |
|---|
| textAlign | left |
|---|
| fontSize | 24 |
|---|
| lineHeight | 24 |
|---|
| cloudText | Demo Title |
|---|
| tag | h6 |
|---|
| fontWeight | normal |
|---|
| Complete the Site Information section: |
| Section |
|---|
| Column |
|---|
|
| UI Steps |
|---|
|
| UI Step |
|---|
Using the Address field, begin typing in your street address. Salesforce will suggest verified addresses below this field as you type. Selecting an option from this list will populate all other address fields on the page. | Expand |
|---|
| title | Regarding Your Internet Browser |
|---|
| Applicants should be aware that, depending on the internet browser used to complete the Online Application, the address fields may pre-populate based on your Browser's auto-form filling functionality, such as with Google Chrome. Applicants should review the address fields if they pre-populate and update with the correct address if necessary. |
| Tooltip |
|---|
| linkTextStrong | true |
|---|
| appendIcon | camera |
|---|
| linkTextUnderline | true |
|---|
| linkText | screenshot |
|---|
| linkTextColor | #0073A4 |
|---|
| 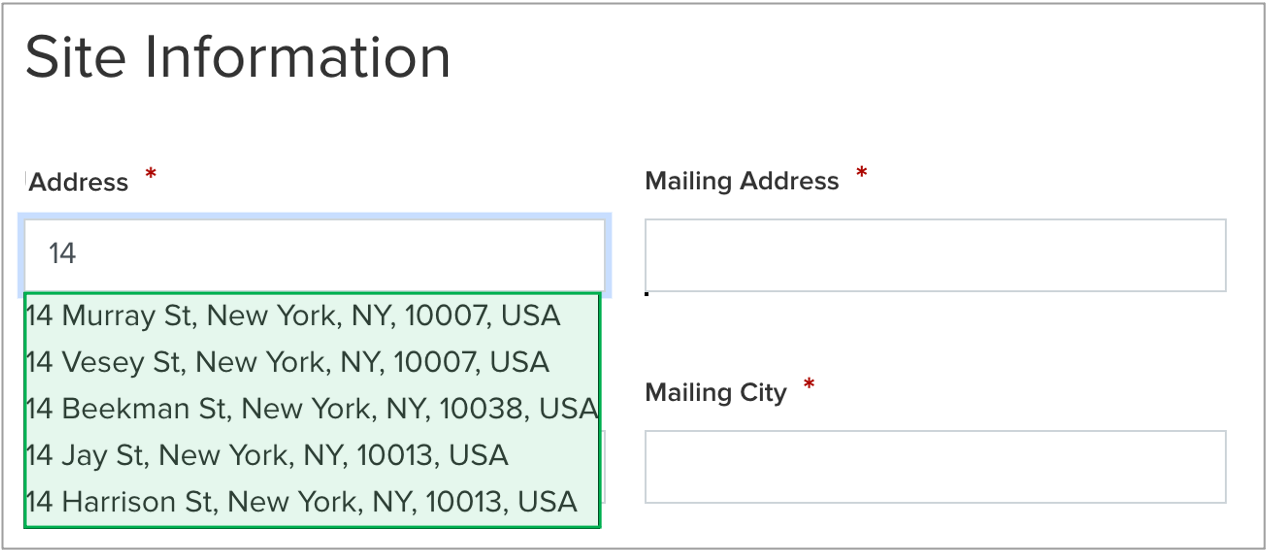 Image Added Image Added
|
|
| UI Step |
|---|
If your Mailing address is different from your Address, update the Mailing Address fields as needed. |
| UI Step |
|---|
Select the appropriate response for the Does the applicant own this site drop down. This field identifies if the applicant |
|
|
|
|
| Aura - Title |
|---|
| color | #0077c8 |
|---|
| textAlign | left |
|---|
| fontSize | 24 |
|---|
| lineHeight | 24 |
|---|
| cloudText | Demo Title |
|---|
| tag | h6 |
|---|
| fontWeight | normal |
|---|
| Complete the Utility Site Information section: |
| Section |
|---|
| Column |
|---|
| | UI Steps |
|---|
| | UI Step |
|---|
Using the Utility Address field, begin typing in your street address. Salesforce will suggest verified addresses below this field as you type. Selecting an option from this list will populate all other Utility and Mailing address fields. | Expand |
|---|
| title | Regarding Your Internet Browser |
|---|
| Applicants should be aware that, depending on the internet browser used to complete the Online Application, the address fields may pre-populate based on your Browser's auto-form filling functionality, such as with Google Chrome. Applicants should review the address fields if they pre-populate and update with the correct address if necessary. |
| UI Step |
|---|
If your Mailing address is different from your Utility address, update the Mailing Address fields as needed. |
| UI Step |
|---|
Select the appropriate response for the Does the applicant own this site drop down. This field identifies if the Applicant is the owner of the dwelling associated with the |
Utility Address address entered into the application. |
| UI Step |
|---|
Select the option from the Dwelling Type drop-down that most closely identifies what type of dwelling exists on the site. |
| UI Step |
|---|
The Number of Units field becomes required |
if if you select Multi-Family (5+ units) |
is selected as the
|
|
| Column |
|---|
| 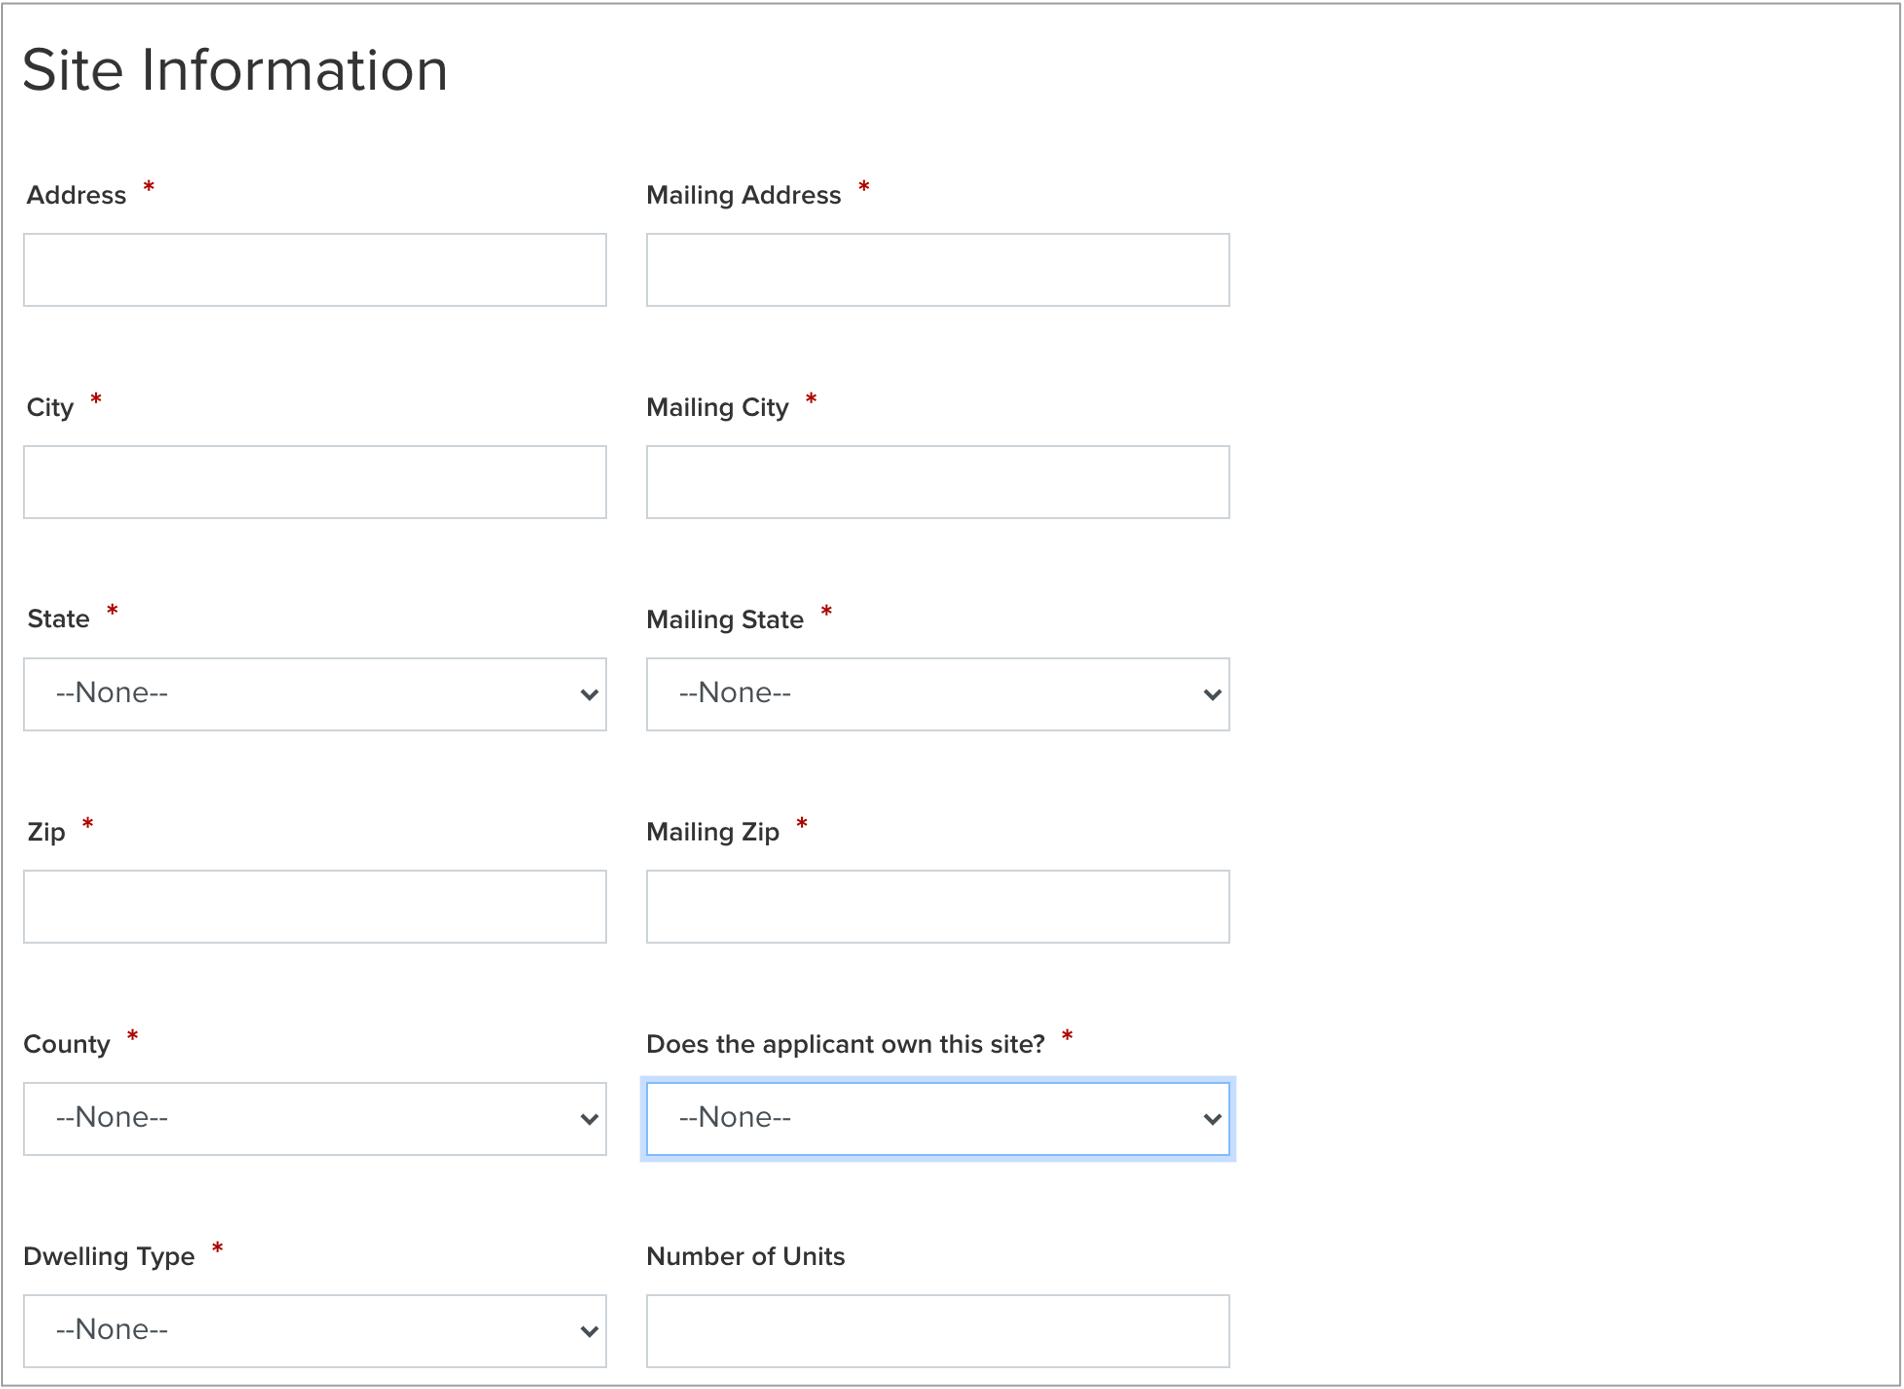 Image Modified Image Modified
|
|
| Aura - Title |
|---|
| color | #0077c8 |
|---|
| textAlign | left |
|---|
| fontSize | 24 |
|---|
| lineHeight | 24 |
|---|
| cloudText | Demo Title |
|---|
| tag | h6 |
|---|
| fontWeight | normal |
|---|
| Save & Continue: |
| Section |
|---|
| Column |
|---|
|
| UI Steps |
|---|
|
| UI Step |
|---|
To advance to the next step, click Continue at the bottom of the page. |
|
|
|
| Column |
|---|
|  Image Removed Image Removed
|
| | Tip |
|---|
It is recommended that you click Save before clicking Continue. |
|
|
| Column |
|---|
| Image Added |
|
|
|
| Aura - Panel |
|---|
| tab | 1 |
|---|
| styles | {"body":{"text":{"color":"#465671","textAlign":"left","fontWeight":"normal","fontSize":14}},"header":{"backgroundColor":{"color":"#ffffff"}},"headline":{"text":{"text":"STEP 2: Utility Information","color":"#233e90","textAlign":"left","fontWeight":"normal","fontSize":26}},"base":{"boxShadow":{"shadows":[{"color":"rgba(0, 0, 0, 0.08)","x":0,"y":1,"blur":1,"spread":0},{"color":"rgba(0, 0, 0, 0.16)","x":0,"y":1,"blur":3,"spread":1}]},"backgroundColor":{"color":"#ffffff"},"border":{"color":"#233e90","style":"solid","width":4,"bottom":false,"top":false,"left":true,"right":false},"borderRadius":{"radius":4}}} |
|---|
| body | <p><br /></p> |
|---|
|
| Expand |
|---|
|
| Aura - Title |
|---|
| color | #0077c8 |
|---|
| textAlign | left |
|---|
| fontSize | 24 |
|---|
| lineHeight | 24 |
|---|
| cloudText | Demo Title |
|---|
| tag | h6 |
|---|
| fontWeight | normal |
|---|
| Complete the Utility Information section: |
| Section |
|---|
| Column |
|---|
|
| UI Steps |
|---|
|
| UI Step |
|---|
Select the Electric Utility |
Provider & the Provider and the Primary Heating Fuel Type for the site. |
When selecting either Selecting either Natural Gas or Other from the Primary Heating Fuel Type drop-down will enable an additional required field for this section that must be completed. |
| UI Step |
|---|
Include Electric Utility and Primary Fuel Account Numbers. These fields are optional. However, providing NYSERDA with this information will enable us to provide the most accurate and effective recommendations for work that will be performed at the site. |
| UI Step |
|---|
If the site has a Secondary Heating |
Fuel TypeFuel Type, select it from the drop-down. This field is optional. |
| UI Step |
|---|
Respond to the Additional Question, if applicable or appropriate, with any additional information that will help NYSERDA reduce your energy consumption or reduce risks to occupant health or special needs. |
, select it from the drop-down. This field is optional.
|
|
| Column |
|---|
| 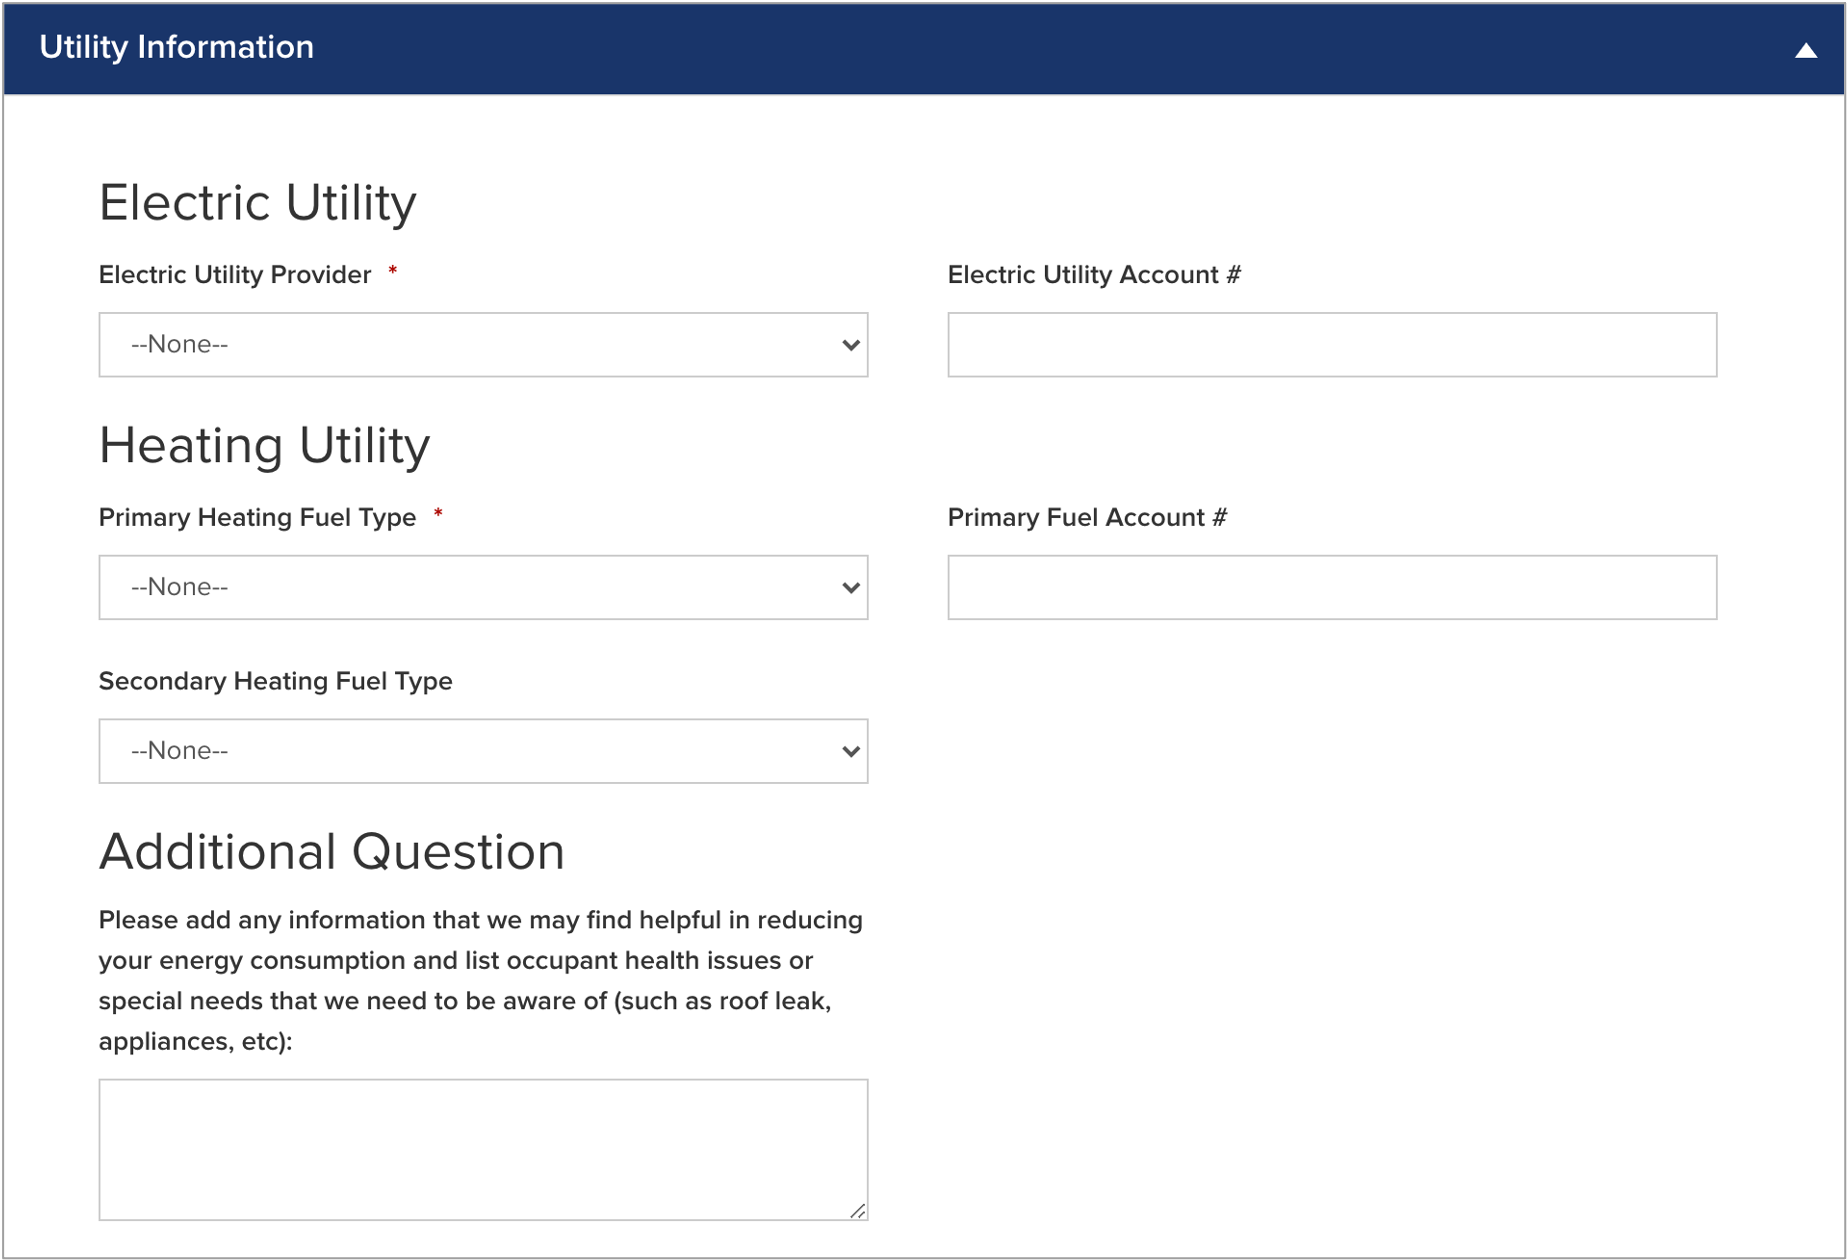 Image Modified Image Modified
|
|
| Aura - Title |
|---|
| color | #0077c8 |
|---|
| textAlign | left |
|---|
| fontSize | 24 |
|---|
| lineHeight | 24 |
|---|
| cloudText | Demo Title |
|---|
| tag |
|---|
|
| h6 | | fontWeight | normal |
|---|
Complete the Additional Question section: | | Section |
|---|
| Column |
|---|
| | UI Steps |
|---|
| | UI Step |
|---|
Respond to the question, if applicable or appropriate, with any additional information that will help NYSERDA reduce your energy consumption or reduce risks to occupant health or special needs. |
| Column |
|---|
|  Image Removed Image Removed
|
| Aura - Title |
|---|
| color | #0077c8 |
|---|
| textAlign | left |
|---|
| fontSize | 24 |
|---|
| lineHeight | 24 |
|---|
| cloudText | Demo Title |
|---|
| tag | h6 |
|---|
| fontWeight | normal |
|---|
| Save & Continue: |
| Section |
|---|
| Column |
|---|
| | | UI Steps |
|---|
| | UI Step |
|---|
To advance to the next step, click Continue at the bottom of the page. |
| Column |
|---|
| Image Removed |
| Tip |
|---|
It is recommended that you click Save before clicking Continue. |
| | Aura - Panel |
|---|
| Section |
|---|
| Column |
|---|
|
| UI Steps |
|---|
|
| UI Step |
|---|
To advance to the next step, click Continue at the bottom of the page. It is recommended that you click Save before clicking Continue. |
|
|
| Column |
|---|
| Image Added |
|
|
|
| Aura - Panel |
|---|
| tab | 1 |
|---|
| styles | {"body":{"text":{"color":"#465671","textAlign":"left","fontWeight":"normal","fontSize":14}},"header":{"backgroundColor":{"color":"#ffffff"}},"headline":{"text":{"text":"STEP 3: Partner Information","color":"#233e90","textAlign":"left","fontWeight":"normal","fontSize":26}},"base":{"boxShadow":{"shadows":[{"color":"rgba(0, 0, 0, 0.08)","x":0,"y":1,"blur":1,"spread":0},{"color":"rgba(0, 0, 0, 0.16)","x":0,"y":1,"blur":3,"spread":1}]}," |
|---|
|
|
| tab | 1 |
|---|
styles | {"body":{"text":{"color":"#465671","textAlign":"left","fontWeight":"normal","fontSize":14}},"header":{"| backgroundColor":{"color":"#ffffff"} |
|
| } | headline | text":{"text":"STEP 3: Partner Information"," | textAlign | left | fontWeight | "normal" | fontSize":26}},"base":{"boxShadow":{"shadows":[{"color":"rgba(0, 0, 0, 0.08)","x":0,"y":1,"blur":1,"spread":0},{"color":"rgba(0, 0, 0, 0.16)","x":0,"y":1,"blur":3,"spread":1}]},"backgroundColor":{"color":"#ffffff"},"border":{"color":"#233e90","style":"solid","width":4,"bottom":false,"top":false,"left":true,"right":false},"borderRadius":{"radius":4}}}| body | <p><br /></p> |
|---|
| bottom":false,"top":false,"left":true,"right":false},"borderRadius":{"radius":4}}} | | body | <p><br /></p> |
|---|
| | Expand |
|---|
|
| Expand |
|---|
|
| Aura - Title |
|---|
| color | #0077c8 |
|---|
| textAlign | left |
|---|
| fontSize | 24 |
|---|
| lineHeight | 24 |
|---|
| cloudText | Demo Title |
|---|
| tag | h6 |
|---|
| fontWeight | normal |
|---|
| Complete the Partner Information section: |
| Section |
|---|
| Column |
|---|
|
| UI Steps |
|---|
|
| UI Step |
|---|
Select a contractor from the Contractor Selection drop-down. | Expand |
|---|
| title | Rules to Selecting a Contractor |
|---|
| - When selecting a contractor, you can either,
- Select one that you have been working with,
- Select the Select Next Available option to have the next available contractor assigned to your project, or
- Select your preference for a contractor partner from the list.
- Only those contractors that serve your designated area will appear on the list.
- If you do not see a contractor, it is likely because they do not serve your area.
- If a selected contractor cannot perform the work due to scheduling restrictions, they may not accept the project.
- If so, an alternate will be selected by CLEAResult Shared Services.
- CLEAResult Shared Services selects contractors when they receive Paper Applications or if the Applicant did not select one when applying online.
- When applicants apply using a Campaign Code, the contractor will be selected automatically.
- Applicants can change the pre-selected contractor at need.
|
|
| UI Step |
|---|
While not required, you can help NYSERDA understand if an independent organization has been assisting you with the application process. If that organization appears on the Are any of these organizations assisting you with the application process? drop-down, select it from the list. |
|
|
| Column |
|---|
| 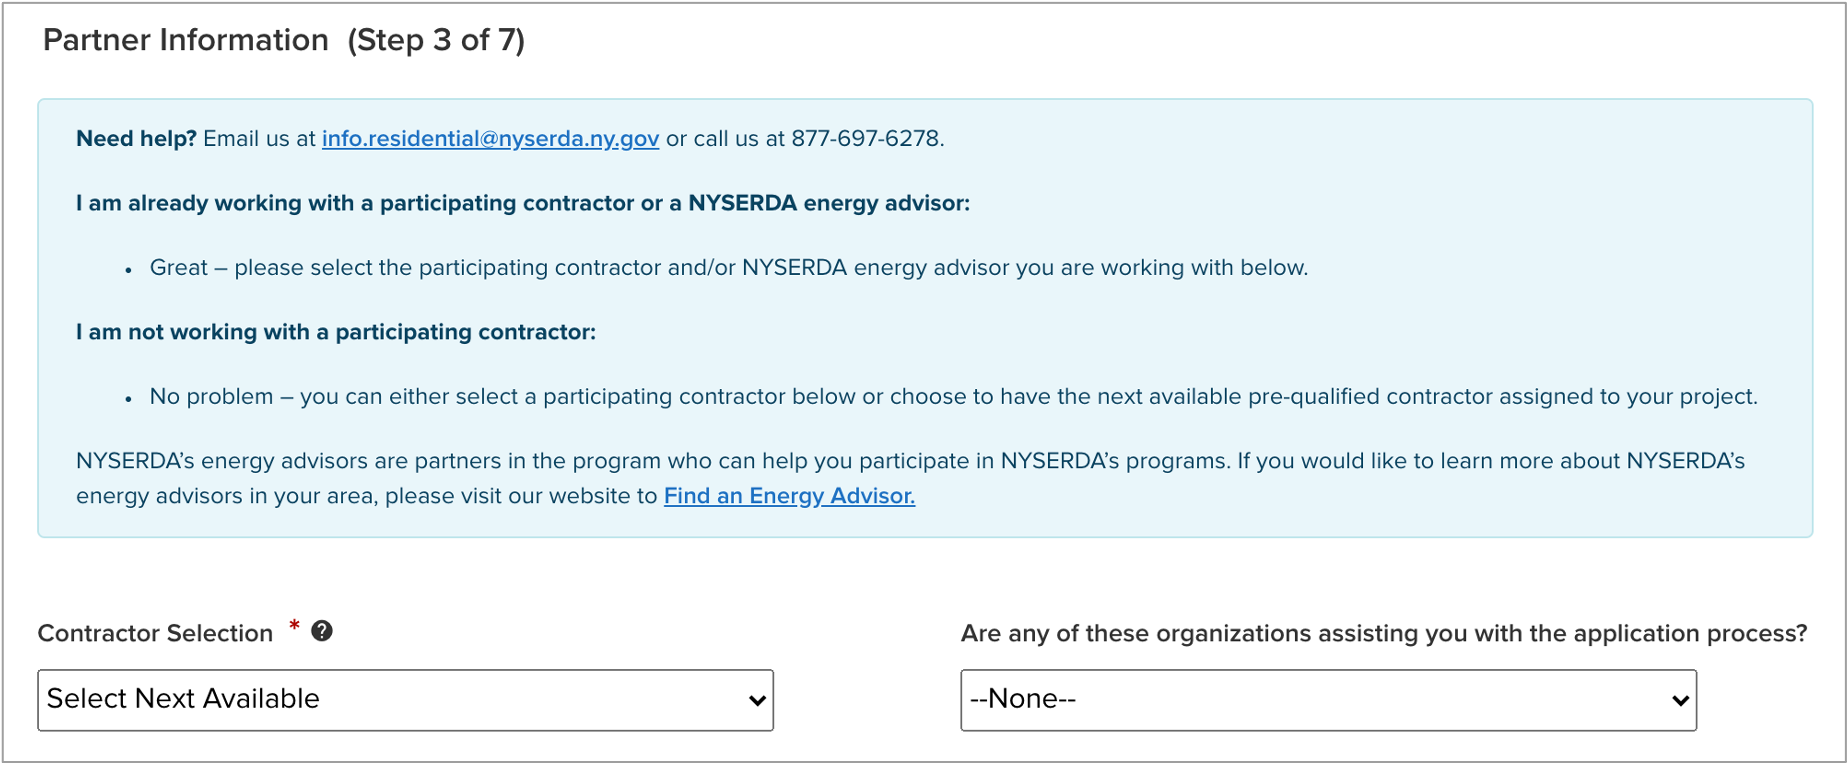 Image Added Image Added
|
|
|
| | Aura - Title |
|---|
| color | #0077c8 |
|---|
| textAlign | left |
|---|
| fontSize | 24 |
|---|
| lineHeight | 24 |
|---|
| cloudText | Demo Title |
|---|
| tag | h6 |
|---|
| fontWeight | normal |
|---|
|
Completethe Partner Information section
| Section |
|---|
| | UI Steps |
|---|
| | UI Step |
|---|
Select a Contractor from the Contractor Selection drop-down. | Expand |
|---|
| title | Rules to Selecting a Contractor |
|---|
| - When selecting a Contractor, you can either,
- Select one that you have already been working with,
- Select the Select Next Available option to have the next available Contractor assigned to your project, or
- Select your preference for a Contractor Partner from the list.
- Only those Contractors that serve your designated area will appear on the list.
- If you do not see a Contractor, it is likely because they do not serve your area.
- If a selected Contractor cannot perform the work due to scheduling restrictions, they may not accept the project.
- If so, an alternate will be selected by CLEAResult Shared Services.
- CLEAResult Shared Services selects Contractors when Paper Applications are submitted or if the Applicant did not select one when applying online.
- When applicants apply using a Campaign Code, the Contractor will be selected automatically.
- Applicants can change the pre-selected Contractor at need.
|
| UI Step |
|---|
While not required, you can help NYSERDA understand if an independent organization has been assisting you with the application process. If that organization appears on the other drop-down, select it from the list. |
| Column |
|---|
| Image Removed |
|
| Aura - Title |
|---|
| color | #0077c8 |
|---|
| textAlign | left |
|---|
| fontSize | 24 |
|---|
| lineHeight | 24 |
|---|
| cloudText | Demo Title |
|---|
| tag | h6 |
|---|
| fontWeight | normal |
|---|
| Save & Continue: |
| Section |
|---|
| Column |
|---|
| | | UI Steps |
|---|
| | UI Step |
|---|
To advance to the next step, click Continue at the bottom of the page. |
| Column |
|---|
| Image Removed |
| Tip |
|---|
It is recommended that you click Save before clicking Continue. |
| | Aura - Panel |
|---|
|
| UI Steps |
|---|
|
| UI Step |
|---|
To advance to the next step, click Continue at the bottom of the page. It is recommended that you click Save before clicking Continue. |
|
|
| Column |
|---|
| Image Added |
|
|
|
| Aura - Panel |
|---|
| tab | 1 |
|---|
| styles | {"body":{"text":{"color":"#465671","textAlign":"left","fontWeight":"normal","fontSize":14}},"header":{"backgroundColor":{"color":"#ffffff"}},"headline":{"text":{"text":"STEP 4: Eligibility Screening","color":"#233e90","textAlign":"left","fontWeight":"normal","fontSize":26}},"base":{"boxShadow":{"shadows":[{"color":"rgba(0, 0, 0, 0.08)","x":0,"y":1,"blur":1,"spread":0},{"color":"rgba(0, 0, 0, 0.16)","x":0,"y":1,"blur":3,"spread":1}]}, |
|---|
|
|
| tab | 1 |
|---|
styles | {"body":{"text":{"color":"#465671","textAlign":"left","fontWeight":"normal","fontSize":14}},"header":{| "backgroundColor":{"color":"#ffffff" |
|
| } | headline | text | {"text | STEP 4: Eligibility Screening | color | #233e90 | textAlign | fontWeight | normal | , | fontSize | 26}},"base":{"boxShadow":{"shadows":[{"color":"rgba(0, 0, 0, 0.08)","x":0,"y":1,"blur":1,"spread":0},{"color":"rgba(0, 0, 0, 0.16)","x":0,"y":1,"blur":3,"spread":1}]},"backgroundColor":{"color":"#ffffff"},"border":{"color":"#233e90","style":"solid","width":4,"bottom":false,"top":false,"left":true,"right":false},"borderRadius":{"radius":4}}}| body | <p><br /></p> |
|---|
| | Expand |
|---|
| | Expand |
|---|
| | Aura - Title |
|---|
| color | #0077c8 |
|---|
| textAlign | left |
|---|
| fontSize | 24 |
|---|
| lineHeight | 24 |
|---|
| cloudText | Demo Title |
|---|
| tag | h6 |
|---|
| fontWeight | normal |
|---|
| Household Information & Demographics |
| Section |
|---|
| Column |
|---|
|
| UI Steps |
|---|
|
| UI Step |
|---|
Add Household Members. The Number of Household Members field will automatically generate. |
| UI Step |
|---|
Complete Household Demographics details fields, selecting all options that apply for all members of the household. |
|
|
| Column |
|---|
|  Image Added Image Added
|
|
| Aura - Title |
|---|
| color | #0077c8 |
|---|
| textAlign | left |
|---|
| fontSize | 24 |
|---|
| lineHeight | 24 |
|---|
| cloudText | Demo Title |
|---|
| tag | h6 |
|---|
| fontWeight | normal |
|---|
| Complete the Referral Code Screening: |
| Section |
|---|
| Column |
|---|
|
| UI Steps |
|---|
|
| UI Step |
|---|
If you received a letter from NYSERDA with a Referral Code, select Yes in response to the question, enter the Referral Code in the provided field, then skip to Complete the Household Demographics Section below. No additional eligibility questions are required. | Expand |
|---|
| title | Regarding Referral Codes |
|---|
| - The Referral Code field is only accessible if Yes is selected. If you have a Referral Code, enter it in the field that appears.
- Referral Codes are provided to applicants through mailed letters or emails either from the Applicant's Utility, from NYSERDA directly, or from the Office of Temporary Disability Assistance (OTDA).
- Applicants who have a referral code and enter it in the application will not need to provide additional income verification as part of the application process.
- Contractors and/or Community Organizations assisting Applicants with the application process should inquire if the Applicant, or their household, received a Referral Code through email or mail.
|
|
| UI Step |
|---|
However, if you did not receive a letter with a Referral Code, select No. An additional section will appear on the application titled Categorical Screening. Review instructions for that section below. |
|
|
| Column |
|---|
|  Image Added Image Added
|
|
|
| | Aura - Title |
|---|
| color | #0077c8 |
|---|
| textAlign | left |
|---|
| fontSize | 24 |
|---|
| lineHeight | 24 |
|---|
| cloudText | Demo Title |
|---|
| tag | h6 |
|---|
| fontWeight | normal |
|---|
|
ReviewGeo Eligibilitysection | | Tip |
|---|
| Info |
|---|
This section of the application will only appear if the applicant answers No to the question in the Referral Code Screening section |
Applicants need only satisfy one Eligibility Requirement
| Section |
|---|
| Column |
|---|
|
| UI Steps |
|---|
|
Geo Eligibility is determined automatically by the system based on the Applicant's address. | Expand |
|---|
| title | Geo Eligibility for Moderate Income Applicants |
|---|
| Applicants who are considered Moderate Income are not eligible for Geo Eligibility. |
|
|
|
| Column |
|---|
|  Image Removed Image Removed
|
|
| Aura - Title |
|---|
| color | #0077c8 |
|---|
| textAlign | left |
|---|
| fontSize | 24 |
|---|
| lineHeight | 24 |
|---|
| cloudText | Demo Title |
|---|
| tag | h6 |
|---|
| fontWeight | normal |
|---|
| Complete the Referral Section: |
| Section |
|---|
| Column |
|---|
| | | UI Steps |
|---|
| | UI Step |
|---|
If you received a letter from NYSERDA with a Referral Code, select Yes in response to the question, enter the Referral Code in the provided field, then skip to Complete the Household Demographics Section below. No additional eligibility questions are required. If you or any household member received an award letter for HEAP, SNAP (food benefits), SSI, TANF, or Public Assistance in the past 12 months, select Yes. Categorical eligibility is based on the date within the award letter. Award letters are good for one year from the date provided. Once completed, advance to the Household Demographics section. |
| UI Step |
|---|
If you, or any household members did not receive any assistance listed above, select No. An additional section will appear on the application titled Income Documentation Screening. Review instructions for that section below. |
|
|
| Column |
|---|
|  Image Added Image Added
|
|
| Aura - Title |
|---|
| color | #0077c8 |
|---|
| textAlign | left |
|---|
| fontSize | 24 |
|---|
| lineHeight | 24 |
|---|
| cloudText | Demo Title |
|---|
| tag | h6 |
|---|
| fontWeight | normal |
|---|
| Complete the Income Documentation Screening: |
| Section |
|---|
| Column |
|---|
|
| UI Steps |
|---|
|
| UI Step |
|---|
To add spaces for other members of the household for income documentation purposes, click the Add Household Member option. This will open a modal window for you to document the household member's: - First Name
- Last Name
- Age
- If they are a Full-time Student
- Gross Income Amount
- Income Source
- Income Source Frequency
- Verification Method
|
| UI Step |
|---|
To add an income source for a household member, click the Add Another Income Source option below the household member to document the household member's: - Age
- If they are a Full-time Student
- Gross Income Amount
- Income Source
- Income Source Frequency
- Verification Method
|
| UI Step |
|---|
To edit or delete an income source added to a household member, click the Pencil Icon (edit) or Trash Can Icon (delete) to the far right of the listed income source. |
| UI Step |
|---|
Continue adding household members and income sources as needed. |
|
|
| Column |
|---|
| 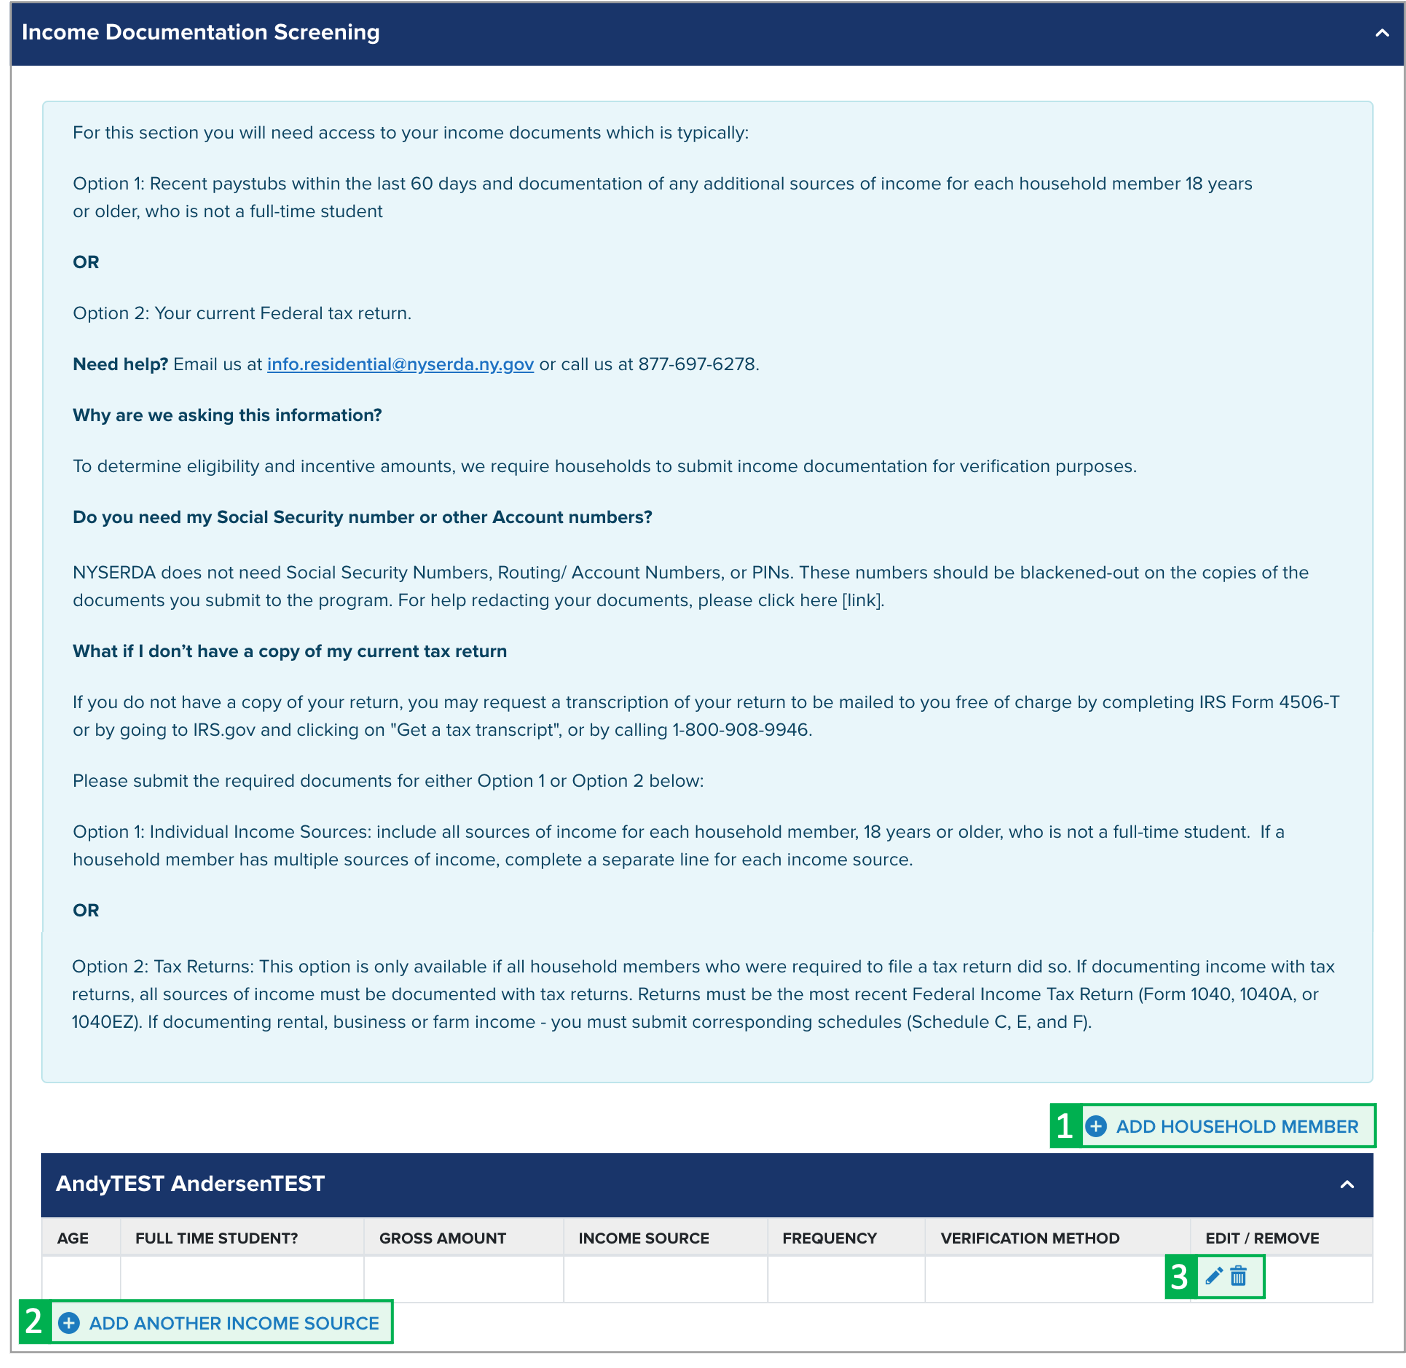 Image Added Image Added
|
|
| Aura - Title |
|---|
| color | #0077c8 |
|---|
| textAlign | left |
|---|
| fontSize | 24 |
|---|
| lineHeight | 24 |
|---|
| cloudText | Demo Title |
|---|
| tag | h6 |
|---|
| fontWeight | normal |
|---|
| Save & Continue: |
| Section |
|---|
| Column |
|---|
|
| UI Steps |
|---|
|
| UI Step |
|---|
To advance to the next step, click Continue at the bottom of the page. It is recommended that you click Save before clicking Continue. |
|
|
| Column |
|---|
| Image Added |
|
|
| Aura - Panel |
|---|
| tab | 1 |
|---|
| styles | {"body":{"text":{"color":"#465671","textAlign":"left","fontWeight":"normal","fontSize":14}},"header":{"backgroundColor":{"color":"#ffffff"}},"headline":{"text":{"text":"STEP 5: Review Page","color":"#233e90","textAlign":"left","fontWeight":"normal","fontSize":26}},"base":{"boxShadow":{"shadows":[{"color":"rgba(0, 0, 0, 0.08)","x":0,"y":1,"blur":1,"spread":0},{"color":"rgba(0, 0, 0, 0.16)","x":0,"y":1,"blur":3,"spread":1}]},"backgroundColor":{"color":"#ffffff"},"border":{"color":"#233e90","style":"solid","width":4,"bottom":false,"top":false,"left":true,"right":false},"borderRadius":{"radius":4}}} |
|---|
| body | <p><br /></p> |
|---|
|
| Expand |
|---|
| title | Regarding Referral Codes |
|---|
| - The Referral Code field is only accessible if Yes is selected. If you have a Referral Code, enter it in the field that appears.
- Referral Codes are provided to Applicants through mailed letters or emails either from the Applicant's Utility, from NYSERDA directly, or from the Office of Temporary Disability Assistance (OTDA).
- Applicants who have a Referral Code and enter it in the application will not need to provide additional income verification as part of the application process.
- Contractors and/or Community Organizations assisting Applicants with the application process should inquire if the Applicant, or their household, received a Referral Code through email or mail.
- PESG (LIPA) Customers referred by the Office of Temporary and Disability and Assistance (OTDA):
- Referrals come directly to the EmPower Program from OTDA.
- Customers who do not receive a referral from OTDA are ineligible for full or reduced incentivized measures.
- Ineligible customers may be able to participate in similar programs through their Utility.
- Low-income National Grid - Long Island customers may be eligible for the Home Energy Affordability Team (HEAT) program
|
| UI Step |
|---|
However, if you did not receive a letter with a Referral Code, select No. An additional section will appear on the application titled Categorical Eligibility. Review instructions for that section below. |
| Column |
|---|
| Image Removed |
| Aura - Title |
|---|
| color | #0077c8 |
|---|
| textAlign | left |
|---|
| fontSize | 24 |
|---|
| lineHeight | 24 |
|---|
| cloudText | Demo Title |
|---|
| tag | h6 |
|---|
| fontWeight | normal |
|---|
| Complete the Categorical Eligibility Section: |
| Info |
|---|
This section of the application will only appear if the applicant answers No to the question in the Referral section. |
| Section |
|---|
| Column |
|---|
| | | UI Steps |
|---|
| | UI Step |
|---|
If you or any household member received an award letter for HEAR, SNAP, SSI, TANF, or Public Assistance in the past 12 months, select Yes. Categorical Eligibility is based on the date within the award letter. Award letters are good for one year from the date provided within. Multiple options can be selected.An award letter, for each option selected, must be submitted as part of this application. | Expand |
|---|
| title | Acceptable Categorical Eligibility Documents |
|---|
| | Categorical Eligibility Type | Acceptable Documentation | Acceptable Date Range |
|---|
| HEAP | - Award Letter
- OTDA provided HEAP list
| Awarded within last 12 months | | SNAP | | Awarded within last 12 months | | TANF | | Awarded within last 12 months | | Supplemental Security Income (SSI) | - Award Letter
- Benefit Statement
| Awarded within last 12 months | For applicants completing the application online, the award letter can be uploaded during Step 6: Project Documents.For Paper Applications, a copy of the award letter can be submitted when mailing in the application.Once completed, advance to the Household Demographics section. | UI Step |
|---|
If you, or any household members did not receive any assistance as listed above, select No. An additional section will appear on the application titled Income Eligibility. Review instructions for that section below. |
| Column |
|---|
| Image Removed |
| Aura - Title |
|---|
| color | #0077c8 |
|---|
| textAlign | left |
|---|
| fontSize | 24 |
|---|
| lineHeight | 24 |
|---|
| cloudText | Demo Title |
|---|
| tag | h6 |
|---|
| fontWeight | normal |
|---|
| Complete the Income Eligibility Section: |
| Info |
|---|
This section of the application will only appear if the Applicant:- Chooses not to accept Geo Eligibility determination that indicates the Applicant is Geo Eligible (if applicable), and/or
- Answered No to the Referral question in this section, or did not receive a Referral Code from their Utility, NYSERDA, or the Office of Temporary and Disability Assistance (OTDA), and/or
Is not eligible for Categorial Eligibility (i.e., did not receive an award letter for HEAR, SNAP, SSI, TANF, or Public Assistance in the past 12 months).
Applicants must document income for all members of the household if all previous eligibility requirements could not be met. | Expand |
|---|
| title | Acceptable Income Eligibility Documents |
|---|
| | Income Type | Acceptable Document | Acceptable Date Range |
|---|
Social Security | - Award Letter
- Benefit Statement
| Within 12 months | Social Security Disability (SSD) | - Award Letter
- Benefit Statement
| Within 12 months | Pension | - Pension check stub showing gross amount
- Letter from Pension Board
| Within 12 months | Disability (Short Term or Long Term) | | Within 60 days | Child Support / Alimony | - Court Award Letter
- Printout from Domestic Relations
| Within 12 months (within 60 days if using printout from DR website) | Foster Care Payment | - Statement from Social Services
| Within 60 days | Workers Compensation | - Award Letter
- Benefit Statement
| Within 60 days | Unemployment | | Within 60 days | Veterans Benefits | - Award Letter
- Benefit Statement
| Within 12 months | Annuities | | Within 60 days | Salaries/Wages | | Four weeks of paystubs from the last 60 days | Interest Income | | Within 60 days | Rental Income | - Current Lease
- Rent Receipt
| Within 12 months | Business or Farm Income | - Tax Return
- IRS Report of Quarterly Earnings
- Business records.
| Tax Return: Previous Year
IRS Report: Previous 3 months Business Records: Previous 3 months | Tax Documentation | Form 1040, 1040A, or 1040EX | Most recent Federal Income Tax Return. - This is only acceptable if all members of the household who were required to file a tax return did so.
- Additionally, all sources of income must be documented within the Tax Return for each household member.
- If documenting Rental, Business, or Farm income, Applicants must submit corresponding schedules (C, E, and F)
| This section of the application will initially contain a space for the Applicant to add income sources| Section |
|---|
| Column |
|---|
| | UI Steps |
|---|
| | UI Step |
|---|
To add spaces for other members of the household for income documentation purposes, click the Add Household Member option. This will open a modal window for you to document the household member's: - First Name
- Last Name
- Age
- If they are a Full-time Student
- Gross Income Amount
- Income Source
- Income Source Frequency
- Verification Method
|
| UI Step |
|---|
To add an income source for a household member, click the Add Another Income Source option below the household member to document the household member's: - Age
- If they are a Full-time Student
- Gross Income Amount
- Income Source
- Income Source Frequency
- Verification Method
|
| UI Step |
|---|
To edit or delete an income source added to a household member, click the Pencil Icon (edit) or Trashcan Icon (delete) to the far right of the listed income source. |
| UI Step |
|---|
Continue adding household members and income sources as needed. |
| Column |
|---|
| Image Removed |
| Aura - Title |
|---|
| color | #0077c8 |
|---|
| textAlign | left |
|---|
| fontSize | 24 |
|---|
| lineHeight | 24 |
|---|
| cloudText | Demo Title |
|---|
| tag | h6 |
|---|
| fontWeight | normal |
|---|
| Complete the Household Demographics Section: |
| Section |
|---|
| Column |
|---|
| | UI Steps |
|---|
| | UI Step |
|---|
Complete the Household Demographics Details field, selecting all options that apply for all members of the household. |
| UI Step |
|---|
Document how many members of the household are: - 60 years of age or older
- Children (age 17 years or younger)
- Persons with Disabilities
- Veterans or Disabled Veterans
|
| Column |
|---|
| 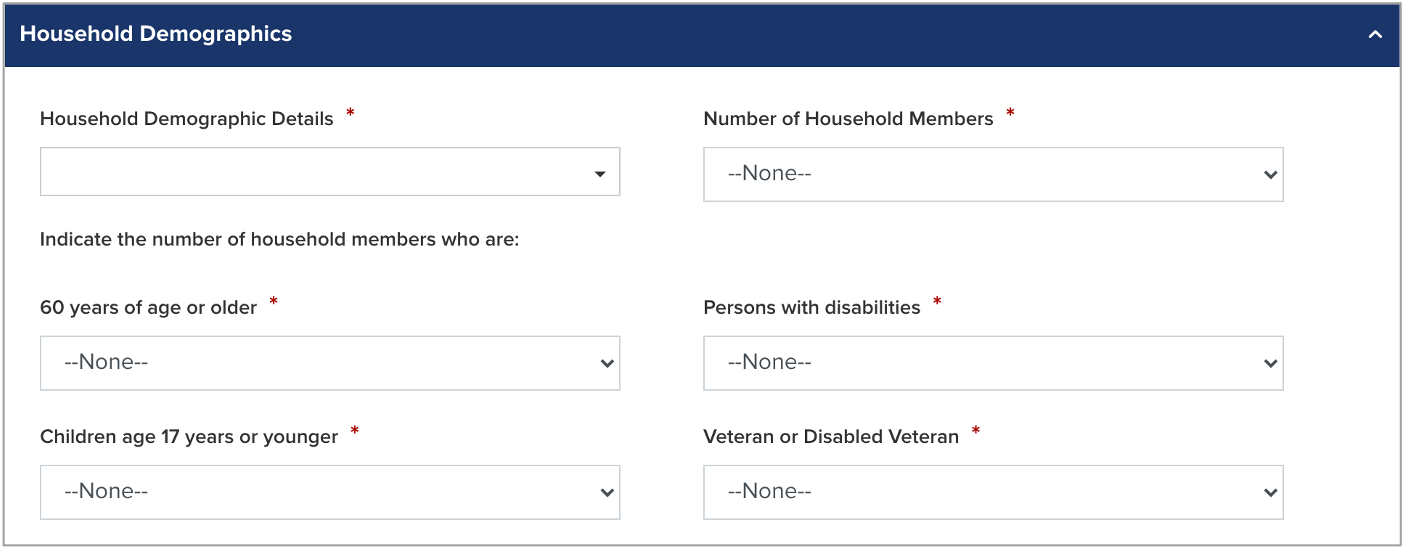 Image Removed Image Removed |
| Aura - Title |
|---|
| color | #0077c8 |
|---|
| textAlign | left |
|---|
| fontSize | 24 |
|---|
| lineHeight | 24 |
|---|
| cloudText | Demo Title |
|---|
| tag | h6 |
|---|
| fontWeight | normal |
|---|
|
Save&Continue
| Section |
|---|
| Column |
|---|
|
| UI Steps |
|---|
|
To advance to the next step, click Continue Review each section of the Review Page for your application. If information on the application is incorrect, use the Previous button at the bottom of the page to return to previous steps (pages) and update the information as needed. |
|
|
| Image Removed |
|
| Tip |
|---|
It is recommended that you click Save before clicking Continue. |
| | Aura - Panel |
|---|
| tab | 1 |
|---|
| styles | {"body":{"text":{"color":"#465671","textAlign":"left","fontWeight":"normal","fontSize":14}},"header":{"backgroundColor":{"color":"#ffffff"}},"headline":{"text":{"text":"STEP 5: Review Page","color":"#233e90","textAlign":"left","fontWeight":"normal","fontSize":26}},"base":{"boxShadow":{"shadows":[{"color":"rgba(0, 0, 0, 0.08)","x":0,"y":1,"blur":1,"spread":0},{"color":"rgba(0, 0, 0, 0.16)","x":0,"y":1,"blur":3,"spread":1}]},"backgroundColor":{"color":"#ffffff"},"border":{"color":"#233e90","style":"solid","width":4,"bottom":false,"top":false,"left":true,"right":false},"borderRadius":{"radius":4}}} |
|---|
| body | <p><br /></p> |
|---|
|
| 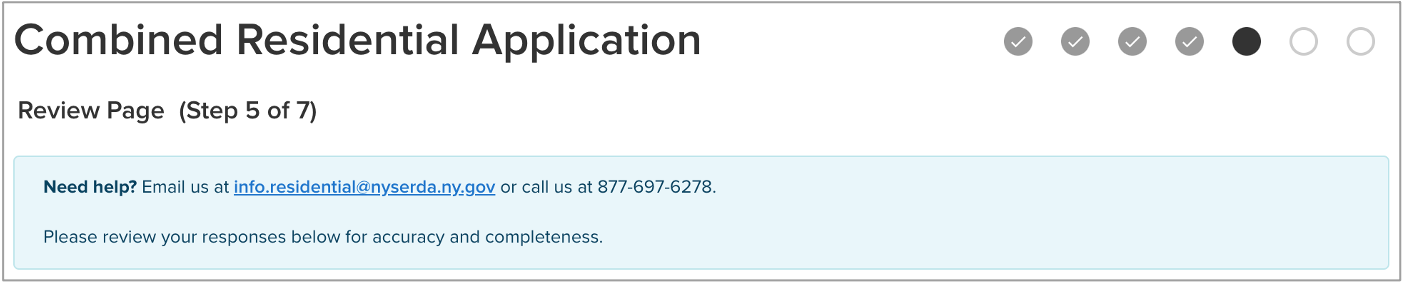 Image Added Image Added
|
|
| Aura - Title |
|---|
| color | #0077c8 |
|---|
| textAlign | left |
|---|
| fontSize | 24 |
|---|
| lineHeight | 24 |
|---|
| cloudText | Demo Title |
|---|
| tag | h6 |
|---|
| fontWeight | normal |
|---|
| Section D: Energy Information: |
| Section |
|---|
| Column |
|---|
|
| UI Steps |
|---|
|
| UI Step |
|---|
For Section D: Energy Information, read through the disclaimer and check the I agree to the terms and conditions stated above box. |
|
|
| Column |
|---|
|  Image Added Image Added
|
|
| Aura - Title |
|---|
| color | #0077c8 |
|---|
| textAlign | left |
|---|
| fontSize | 24 |
|---|
| lineHeight | 24 |
|---|
| cloudText | Demo Title |
|---|
| tag | h6 |
|---|
| fontWeight | normal |
|---|
| Section H: Applicant Information: |
| Section |
|---|
| Column |
|---|
|
| UI Steps |
|---|
|
| UI Step |
|---|
After reviewing the complete application, scroll to Section H: Application Information, |
| UI Step |
|---|
Read through the disclaimer, then click the Electronic Signature button. | Expand |
|---|
| title | Important Note about Electronic Signatures |
|---|
| Applicants are not required to provide Electronic Signatures. However applicants must satisfy one of alternate options below when not providing an Electronic Signature: Applicants who would prefer to print and mail a hand-signed application can bypass the Electronic Signature and click Print at the bottom of the page instead. Applicants must also provide, along with the signed application, any supporting documents required to provide proof of choices made during Step 4: Eligibility Screening. | Expand |
|---|
| Energy Audit Application 2 Wall Street, Albany, New York 12205 |
- Applicants who would prefer to hand sign the application, but still submit electronically, can click Print at the bottom of the page, hand sign the application, and scan the signed application onto their computer for upload during Step 6: Project Documents.
|
|
| UI Step |
|---|
You will be directed to electronically sign the application through DocuSign. When the page loads, check the agreement box and click Continue at the top of the page. | Tooltip |
|---|
| linkTextStrong | true |
|---|
| appendIcon | camera |
|---|
| linkTextUnderline | true |
|---|
| iconColor | #0073A4 |
|---|
| linkText | screenshot |
|---|
| linkTextColor | #0073A4 |
|---|
|  Image Added Image Added
|
|
| UI Step |
|---|
croll to the bottom of the application and click the Sign option next to the Applicant Signature field. |
| UI Step |
|---|
In the modal window that appears, click Adopt and Sign to electronically sign the application. Your Name, Initials will pre-populate and a, and signature example will already be completed for you.
| Tooltip |
|---|
| linkTextStrong | true |
|---|
| appendIcon | camera |
|---|
| linkTextUnderline | true |
|---|
| linkText | screenshot |
|---|
| linkTextColor | #0073A4 |
|---|
| 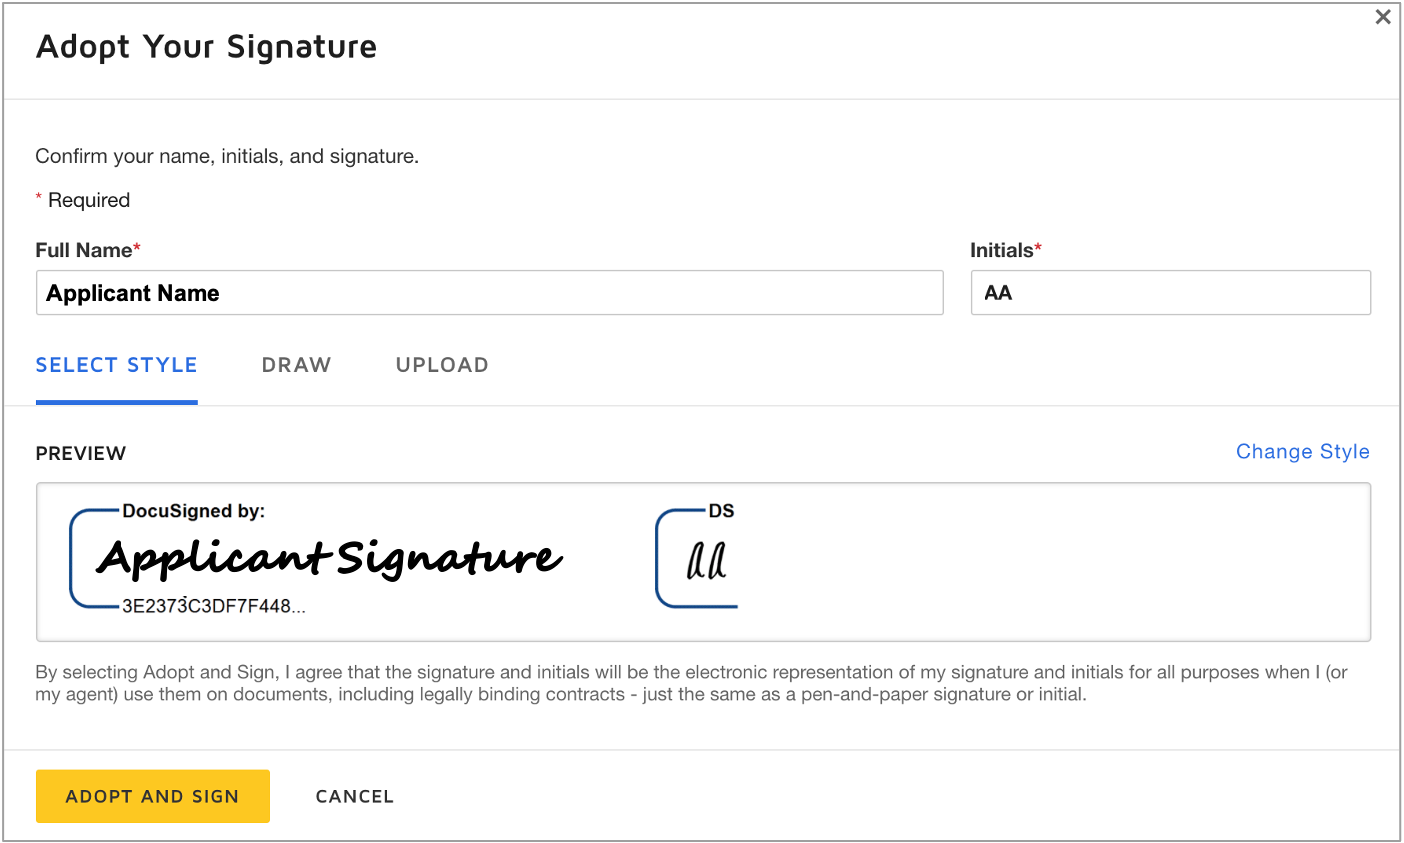 Image Added Image Added
|
|
| UI Step |
|---|
Your signature example will now appear on the signature line for the application. Click Finish to return to the application |
|
|
|
|
| | Expand |
|---|
| | Aura - Title |
|---|
| color | #0077c8 |
|---|
| textAlign | left |
|---|
| fontSize | 24 |
|---|
| lineHeight | 24 |
|---|
| cloudText | Demo Title |
|---|
| tag | h6 |
|---|
| fontWeight | normal |
|---|
| Review the Application: |
| Section |
|---|
| Column |
|---|
| | UI Steps |
|---|
| | UI Step |
|---|
| Review each section of the Review Page for your application. If information on the application is incorrect, use the Previous button at the bottom of the page to return to previous steps (pages) and update the information as needed
|
|
Image Removed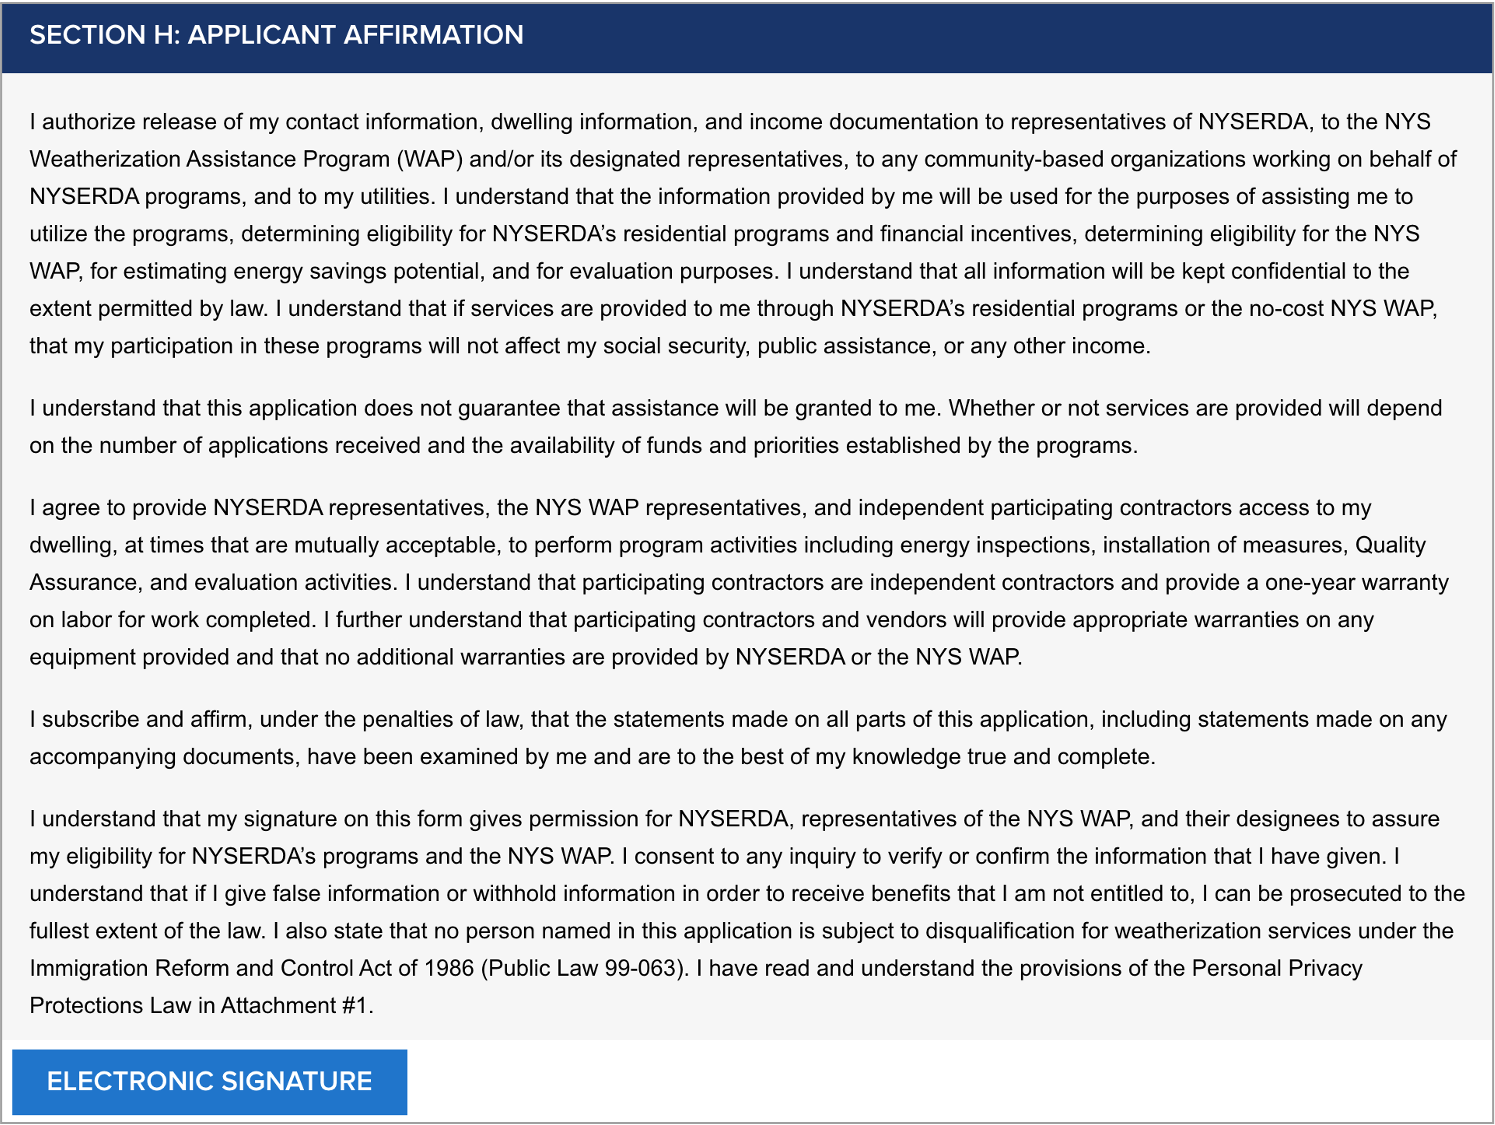 Image Added Image Added
|
|
| Aura - Title |
|---|
| color | #0077c8 |
|---|
| textAlign | left |
|---|
| fontSize | 24 |
|---|
| lineHeight | 24 |
|---|
| cloudText | Demo Title |
|---|
| tag | h6 |
|---|
| fontWeight | normal |
|---|
|
SectionD: Energy Information
| Section |
|---|
| Column |
|---|
|
| UI Steps |
|---|
|
| For Section D: Energy Information, read through the disclaimer and check the I agree to the terms and conditions stated above box. |
|
|
| Column |
|---|
| Image Removed |
|
| Aura - Title |
|---|
| color | #0077c8 |
|---|
| textAlign | left |
|---|
| fontSize | 24 |
|---|
| lineHeight | 24 |
|---|
| cloudText | Demo Title |
|---|
| tag | h6 |
|---|
| fontWeight | normal |
|---|
| Section H: Applicant Information: |
|
|---|
If you'd like a copy of the application, click Print . - Applicants who prefer to hand sign the application can bypass the Electronic Signature, clicking the Print button to print the application. Hand sign the application then either mail it in along with all required supporting documentation or scan the signed application onto your computer and upload it to the Online Application in the Step 6: Project Documents.
|
| UI Step |
|---|
To advance to the next step, click Continue at the bottom of the page. |
|
|
| Column |
|---|
|  Image Added Image Added
|
|
|
|
| Aura - Panel |
|---|
| tab | 1 |
|---|
| styles | {"body":{"text":{"color":"#465671","textAlign":"left","fontWeight":"normal","fontSize":14}},"header":{"backgroundColor":{"color":"#ffffff"}},"headline":{"text":{"text":"STEP 6: Project Documents","color":"#233e90","textAlign":"left","fontWeight":"normal","fontSize":26}},"base":{"boxShadow":{"shadows":[{"color":"rgba(0, 0, 0, 0.08)","x":0,"y":1,"blur":1,"spread":0},{"color":"rgba(0, 0, 0, 0.16)","x":0,"y":1,"blur":3,"spread":1}]},"backgroundColor":{"color":"#ffffff"},"border":{"color":"#233e90","style":"solid","width":4,"bottom":false,"top":false,"left":true,"right":false},"borderRadius":{"radius":4}}} |
|---|
| body | <p><br /></p> |
|---|
|
| Expand |
|---|
| | Section |
|---|
| Column |
|---|
| | UI Steps |
|---|
| | UI Step |
|---|
After reviewing the complete application, scroll to Section H: Application Information, |
| UI Step |
|---|
Read through the disclaimer, then click the Electronic Signature button. | Expand |
|---|
| title | Important Note about Electronic Signatures |
|---|
| Applicants are not required to provide Electronic Signatures. However Applicants must satisfy one of alternate options below when not providing an Electronic Signature: Applicants who would prefer to print and mail in a hand signed application can bypass the Electronic Signature and click Print at the bottom of the page instead. Applicants must also provide, along with the signed application, any supporting documents required to provide proof of choices made during Step 4: Eligibility Screening. | Expand |
|---|
| Energy Audit Application 2 Wall Street, Albany, New York 12205 |
Applicants who would prefer to hand sign the application, but still submit electronically, can click Print at the bottom of the page, hand sign the application, then scan the signed application onto their computer for upload during Step 6: Project Documents.| UI Step |
|---|
You will be directed to electronically sign the application through DocuSign. When the page loads, check the agreement box and click Continue at the top of the page.
| Tooltip |
|---|
| linkTextStrong | true |
|---|
| appendIcon | camera |
|---|
| linkTextUnderline | true |
|---|
| iconColor | #0073A4 |
|---|
| linkText | screenshot |
|---|
| linkTextColor | #0073A4 |
|---|
| Image Removed |
| UI Step |
|---|
Then, scroll to the bottom of the application and click the Sign option next to the Applicant Signature field. |
| UI Step |
|---|
In the modal window that appears, click Adopt and Sign to electronically sign the application. Your Name, Initials will pre-populate and a, and signature example will already be completed for you.
| Tooltip |
|---|
| linkTextStrong | true |
|---|
| appendIcon | camera |
|---|
| linkTextUnderline | true |
|---|
| linkText | screenshot |
|---|
| linkTextColor | #0073A4 |
|---|
| Image Removed |
| UI Step |
|---|
Your signature example will now appear on the signature line for the application. Click Finish to return to the application. |
| Column |
|---|
| Image Removed |
| Aura - Title |
|---|
| color | #0077c8 |
|---|
| textAlign | left |
|---|
| fontSize | 24 |
|---|
| lineHeight | 24 |
|---|
| cloudText | Demo Title |
|---|
| tag | h6 |
|---|
| fontWeight | normal |
|---|
|
Print & ContinueReview the Required Documents section: |
| Section |
|---|
| |
| UI Steps |
|---|
|
| UI Step |
|---|
The Required Documents section will outline any documents that are required as part of you application. |
|
|
| 45% | steps| step |
|---|
If your application requires multiple documents, each will be listed as a separate line item. Click the Choose File button to the right of each requested required document to locate and upload the file from your computer. |
|
| size | small
'd like a Electronically Signed the application in a previous step, there is no need to upload a signed application. However, if you chose to sign the application manually, after printing it, you will be required to upload a signed copy of the application |
, click Print. | | UI Step |
|---|
| To advance to the next step, click Continue at the bottom of the page
|
|
|---|
Image Removed Image Added Image Added
|
|
|
|
|
panel | tab | 1 | styles | {"body":{"text":{"color":"#465671","textAlign":"left","fontWeight":"normal","fontSize":14}},"header":{"backgroundColor":{"color":"#ffffff"}},"headline":{"text":{"text":"STEP 6: Project Documents","color":"#233e90","textAlign":"left","fontWeight":"normal","fontSize":26}},"base":{"boxShadow":{"shadows":[{"color":"rgba(0, 0, 0, 0.08)","x":0,"y":1,"blur":1,"spread":0},{"color":"rgba(0, 0, 0, 0.16)","x":0,"y":1,"blur":3,"spread":1}]},"backgroundColor":{"color":"#ffffff"},"border":{| textAlign | left |
|---|
| fontSize | 24 |
|---|
| lineHeight | 24 |
|---|
| cloudText | Demo Title |
|---|
| tag | h6 |
|---|
| fontWeight | normal |
|---|
| Complete the Other Documents section: |
| Section |
|---|
| Column |
|---|
|
| UI Steps |
|---|
|
| UI Step |
|---|
If there are any additional supporting documents you'd like to include as part of the application, click the Add Another Document option to locate and upload a document or file from your computer. |
| UI Step |
|---|
Continue adding additional documents or files as needed. |
|
|
| Column |
|---|
|  Image Added Image Added
|
|
| Aura - Title |
|---|
| color | #0077c8 |
|---|
| textAlign | left |
|---|
| fontSize | 24 |
|---|
| lineHeight | 24 |
|---|
| cloudText | Demo Title |
|---|
| tag | h6 |
|---|
| fontWeight | normal |
|---|
| Save & Continue: |
| Section |
|---|
| Column |
|---|
|
| UI Steps |
|---|
|
| UI Step |
|---|
To advance to the next step, click Continue at the bottom of the page. It is recommended that you click Save before clicking Continue. |
|
|
| Column |
|---|
| Image Added |
|
|
|
| Aura - Panel |
|---|
| tab | 1 |
|---|
| styles | {"body":{"text":{"color":"#465671","textAlign":"left","fontWeight":"normal","fontSize":14}},"header":{"backgroundColor":{"color":"#ffffff"}},"headline":{"text":{"text":"STEP 7: Submission Page","color":"#233e90"," |
|---|
|
| style | solid | width | 4, | bottom | :false | top | false | left | true, | right | false}, | borderRadius | radius":4}}}
|---|
| body | <p><br /></p> |
|---|
| color":"rgba(0, 0, 0, 0.08)","x":0,"y":1,"blur":1,"spread":0},{"color":"rgba(0, 0, 0, 0.16)","x":0,"y":1,"blur":3,"spread":1}]},"backgroundColor":{"color":"#ffffff"},"border":{"color":"#233e90","style":"solid","width":4,"bottom":false,"top":false,"left":true,"right":false},"borderRadius":{"radius":4}}} | | body | <p><br /></p> |
|---|
|
| | Expand |
|---|
| | Aura - Title |
|---|
| color | #0077c8 |
|---|
| textAlign | left |
|---|
| fontSize | 24 |
|---|
| lineHeight | 24 |
|---|
| cloudText | Demo Title |
|---|
| tag | h6 |
|---|
| fontWeight | normal |
|---|
| Review the Required Documents section: |
| Section |
|---|
| Column |
|---|
| | | UI Steps |
|---|
| | UI Step |
|---|
The Required Documents section will outline any documents that are required as part of you application. |
| UI Step |
|---|
If your application requires multiple documents, each will be listed as a separate line item. Click the Choose File button to the right of each requested required document to locate and upload the file from your computer. |
| UI Step |
|---|
If you Electronically Signed the application in a previous step, there is no need to upload a signed application. However, if you chose to sign the application manually, after printing it out, you will be required to upload a signed copy of the application to this section. |
| Column |
|---|
| Image Removed |
| Aura - Title |
|---|
| color | #0077c8 |
|---|
| textAlign | left |
|---|
| fontSize | 24 |
|---|
| lineHeight | 24 |
|---|
| cloudText | Demo Title |
|---|
| tag | h6 |
|---|
| fontWeight | normal |
|---|
| Complete the Other Documents section: |
| Section |
|---|
| Column |
|---|
| | | UI Steps |
|---|
| | UI Step |
|---|
If there are any additional supporting documents you'd like to include as part of the application, click the Add Another Document option to locate and upload a document or file from your computer. |
| UI Step |
|---|
Continue adding additional documents or files as needed. |
| Column |
|---|
| Image Removed |
| Aura - Title |
|---|
| color | #0077c8 |
|---|
| textAlign | left |
|---|
| fontSize | 24 |
|---|
| lineHeight | 24 |
|---|
| cloudText | Demo Title |
|---|
| tag | h6 |
|---|
| fontWeight | normal |
|---|
|
Save&Continue
It is recommended that you click Save before clicking Continue.| Section |
|---|
| Column |
|---|
|
| UI Steps |
|---|
|
| To advance to the next step, click Continue at the bottom of the page. | On the last page of the application, click the Submit button. |
| UI Step |
|---|
When you have successfully submitted your application, the page will reload and display Application Status: Your application has been submitted successfully.
| Tooltip |
|---|
| appendIcon | camera |
|---|
| linkTextUnderline | true |
|---|
| linkText | screenshot |
|---|
| linkTextColor | #002d72 |
|---|
| linkTextUnderlineColor | #002d72 |
|---|
| 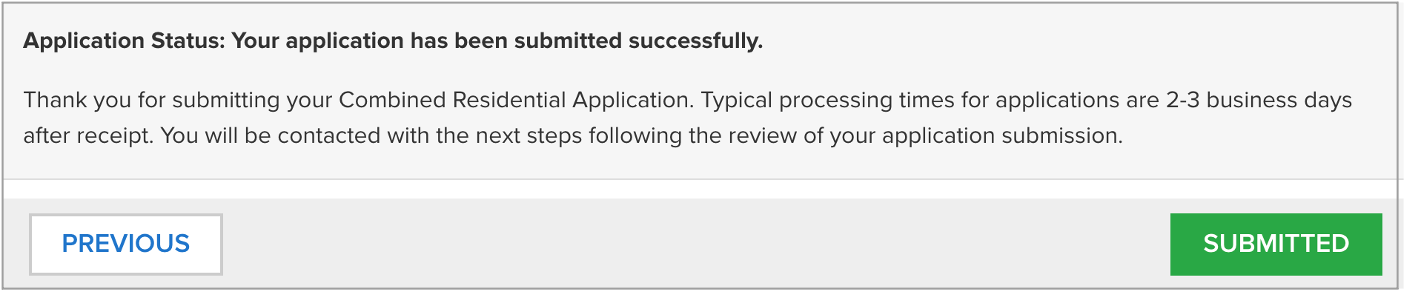 Image Added Image Added
|
|
|
|
| Image Removed |
| Tip |
|---|
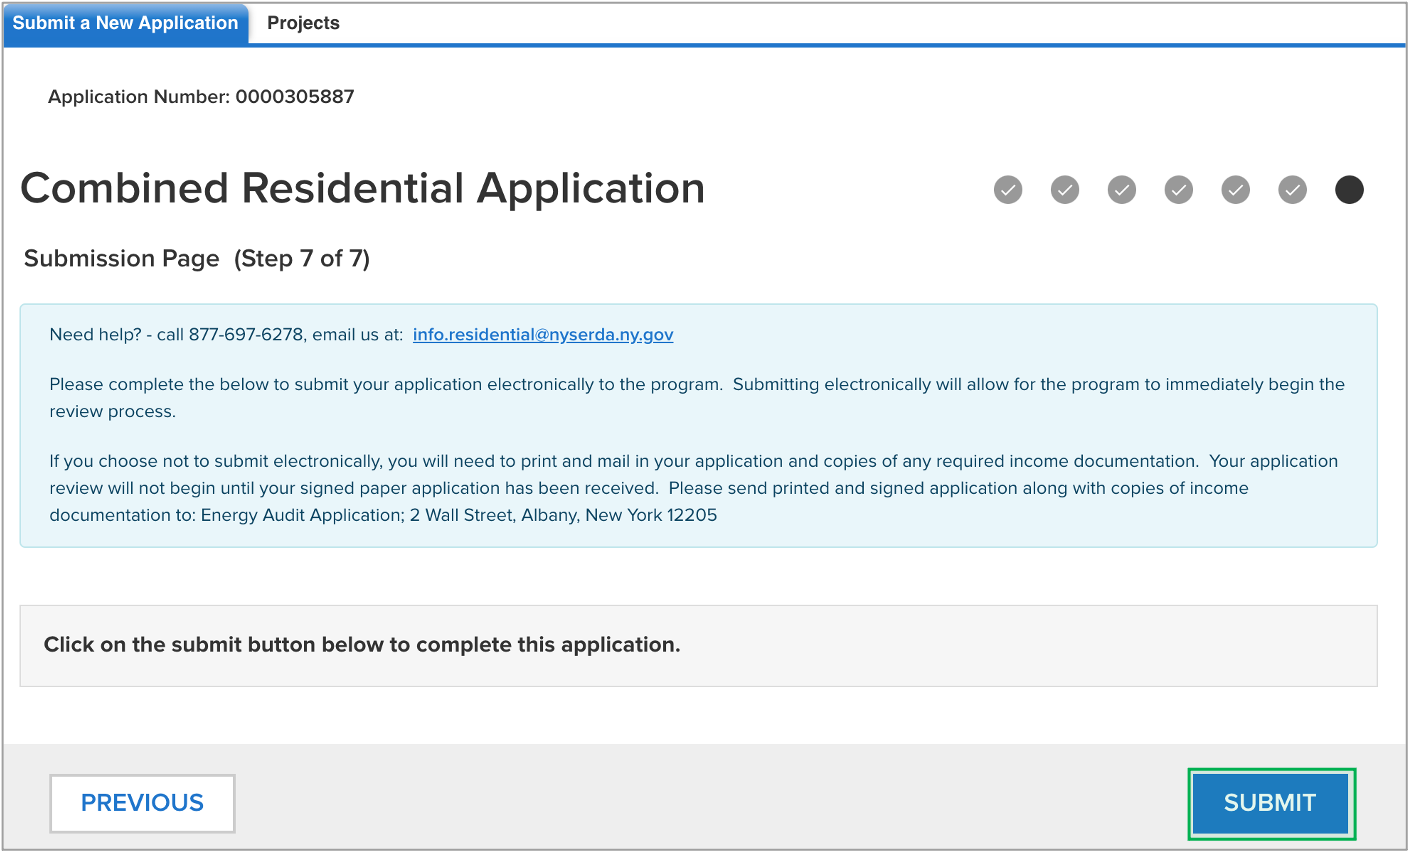 Image Added Image Added
|
|
|
| Aura - Panel |
|---|
| tab | 1 |
|---|
| styles | {"body":{"text":{"color":"#465671","textAlign":"left","fontWeight":"normal","fontSize":14}},"header":{"backgroundColor":{"color":"#ffffff"}},"headline":{"text":{"text" |
|---|
|
| :"STEP 7: Submission Page| :"Next Steps","color":"#233e90","textAlign":"left","fontWeight":"normal","fontSize":26}},"base":{"boxShadow":{"shadows":[{"color":"rgba(0, 0, 0, 0.08)","x":0,"y":1,"blur":1,"spread":0},{"color":"rgba(0, 0, 0, 0.16)","x":0,"y":1,"blur":3,"spread":1}]},"backgroundColor":{"color":"#ffffff"},"border":{"color":"#233e90","style":"solid","width":4,"bottom":false,"top":false,"left":true,"right":false},"borderRadius":{"radius":4}}} | | body | <p><br /></p> |
|---|
|
| |
| Aura - Title |
|---|
| color | #0077c8 |
|---|
| textAlign | left |
|---|
| fontSize | 24 |
|---|
| lineHeight | 24 |
|---|
| cloudText | Demo Title |
|---|
| tag | h6 |
|---|
| fontWeight | normal |
|---|
| Application Review and Approval |
| UI Steps |
|---|
|
| UI Step |
|---|
CLEAResult Shared Services will review your submitted application. If they require additional information or documentation, you will receive an email communication identifying the needed information. - Applicants should respond to this communication within ten (10) days to provide the request information.
- Applicants who do not respond after ten (10) days to the initial notice will receive two (2) additional notices (the second at Day 20 and the third at Day 30) to remind them of the required information they must provide.
- Once an applicant responds to any of the 3 (three) communications, the application will continue through the approval process.
- Applicants who fail to respond to any of the three (3) notices will have their application cancelled systematically.
|
| UI Step |
|---|
If you application is approved, you will receive an email notice guiding you on next steps. |
| UI Step |
|---|
If you application is rejected, you will receive an email notice outlining the reason for denial. |
|
|
| learn more... | | Aura - Title |
|---|
| color | #0077c8 |
|---|
| textAlign | left |
|---|
| fontSize | 24 |
|---|
| lineHeight | 24 |
|---|
| cloudText | Demo Title |
|---|
| tag | h6 |
|---|
| fontWeight | normal |
|---|
| Submit the Application: |
| Section |
|---|
| Column |
|---|
| | UI Steps |
|---|
| | UI Step |
|---|
On the last page of the application, click the Submit button. |
| UI Step |
|---|
When your application has been successfully submitted, the page will reload and display Application Status: Your application has been submitted successfully.
| Tooltip |
|---|
| appendIcon | camera |
|---|
| linkTextUnderline | true |
|---|
| linkText | screenshot |
|---|
| linkTextColor | #002d72 |
|---|
| linkTextUnderlineColor | #002d72 |
|---|
| Image Removed |
| Column |
|---|
| | Image Removed
|
|
|
|