| Aura - Tab |
|---|
| title | Search for/Create Customer |
|---|
|
| Panel |
|---|
| borderColor | #002D72 |
|---|
| bgColor | #F3F4F9 |
|---|
| titleColor | #ffffff |
|---|
| borderWidth | 1 |
|---|
| titleBGColor | #002D72 |
|---|
| borderStyle | none |
|---|
| title | Search for/Create Customer |
|---|
|
|
| Info |
|---|
| The instructions below are intended to support Contractors when creating new customer records or searching for existing one when using the Customer List. In order to prevent a the creation of a duplicate customer record, Contractors should always search for and locate an existing customer first before creating a new one. For Contractors who unsure if the customer has an existing customer record, start at step 1 on this page. When creating a new customer record, Contractors should enter in as much known information as possible to ensure locating the customer in the future is easy. For Contractors who know the customer record already exists, start at step 4 on this page. To watch these instructions in action, please watch the training video below: | Expand |
|---|
| | Multimedia |
|---|
| name | NY HEP REA Enrollments Locate and Create Customer Record.mp4 |
|---|
| width | 100% |
|---|
| height | 100% |
|---|
|
|
|
| Tip |
|---|
| As Contractors engage with the NY HEP it is highly recommend to Save your progress as often as you can to avoid losing any data or information entered. When saving, the Reload Page browser button will become an X and Contractors will notice a rotating circular icon at the top-left of the browser page. |
| UI Steps |
|---|
|
| UI Step |
|---|
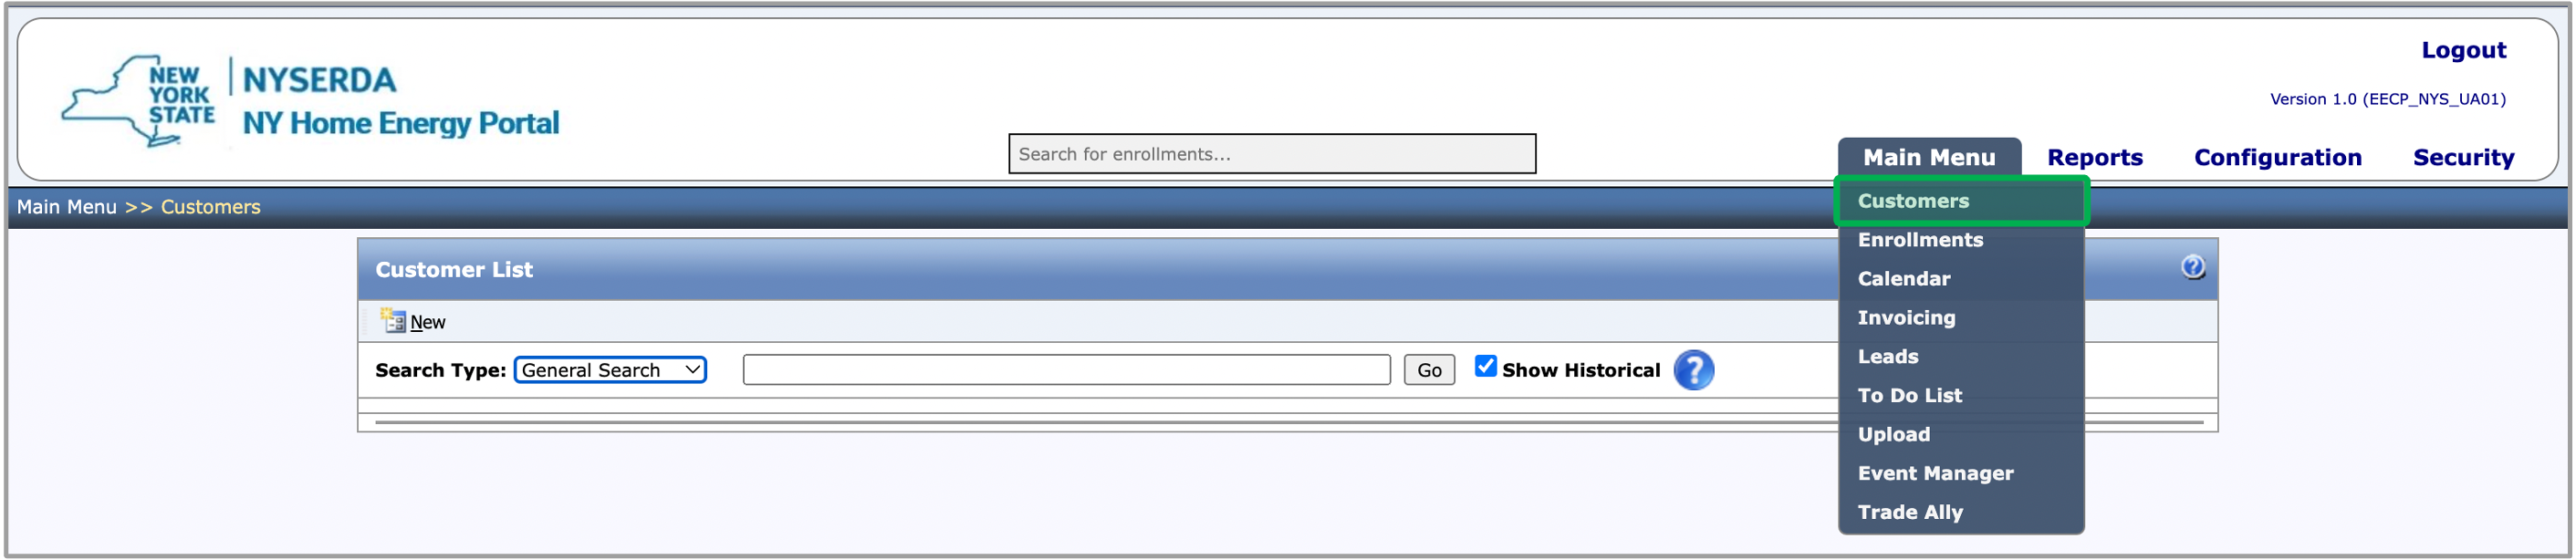
Open the Main Menu and select the Customers option. | Expand |
|---|
|  |
|
| UI Step |
|---|
On the Customer List, use the Search Bar to locate an existing customer. | Tip |
|---|
| The default General Search will use your search criteria to locate customer records that contain that information. |
| Expand |
|---|
|  |
|
| UI Step |
|---|
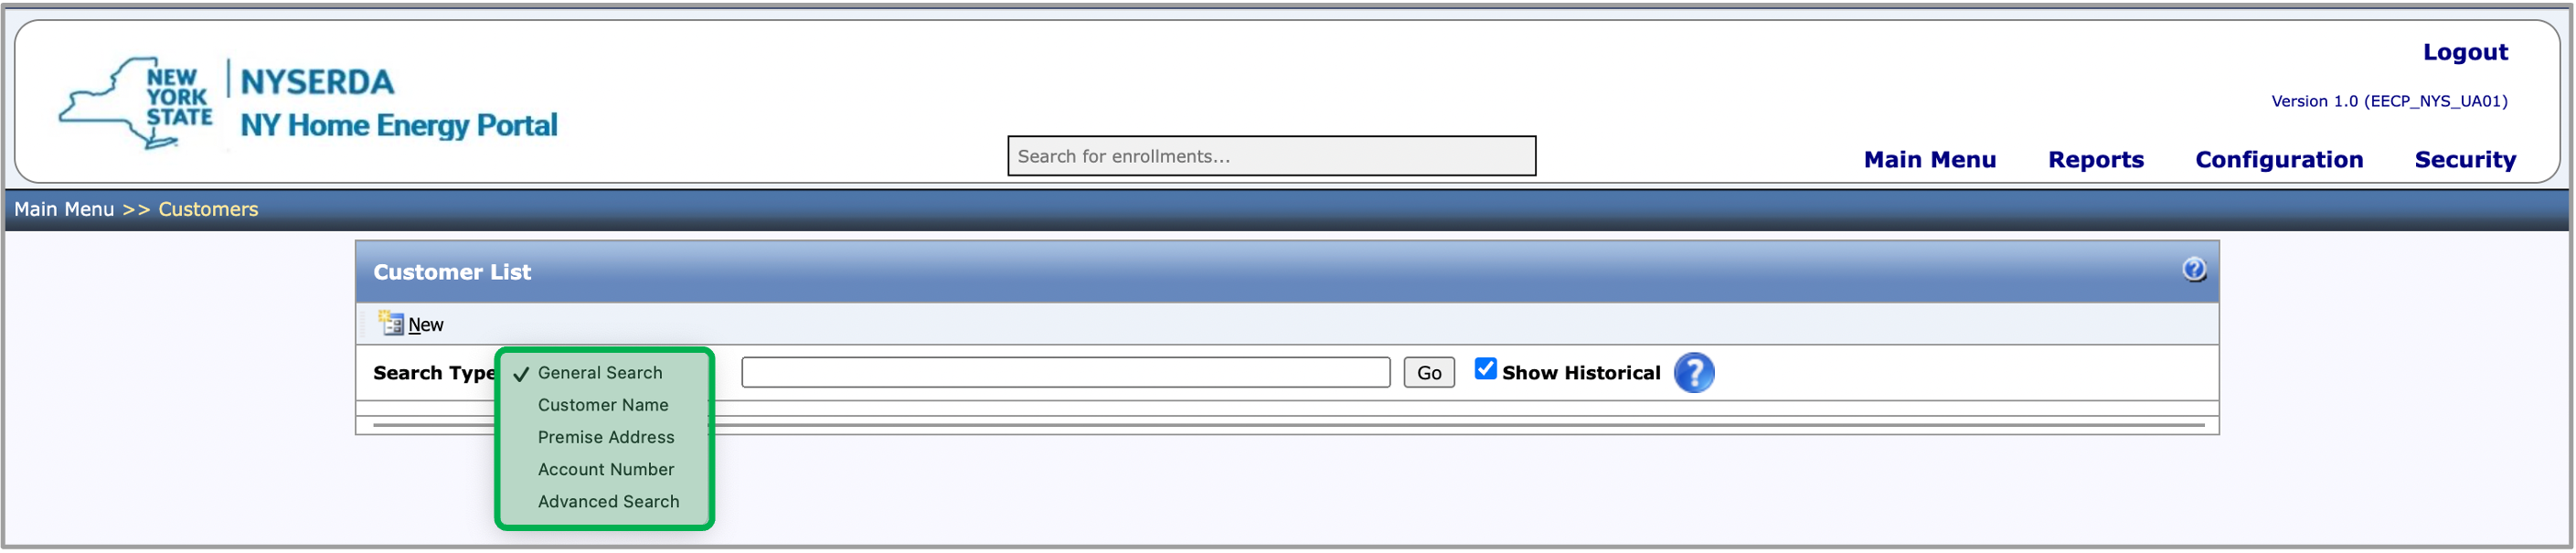
Contractors can also use other options to search from the Search Type drop-down: - Customer Name
- Premise Address
- Account Number (Electric Utility Account Number)
- Advanced Search (Allows Contractors to use multiple Search Types such as Customer Name and Premise Address, together, to locate the existing customer record)
| Tip |
|---|
| If the customer has an existing customer record, proceed to the Create Enrollments instructions section below. If the customer does not have an existing customer record, continue with the steps below. |
| Expand |
|---|
|  |
|
| UI Step |
|---|
If the customer does not have an existing customer record, on the Customers tab, click the New New button to create a new customer record. You will be brought to a blank customer record page. | Expand |
|---|
|  |
|
| UI Step |
|---|
On the blank customer record page, complete all of the required fields listed below: - Customer Name
- Customer Class
Mailing Address - Premise Address Street
- Premise Address City
- Premise Address State
- Premise Address Zip
- Electric Utility Account
Details Vendor Premise ID - #
- Service Provider
- Account Status (this will pre-populate with Active)
- Account Class
- Turn On Date (this will pre-populate withtoday’s date)
- Occupancy Status
- Account Name
| Tip |
|---|
| If | | Tip |
|---|
The Vendor Premise ID section will be auto-populated in the future. In the meantime, enter in the customer's Electric Utility Account Number in this field as well. If required fields are incomplete when clicking Save, the system will provide an error message stating which fields were incomplete. If the error message is closed to quickly. , a red exclamation point will appear in the upper right-hand corner of the Customer Profile Record that can be clicked to access the list of incomplete but required fields.but required fields. When you enter a value in the Customer Name field, these fields will be populated automatically with the Customer’s Name, but you can change the auto-populated values if necessary: - Account Name
- Last Name
- First Name
|
| Warning |
|---|
| warning | This first page needs to be completed and saved before any other tabs in the Customer Record can be accessed, and the Customer Record will not be created until the first page is completed and saved. Additionally, the Billing Account # field in the the Account Details section should be used to document the customer's Electric Utility Account Number. This must be a unique number. A customer record cannot be created if the Billing Account # is already being used on another Customer Record. The Service Point Details section should be left blank. This will generate a warning that can be bypassed when Save is clicked. the customer's Electric Utility Account Number. This must be a unique number. A customer record cannot be created if the Billing Account # is already being used on another Customer Record. |
| Expand |
|---|
| 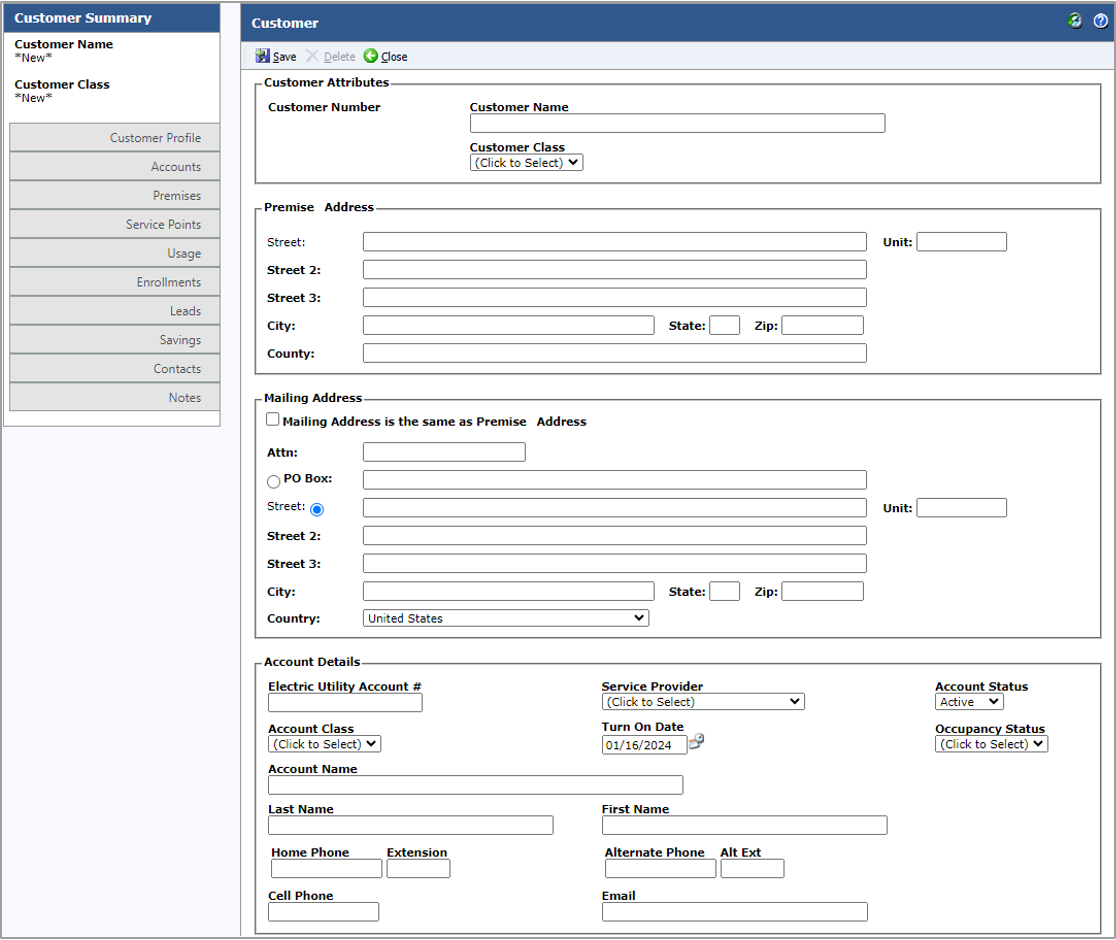 Image Added Image Added
|
|
| UI Step |
|---|
If the Premise Address and Mailing Address are the same, check the Mailing Address is the same as Premise Address checkbox. When you check this box, all the Mailing Address fields will be hidden. | Warning |
|---|
| If the Mailing Address is the same as Premise Address checkbox is NOT checked, these fields will be required: - Mailing Address Street / PO Box
- Mailing Address City
- Mailing Address State
- Mailing Address Zip
| | Expand |
|---|
| | Image Removed |
|
| UI Step |
|---|
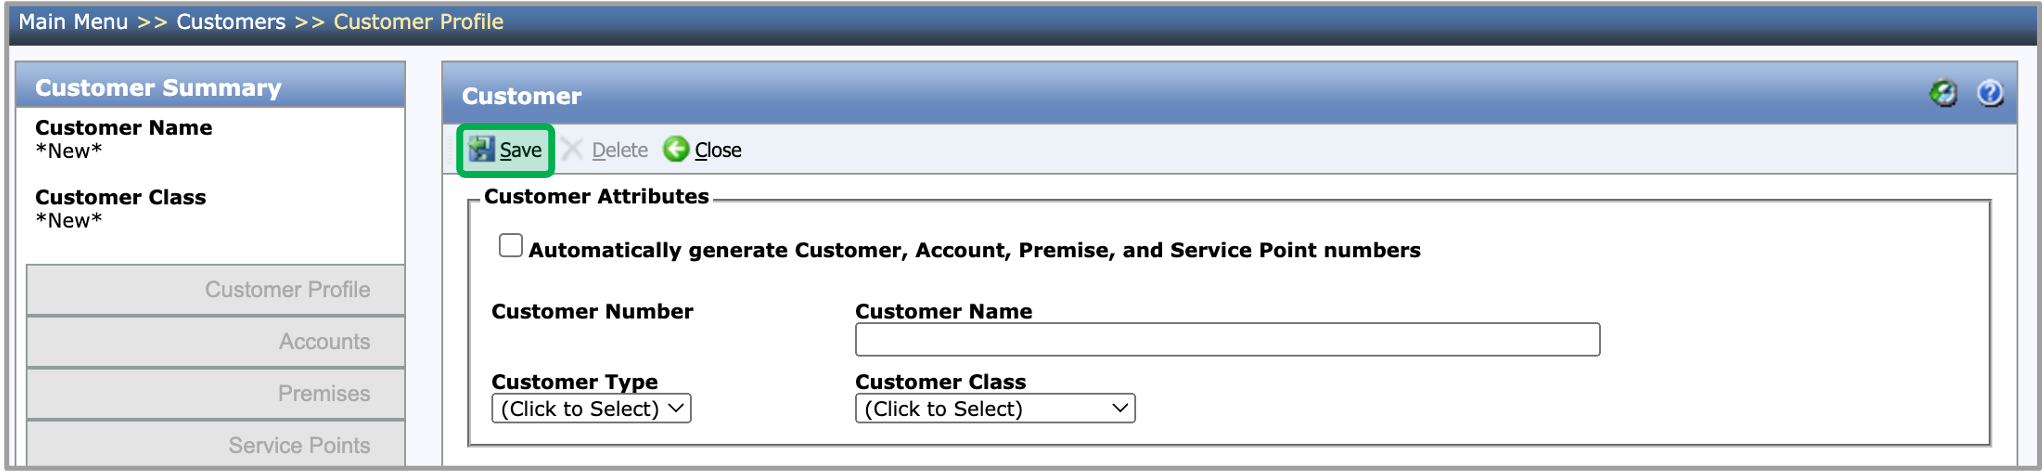
When finished, click the Save button.button, the new customer will be created. | Tip |
|---|
| These values that you entered on the New Customer Page will be displayed on the Customer Profile: - Customer Name
- Customer Class
- Mailing Address
|
| Expand |
|---|
|  |
|
| UI Step |
|---|
A warning These values entered on the New Customer Page will be displayed , press OK to continue. After that, the system will create a Customer Record and will use the information you have entered to create Account and Premise details in the related customer record tabs. | Tip |
|---|
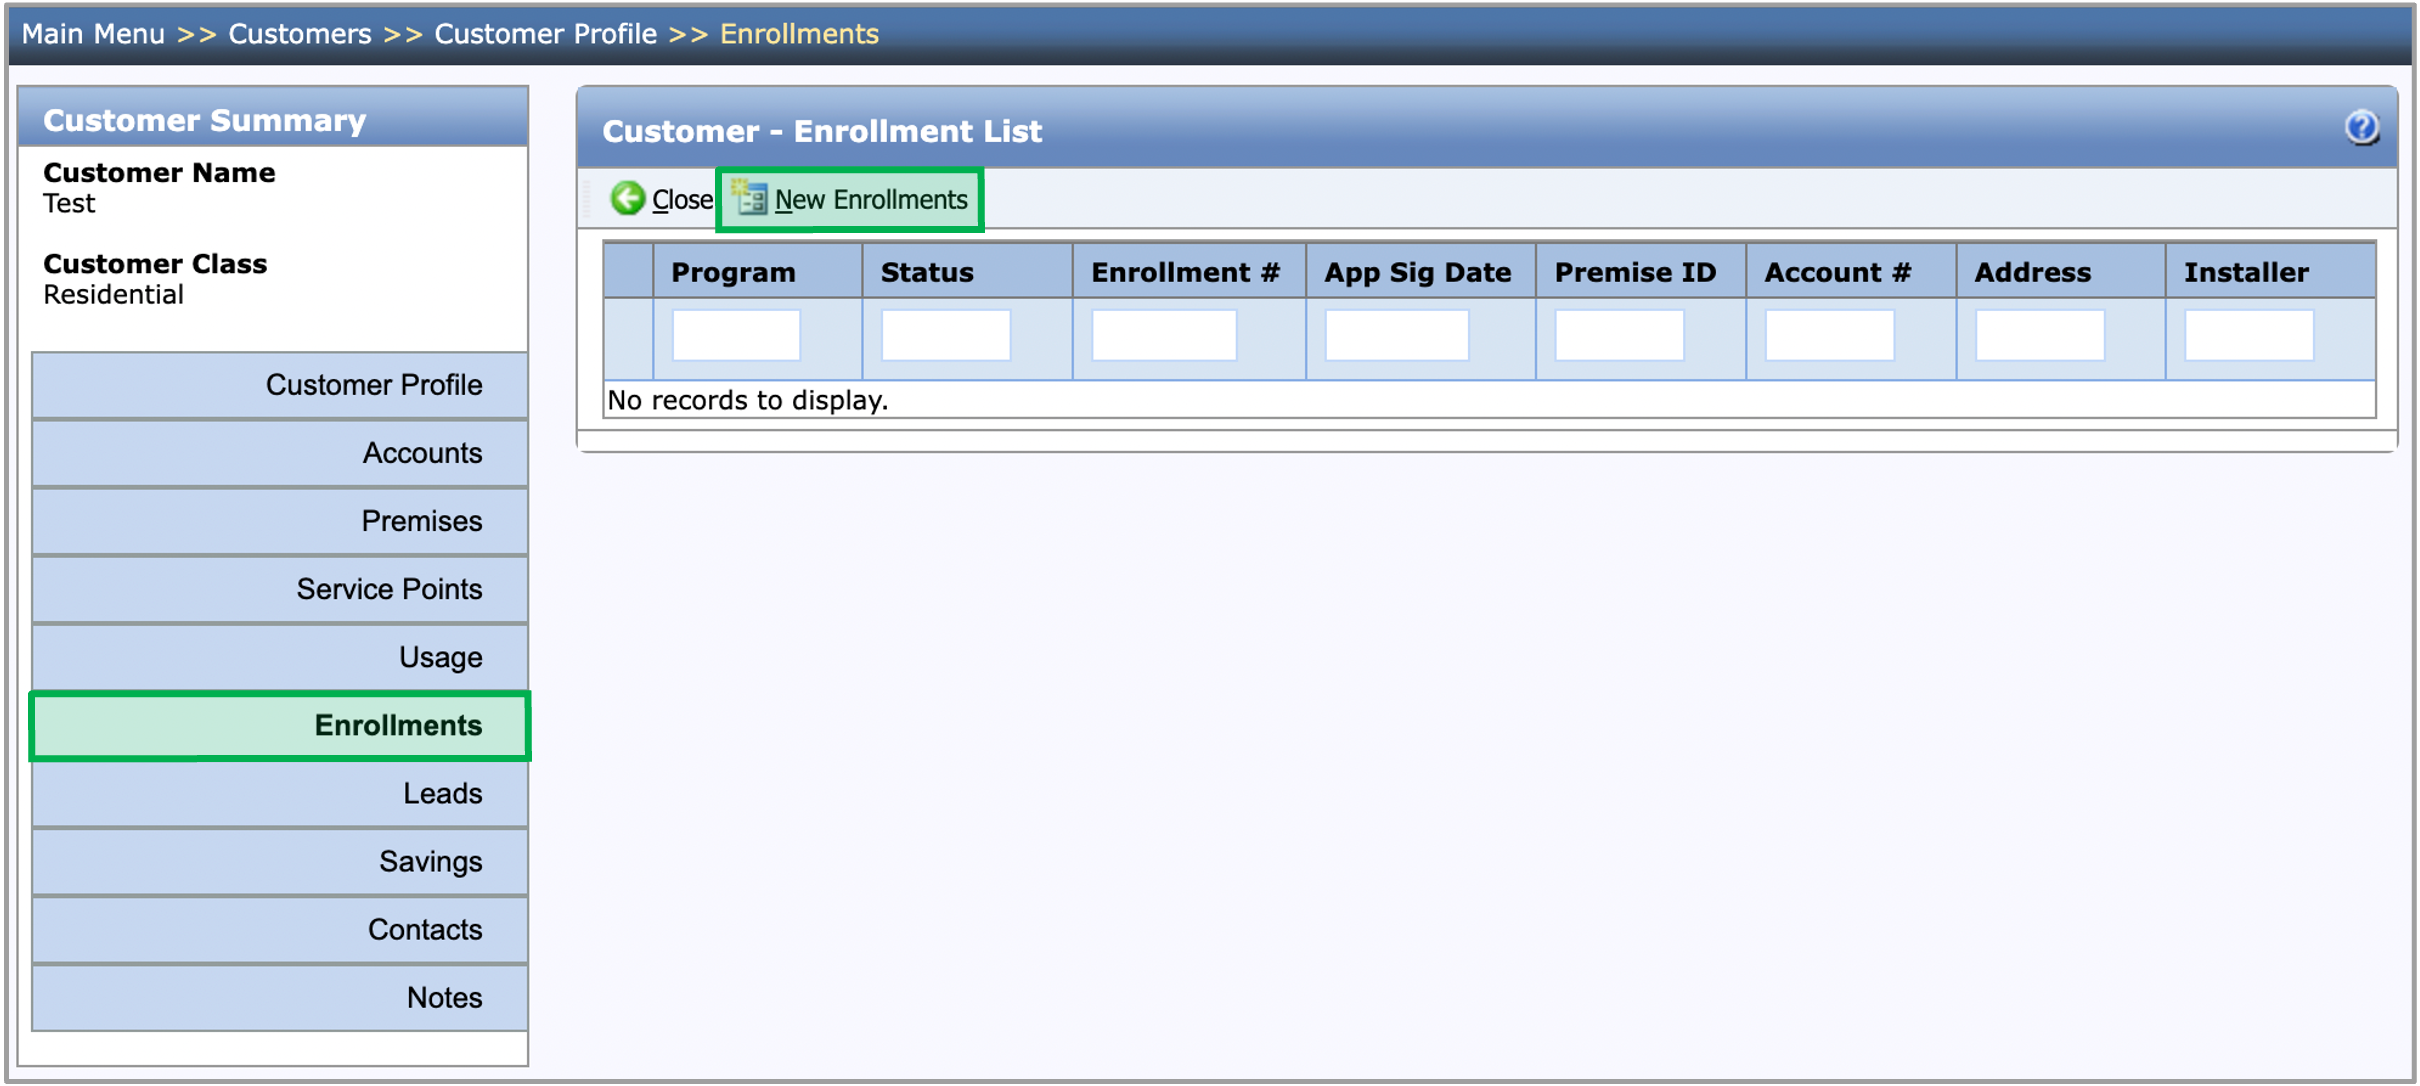
An enrollment can be created once the customer record is created. Click the New Enrollments button from the Enrollments tab in the customer record. |
| Expand |
|---|
| 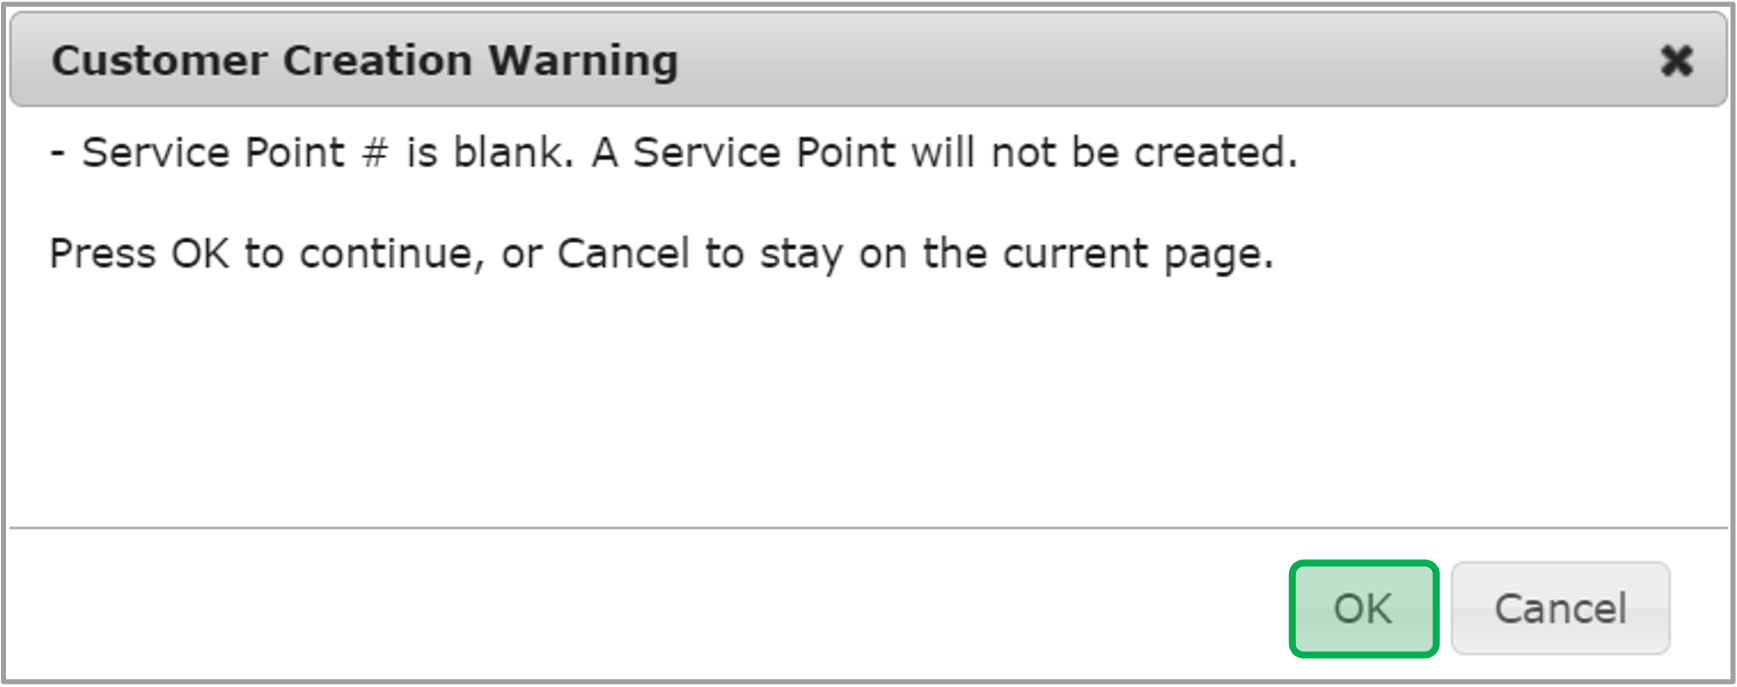 Image Removed Image Removed |
| | UI Step |
|---|
separately on the sections below: | Expand |
|---|
| - Customer Name
- Customer Class
- Mailing Address
|
| Expand |
|---|
| - Electric Utility Account #
- Service Provider
- Account Status
- Turn On Date
- Account Name
- Last Name
- First Name
- Occupancy Status
- Home Phone
- Alternate Phone
- Cell Phone
- Email
- Mailing Address
- Account Class
|
After you bypass the warning message, the customer profile fields will be active. You can do the following in these fields: Create additional premise records (such as to document a mailing address if the initial address entered when creating the customer record was a permanent address)Create additional account records (such as to document an Oil or Gas account)Add/review notes (Contractors will be able to see any notes added by other Contractors) |
| UI Step |
|---|
Navigate to the Create Enrollment section below to learn how to create the enrollment. |
|
|
| Aura - Tab |
|---|
|
| Panel |
|---|
| borderColor | #002D72 |
|---|
| bgColor | #F3F4F9 |
|---|
| titleColor | #ffffff |
|---|
| borderWidth | 1 |
|---|
| titleBGColor | #002D72 |
|---|
| borderStyle | none |
|---|
| title | Create Enrollment |
|---|
|
|
| Info |
|---|
| The instruction below provides guidance for contractors when creating new REA enrollments from the customer profile.the Customer Record. The instructions below begin on the Customer Record. Please refer to the instructions in the Search for/Create Customer tab to learn how to access the Customer Record. To watch these instructions in action, please watch the training video below: | Expand |
|---|
| | Multimedia |
|---|
| name | REA Enrollments New REA Enrollment.mp4 |
|---|
| width | 100% |
|---|
| height | 100% |
|---|
|
|
|
| Tip |
|---|
| | Tip |
|---|
As Contractors engage with the NY HEP it is highly recommend to Save your progress as often as you can to avoid losing any data or information entered. When saving, the Reload Page browser button will become an X and Contractors will notice a rotating circular icon at the top-left of the browser page.will notice a rotating circular icon at the top-left of the browser page. |
| UI Steps |
|---|
| | UI Steps |
|---|
| | UI Step |
|---|
Open the Main Menu and select the Customers option. | Expand |
|---|
| Image Removed |
| UI Step |
|---|
On the Customer List, use the Search Bar to locate an existing customer. | Tip |
|---|
The default general search will use your search criteria to locate customer records that contain that information. |
| Expand |
|---|
| Image Removed |
| UI Step |
|---|
Missed a whole bit about locating and selecting the customer to access their Customer Record...also, refer to it as a Customer Record, not a Customer Profile. |
| UI Step |
|---|
Within your Customer Record, click the Enrollments Tab then click the New Enrollments button. | Expand |
|---|
|  |
|
| UI Step |
|---|
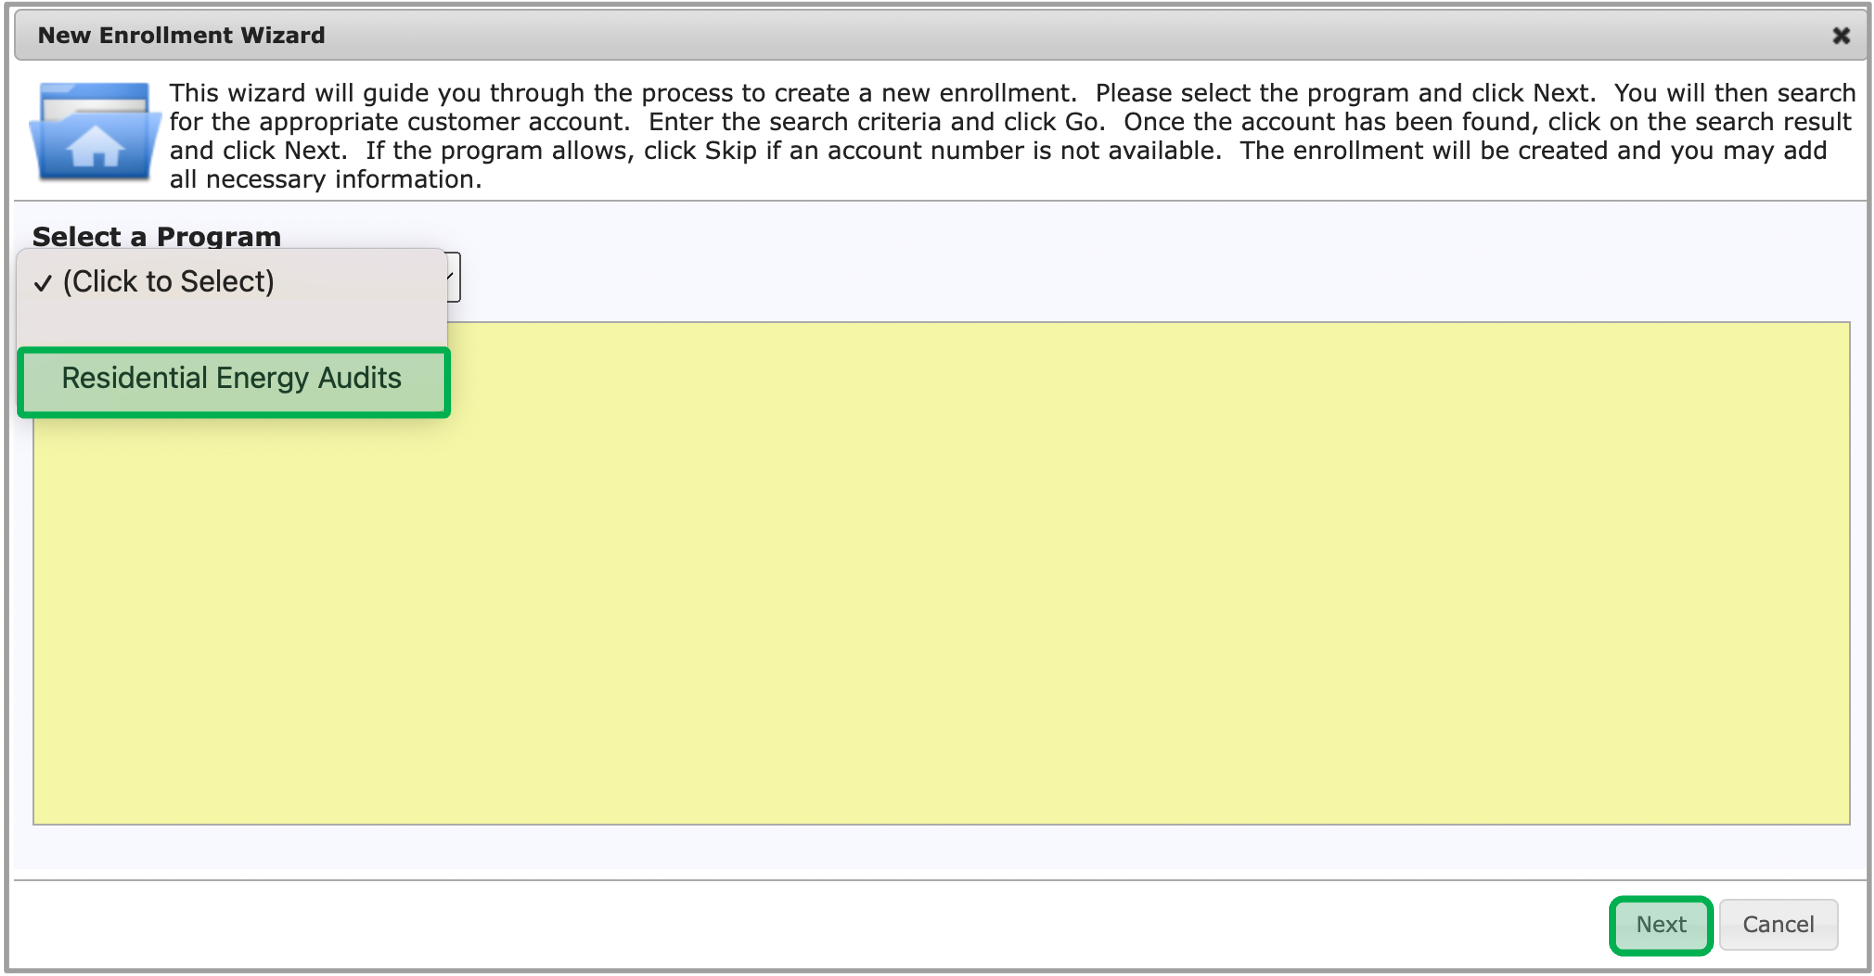
The New Enrollment Wizard window will open, select the Residential Energy Audits option in the dropdown. Then click Next. | Expand |
|---|
|  |
|
| UI Step |
|---|
When a new REA enrollments is created, if the user does not have a browser pop-up blocked, the new enrollment will automatically open in a new tab on the Enrollment Profile - Workflow window. | Tip |
|---|
| tip | If there is a pop-up blocker, follow step 6 below. |
|
| UI Step |
|---|
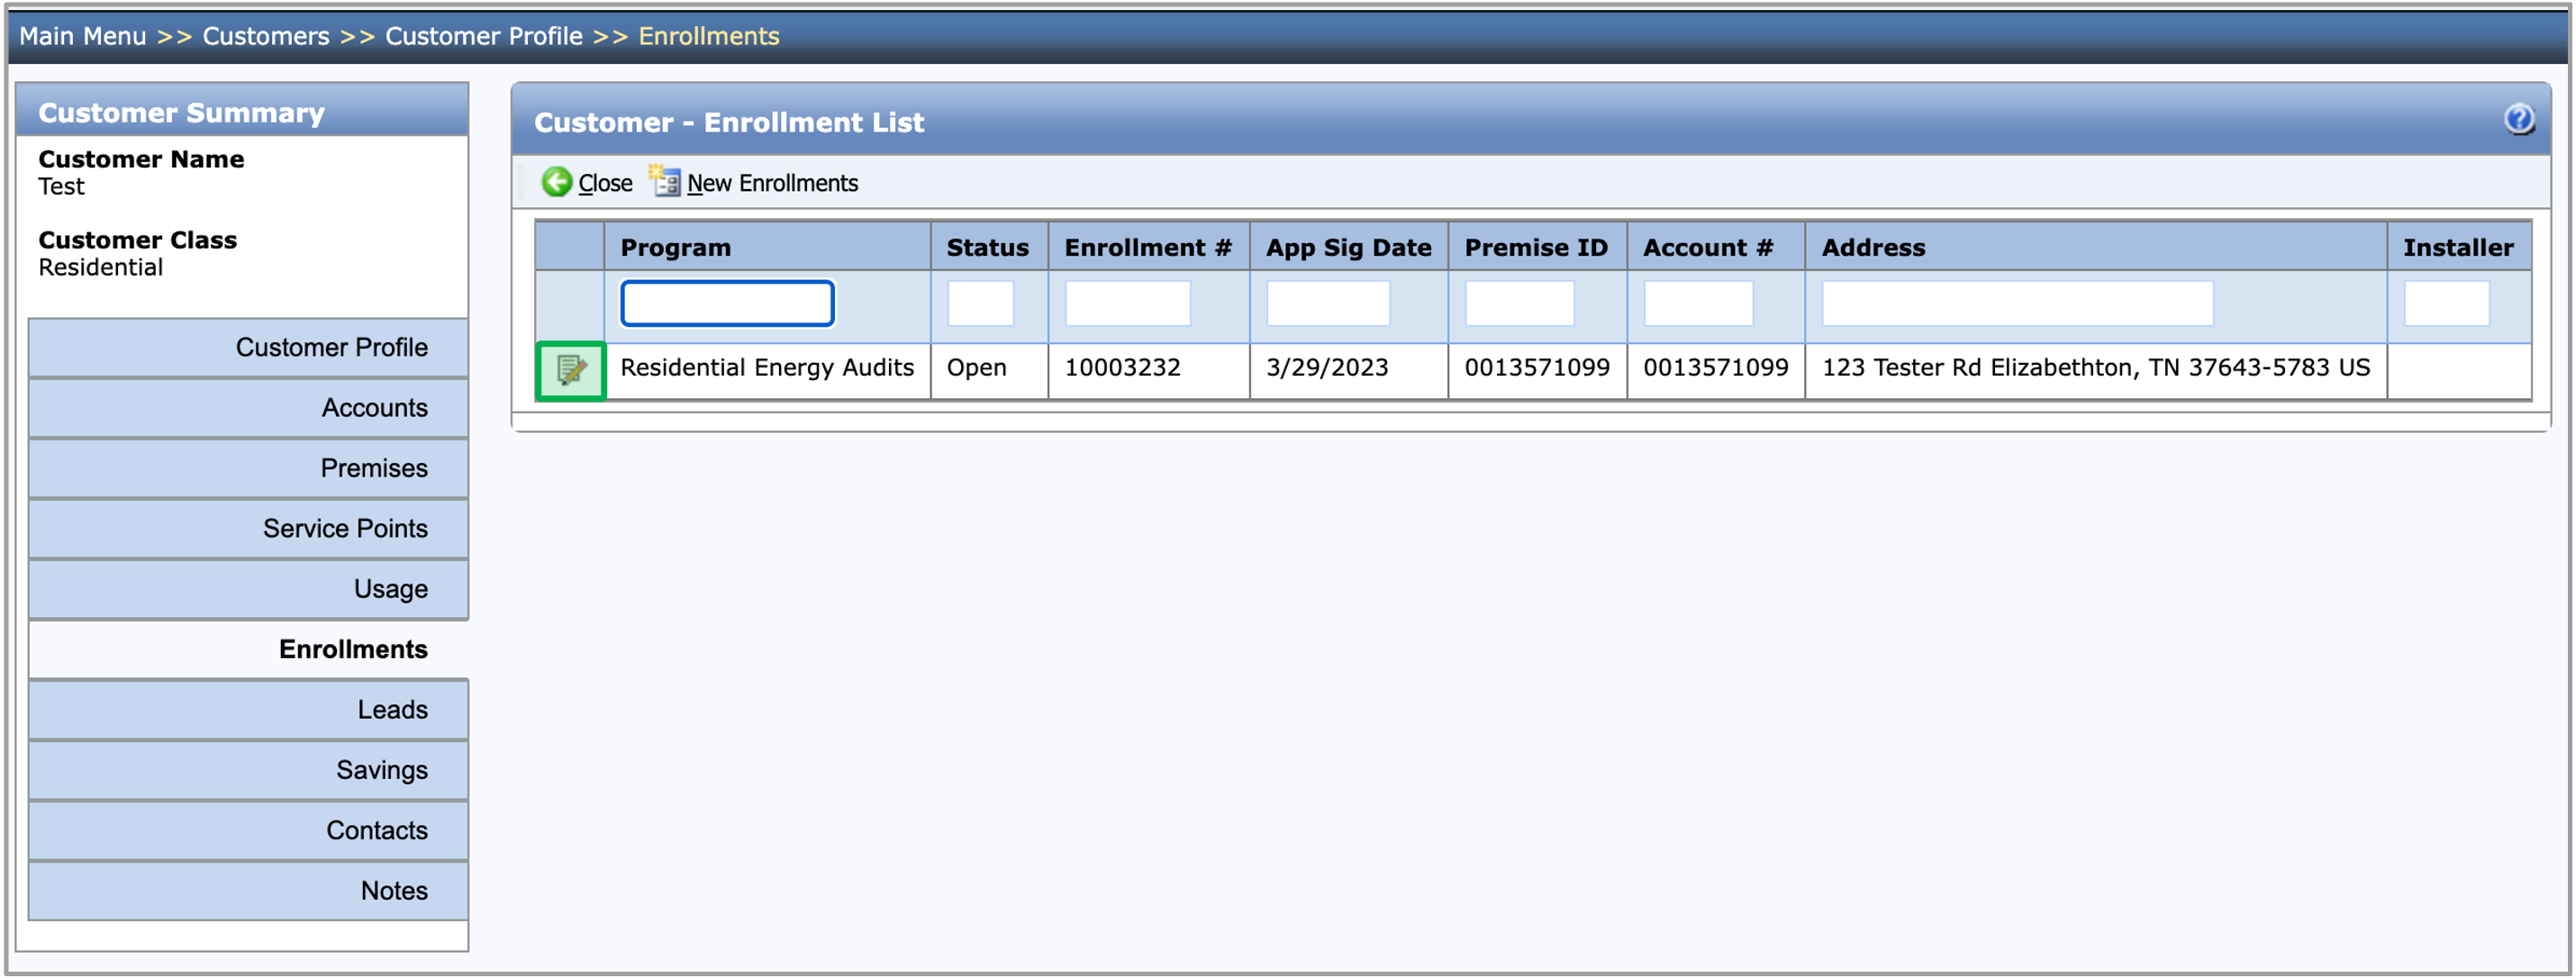
To open the enrollment manually, on the Customer - Enrollment List, click on the Edit Icon next to the Program Name. | Expand |
|---|
|  |
|
| UI Step |
|---|
After the new enrollment is created, the Contractor will be directed to the enrollment’s Assessment Submission step. The Customer Information, Installation Address, Applicant Information, and Mailing Address will be prepopulated from the Account and Premise details associated with the Customer Record. |
| UI Step |
|---|
Navigate to the Assessment Submission section below to enter the assessment details, and submit for reimbursement. |
|
|
| Aura - Tab |
|---|
| title | Assessment Submission |
|---|
|
| Panel |
|---|
| borderColor | #002D72 |
|---|
| bgColor | #F3F4F9 |
|---|
| titleColor | #ffffff |
|---|
| borderWidth | 1 |
|---|
| titleBGColor | #002D72 |
|---|
| borderStyle | none |
|---|
| title | Assessment Submission |
|---|
|
|
| Info |
|---|
| The instruction below provides guidance for contractors with the Assessment Submission step. |
| Tip |
|---|
| As Contractors engage with the NY HEP it is highly recommend to Save your progress as often as you can to avoid losing any data or information entered. When saving, the Reload Page browser button will become an X and Contractors will notice a rotating circular icon at the top-left of the browser page. |
| UI Expand |
|---|
| title | Applicant Information |
|---|
|
| Info |
|---|
| The instruction below provides guidance for contractors to review and update the Applicant Information tab. This tab will be prepopulated with the information on the Customer/Account/Premise. If you need to change the Customer Information, Installation Address, or Mailing Address, you can make those changes on the Applicant Information tab, then click Save. When a new Residential Energy Audits enrollment is created, it will contain an Assessment Submission step in the New status. |
| UI Steps |
|---|
|
| UI Step |
|---|
Contractors should review all populated information on this tab and make updates if needed. |
| UI Step |
|---|
If the new value does not match the value that’s saved on the Customer/Account/Premise, contractors can click the Update Customer button to update the value that’s saved on the Customer/Account/Premise. | Expand |
|---|
|  Image Added Image Added
|
| | UI Step |
|---|
| Contractors should review all populated information on this tab and make updates if needed.
|
| UI Step |
|---|
If the new value does not match the value that’s saved When you click the Update Customer button, the Update Customer dialog will open, displaying every value on the Assessment Submission step that is different than the value saved in the corresponding field on the Customer/Account/Premise, contractors can click the Update Customer button to update the value that’s saved on the . All these fields will be checked by default. When finished updating, click Save in the dialog. The system will update the checked Customer/Account/Premise fields for the values to match the Assessment Submission step. | Expand |
|---|
| Image Removed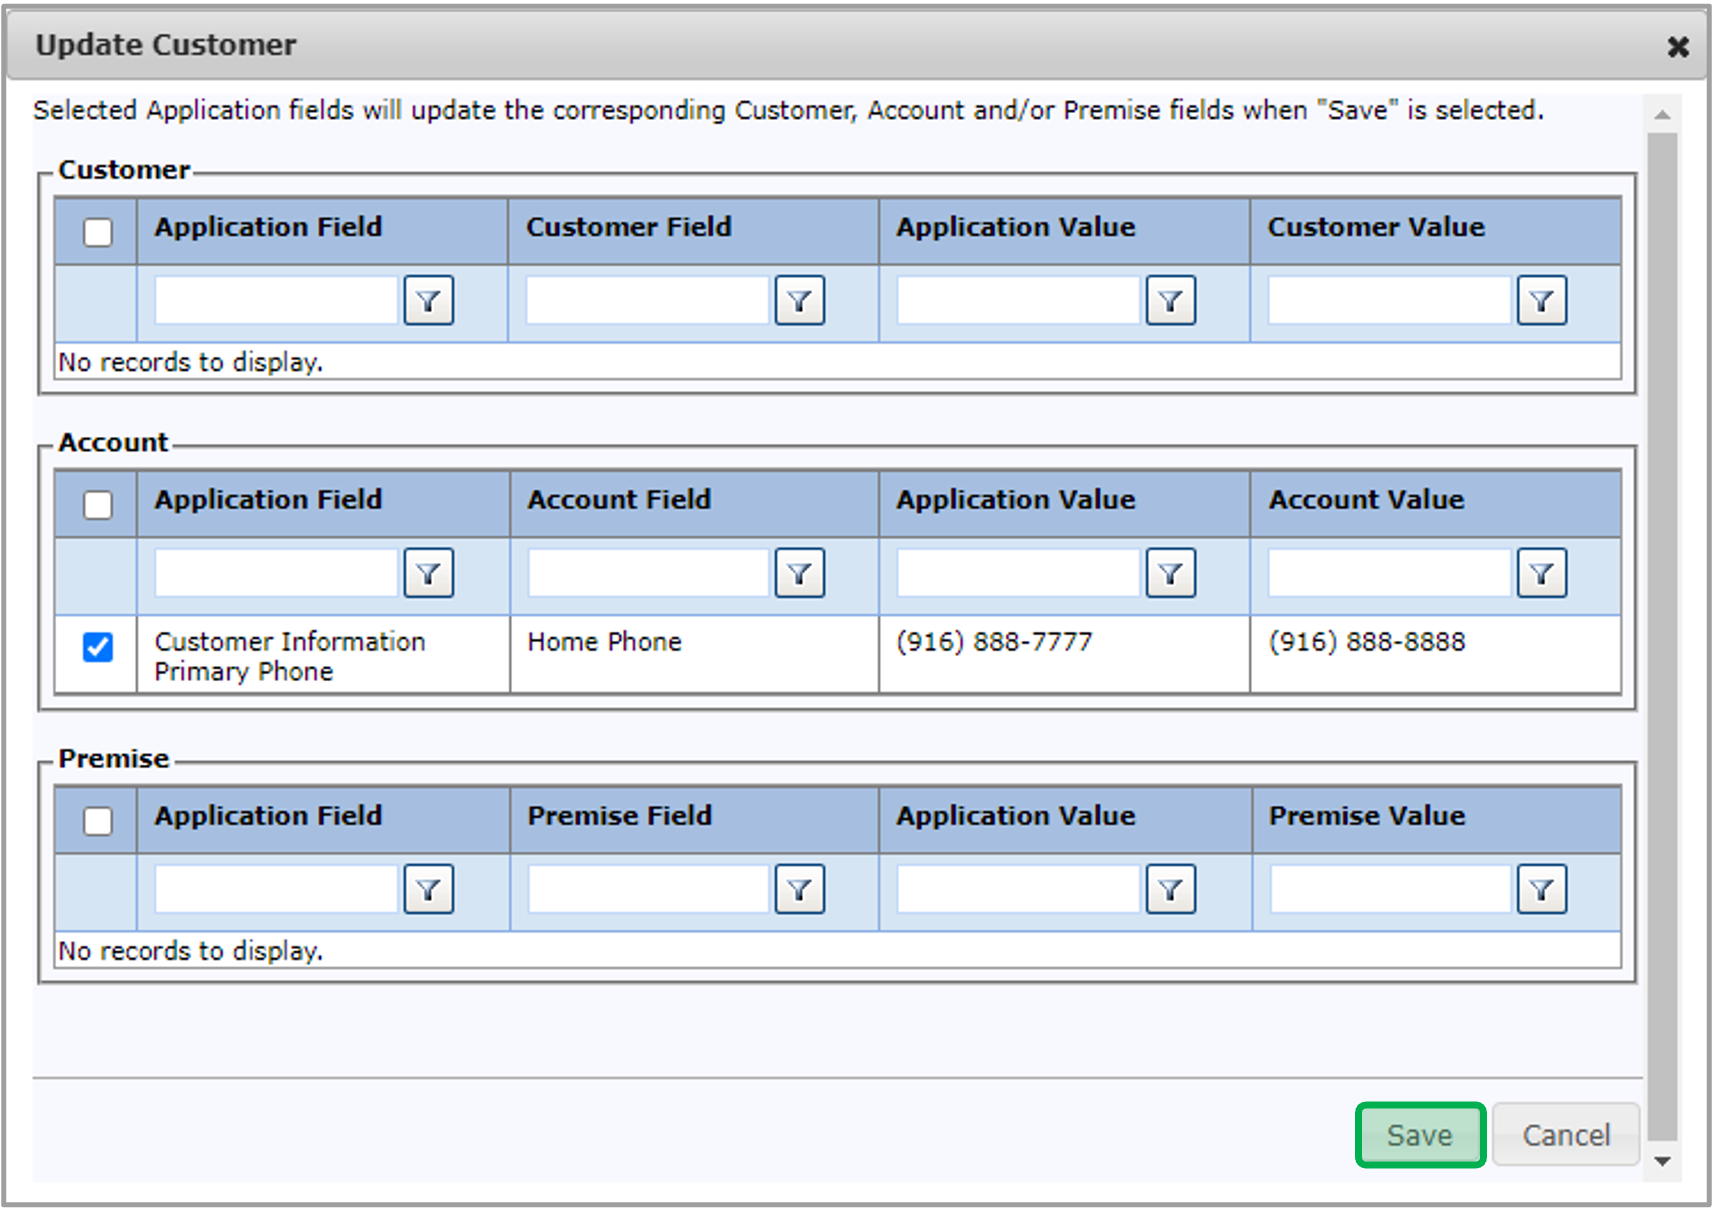 Image Added Image Added |
|
| UI Step |
|---|
When you click the Update Customer button, the Update Customer dialog will open, displaying every value Back on the Applicant Information page, the Primary Trade Ally section on the Assessment Submission step that is different than the value saved in the corresponding field on the Customer/Account/Premise. All these fields will be checked by default. When finished updating, click Save in the dialog. The system will update the checked Customer/Account/Premise fields for the values to match the Assessment Submission stepwill default to the Trade Ally and Employee associated with the user that created the enrollment. To change the Trade Ally to a Contractor/Vendor, click the Trade Ally Name Hyperlink. | Expand |
|---|
|  Image Added Image Added |
|
| UI Step |
|---|
After you click the Trade Ally Name hyperlink, the Add Trade Ally dialog will open. Select the correct Contractor/Vendor and Employee in the Trade Ally and Employee dropdowns, then click Save. | Expand |
|---|
| Image Removed 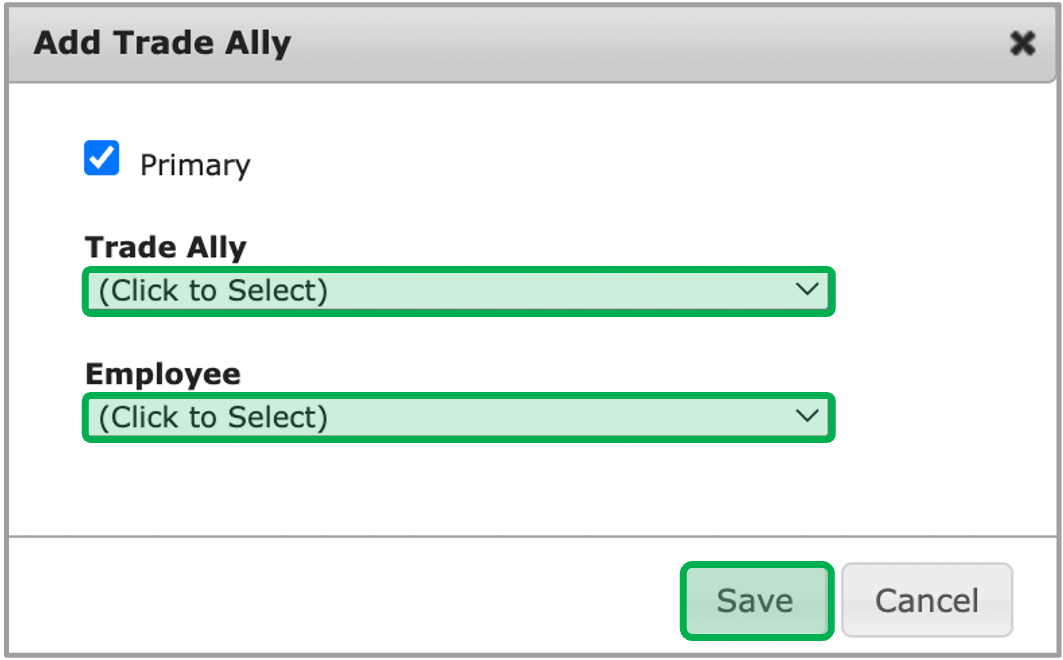 Image Added Image Added |
|
| UI Step |
|---|
Once all of the fields are reviewed/updated, click Save. When saved, access the Usage & Fuel Information tab. |
|
|
| UI Expand |
|---|
|
| Info |
|---|
The instruction below provides guidance for contractors to complete the Usage & Fuel Information tab. |
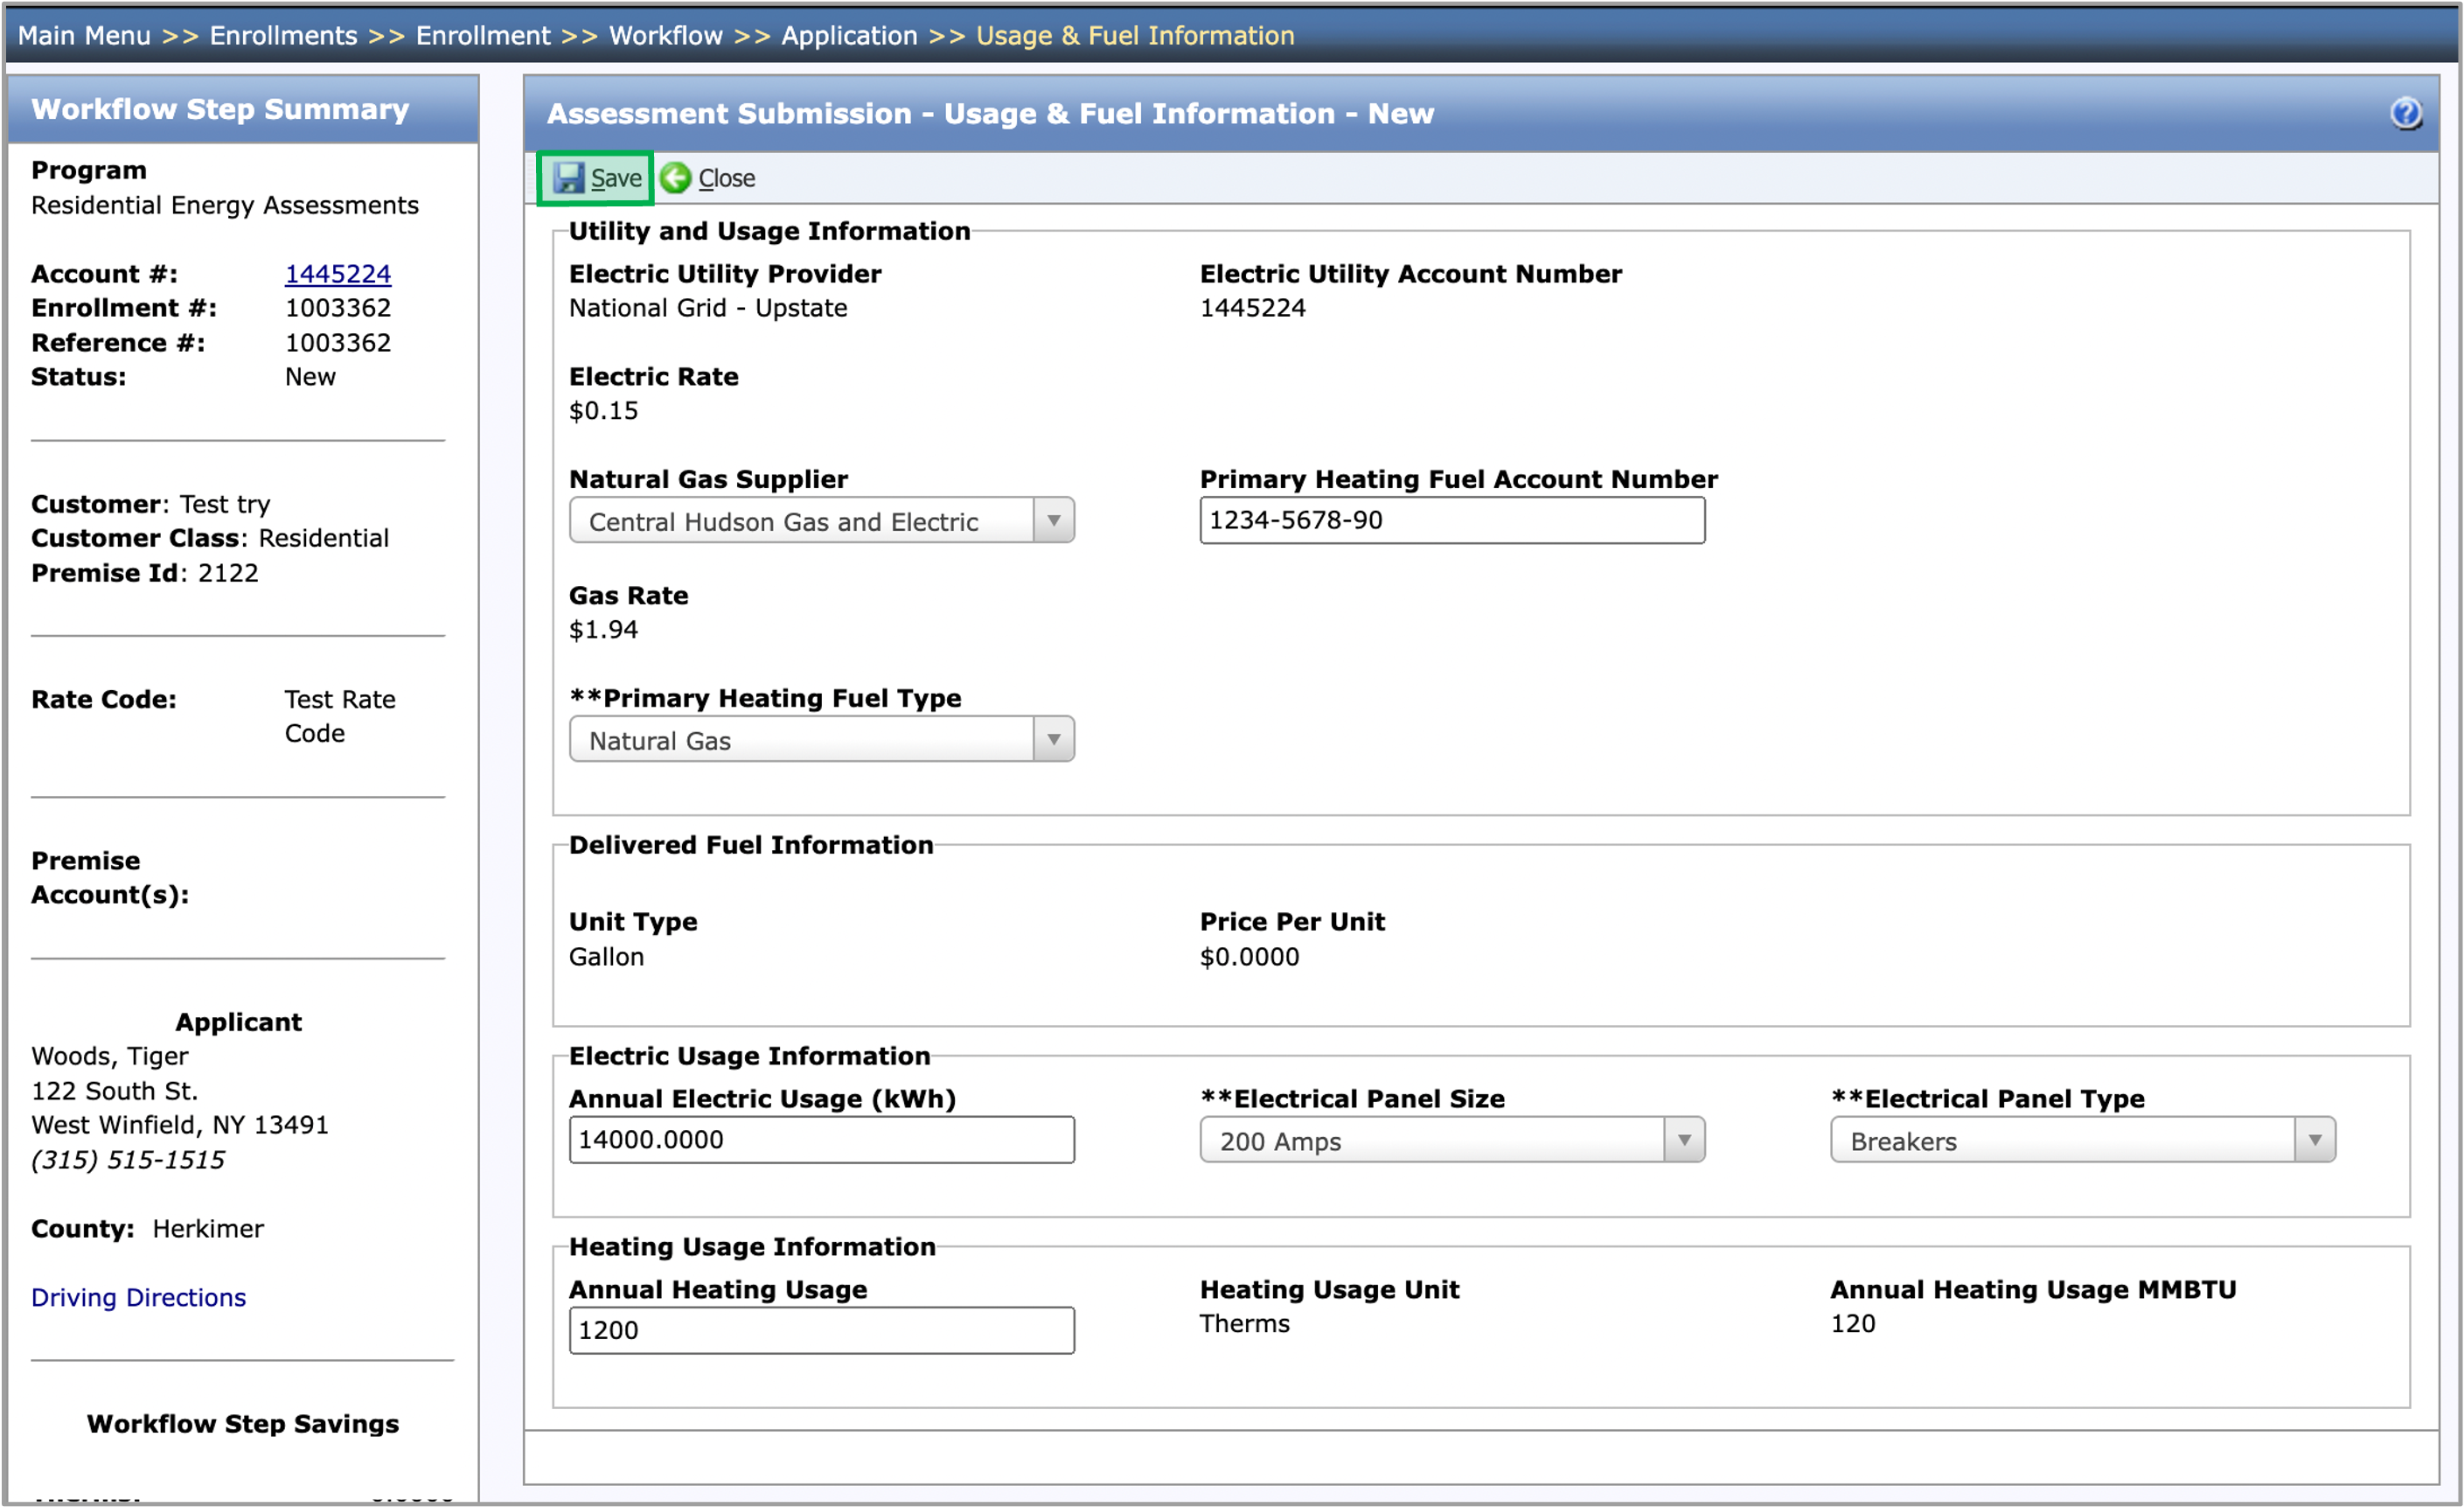 Image Added Image Added
| UI Steps |
|---|
|
| UI Step |
|---|
On the Usage & Fuel tab, fill in all of the required fields that contains two ** (asterisks). | Tip |
|---|
| Some of the non-editable fields on this tab are calculated based on information added to editable fields. |
| Back on the Applicant Information page, the Primary Trade Ally section on the Assessment Submission step will default to the Trade Ally and Employee associated with the user that created the enrollment. To change the Trade Ally to a Contractor/Vendor, click the Trade Ally Name Hyperlink. | Expand |
|---|
| Image Removed |
| UI Step |
|---|
After you click the Trade Ally Name hyperlink, the Add Trade Ally dialog will open. Select the correct Contractor/Vendor and Employee in the Trade Ally and Employee dropdowns, then click Save. | Expand |
|---|
| Image Removed |
|
| UI Step |
|---|
Once all of the required fields are reviewed/updated, click Save. When saved, access the Usage & Fuel Information complete, click the Save button to save inputs to the Usage & Fuel information tab. Then, navigate to Existing Conditions tab. |
|
|
| UI Expand |
|---|
| title | Usage & FuelExisting Conditions |
|---|
|
| Info |
|---|
The instruction instructions below provides guidance for contractors to complete the Usage & Fuel Information Existing Conditions tab.
|
Image Removed
| UI Steps |
|---|
|
| UI Step |
|---|
On the Usage & Fuel Existing Conditions tab, fill in all of the required fields that contains two two ** (asterisksasterisk). | Tip |
|---|
| Enter in as much known information as possible from the assessmentSome of the non-editable fields on this tab are calculated based on information added to editable fields. |
|
| UI Step |
|---|
Once all of the required fields tabs are completefilled out, click the Save button to save inputs to the Usage & Fuel information tab. Then, navigate to Existing Conditions tab.on the Partner Information tab. |
|
|
| UI Expand |
|---|
| title | Partner Information | title
|---|
|
| Existing Conditions | info | The instructions instruction below provides guidance for contractors to complete the Exisiting Conditions Partner Information tab. |
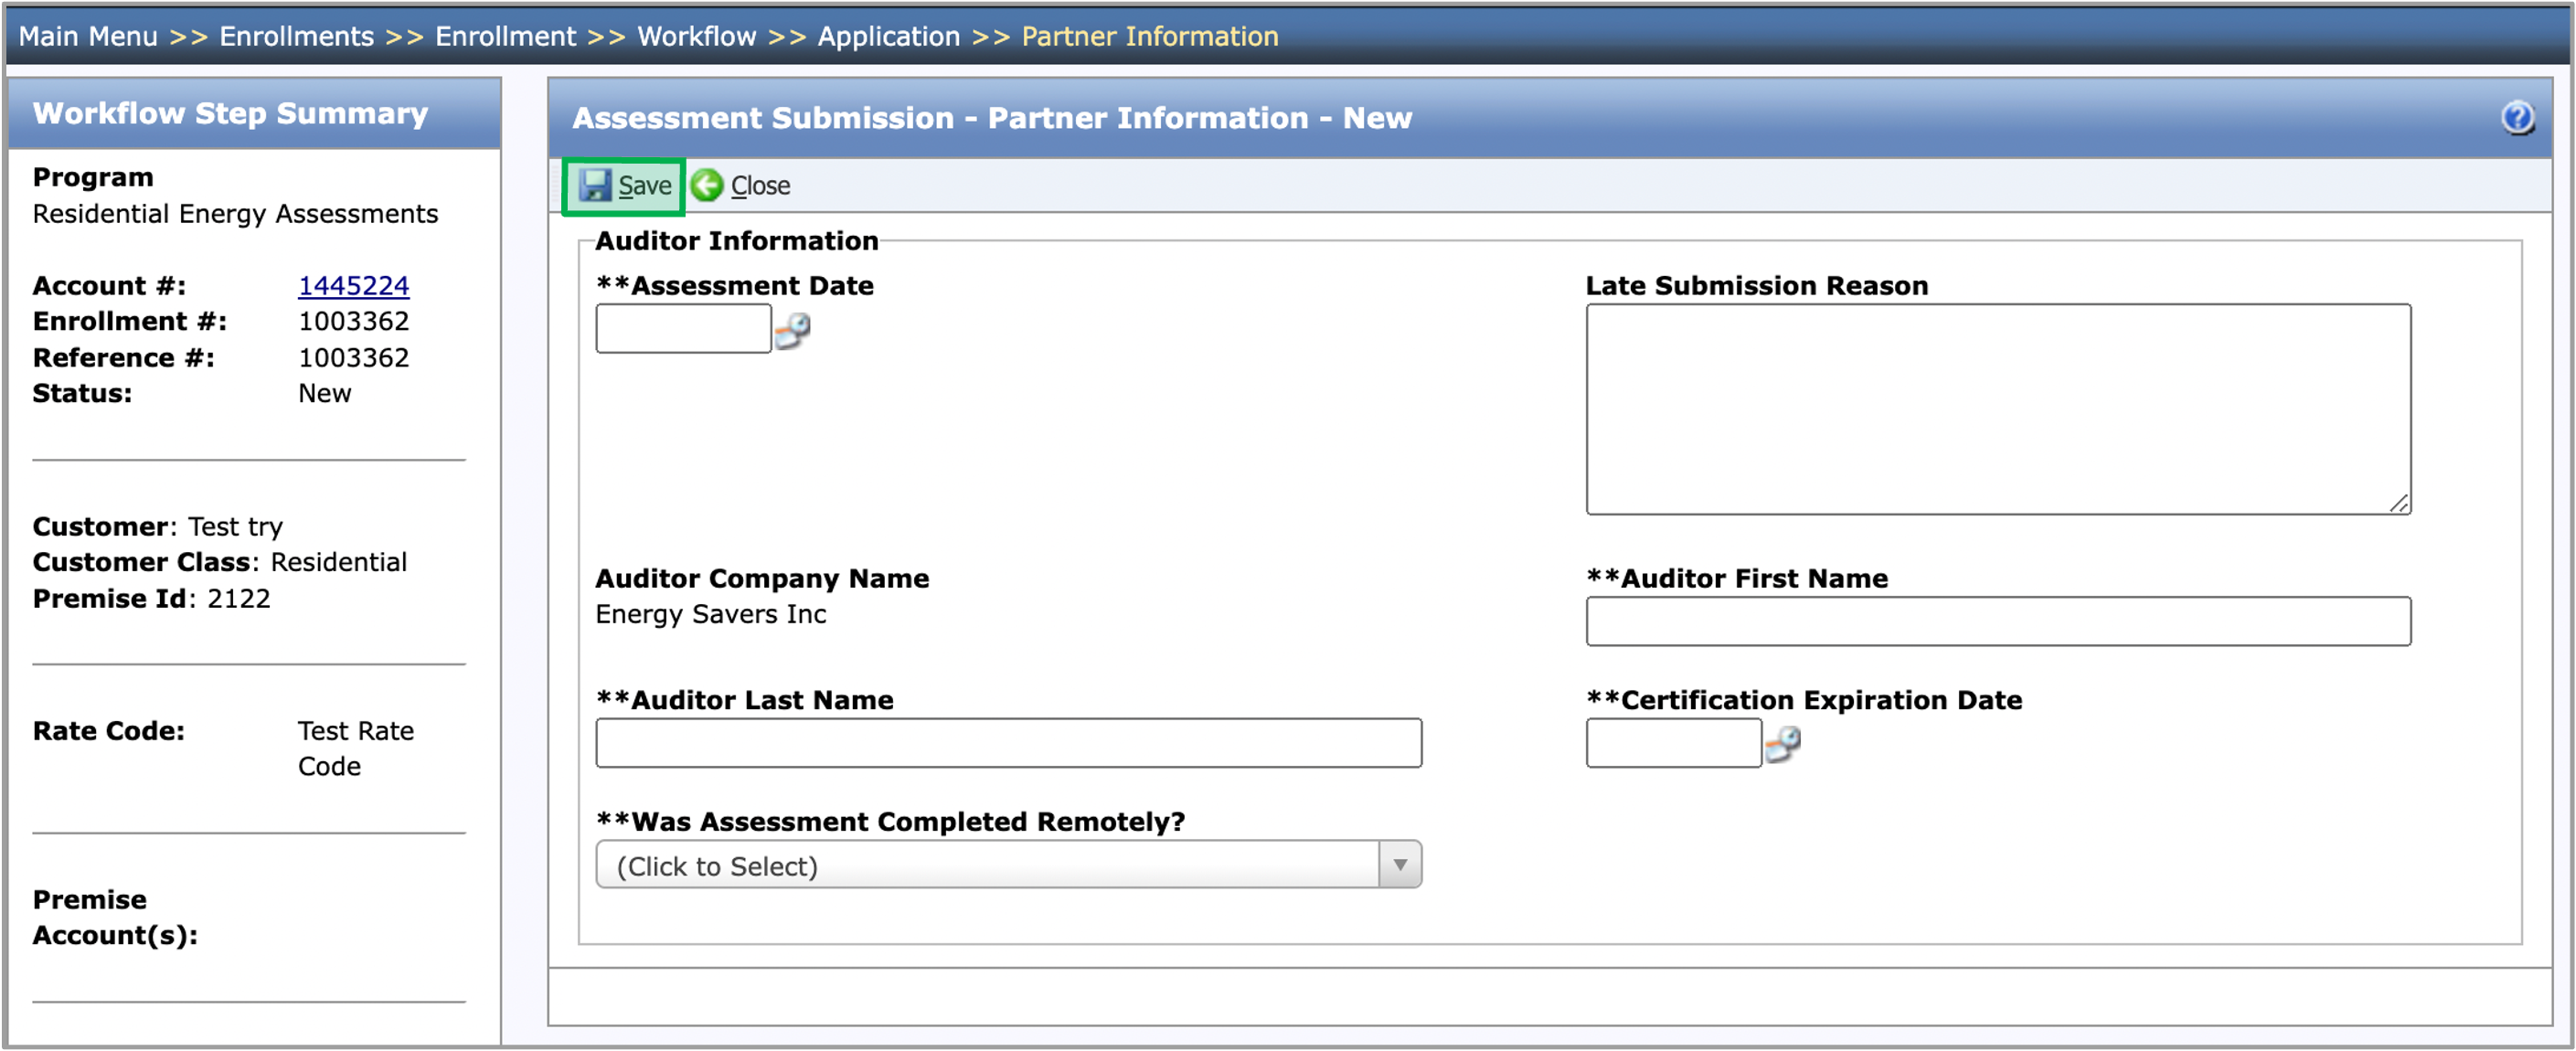 Image Added Image Added
| UI Steps |
|---|
|
| UI Step |
|---|
On the Existing Conditions Partner Information tab, fill Fill in all of the required fields that contains two ** (asteriskasterisks). | Tip |
|---|
| Depending on the option you select, you may have to respond to additional questions. The Late Submission Reason box will populate when the assessment date is 37 of more days from the date the enrollment was createdEnter in as much known information as possible from the assessment. |
|
| UI Step |
|---|
Once all of the required tabs fields are filled outcomplete, click the Save button and move on the Partner to Other Information tab. |
|
|
| UI Expand |
|---|
| | Info |
|---|
The instruction below provides guidance for contractors to complete the Partner Information tab. |
Image Removed | UI Steps |
|---|
| | UI Step |
|---|
On the Partner Information tab, Fill in all of the required fields that contains two ** (asterisks). | Tip |
|---|
Depending on the option you select, you may have to respond to additional questions. The Late Submission Reason box will populate when the assessment date is 37 of more days from the date the enrollment was created. |
| UI Step |
|---|
Once all of the required fields are complete, click the Save button and move on the to Other Information tab. |
| UI Expand |
|---|
| | Excerpt Include |
|---|
NY Home Energy Portal Overview | NY Home Energy Portal Overview | | nopanel | true |
|---|
| | Excerpt Include |
|---|
| NY Home Energy Portal Overview |
|---|
| NY Home Energy Portal Overview |
|---|
| nopanel | true |
|---|
|
|
| UI Expand |
|---|
| | Info |
|---|
| The instruction below provides guidance on how to upload document(s) within an enrollment. A red exclamation mark will be displayed under the Required column indicating the document type being a Required Document. When uploading documents, multiple document types can be selected for a single document. This is helpful when a single document can satisfy multiple document requirements. Multiple documents can be uploaded at the same time: PC Users: CTRL + Click Mac Users: Command + Click To see these instructions in action, please watch the training video below: | Expand |
|---|
| | Multimedia |
|---|
| name | NY HEP Uploading Documents.mp4 |
|---|
| width | 100% |
|---|
| page | NY Home Energy Portal Overview |
|---|
| height | 100% |
|---|
|
|
|
| | UI Expand |
|---|
| | Info |
|---|
The instructions below provide guidance on how to upload document(s) within a REA enrollment. A red exclamation mark will be displayed under the Required column indicating the document type being a Required Document. Multiple documents can be uploaded at the same time: PC Users: CTRL + Click Mac Users: Command + Click
|
| UI Steps |
|---|
|
| UI Step |
|---|
To upload a Document, access the enrollment's Documents tab during any workflow step. |
| UI Step |
|---|
Click Click the New button for the Document dialog will open. | Expand |
|---|
|  Image Modified Image Modified
|
|
| UI Step |
|---|
Click Browse to select a file to upload. | Tip |
|---|
| Multiple documents can be uploaded at the same time. |
| Warning |
|---|
| If no Refrigerator/Freezer is planned for a Tier 1 Enrollment, the Appliance Exchange Agreement (AEA) is a required document on the EmPower + EnrollmentMultiple documents can be uploaded at the same time. |
| Expand |
|---|
| 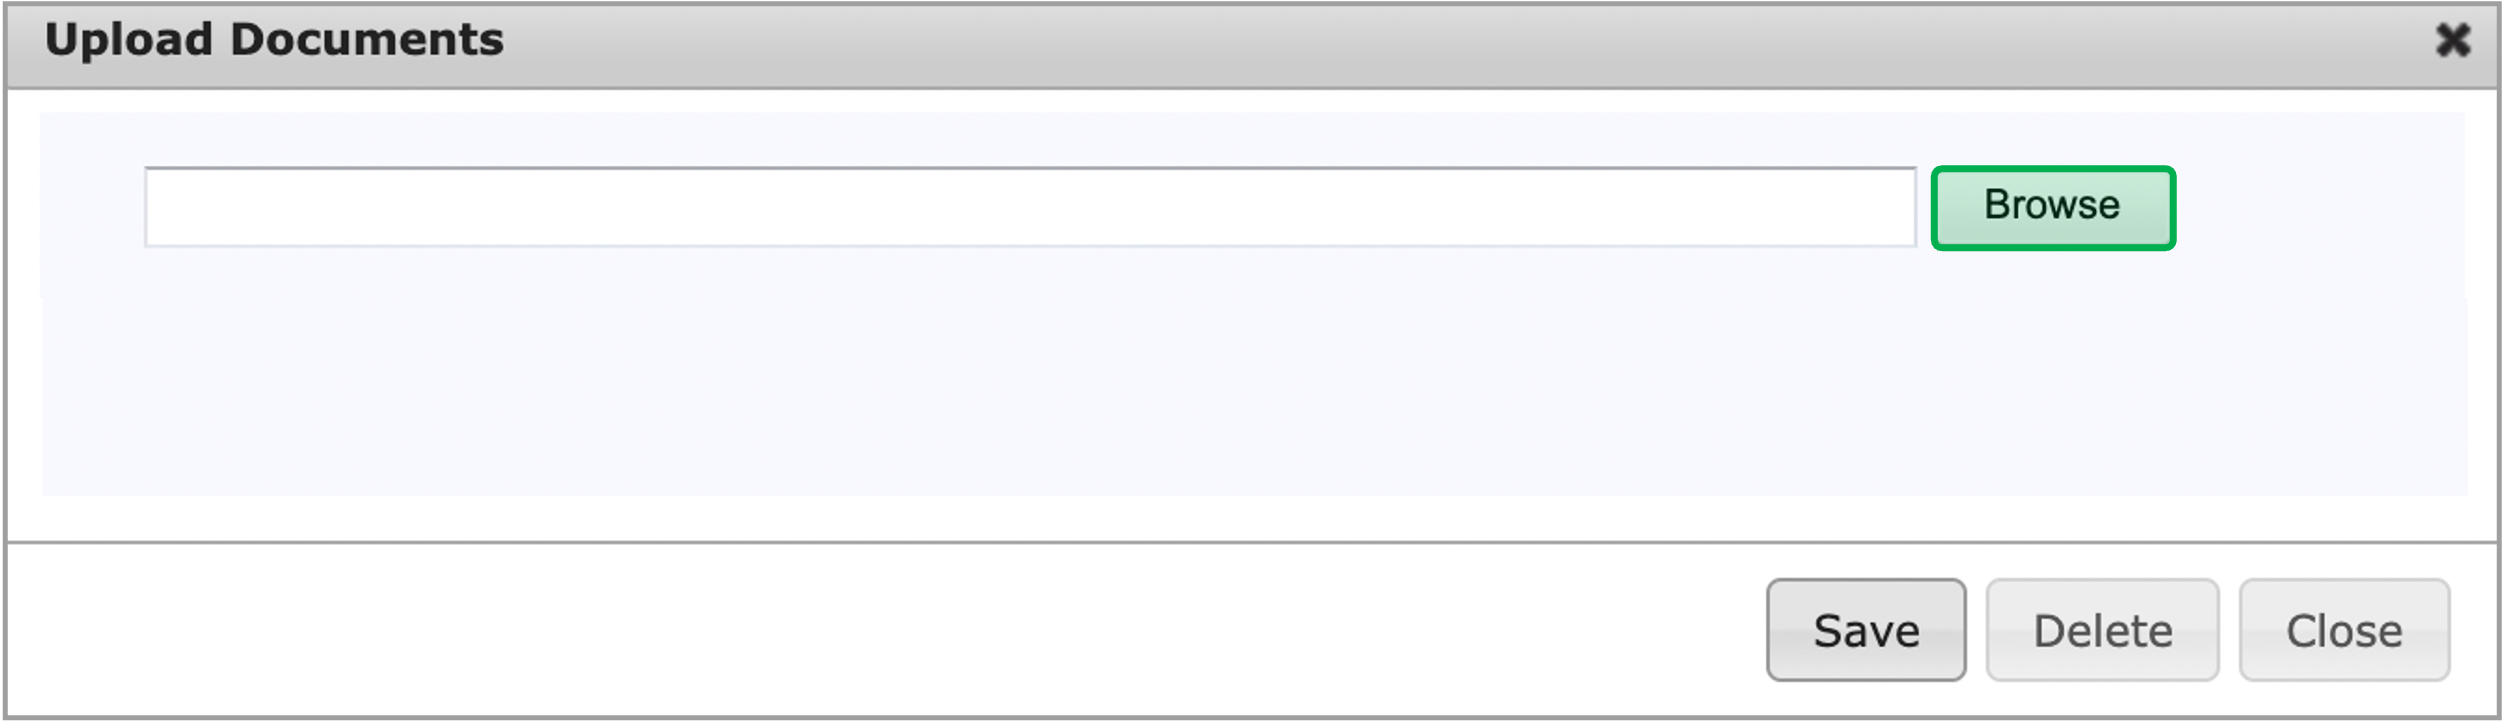 Image Removed Image Removed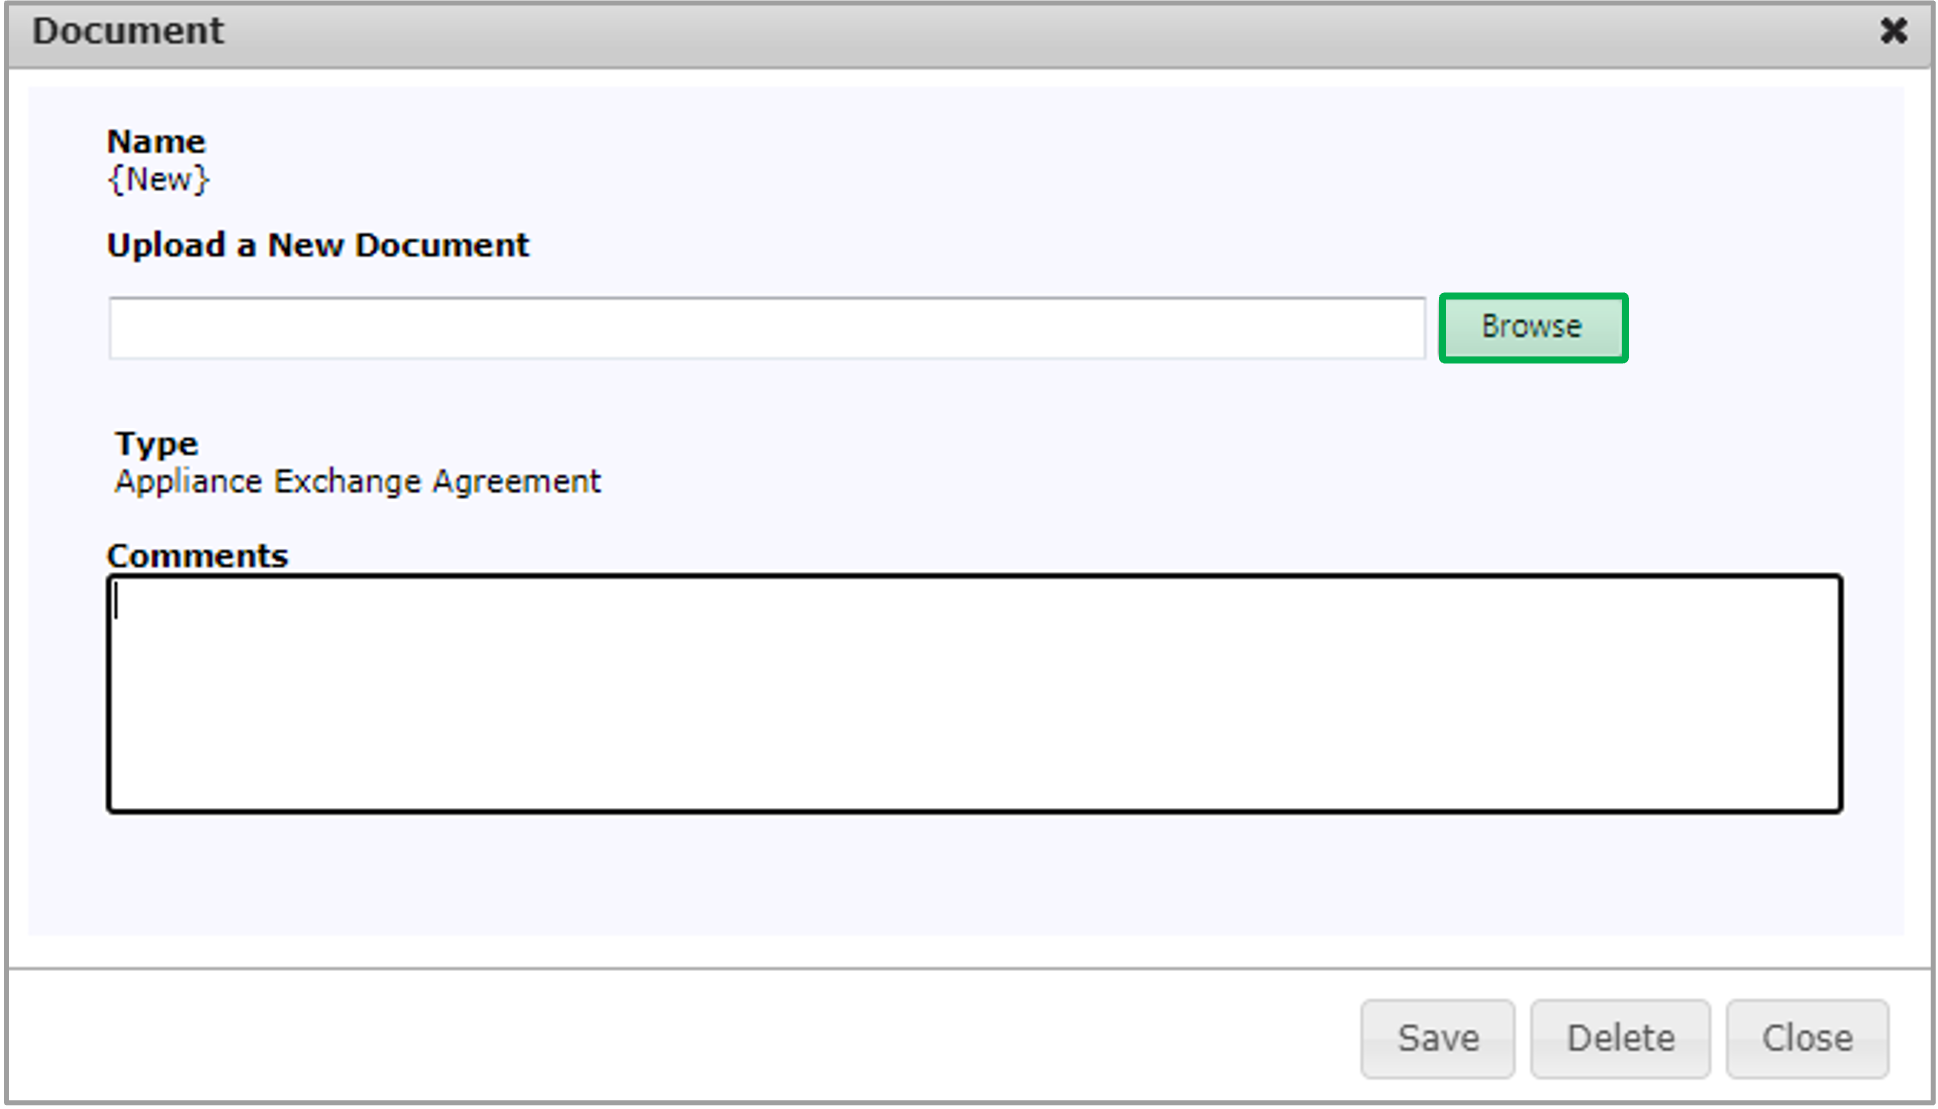 Image Added Image Added
|
|
| UI Step |
|---|
After the file is uploaded , select for the Document Type under the drop down, click Save and then click Close to upload the file and close the dialog. | Tip |
|---|
| After you’ve selected a file, you can remove it by clicking the x Remove button. Multiple document types can be selected for a single document during upload. This is helpful when a single document can be used to satisfy multiple document requirements. Once the initial document type is selected, re-click the document type field to add an additional document type. |
| Warning |
|---|
| This is the Contractors last opportunity to click Remove and to not upload a specific document. Once Once Save is clicked, the document becomes a public record and it cannot be edited, deleted, or otherwise overwritten. If the wrong document is uploaded, Contractors will need to upload the correct document and use the Comments fields to let both CLEAResult and NYSERDA know which is the correct document to review. |
| Expand |
|---|
| 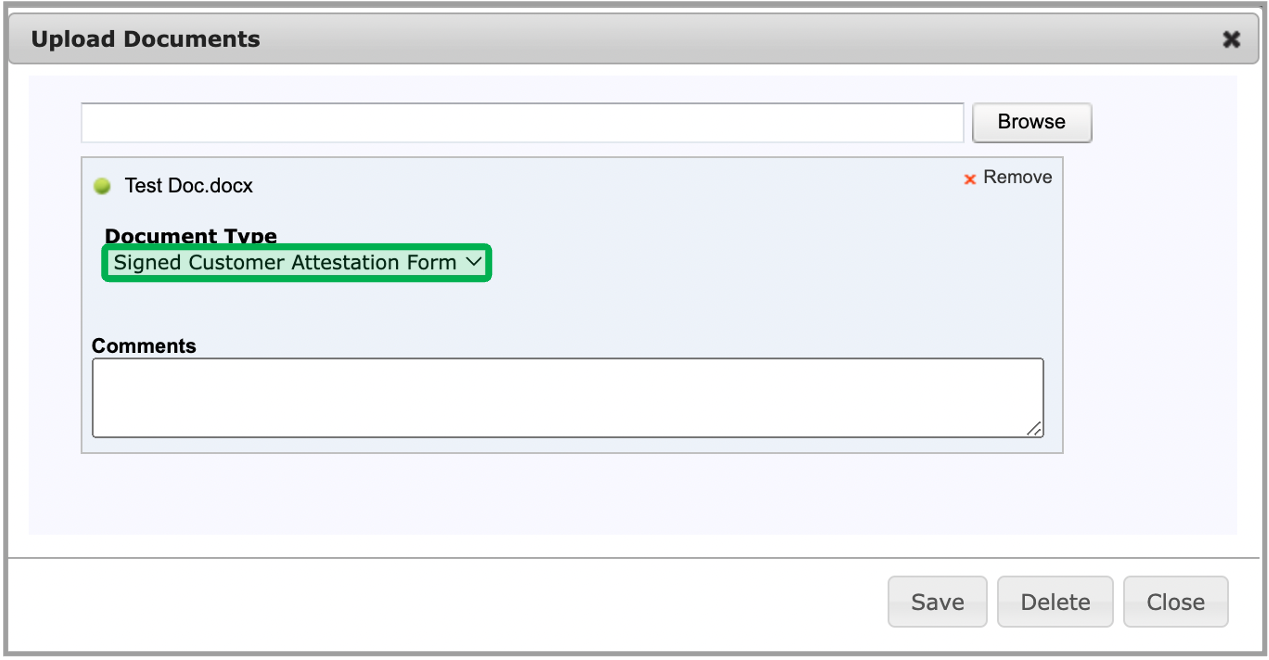 Image Removed Image Removed  Image Added Image Added |
|
| UI Step |
|---|
To download and view an uploaded document, click the Document Name Hyperlink. | Tip |
|---|
The Red Exclamation Point Icon under the Required column indicates the document is required. The Green Check Mark Icon under the Required column indicates the file is uploaded| Expand |
|---|
| 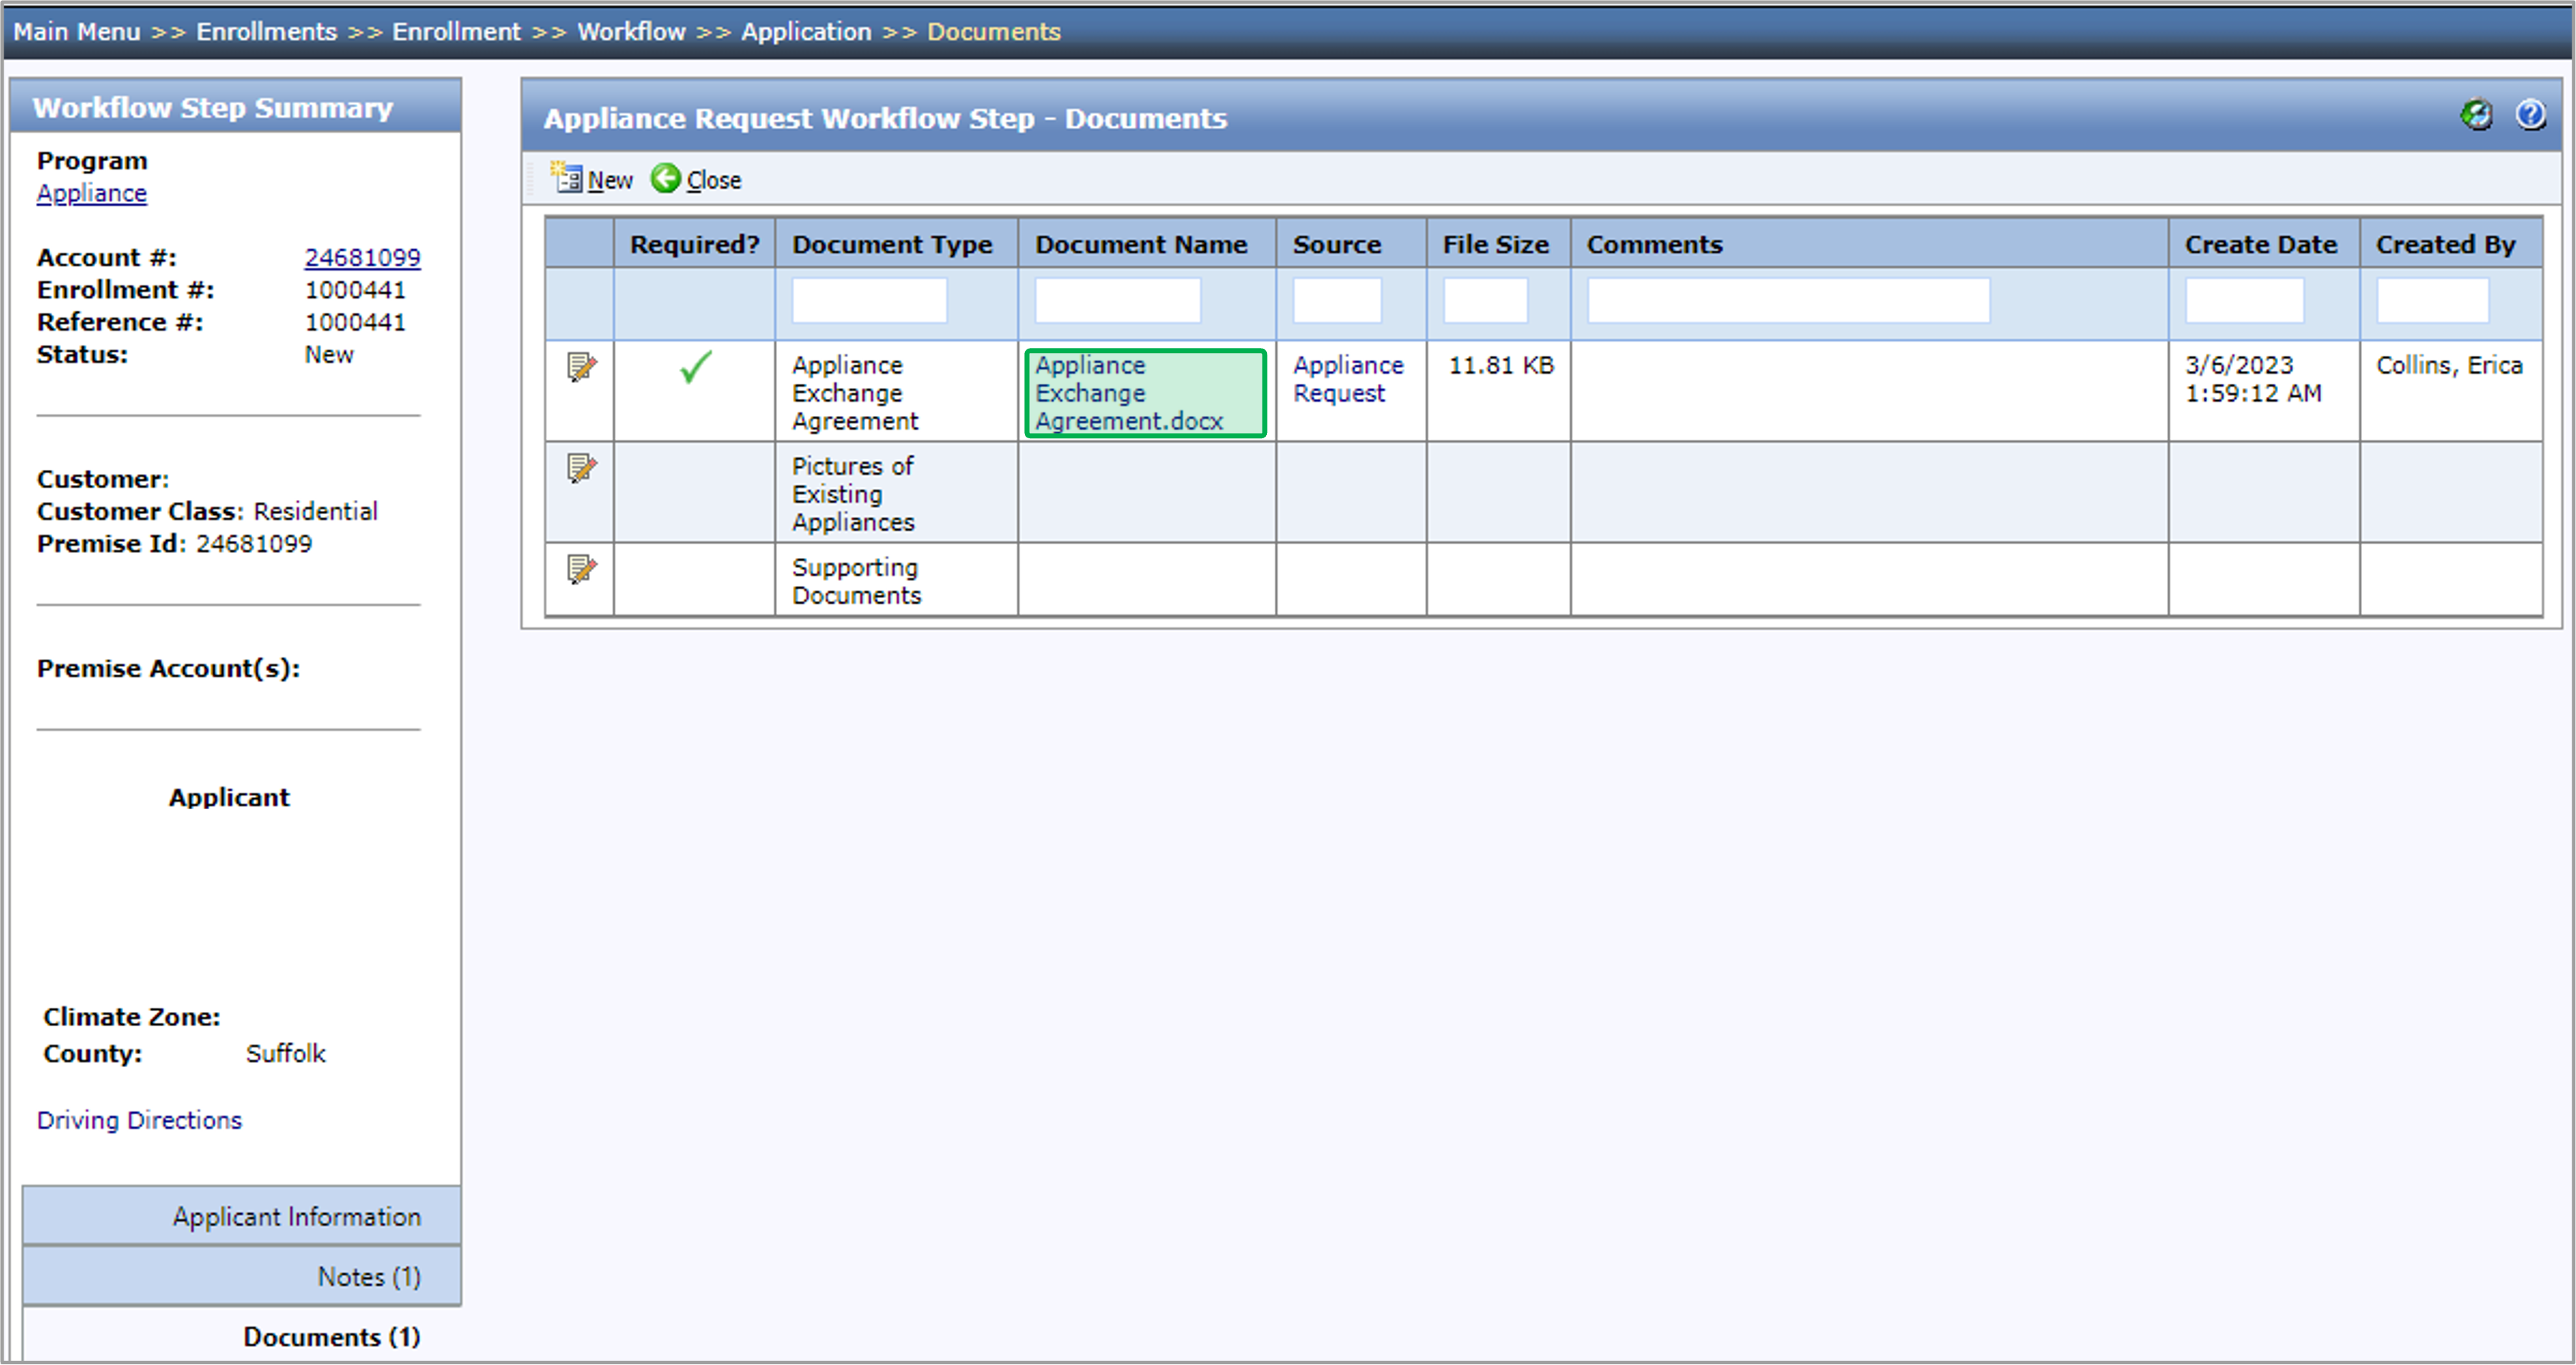 Image Added Image Added
|
|
|
|
| UI Expand |
|---|
|
| Info |
|---|
| As Measures are configured, calculations for Measure Cost, Incentives, and Savings will begin to populate. | Expand |
|---|
| screenshot | Image Removed |
|
| | UI Expand |
|---|
| | Measure Cost and Incentive Definition |
|---|
| Header Fields - Measure Cost: Measure cost to NYSERDA that incentives are based on
- Incentive: NYSERDA program incentives
Measure Fields - Cost: Total measure cost not including incentives or alternate funding
- Alternate Funding: Non-NYSERDA program rebates or incentives
|
The Final Measure on the Measures list will always be the Funding Information Measure, which sums up the information for all the other measures. | Expand |
|---|
| title | Funding Information Definition |
|---|
| - Additional Funding Requested Above Maximum Incentive Amount: Tier 1 only; displays how much additional funding is being requested above the enrollment’s maximum incentive.
- Additional Customer Contribution Required: Amount needed for project to meet Project Level Cost Effectiveness (Tier 1 or 3) or to not exceed the Maximum Incentive Amount (Tier 3). Needs to be $0.
|
Assessment measures will no longer be automatically added, they will need to be manually added. – Temporary change only and anticipated to last for only a few months | | Info |
|---|
The instruction below provides guidance for contractors to complete the required data entry fields when adding measures to the Assessment Submission step. Assessment measures will no longer be automatically added, they will need to be manually added. – Temporary change only and anticipated to last for only a few months As Measures are configured, calculations for Measure Cost, Incentives, and Savings will begin to populate. Contractors may need to click the Save button a few times to have calculations show correctly. Newly added measures will always appear at the top of the list to make them easier to find and configure. Clicking save will alphabetize all measures but the Funding Information measure. That will always be at the bottom and sums up the calculations for all other measures. Once a new measure is accessed to configure, the previous measure will become read only until it is clicked in again. Be sure to save before leaving this tab otherwise the added and configured measures will be lost. For a full list of all program measures that may help with this tab, please access the NY HEP Measures List. To see these instructions in action, watch the training video below: | Expand |
|---|
| | Multimedia |
|---|
| name | NY HEP Adding and Configuring Measures.mp4 |
|---|
| width | 100% |
|---|
| page | External Guide Video Library |
|---|
| height | 100% |
|---|
|
|
|
| UI Steps |
|---|
|
| UI Step |
|---|
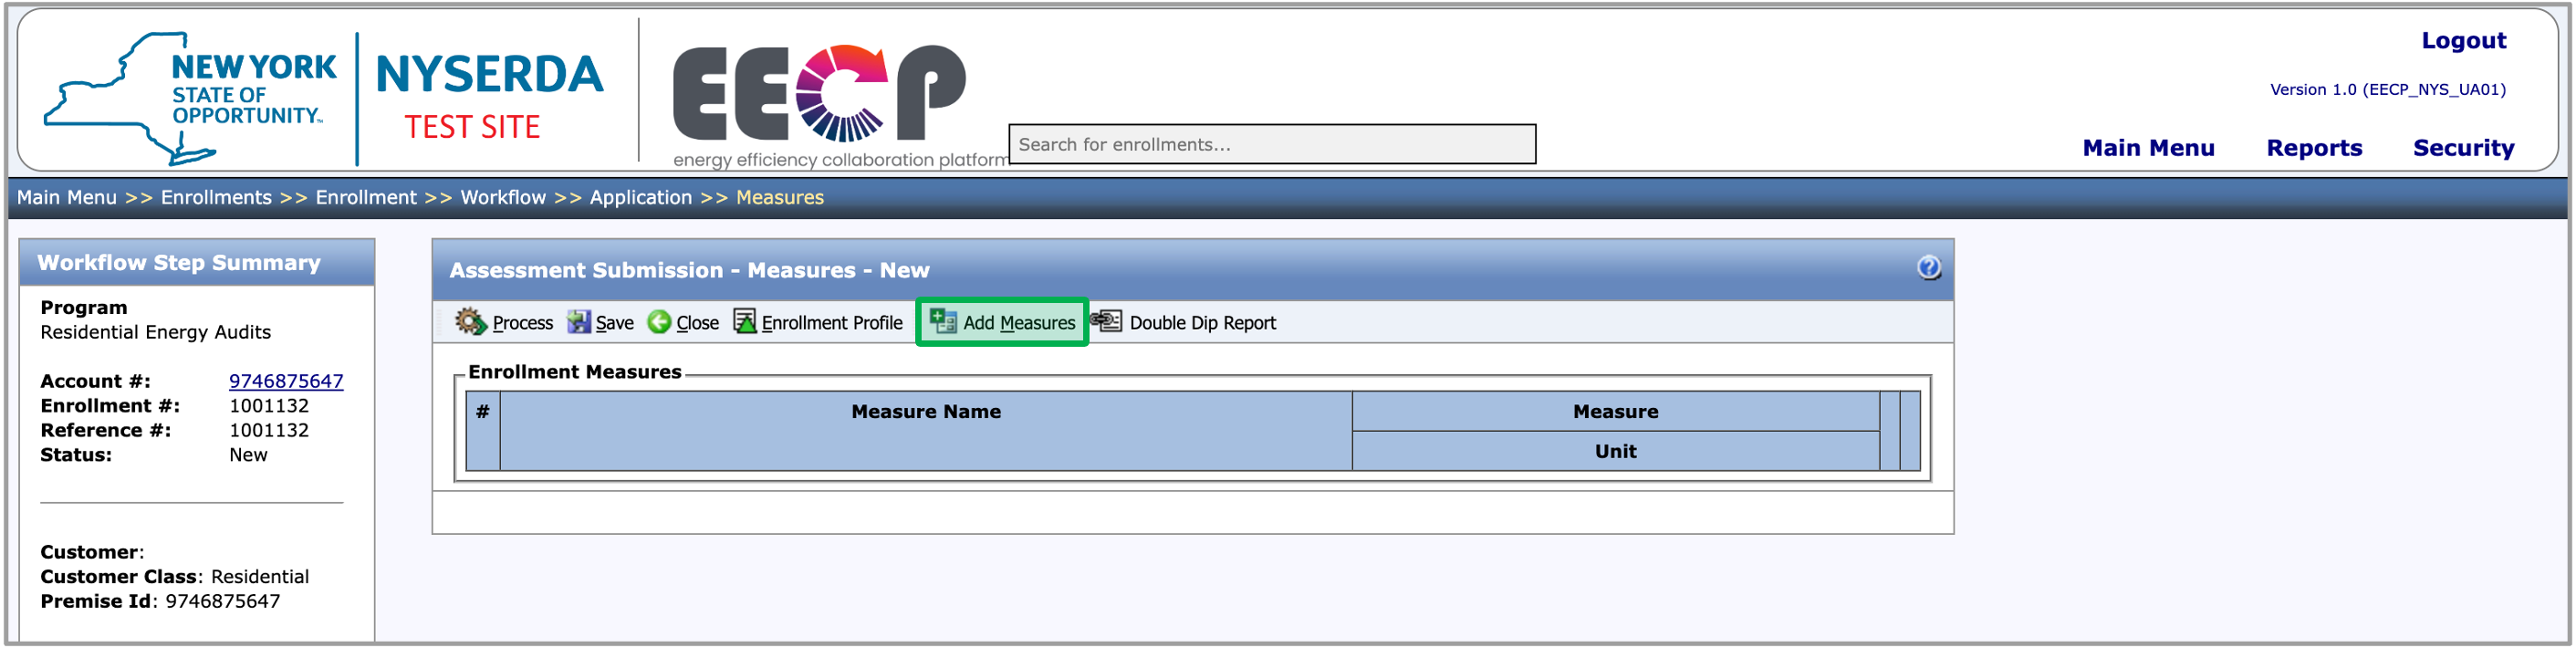
If additional measures are recommended in addition to the pre-populated measure, click the Add Measures button on the Measures tab. The Add Measures dialog will open. | Tip |
|---|
| Clicking the Add Measures button is only needed if additional measures are being recommended, in addition to the one pre-populate. |
| Expand |
|---|
|  |
|
| UI Step |
|---|
To select one or more measures to add to the step, check the box in the left-hand column. To add the selected measures to the step, click the Save button in the dialog. | Tip |
|---|
| If you increase the No. to Add value after selecting the measure, the system will add that many unique instances of the measure to the Add Measure step. Use the filter boxes at the top of each column to filter the list of measures. |
| Warning |
|---|
| This is not where a contractor will document the number of Measures installed, that is done when configuring each measure. |
| Expand |
|---|
|  |
|
| UI Step |
|---|
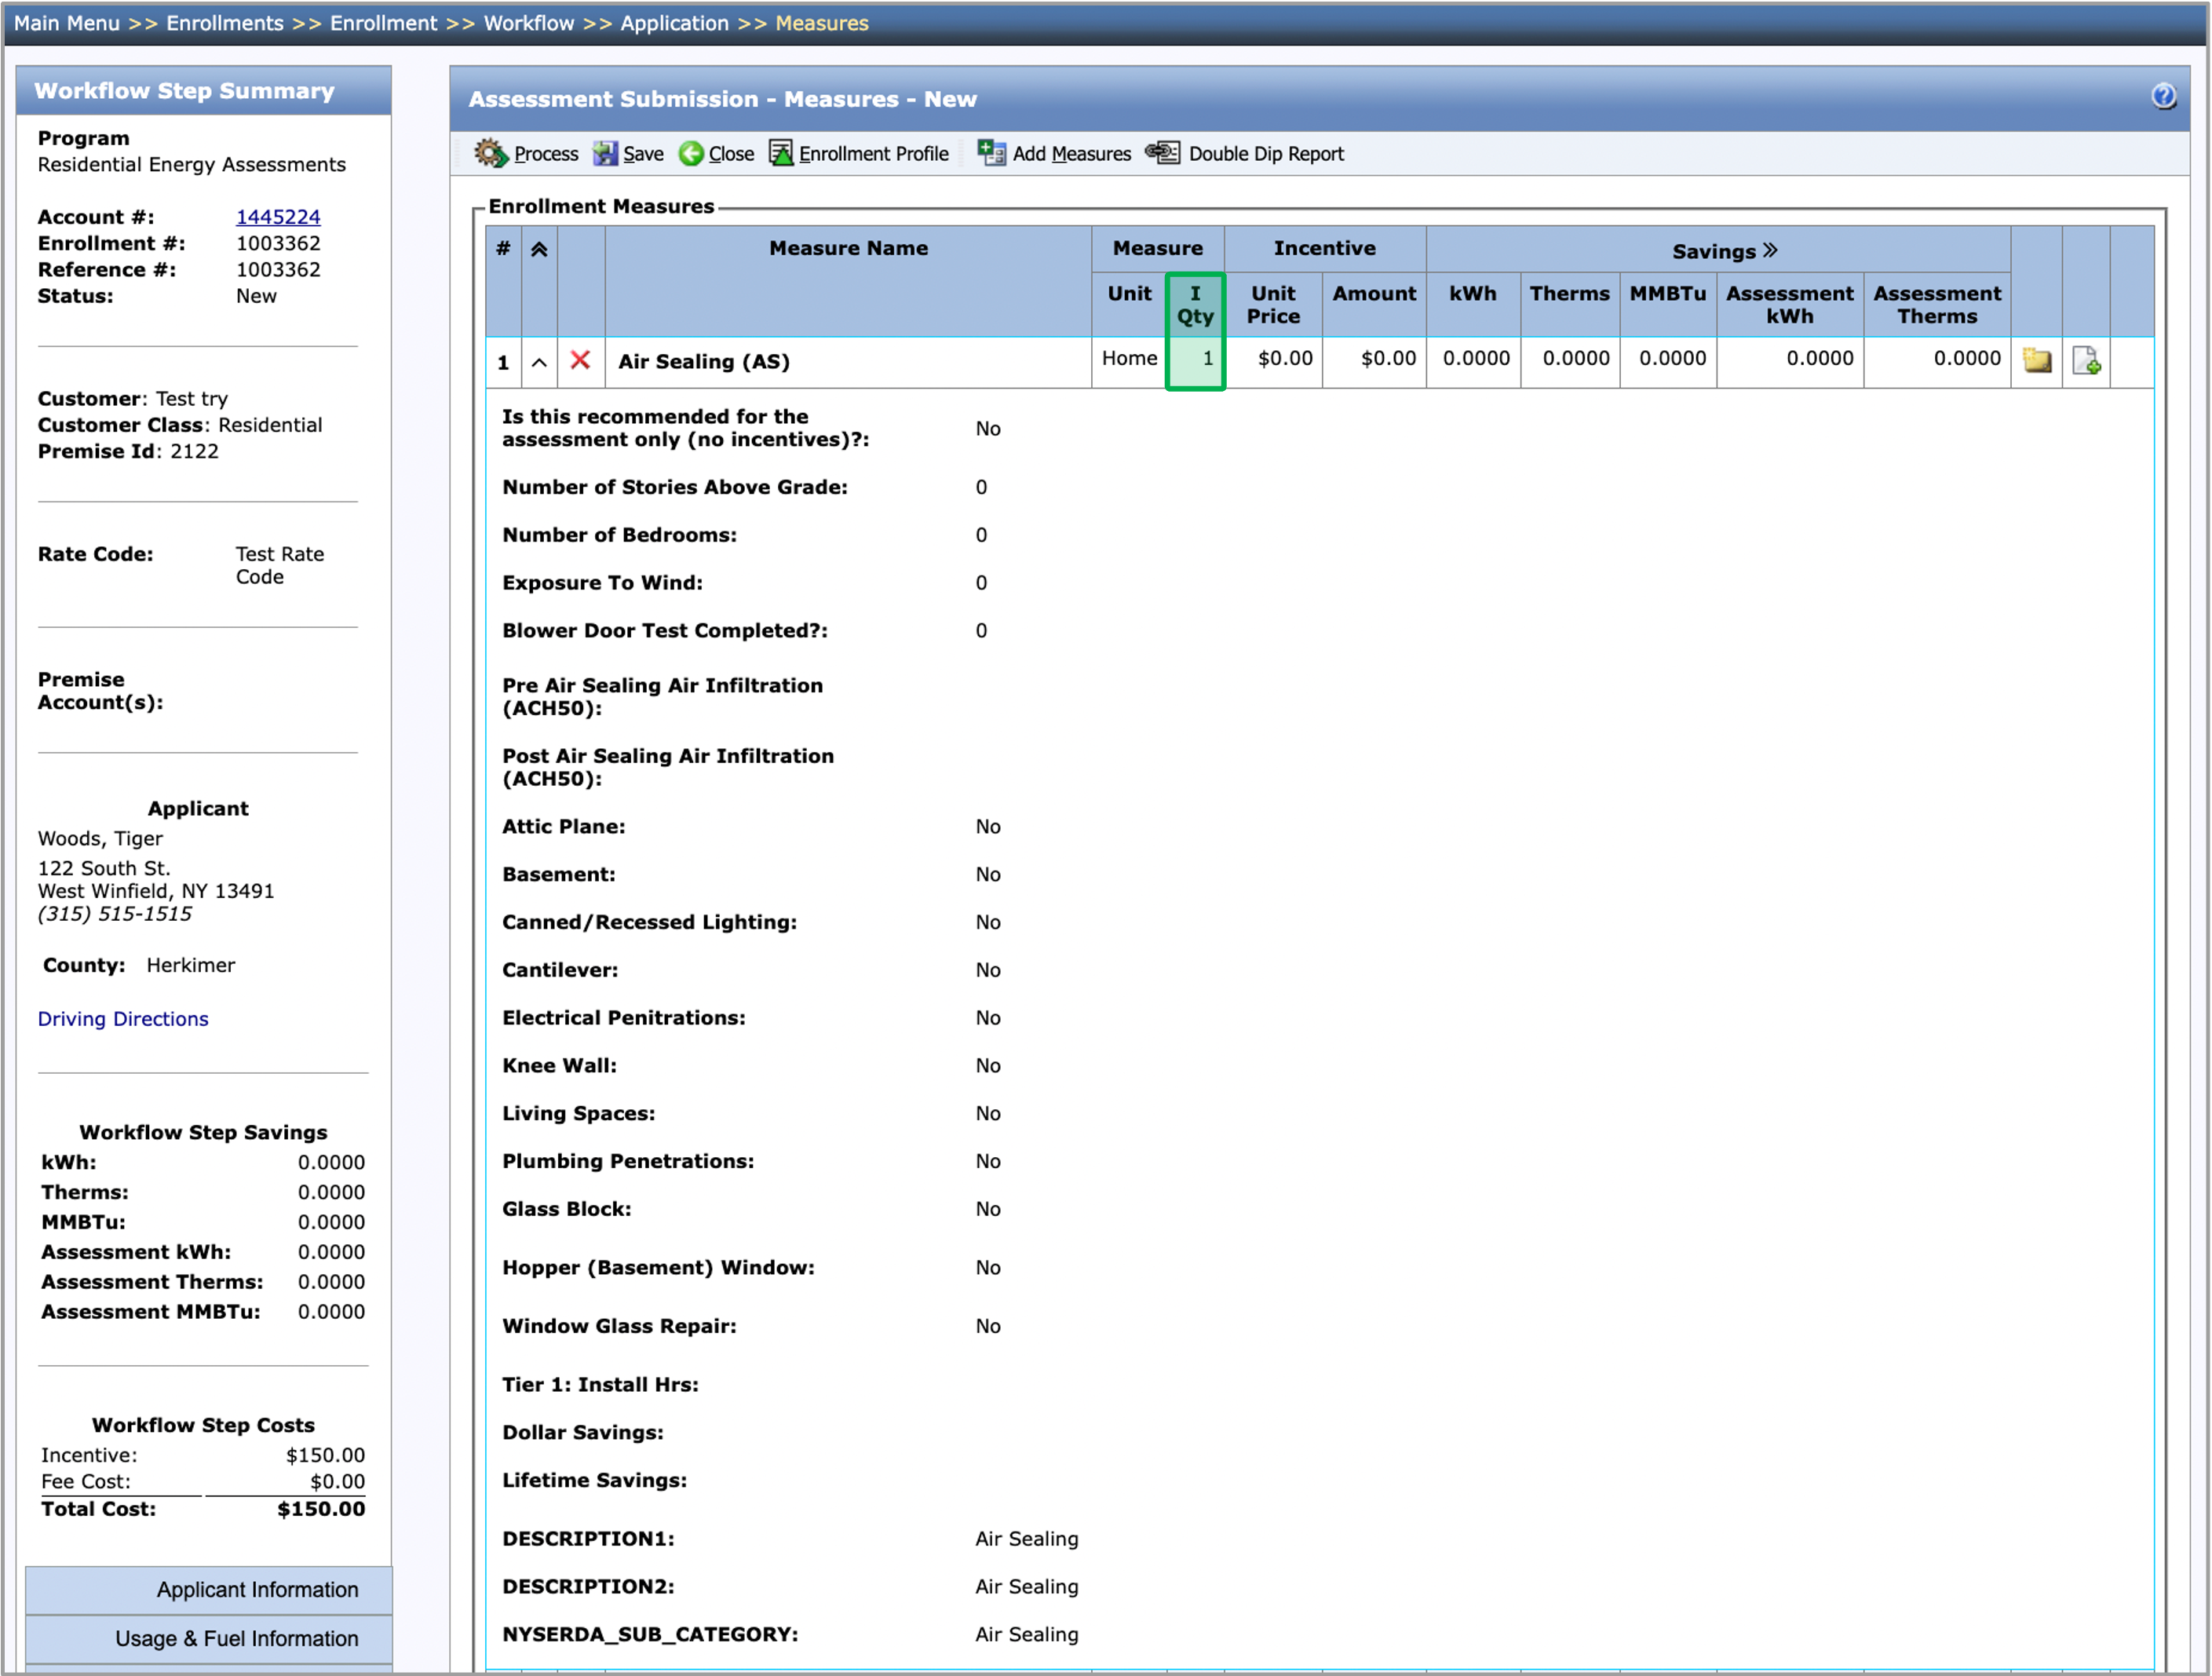
After you add one or more measures to the step, enter each measure’s I Qty (installed quantity) if it is not prepopulated. Then, complete the data entry fields for each measure. Required fields are denoted with **. After all the measures are added and all the data entry fields are filled out, the Appliance Request step can be processed. | Warning |
|---|
| warning | If the Contractor leaves the Is this recommended for assessment only question on No, then this is a proposed measure, meaning that the contractor is saying they will do this work. If contractors changes the answer to yes, this work is Recommended and will not be performed by the contractor as part of this project. Recommended measures do no effect Incentive amounts |
| Expand |
|---|
|  |
|
| UI Step |
|---|
Contractors can delete a Measure by clicking on the Red X button. | Expand |
|---|
|  |
|
| UI Step |
|---|
The Folder Icon at the fart right of each measure will allow Contractors to add 1 comment per measure per step. These comments can be viewed at other workflow steps and by anyone with access to the enrollment. | Expand |
|---|
|  Image Removed Image Removed |
anyone with access to the enrollment. | Expand |
|---|
| Image Added |
|
| UI Step |
|---|
The Paper Icon at the far right of each measure will allows Contractors to associated previously uploaded documents to specific measures, such as a PDF of images documenting the existing conditions of the premise. | Expand |
|---|
|  Image Added Image Added |
|
| UI Step |
|---|
Once all of the required fields are completed, click the Save button. | Tip |
|---|
| Once you click Save, the newly added measures will always appear at the top of the list to make them easier to find and configure. |
| Warning |
|---|
| Under certain conditions users may need to click Save more than once to update a measure’s dollar and energy savings on the Measures tab. - First Save updates the measures.
- Second Save (if needed) would update measures dependent on others such as: Heating/Cooling System or Water Heater.
- Third Save would (if required) would update totals in the Funding Information Measure (last measure in list).
|
| | UI Step |
|---|
The Paper Icon at the far right of each measure will allows Contractors to associated previously uploaded documents to specific measures, such as a PDF of images documenting the existing conditions of the premise. | Expand |
|---|
| | Image Removed |
|
| UI Step |
|---|
After all the measures are added and all the data entry fields are filled out, the Assessment Submission step can be processed. Click the Process button at the top of the Measures tab or the Applicant Information tab. | Tip |
|---|
| If there are any missing fields, a popup will appear notifying you of what is missing. |
| Expand |
|---|
|  |
|
|
|
| UI Expand |
|---|
|
| Info |
|---|
| The instructions below provides guidance for contractors to generate reports. The Reports Tab is used to generate either the Customer Report (required to give to customers to show the work recommend or proposed) and the Invoice ProForma Report (which will be needed if the customer is interested in applying for a loan). |
| UI Steps |
|---|
|
| UI Step |
|---|
On the Reports the Reports tab, click the the Generate Reports Reports button, a new Report dialog will open. | Expand |
|---|
| 
|
|
| UI Step |
|---|
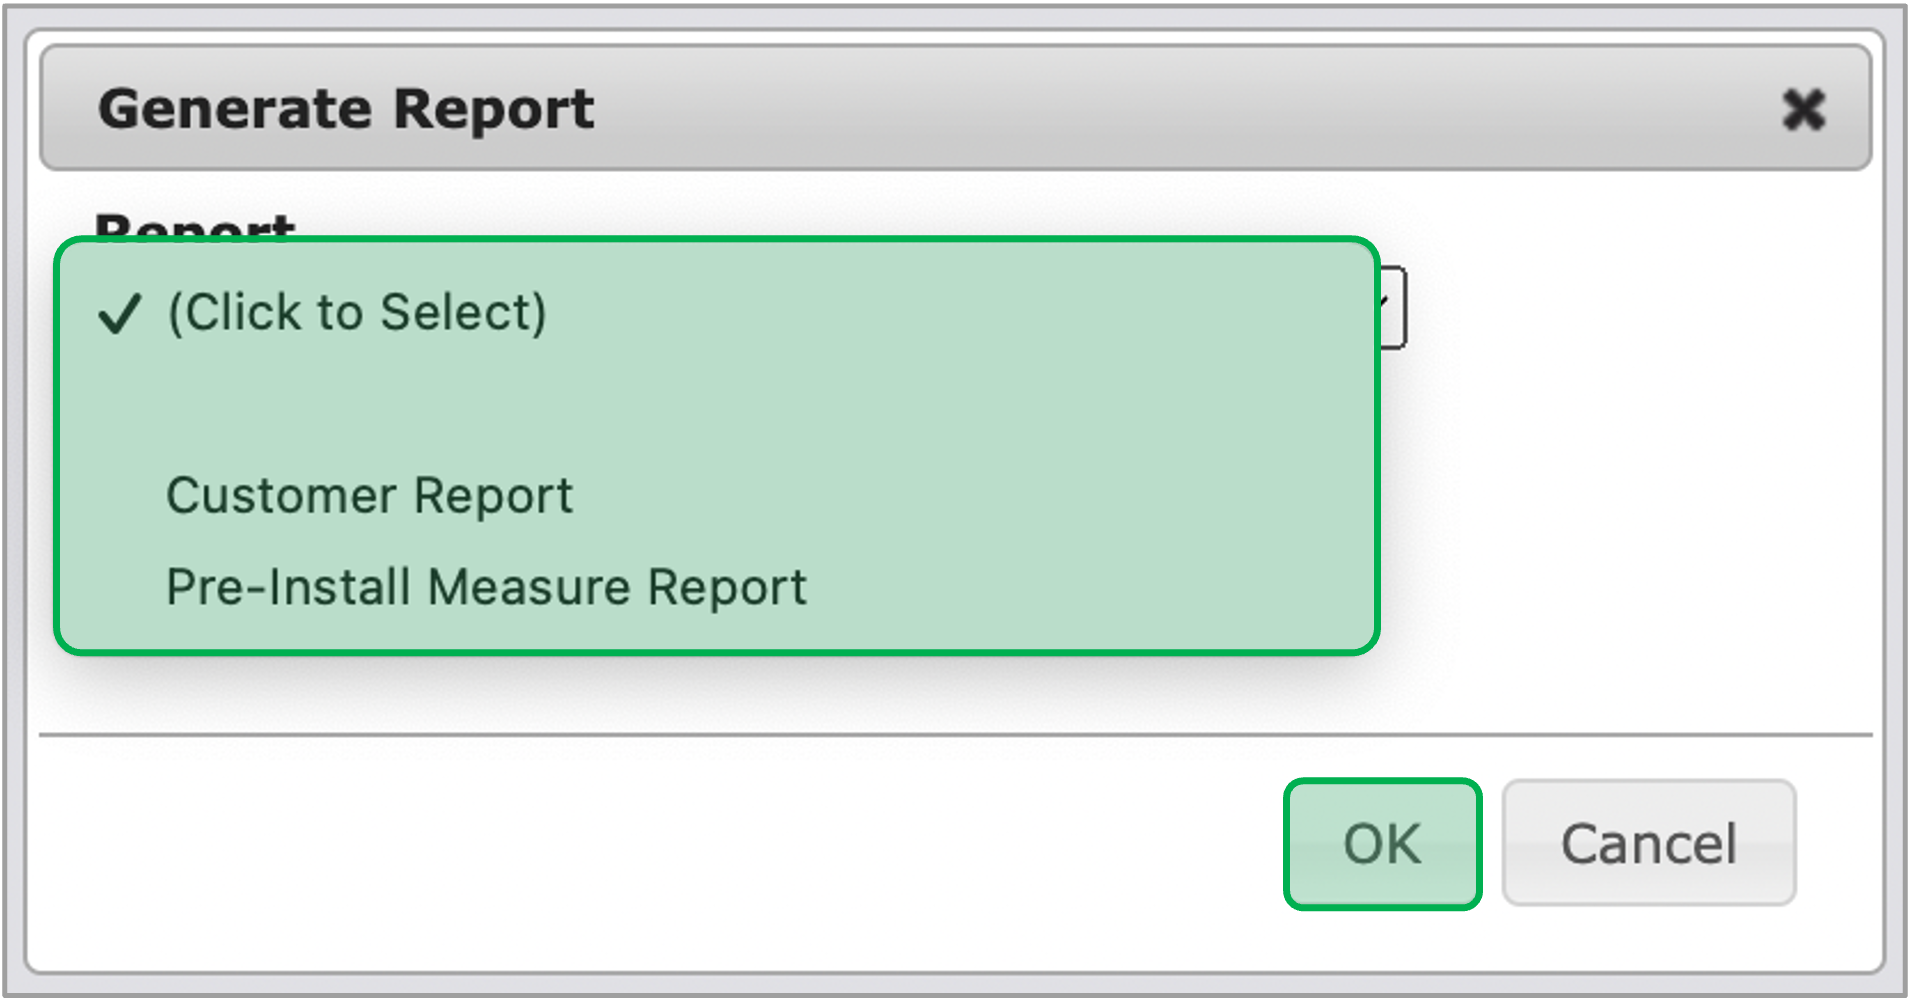
Select either the Customer Audit Report Report or Pre Install Audit report report and click the OK the OK button. | Expand |
|---|
| 
|
|
| UI Step |
|---|
The reports will automatically download once they are generated. Reports can also be downloaded manually by clicking on the hyperlink under the the Name column column. | Expand |
|---|
| 
|
|
|
|
|
| Aura - Tab |
|---|
|
| Panel |
|---|
| borderColor | #002D72 |
|---|
| bgColor | #F3F4F9 |
|---|
| titleColor | #ffffff |
|---|
| borderWidth | 1 |
|---|
| titleBGColor | #002D72 |
|---|
| borderStyle | none |
|---|
| title | Maintain To-Do List |
|---|
|
|
| Info |
|---|
| The instruction below provides guidance for contractors on how to use and maintain the To Do List by reviewing regularly for outstanding enrollments. |
| UI Steps |
|---|
|
| UI Step |
|---|
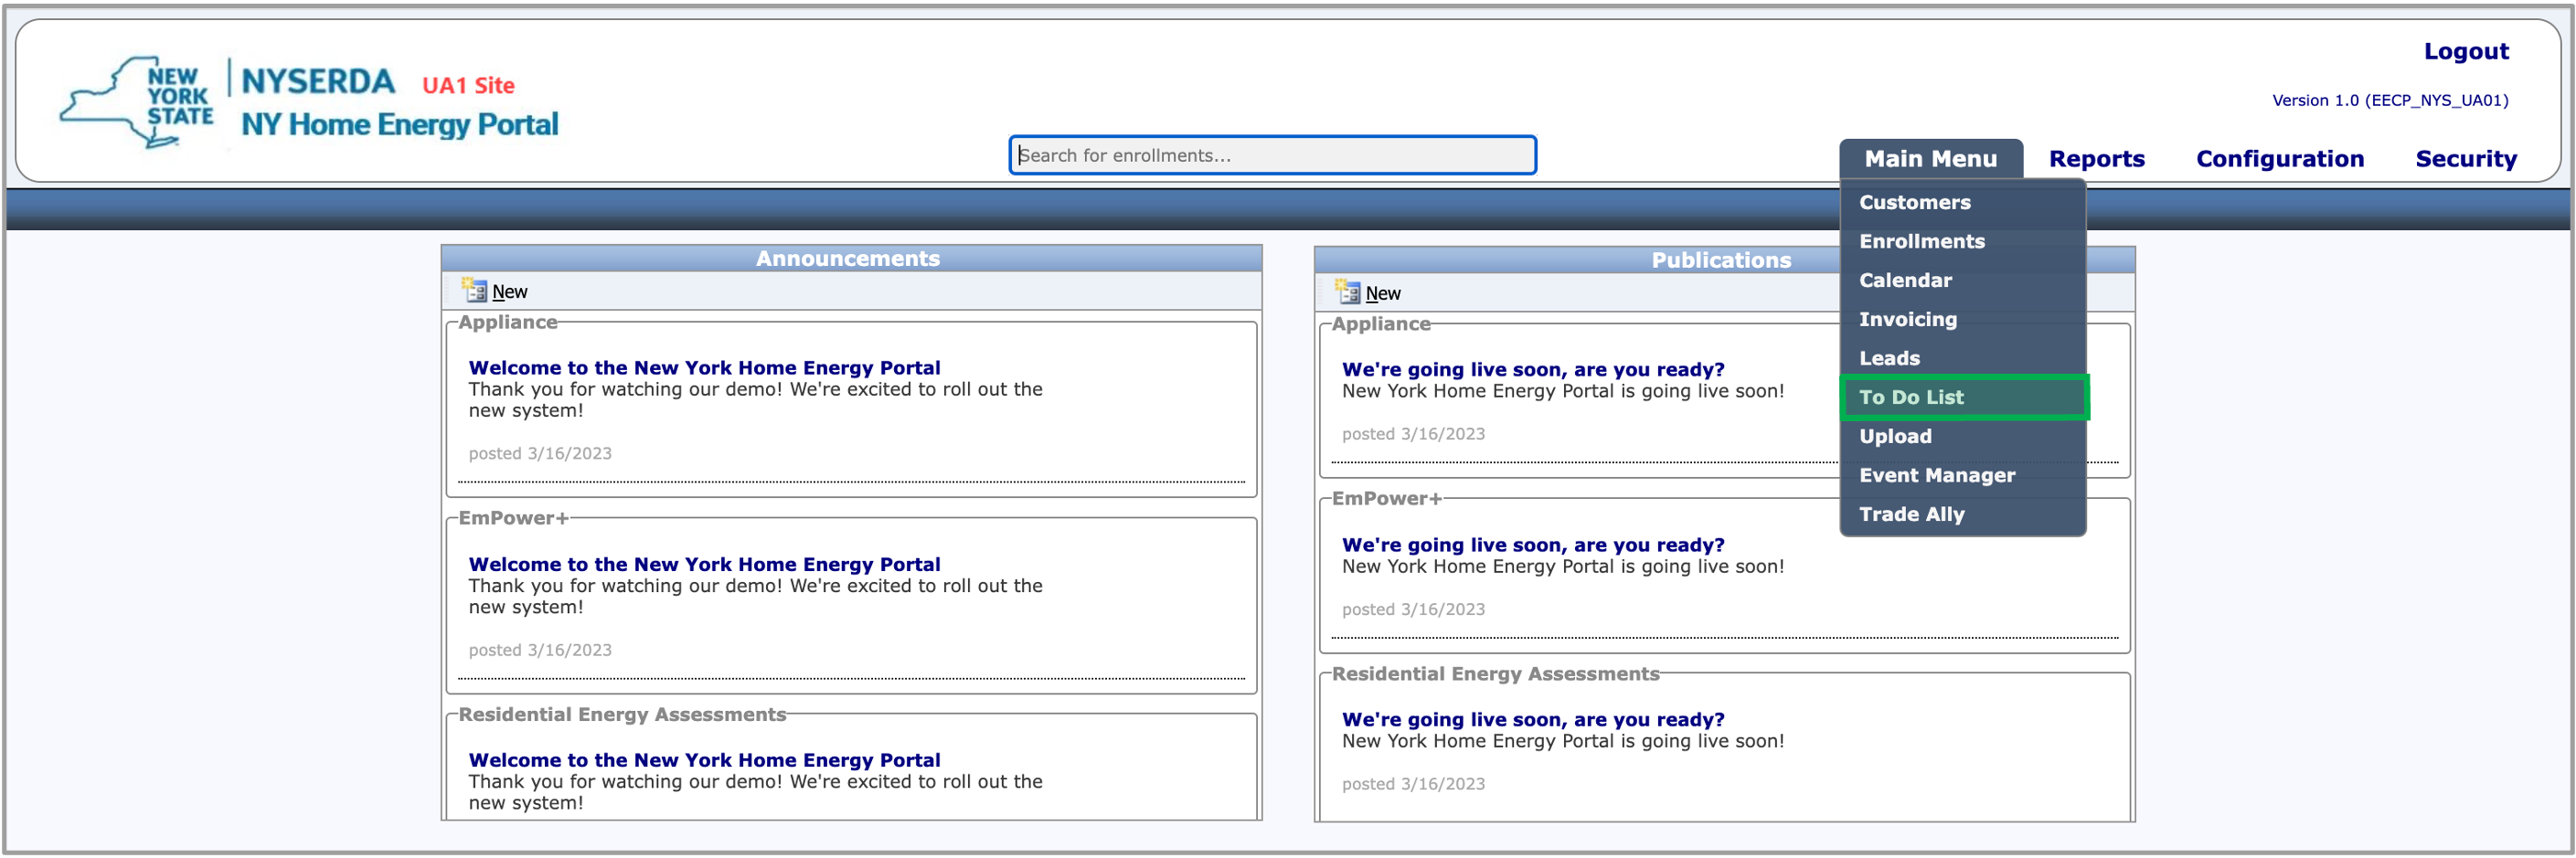
From your NYHEP Home Screen, hover over the Main Menu tab, then select To Do List. | Expand |
|---|
| 
|
|
| UI Step |
|---|
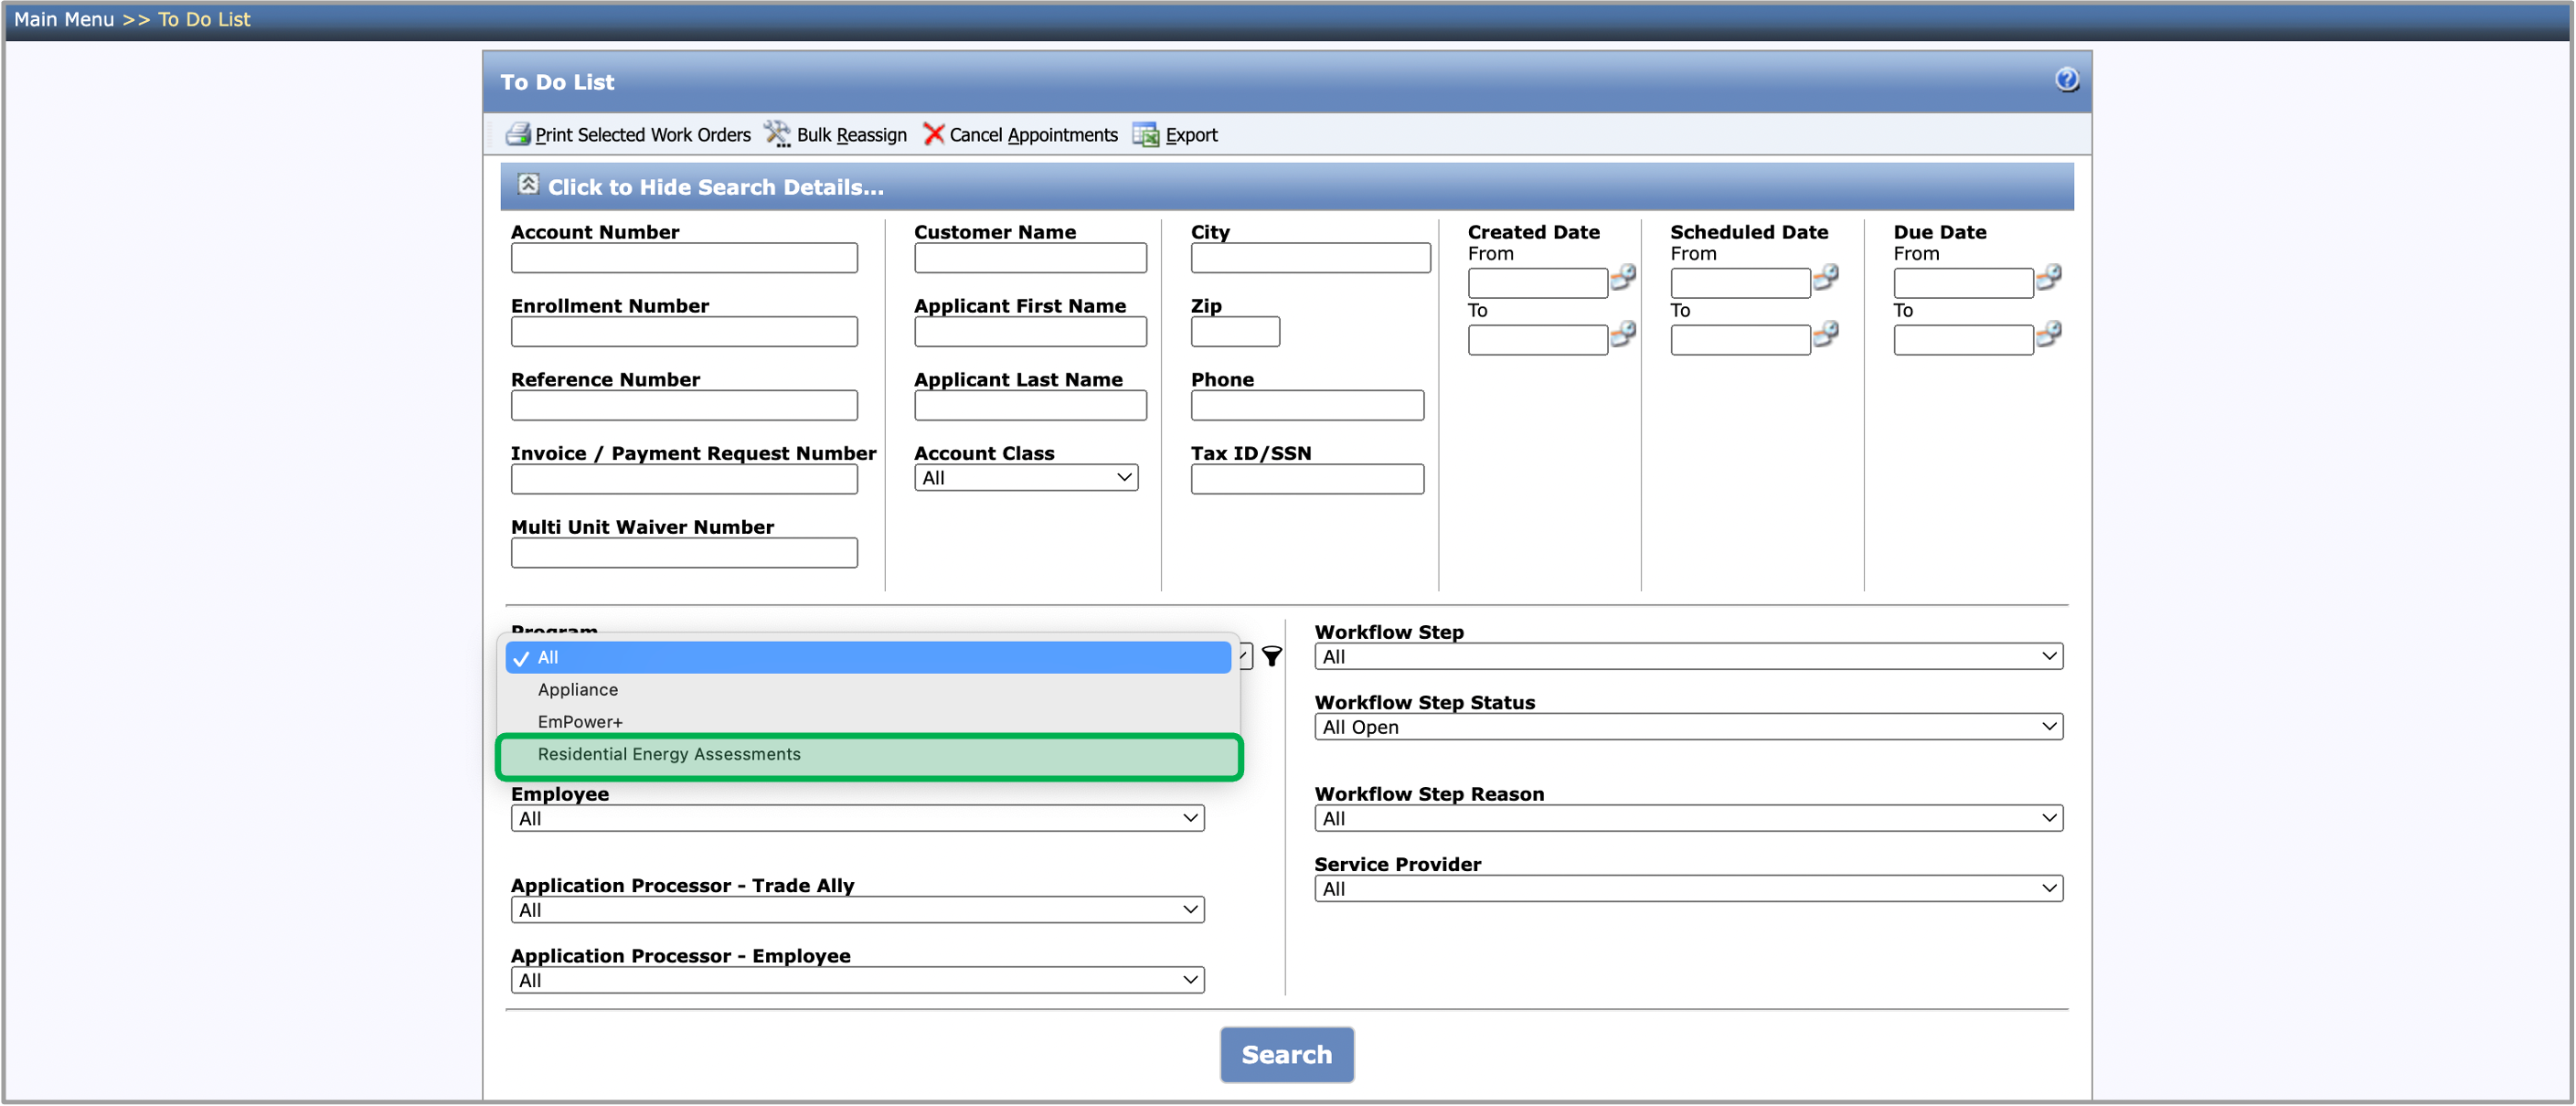
Using the filter criteria, select Residential Energy Assessments from the Program dropdown. | Expand |
|---|
| 
|
|
| UI Step |
|---|
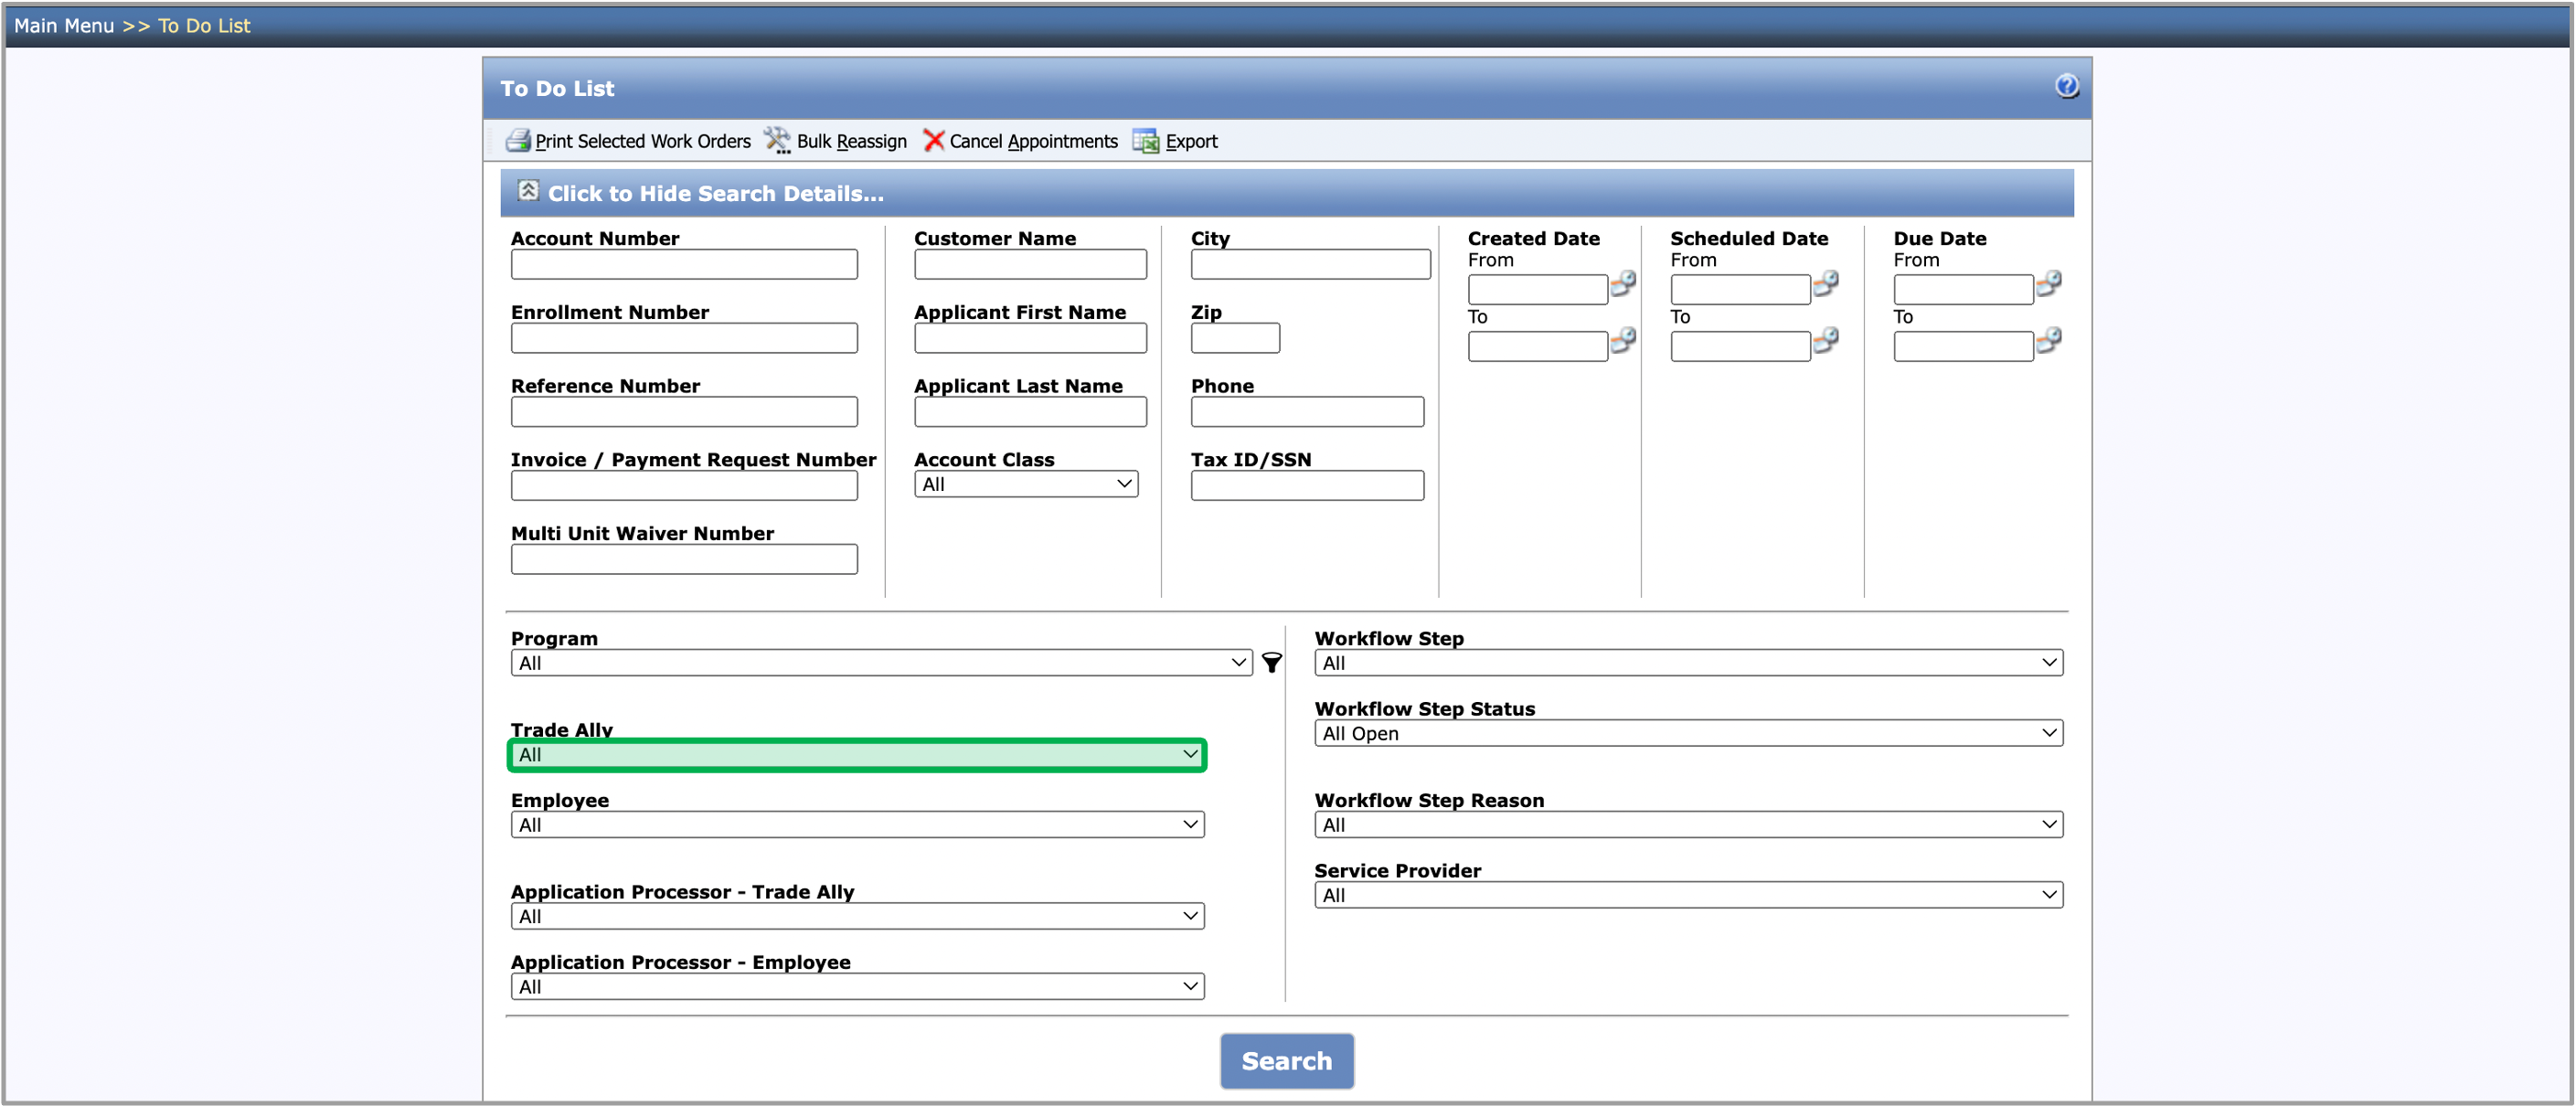
Select your company from the Trade Ally dropdown. | Expand |
|---|
| 
|
|
| UI Step |
|---|
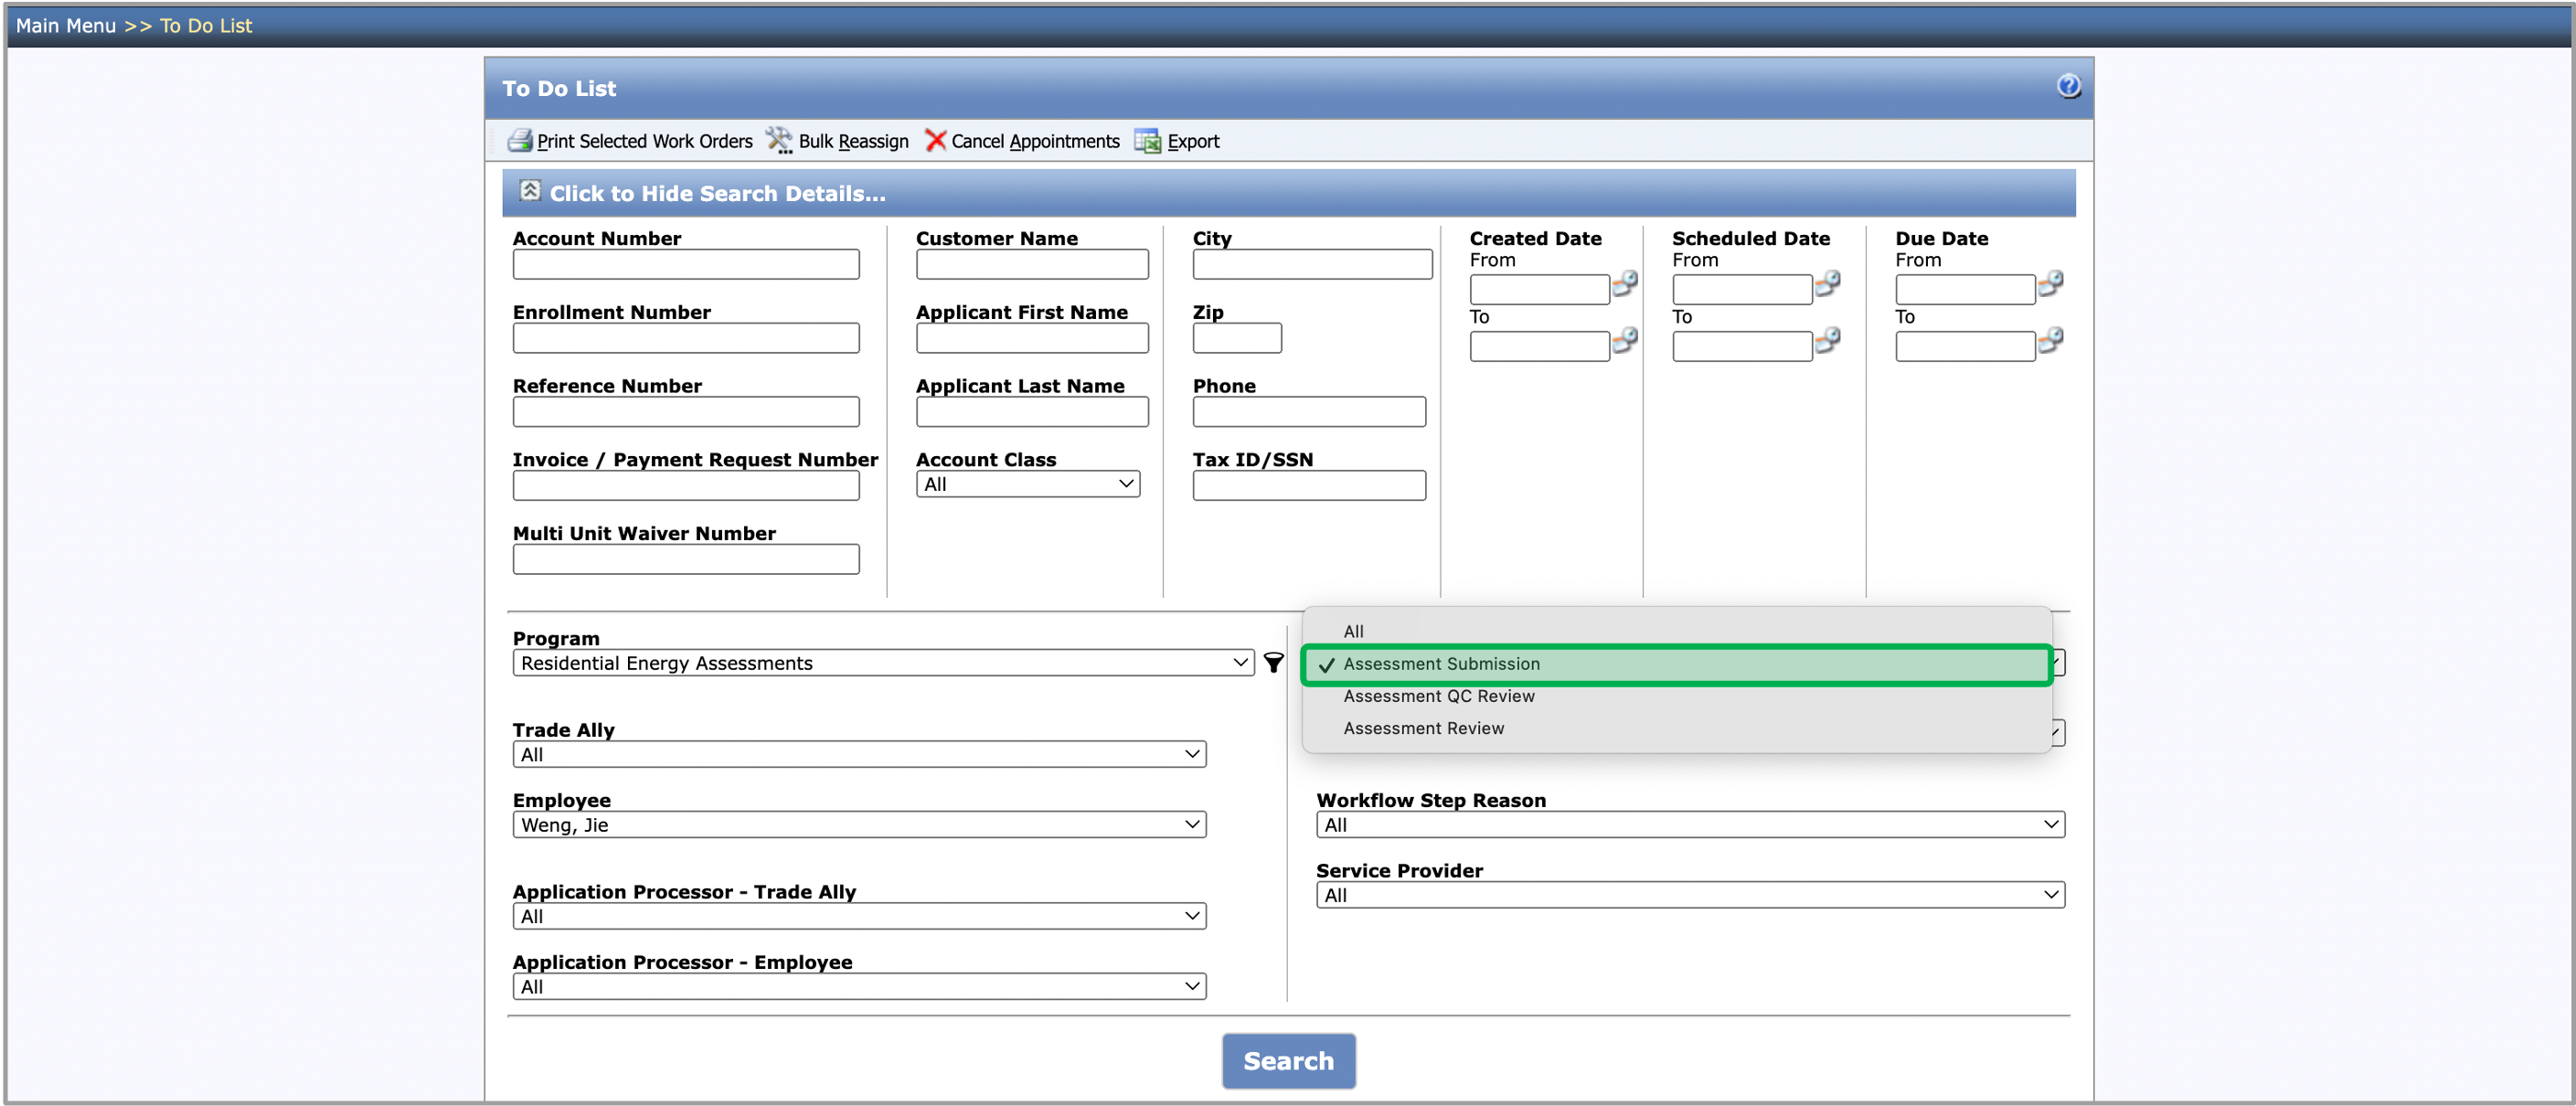
Select Assessment Submission from the Workflow Step dropdown. | Expand |
|---|
| 
|
|
| UI Step |
|---|
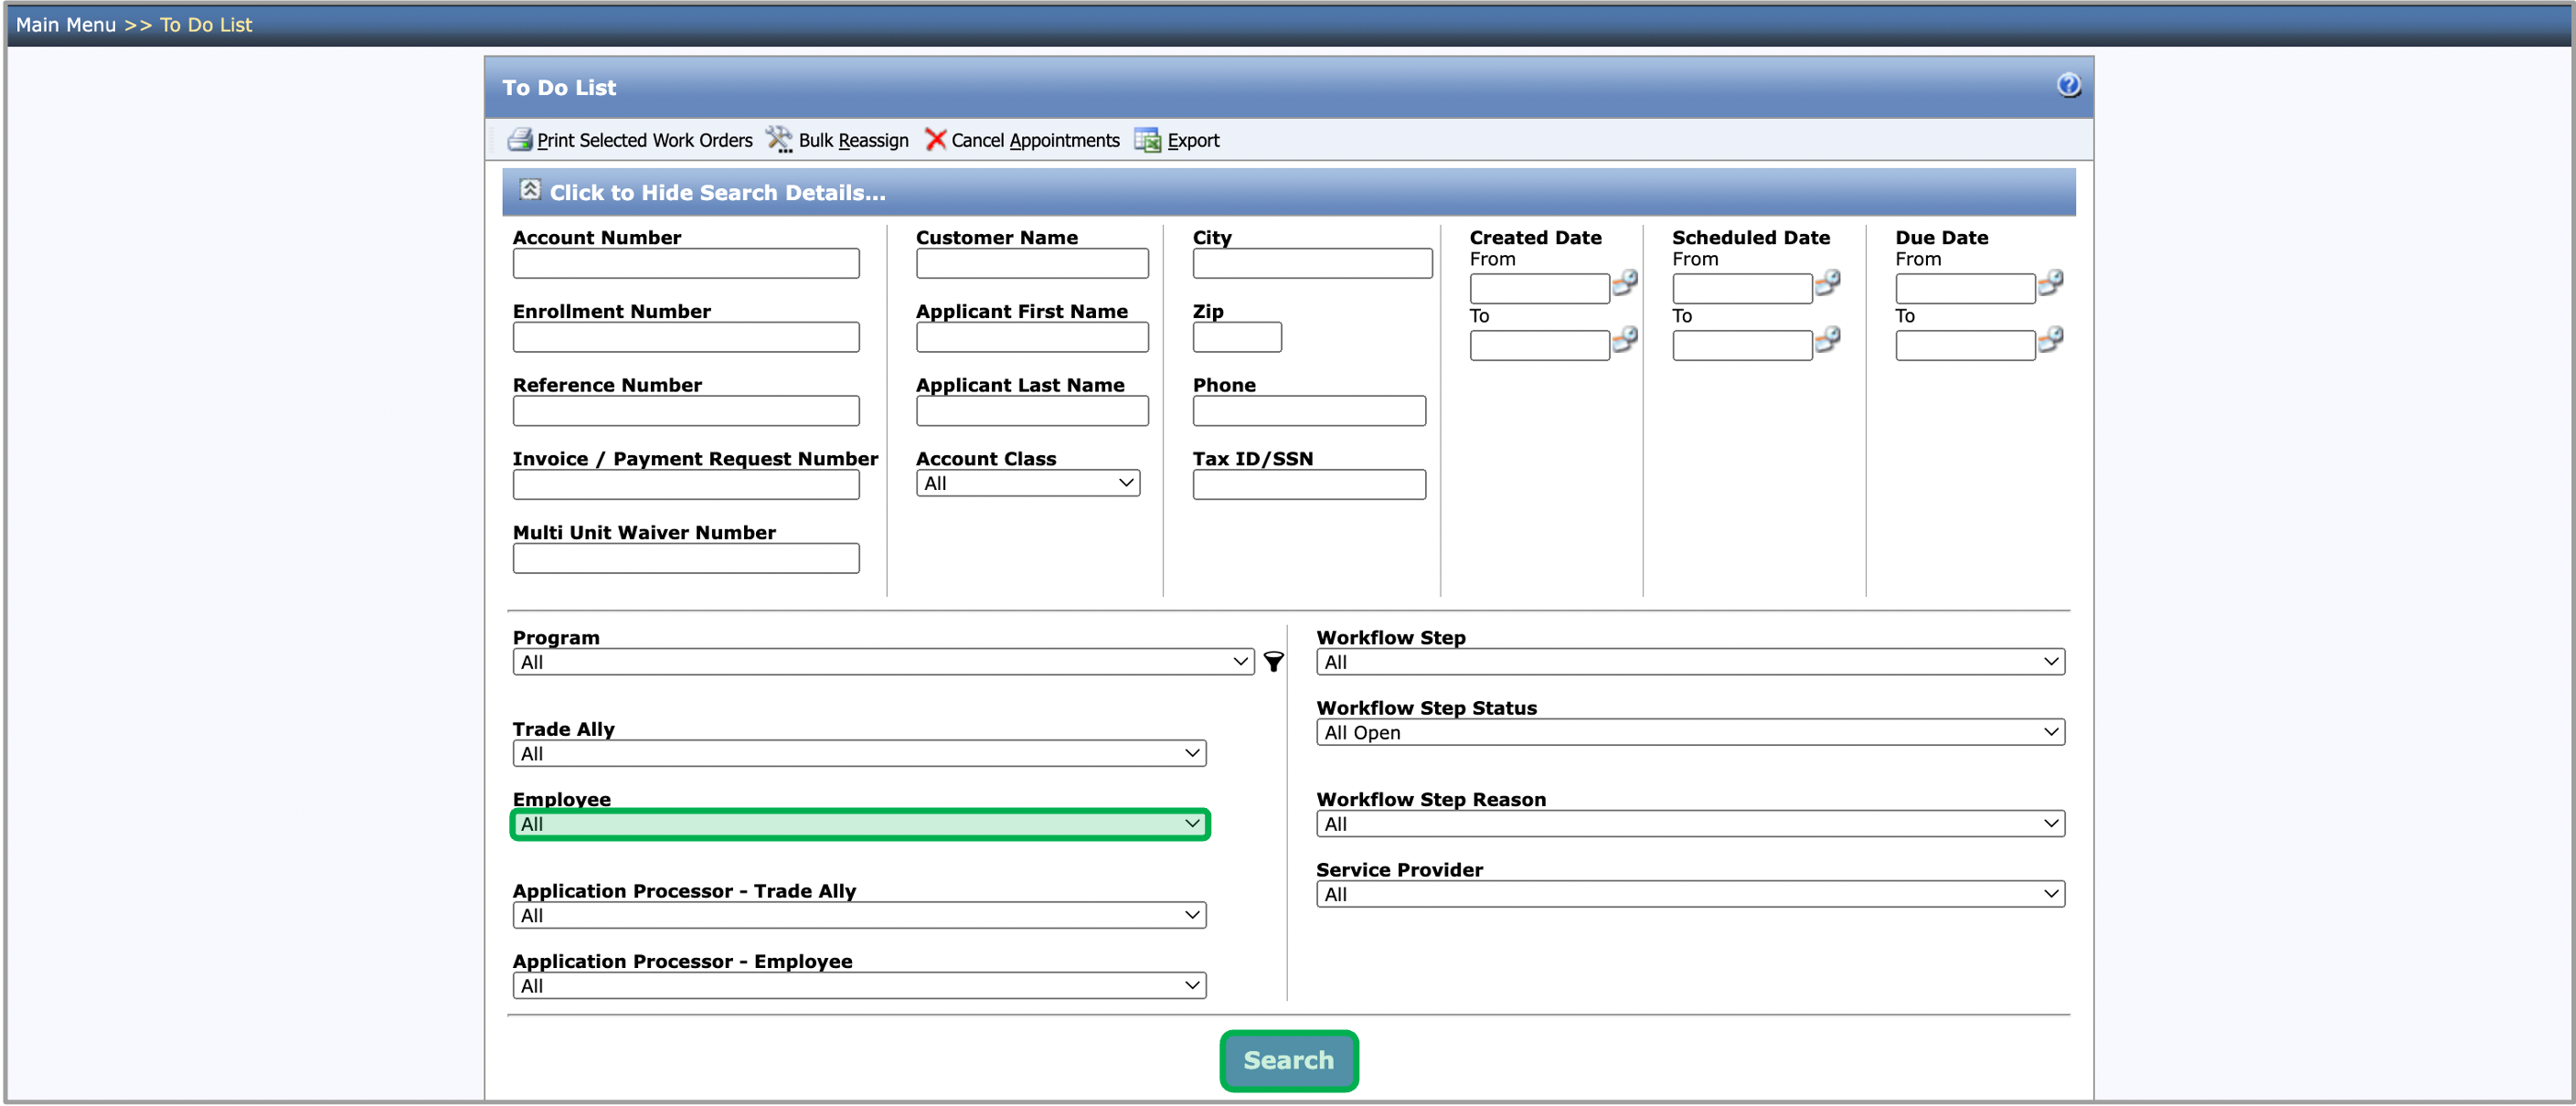
Select All from the Employee dropdown, then click Search. | Expand |
|---|
| 
|
|
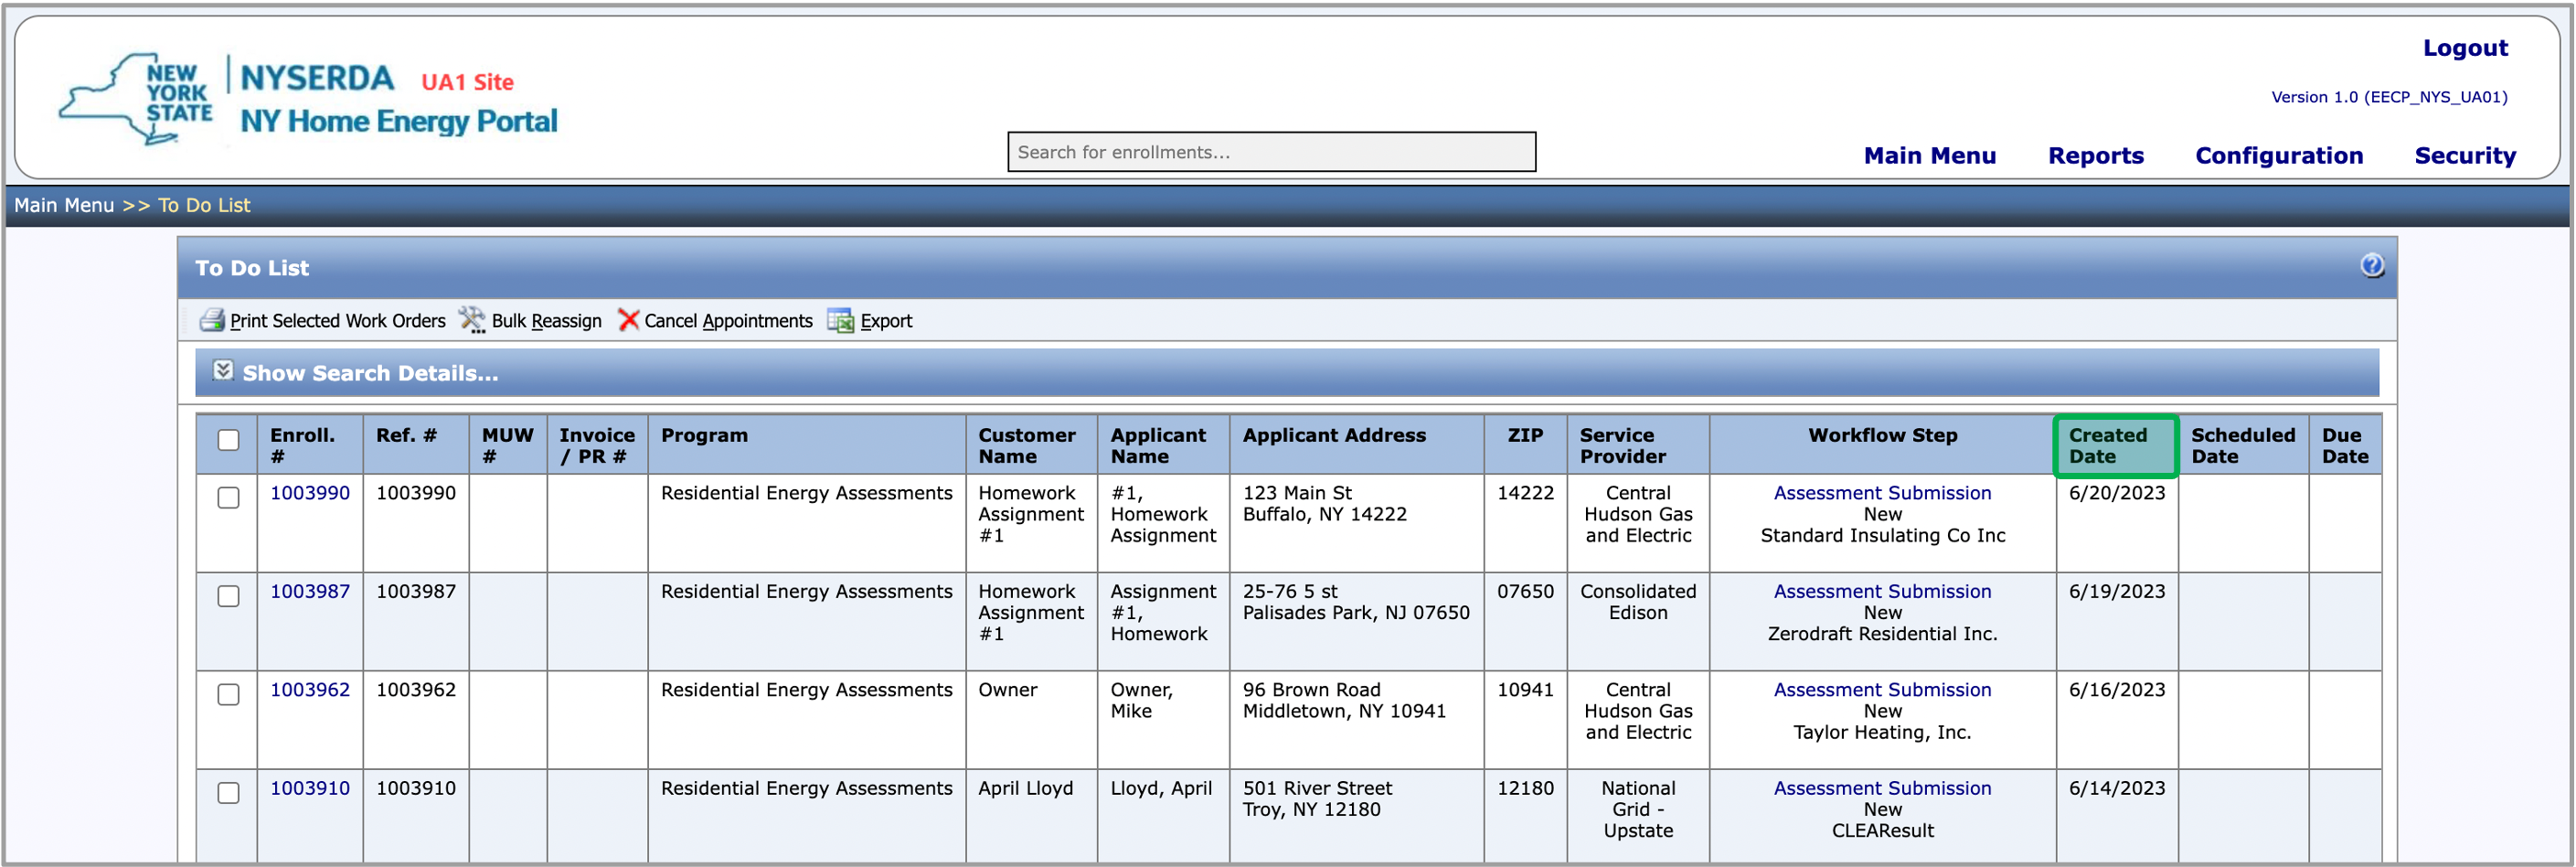
| UI Step |
|---|
Enrollments in your queue will populate here, based on the Created Date. You should see the most recent at the top. | Tip |
|---|
| If there are multiple enrollments in this list, it is recommended to start from the bottom (the oldest enrollment) to review the revision reasons and notes in order to resubmit the enrollment for reimbursement. You can click the Created Date column header to sort the results from oldest to newest. |
| Expand |
|---|
| 
|
|
| UI Step |
|---|
This list could contain enrollments that your company submitted, but were sent back after review, or enrollments that your company created, but have not yet been submitted for reimbusementreimbursement. | Tip |
|---|
| It is important that you maintain you To Do List regularly, but reviewing the outstanding enrollments should happen several times per week. |
| Warning |
|---|
| If there is an enrollment in your To Do List that was created inadvertently, or you do not plan to submit for reimbursement, please reach out to [email protected] to request that the enrollment be cancelled. Please be sure to provide a reason for cancelling the enrollment, so we can include that in the record. |
|
|
|
| Aura - Tab |
|---|
| title | Process Resubmittals |
|---|
|
| Panel |
|---|
| borderColor | #002D72 |
|---|
| bgColor | #F3F4F9 |
|---|
| titleColor | #ffffff |
|---|
| borderWidth | 1 |
|---|
| titleBGColor | #002D72 |
|---|
| borderStyle | none |
|---|
| title | Process Resubmittals |
|---|
|
|
| Info |
|---|
| The instruction below provides guidance for contractors on enrollments to be resubmitted for review. - CLEAResult will review the enrollment submitted by your company.
- If issues were flagged upon their review, they will send the enrollment back to your company for revisions/resubmission.
- The contractor will receive an email when enrollments are sent back.
|
| Tip |
|---|
| As Contractors engage with the NY HEP it is highly recommend to Save your progress as often as you can to avoid losing any data or information entered. When saving, the Reload Page browser button will become an X and Contractors will notice a rotating circular icon at the top-left of the browser page. |
| UI Steps |
|---|
|
| UI Step |
|---|
From your NYHEP Home Screen, hover over the Main Menu tab, then select To Do List. | Expand |
|---|
|
|
|
| UI Step |
|---|
Using the filter criteria, select Residential Energy Assessments from the Program dropdown. | Expand |
|---|
|
|
|
| UI Step |
|---|
Select your company from the Trade Ally dropdown. | Expand |
|---|
|
|
|
| UI Step |
|---|
Select Assessment Submission from the Workflow Step dropdown. | Expand |
|---|
|
|
|
| UI Step |
|---|
Select All from the Employee dropdown, then click Search. | Expand |
|---|
|
|
|
| UI Step |
|---|
Enrollments in your queue will populate here, based on the Created Date. You should see the most recent at the top. | Tip |
|---|
| If there are multiple enrollments in this list, it is recommended to start from the bottom (the oldest enrollment) to review the revision reasons and notes in order to resubmit the enrollment for reimbursement. You can click the Created Date column header to sort the results from oldest to newest. |
| Expand |
|---|
|
|
|
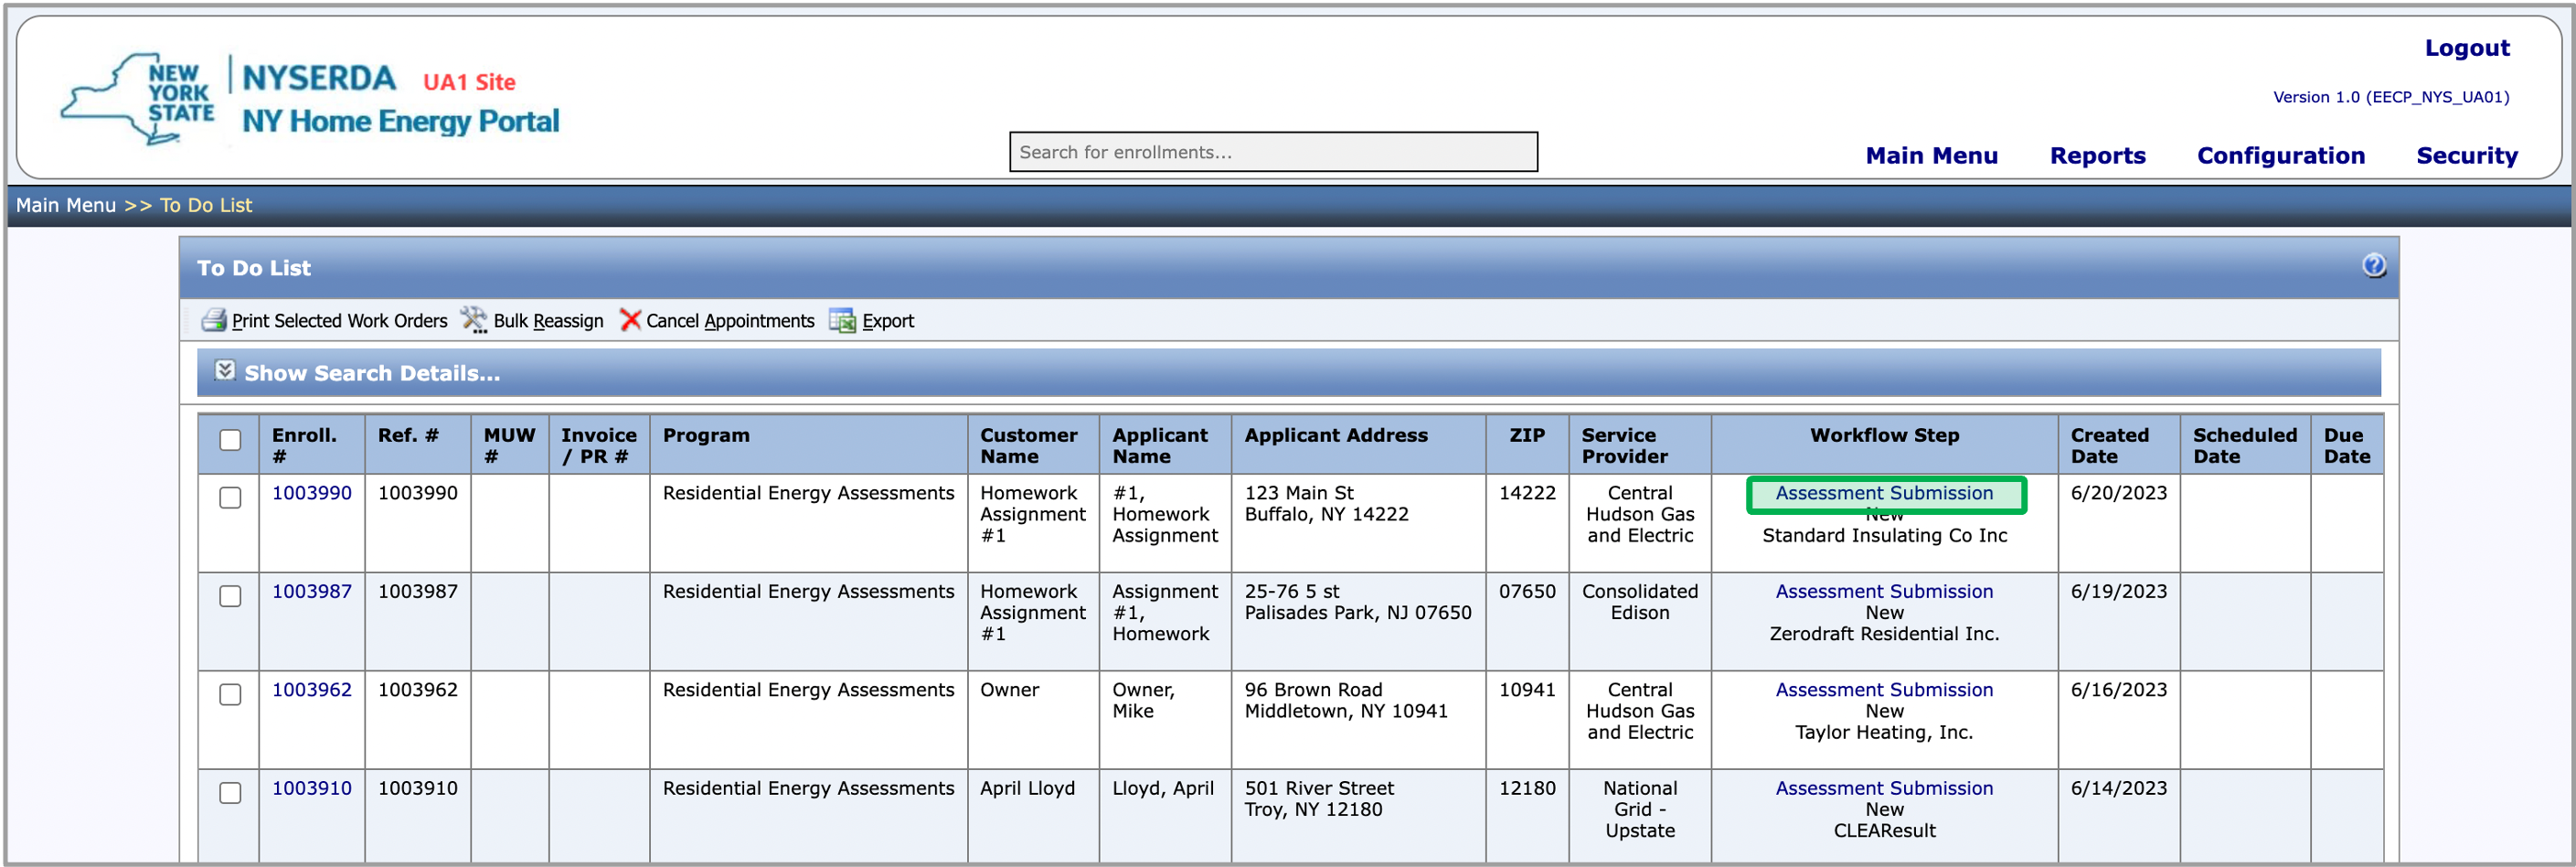
| UI Step |
|---|
Select the Assessment Submission link within the under the Workflow Step column. | Expand |
|---|
| 
|
|
| UI Step |
|---|
Scroll down to the Notes tab. | Expand |
|---|
| 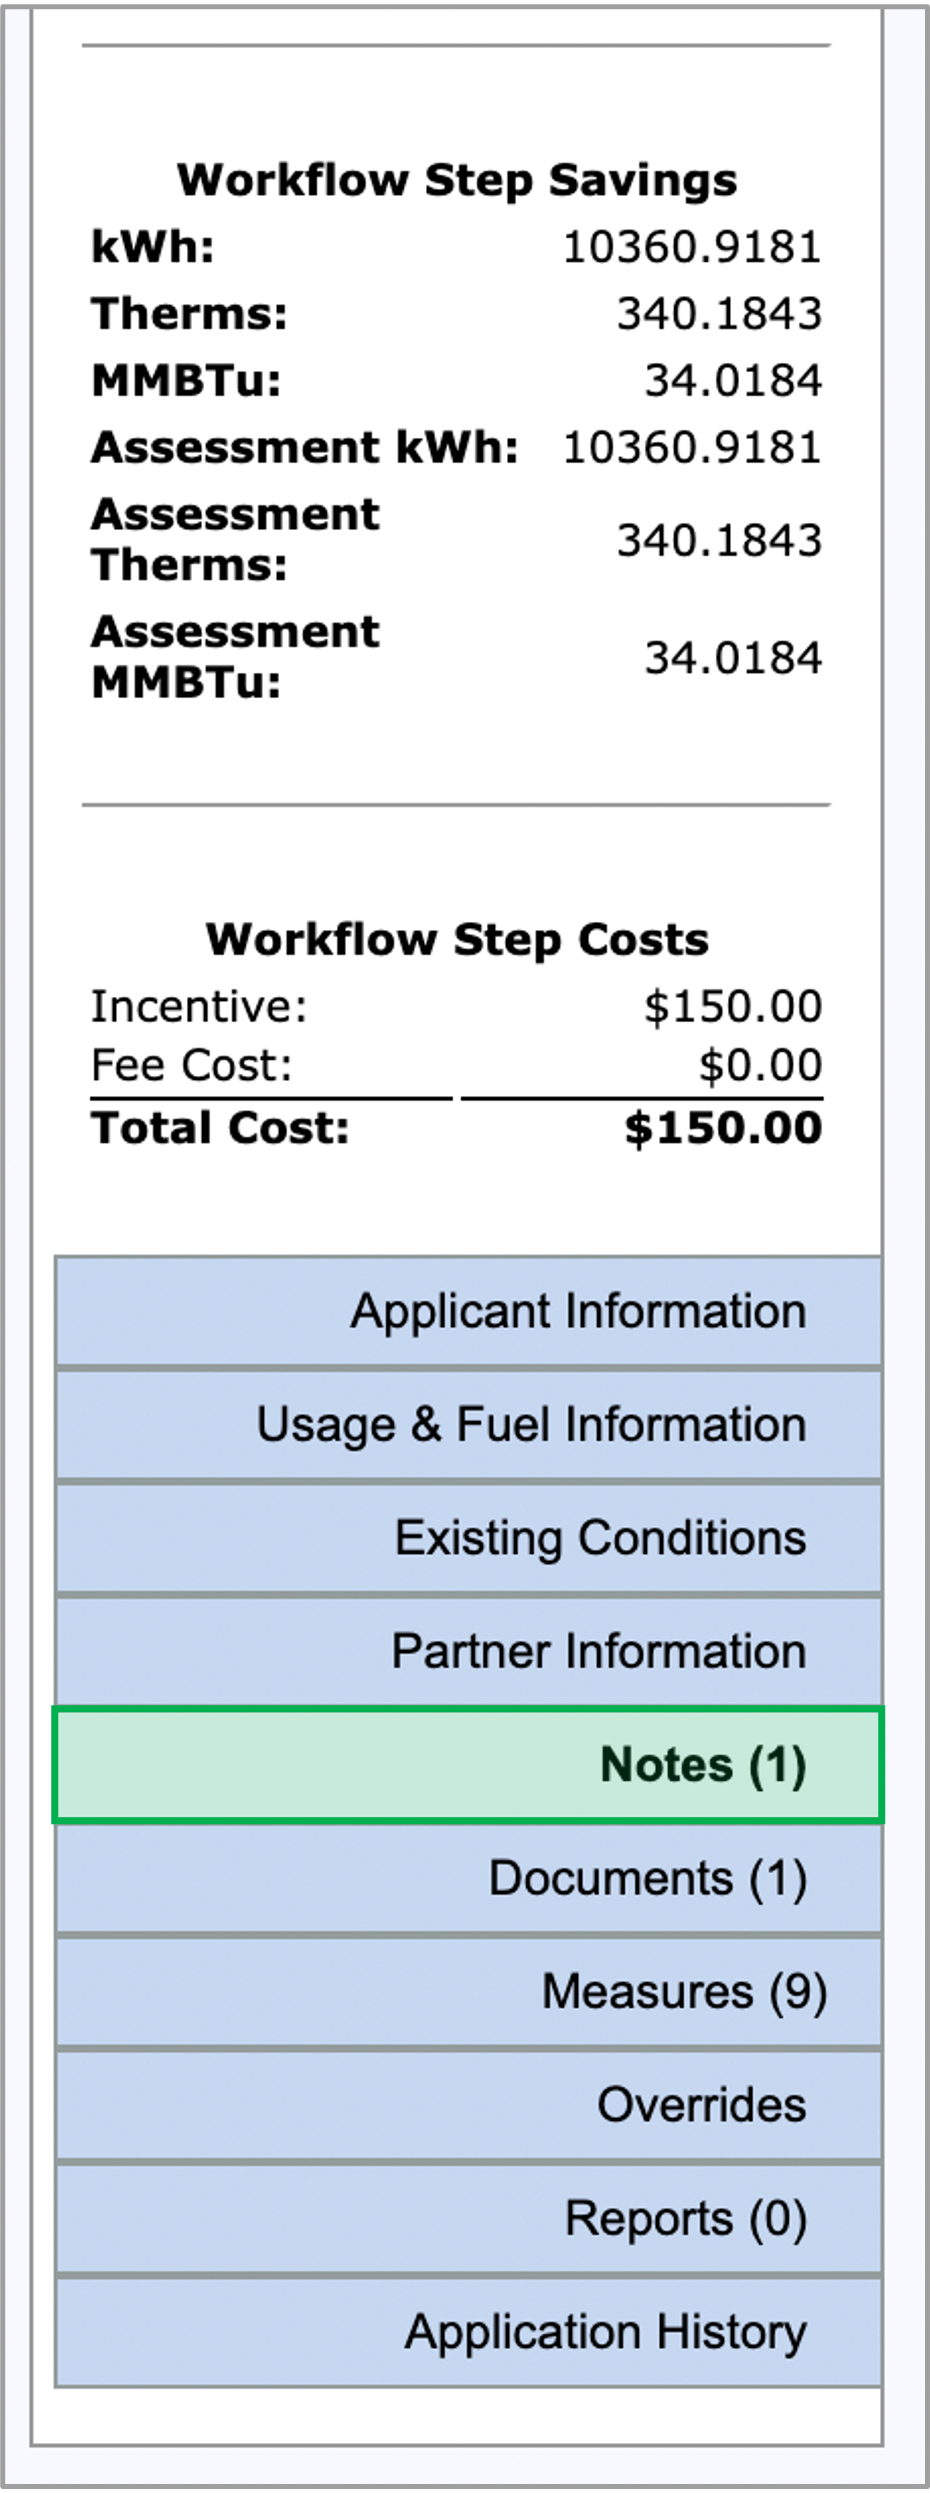 Image Modified Image Modified
|
|
| UI Step |
|---|
Click the Date associated with the note from the Assessment QC or Assessment Review origin. This will open the full note submitted by the CLEAResult team. | Expand |
|---|
| 
|
|
| UI Step |
|---|
Review the details of the note to understand what needs to be revised within the Enrollment Submission. | Tip |
|---|
| tip | If you are unsure how to address the revision(s), please reach out to [email protected]. |
|
| UI Step |
|---|
If you need to revise the Customer Attestation form, click the Documents tab of the Assessment Submission Workflow step. | Expand |
|---|
| 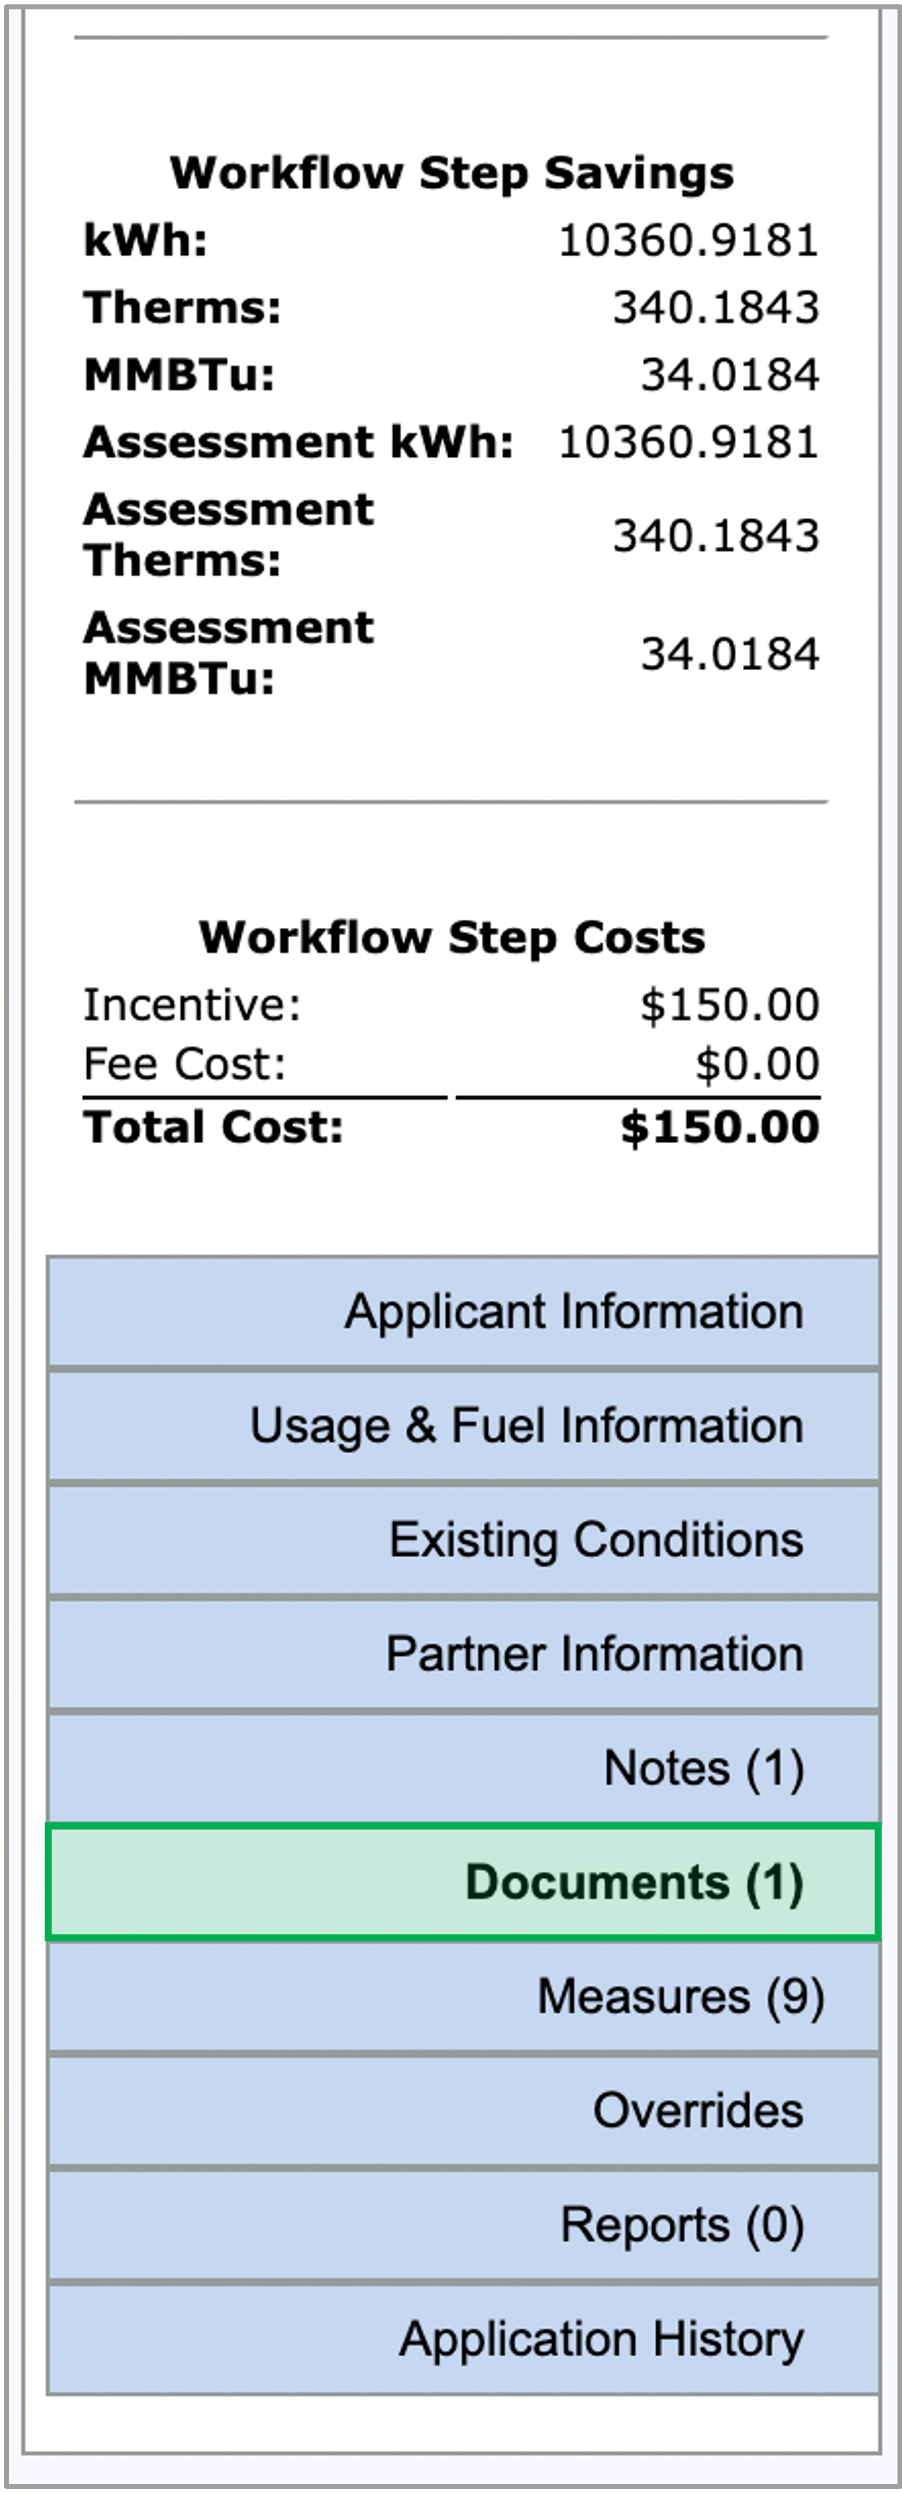 Image Modified Image Modified
|
|
| UI Step |
|---|
Click the New button. | Expand |
|---|
|
|
|
| UI Step |
|---|
On the new window, click Browse and look for the revised Attestation form from your computer. | Expand |
|---|
|
|
|
| UI Step |
|---|
Select the revised Attestation form and select Signed Customer Attestation Form from the Document Type dropdown. | Expand |
|---|
|
|
|
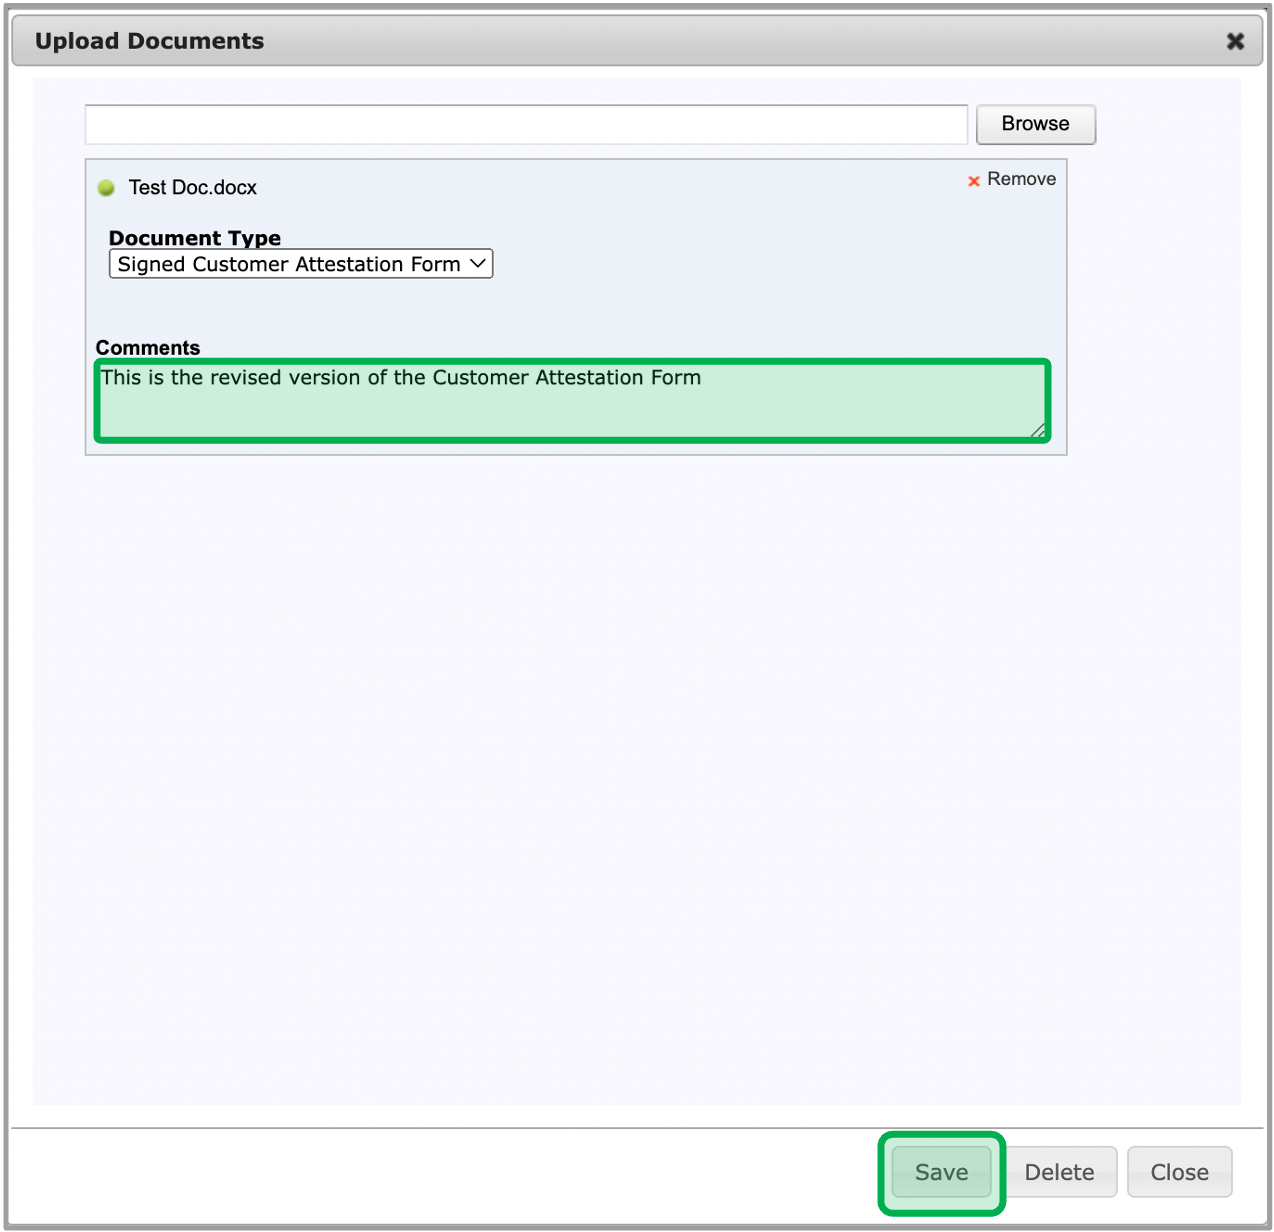
| UI Step |
|---|
In the Comments section, add a note that states: This is the revised version of the Customer Attestation Form. Then click Save. | Expand |
|---|
| 
|
|
| UI Step |
|---|
You should now see the revised version of the Customer Attestation Form with the comment you entered. | Warning |
|---|
| You cannot edit or delete documents or comments. |
| Expand |
|---|
| 
|
|
| UI Step |
|---|
If you need to edit the Existing Conditions or Recommended Measures, navigate to the applicable tab in the Assessment Submission step, and add or edit the existing information or measure per the review notes. | Tip |
|---|
| Make sure to click the Save button whenever edits or changes are made. |
| Expand |
|---|
| 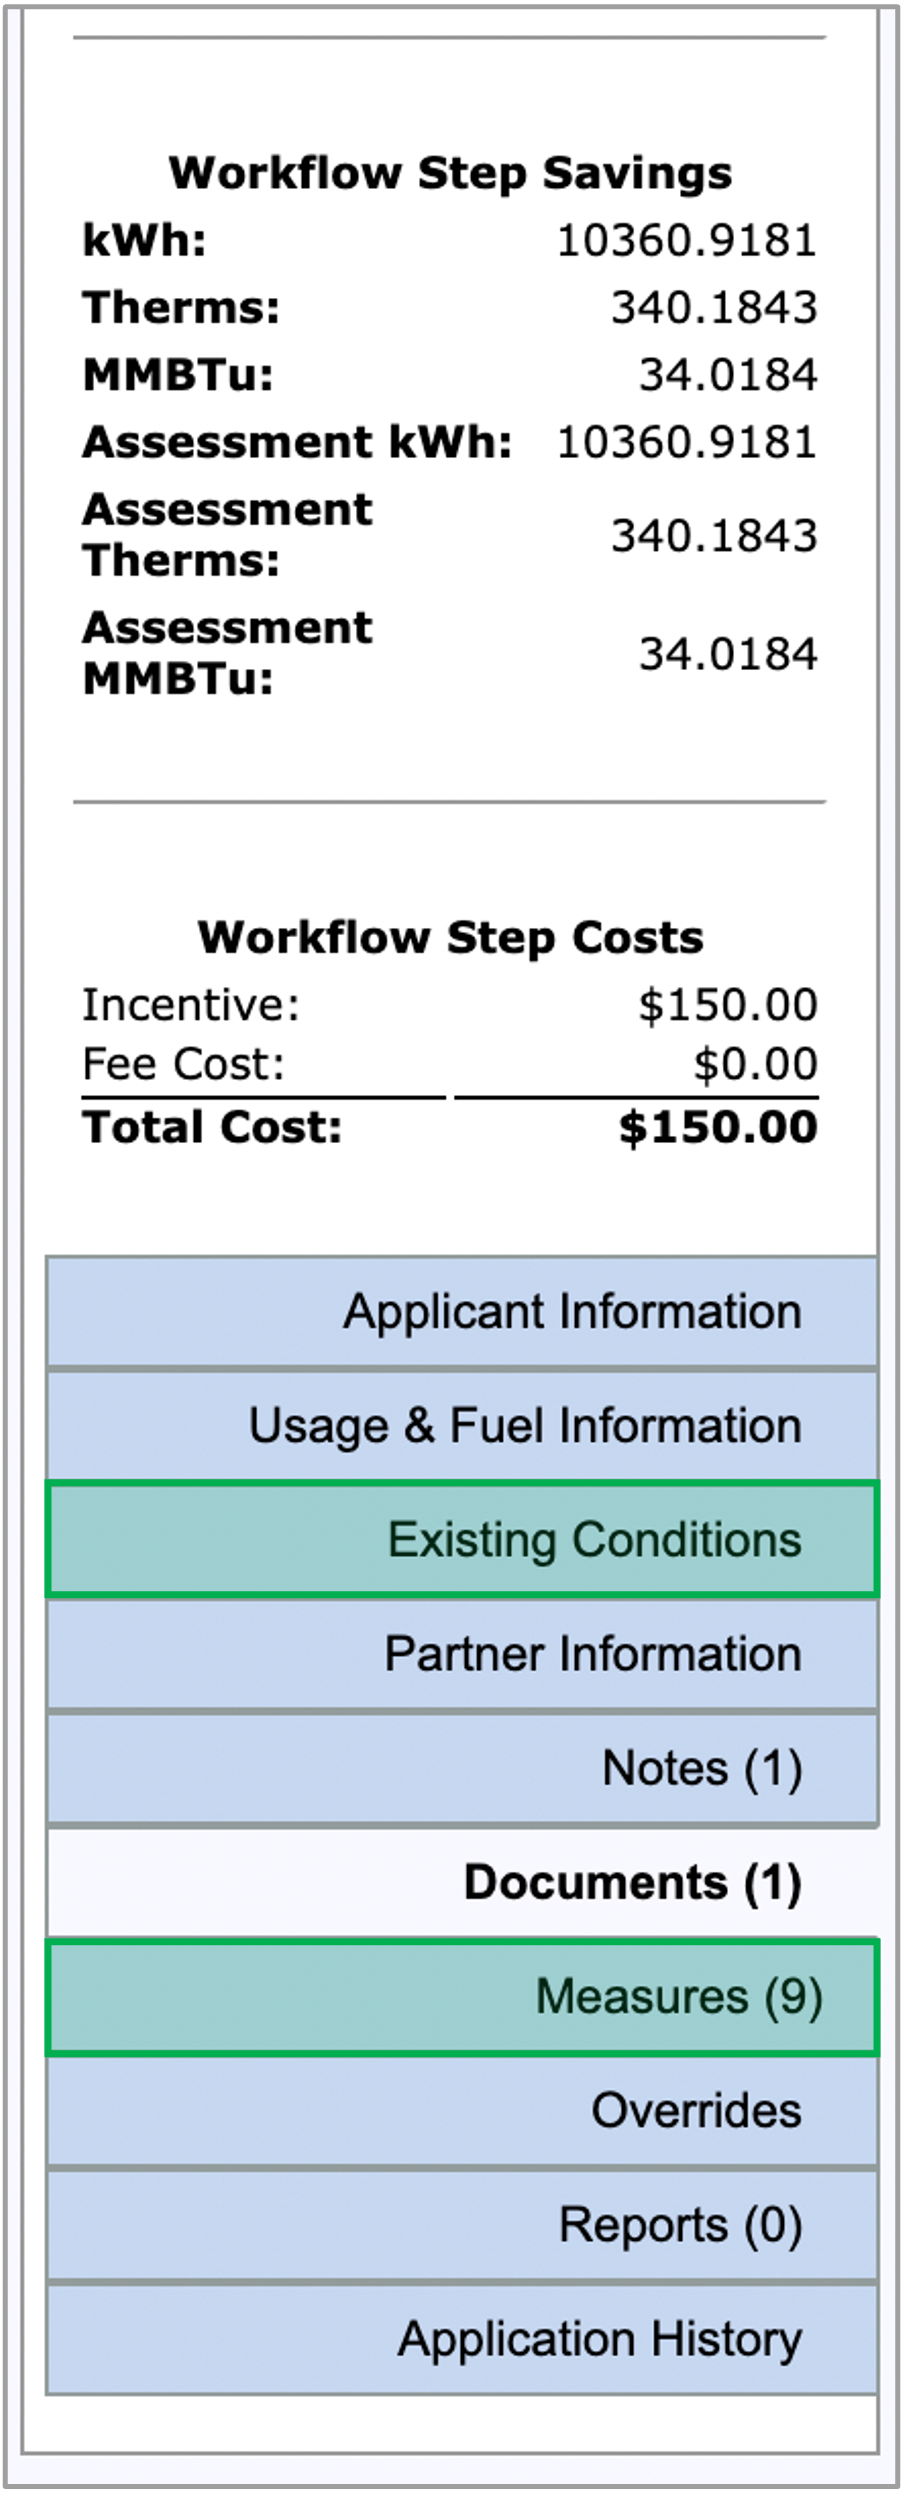 Image Modified Image Modified
|
|
| UI Step |
|---|
When the enrollment has been updated entirely based on the review notes, click the Process button from the Measures or Applicant Information tab. | Expand |
|---|
| 
|
|
| UI Step |
|---|
When the enrollment is resubmitted, you'll see that the Assessment Submission step has been completed. |
|
|
|